
 The South African
by Major D.M. Moore
Copyright 1978
1.1. The General State of the War
The Orange Free State was annexed on 24 May 1900 and the South African Republic on 1 September 1900. Soon after these annexations the war entered its irregular phase. By mid-1901 political pressure was being exerted upon Kitchener from London to end the war as quickly and as cheaply as possible. The Boer leaders were also considering the possibility of peace. However the terms offered by the British in the course of a series of negotiations proved unacceptable to the Boers. At a conference of the military and civil leaders of both Republics, which took place at Waterval near Standerton on 20 June 1901, it was resolved to continue the war. In a further effort to force a Boer surrender Kitchener issued a proclamation with the full authority of the British Government on 7 August 1901. This proclamation threatened all burghers still in the field on 15 September with confiscation of their property. In addition the leaders were threatened with life-long banishment. In general, the Boers saw this proclamation as a challenge and they responded with the Spring Offensive of 1901. Part of that offensive was the expedition of the Commandant-General, Louis Botha, to Natal.
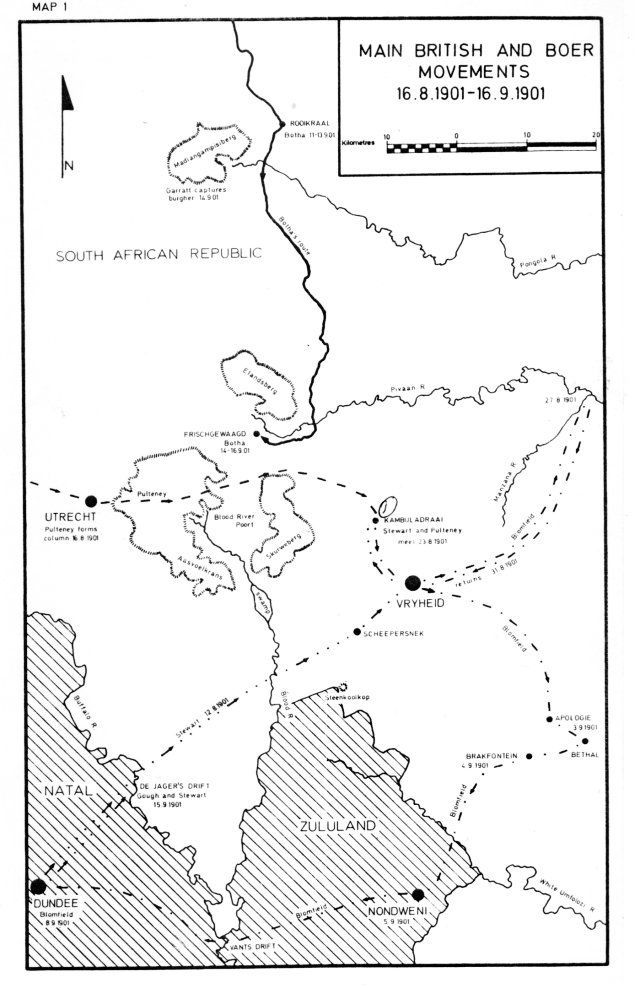
Map 1 - MAIN BRITISH AND BOER MOVEMENTS
16.8.1901-16.09.1901
On 14 September the expedition halted at the farm "Frischgewaagd" on the Pivaan River. Here they were joined by the Utrecht Commando, and it was here that General Botha conceived his final plan. The Vryheid and the Utrecht Commandos under the command of his brother-in-law, General J.J.C. Emmett were to move from their assembly point at Steenkoolkop and to attack Dundee from the west, while the other Commandos would attack from the east. The spring rains intervened and Botha had to cancel these plans. Emmett was now instructed to proceed to Spieshoek in order to meet Botha. This meeting was due to take place on 17 September.
1.3. The British Forces
Kitchener was aware of the Boer concentration near Ermelo and he was aware of its purpose. He thus reinforced the Natal Command of General H.T.J. Hildyard. The reinforcements consisted of columns under Lieutenant-Colonel H.K. Stewart and Colonel W.P. Pulteney. These two columns were employed to make a large-scale reconnaissance of the Vryheid area in the hope of intercepting the Boer expedition. On 4 September Hildyard was replaced by General N. G. Lyttelton and on 6 September the Natal Government was warned by Kitchener of the strong possibility of a Boer raid. Natal prepared to mobilize her Volunteer Units. The British attempts to locate the Boers met with little success and more reinforcements were brought from the Highveld. On 14 September a column under the command of Lieutenant-Colonel F.S. Garratt captured a lone burgher in the Madlangampisiberg. Acting upon information given by this prisoner Pulteney was ordered to move southwards from Wakkerstroom towards Utrecht. On 17 September Pulteney was still en route to Utrecht and about 30 kilometres north-west of Botha at Blood River Poort. Heavy rains and cumbersome transport had restricted him to only 22 kilometres in three days.
2. BLOOD RIVER POORT
2.1. The Terrain
There are three features of the terrain at Blood River Poort that were to assume military importance on 17 September 1901. The Rooikoppies on the farm "Roodekoppe", the ridge at Scheepersnek and the spur extending from Aasvoelkrans. The road from Dundee to Vryheid passed just to the north of Rooikoppies which lie midway between De Jager's Drift and Scheepersnek. The road passed over high ground at Scheepersnek which is midway between Rooikoppies and Vryheid. Both features offered cover and clear all-round observation at evenly spaced points along the Vryheid-Dundee road.
The role of Aasvoelkrans spur will be dealt with later.
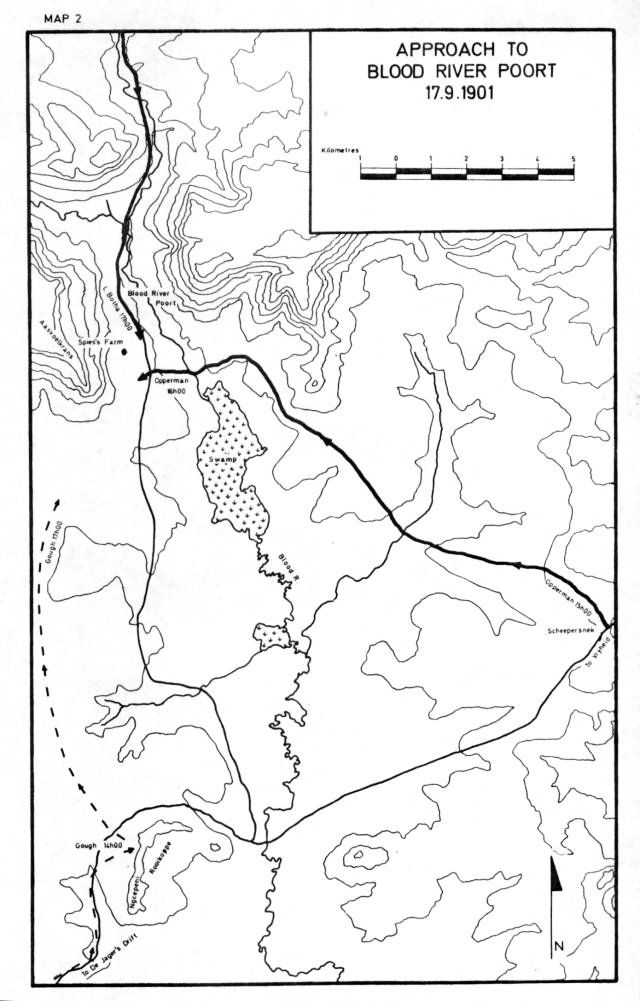
Map 2 - APPROACH TO BLOOD RIVER POORT
17.09.1901
2.3. Original Plan of Attack
At midday an advance patrol signalled from Rooikoppies that they had sighted a group of Boers off-saddled at Scheepersnek. Gough moved out (Stewart followed an hour later) and arrived at Rooikoppies at 14h00. He then ascended the high ground to observe for himself, while his troops were
hidden from Boer view in the hollow of the horseshoe. Gough immediately discounted the possibility of a daylight attack, and proposed to Stewart that they attack at dusk. The group of Boers that had been sighted was a force of 150 men under the command of General J.D. (Koot) Opperman. The British thus had a numerical superiority of 8 to 1. The attack was within the compass of Gough's mission. Before the column under Stewart could reach
Gough the Boers were seen to remount and move off in the direction of Blood River Poort. Gough thus had to abandon his plan.
2.4. Gough's Decision to Attack
At this stage Gough decided to attack the Boer force on his own. He informed Stewart of his decision and requested support. The new Boer position gave Gough the opportunity of a surpise attack. Why? Gough left a company at Rooikoppies to guard his baggage and led his force from Rooikoppies to the south-west of the spur and ridge leading from Aasvoelkrans. At this stage both Botha, approaching from the north, and Gough were ignorant of each other.
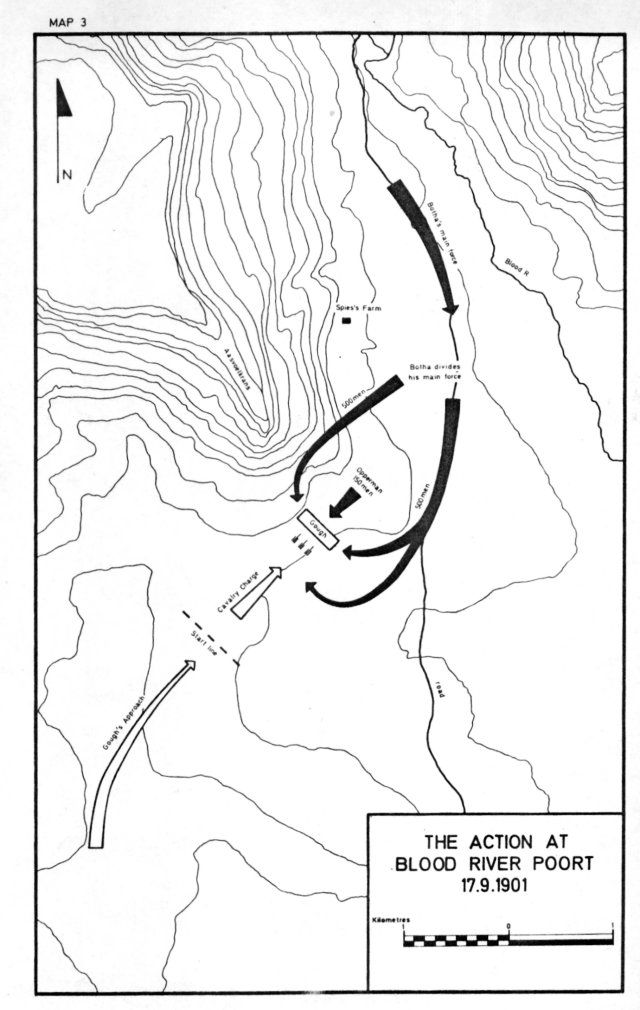
Map 3 - THE ACTION AT BLOOD RIVER POORT
17.09.1901
2.6. The Aftermath
The Boers lost one man killed and three wounded. Botha claimed 200 British prisoners and 90 killed or wounded. The Natal Command Staff Diary gives the following figures: one officer and 19 men killed, five officers and 19 men wounded, six officers and 235 men captured and 11 missing. The British also lost 30 000 Lee-Metford cartridges, 180 rifles, 210 horses and two field guns (12-pounders) with 250 shells, and a Colt gun. The British reported that the sights and the breechblocks of the guns had been damaged before capture.
Gough was exonerated of all blame, and escaping that same night he was able to give accurate information on Botha's position strength and intentions, the first reliable information that the British intelligence officers had received since the start of Botha's mevement southwards.
3. FROM BLOOD RIVER POORT TO ITALA
3.1. The Immediate British Reaction to Blood River Poort
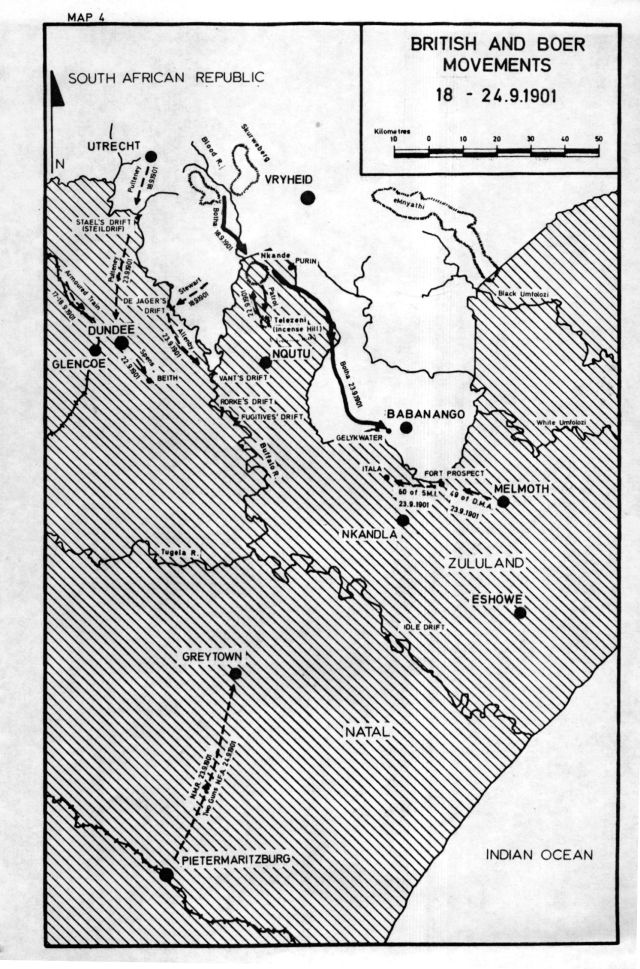
After Blood River Poort the British feared an invasion of Northern Natal, but they realized that they had an ally in the swollen Buffalo River, which restricted any Boer crossing to the drifts. The immediate reaction of Lyttelton's headquarters was thus to secure the drifts on the Buffalo. De Jager's Drift was already securely held by Stewart. Stael's Drift was secured by sending Pulteney from Utrecht on 18 September. As an extra precaution the Natal Governor was asked to callout the Volunteers. Northern Natal was now considered safe from invasion. Lyttelton was free to set about planning an attack on the Boers who were reported to still be in the vicinity of Blood River Poort.
3.2. Boers Moves and British Counter-Moves
Due to the lack of Boer sources on the events from 17 September to 25 September, we find ourselves in very much the same position as the intelligence officers attached to Lyttelton's headquarters when it comes to piecing together the Boer movements of this period, we have to rely [5]
almost exclusively on British intelligence reports. Soon after the engagement at Blood River Poort reports were received of large bodies of Boers moving into the northern sector of the Nqutu District. Estimates of Boer strength were between 1 000 and 2 000. On 22 September the Boers were reported at Incense Hill and Nkande. When he received this news Lyttelton abandoned his plans for an attack on Blood River Poort, as the Boers were obviously no
longer there in any great numbers. He now realized that the threat had moved southwards and he sent troops to secure the Buffalo River between Vant's and Fugitives' Drifts. The Natal Volunteers who had been successfully mobilized were entrusted with the Tugela River from its confluence with the Buffalo to Middledrift. On 22 September a patrol of the Composite Volunteex Regiment working out of Nqutu made contact with a Boer party. Two Boers were reported wounded and one "Native Guard" was reported killed. By 23 September further intelligence reports indicated the Boer positions as:
Map 4 - BRITISH AND BOER MOVEMENTS
18 - 24.09.1901
On 23 September the Officer Commanding the Zululand Sub-District made a move which was to have later significance. Two officers and 60 men of [6] the 5th Division Mounted Infantry were sent from Fort Prospect to ltala, while they were replaced at Fort Prospect by one officer and 48 men of the Durham Militia Artillery from Melmoth. Both Itala and Fort Prospect were posts established to guard the Zululand-Transvaal border.
3.3 General Botha's Situation
At this stage Botha enjoyed a distinct advantage in that many of his men, especially those of the Vryheid Commando were operating in their home area. This was virtually the only factor counting in his favour. Sometime before the 25 September he had moved his headquarters to the farm "Gelykwater",
in the Babanango District. The weather and the deployment of British troops had prevented him from entering Northern Natal and he had to seek an
alternative objective, which would still serve his purpose of demonstrating the Boer ability to continue the war and at the same time divert the maximum number of British troops. In the latter aim he had almost succeeded, 10 000 troops were moving in to block his return to the Eastern Transvaal. As he moved further southwards he was, in fact, moving towards the narrow end of a funnel. To the east and north-east were the fever swamps of Northern Zululand and the Lebombo Mountains inhabited by the potentially hostile Swazis and Zulus, while to the west and south-west was the swollen Buffalo, the British Army and potentially hostile colonists. His men were nearing exhaustion. Both men and horses had spent more than 11 days exposed to
the cold and the wet of the spring rains. Thus instead of by-passing the rather ineffective posts on the Zululand border and raiding the towns of Eshowe, Nkandla and Melmoth which could have provided him with sufficient stores and even more publicity. He chose to strike at the nearest British posts. The information supplied by the local burghers that these posts were poorly defended made them even more attractive.
4. ITALA (Map 7)
4.1. The Terrain
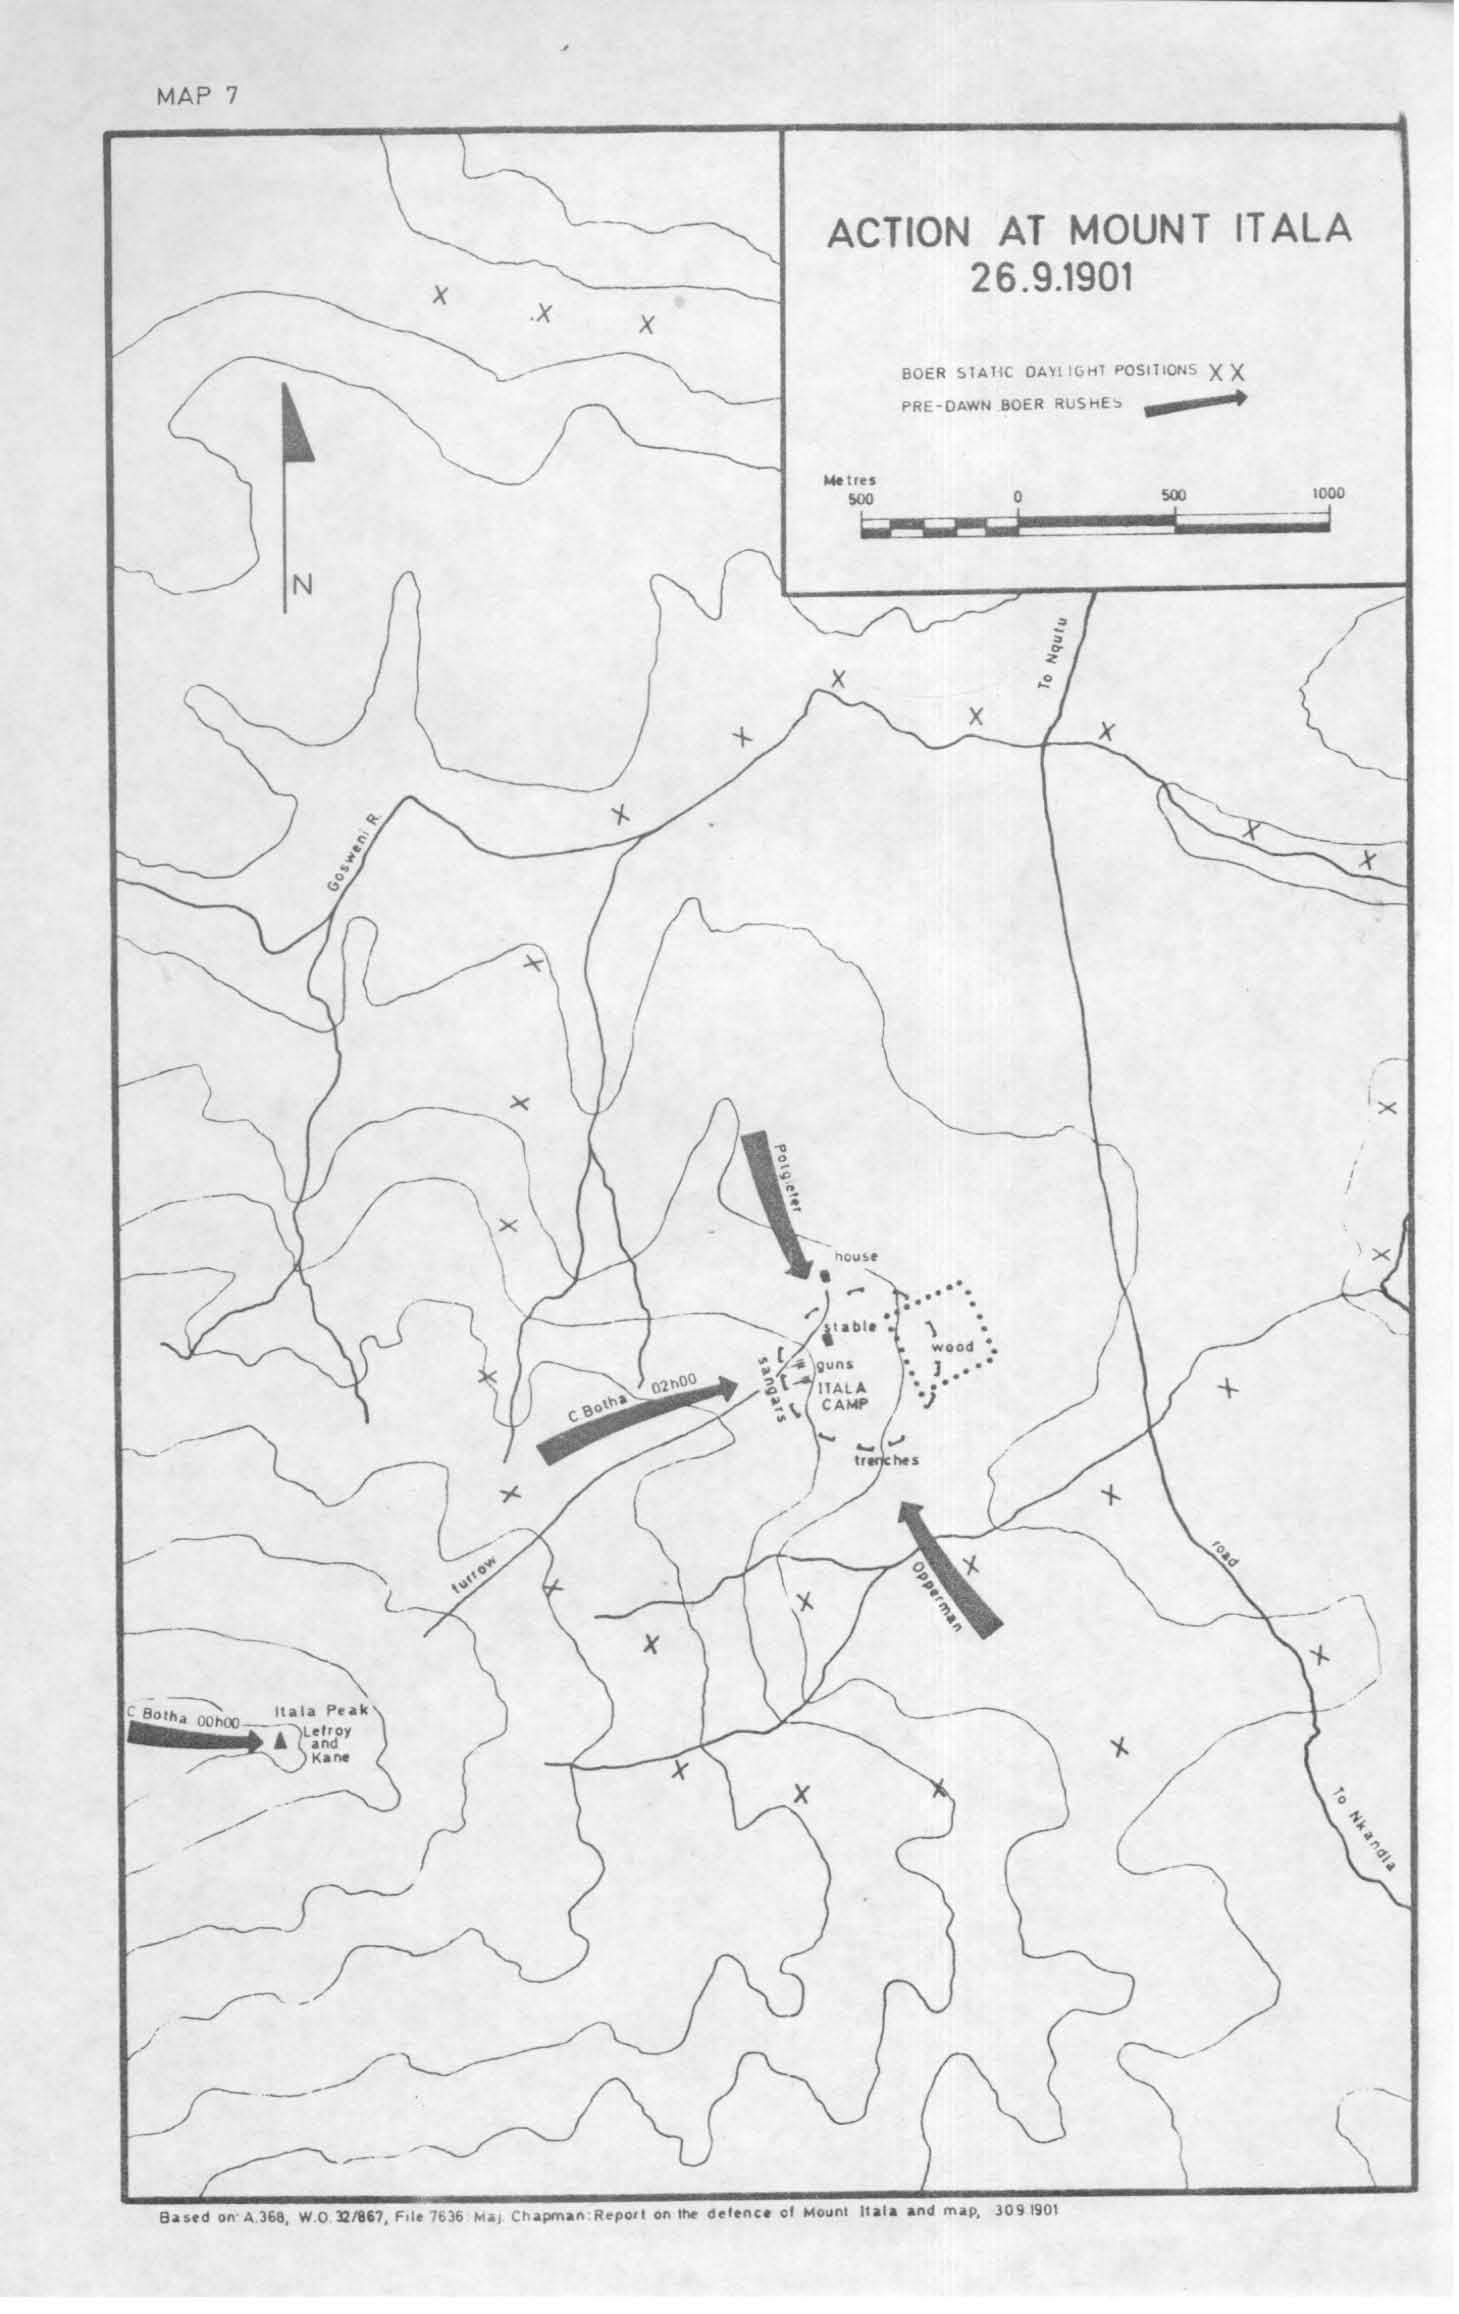
The British camp commanded by Major A. J. Chapman was established in a poor defensive position. The main considerations in the selection of a site being the availability of water and the proximity to a good road. The camp itself was situated below the final ridge of a spur on fairly level ground. The ridge itself commanded the camp. Fortifications on the perimeter of the camp consisted of stone sangars and gun emplacernents on the ridge and trenches on the lower ground. These trenches were about one and a half metres deep and from 50 to 100 metres apart. The camp was commanded by high ground on three sides, other than by the ridge, and on three sides there were also patches of dead ground where the enemy could muster for an attack. The defenders did have the advantage of good fields of fire on all sides for about 400 metres.
Map 7 - ACTION AT MOUNT ITALA
26.09.1901
4.3. The Boer Plan
On 25 September Chapman received reports of a Boer force of 1 800 to 2 000 strong at Babanango. The Boer plans for simultaneous attacks on Itala and Fort Prospect were well developed at this stage. Chris Botha was to approach from the high ground in the west with the main attacking force. General Opperman and Commandant H.J. Potgieter were to lead their men down the Vryheid-Fort Prospect road until they were directly east of Itala, from where they were to leave the road, part with the commandos destined for Fort Prospect, and move westwards across country towards their respective positions. A small detached force was to occupy high ground to the east along the Nkandla-Nqutu road, to guard against a British withdrawal or the arrival of a relief force. General Botha was to remain at Babanango with a small reserve. The Boer attacking force left their base at 20h00.
4.4. The British Prepare for the Boer Attack
On the evening of the 25 September rumours of the Boer approach were discussed in the officers' mess tent, and some bets were even laid on the likelihood of an attack. The men were ordered to spend the night in the trenches. At 22hOO reports came to the British camp that the Boers had reached "Spezi". Chapman acting upon information supplied by the Zulu scouts anticipated a strong attack from the west. He sent a detachment of 80 infantrymen to the summit under the command of two officers, Lieutenants H.R. Kane and B.P. Lefroy. These men took up a good defensive position among the large boulders and awaited the approach of Chris Botha's men.
4.5. The Action on the Summit
At midnight Chris Botha's men approaching the summit in the bright moonlight suddenly came under fire from the hidden British. The initial exchange of fire lasted for about 15 minutes followed by a half-hour period of silence while the Boers re-grouped. Using the same scattered boulders that had afforded the British cover the Boers surrounded the British detachment and charged simultaneously from all sides. The fight lasted for a further half-hour and the British were finally overcome after putting up a desperate resistance. Kane was shot through the spine and stomach and [8] died seven hours later. Lefroy was also severely wounded but recovored to be awarded the D.S.O. Lt. Fielding the British Medical Officer who attended the wounded recorded 6 British dead and 30 wounded. Louis Botha reported 34 British killed and wounded and about 50 captured. Some members of the detachment escaped down the hill and eventually reached the camp. Although this detachment sustained high casualties they did serve the purpose of warning the defenders below of the Boer approach, and of delaying the Boer attack for more than an hour.
4.6. The Attack on the Camp
The first attack on the perimeter of the camp was made at 02h00. Fierce fighting continued for two hours with the Boers attacking from all sides. They used the pockets of deadground to mass and repeatedly charged to within a few metres of the sangars and trenches. Such offensive tactics were
very untypical of the Boers during the war. The British had a great advantage in their possession of artillery with the moonlight being strong enough to give the crews of the two l2-poinders their targets, but it was still dark enough to protect the gunners from directed fire. The guns were directed
upon the burghers who had taken up positions on the high ground in order to give the attackers covering fire. Driver F.C. Bradley of the 69th Battery was awarded the Victoria Cross for retrieving a fallen comrade and then carrying ammunition to the guns. He was assisted by Gunner W.H. Rabb who
was awarded the D.C.M. At 04h00 all firing ceased. With the coming of daylight the charges stopped and the camp was subjected to heavy and accurate rifle fire from the burghers concealed on the high ground. The gunners were forced to cease firing and take cover at 06h30. The Boer marksmen continued to fire into the camp all day on 26 September. Both Major Chapman and his Adjutant, Captain Butler, were wounded. Botha urged his men to make a
final charge, but the cost of such a charge in broad daylight would have been great and the charge was never made.
4.7. Both Forces Withdraw
The unexpected Britishresistance had led to an unanticipated loss of Boer fighters and ammunition, but more important the Boers lost time. Mindful of the British troops closing in behind him the Boer leader decided to call off the attack.
By 19h00 the British defenders had been manning the defences for more than 18 hours. During this time they had been under continual fire and had received neither food nor water. Ammunition supplies were down to 100 rounds per man. Excluding the losses on the summit about one fifth of the garrison had been killed or wounded. The Boer marksmen had almost succeeded in wearing down their opponents. Chapman decided to save his men and at midnight he withdrew. He left a Lieutenant with 20 unarmed men and the Veterinary Surgeon to deal with the wounded. The Medical Officer was still [9] on the summit. Chapman reached Nkandla at 04h00 without incident. Fielding brought his wounded men into the camp soon after Chapman's departure. He spent 27 September caring for the wounded. On the morning of 28 September he was pleasantly surprised to have his breakfast interrupted by the advance scouts of General Bruce Hamilton's Column which had been sent to the relief of Itala.
Hamilton had left Vant's Drift on the morning of 27 September after hastily assembling a force. He had 1 400 mounted men and six guns of the R.H.A. He reached Isandlwana at 17h00, finally bivouacking at Fort Louis. His scouts, drewn form the Scots Greys, reached Itala at 09h00 on 28 September. From the time of receiving his orders until his arrival at Itala 36 hours had passed, 24 of which had been spent on the actual march to cover 60 kilometres.
4.8. Casualties
In his report Chapman mentioned one officer killed and 5 wounded, 21 men killed and 54 wounded. These figures agree with the more conservative of the Boer estimates. General Botha included a detailed casualty list with his report giving his losseS as 15 killed, 40 wounded and one missing.
5. Fort Prospect
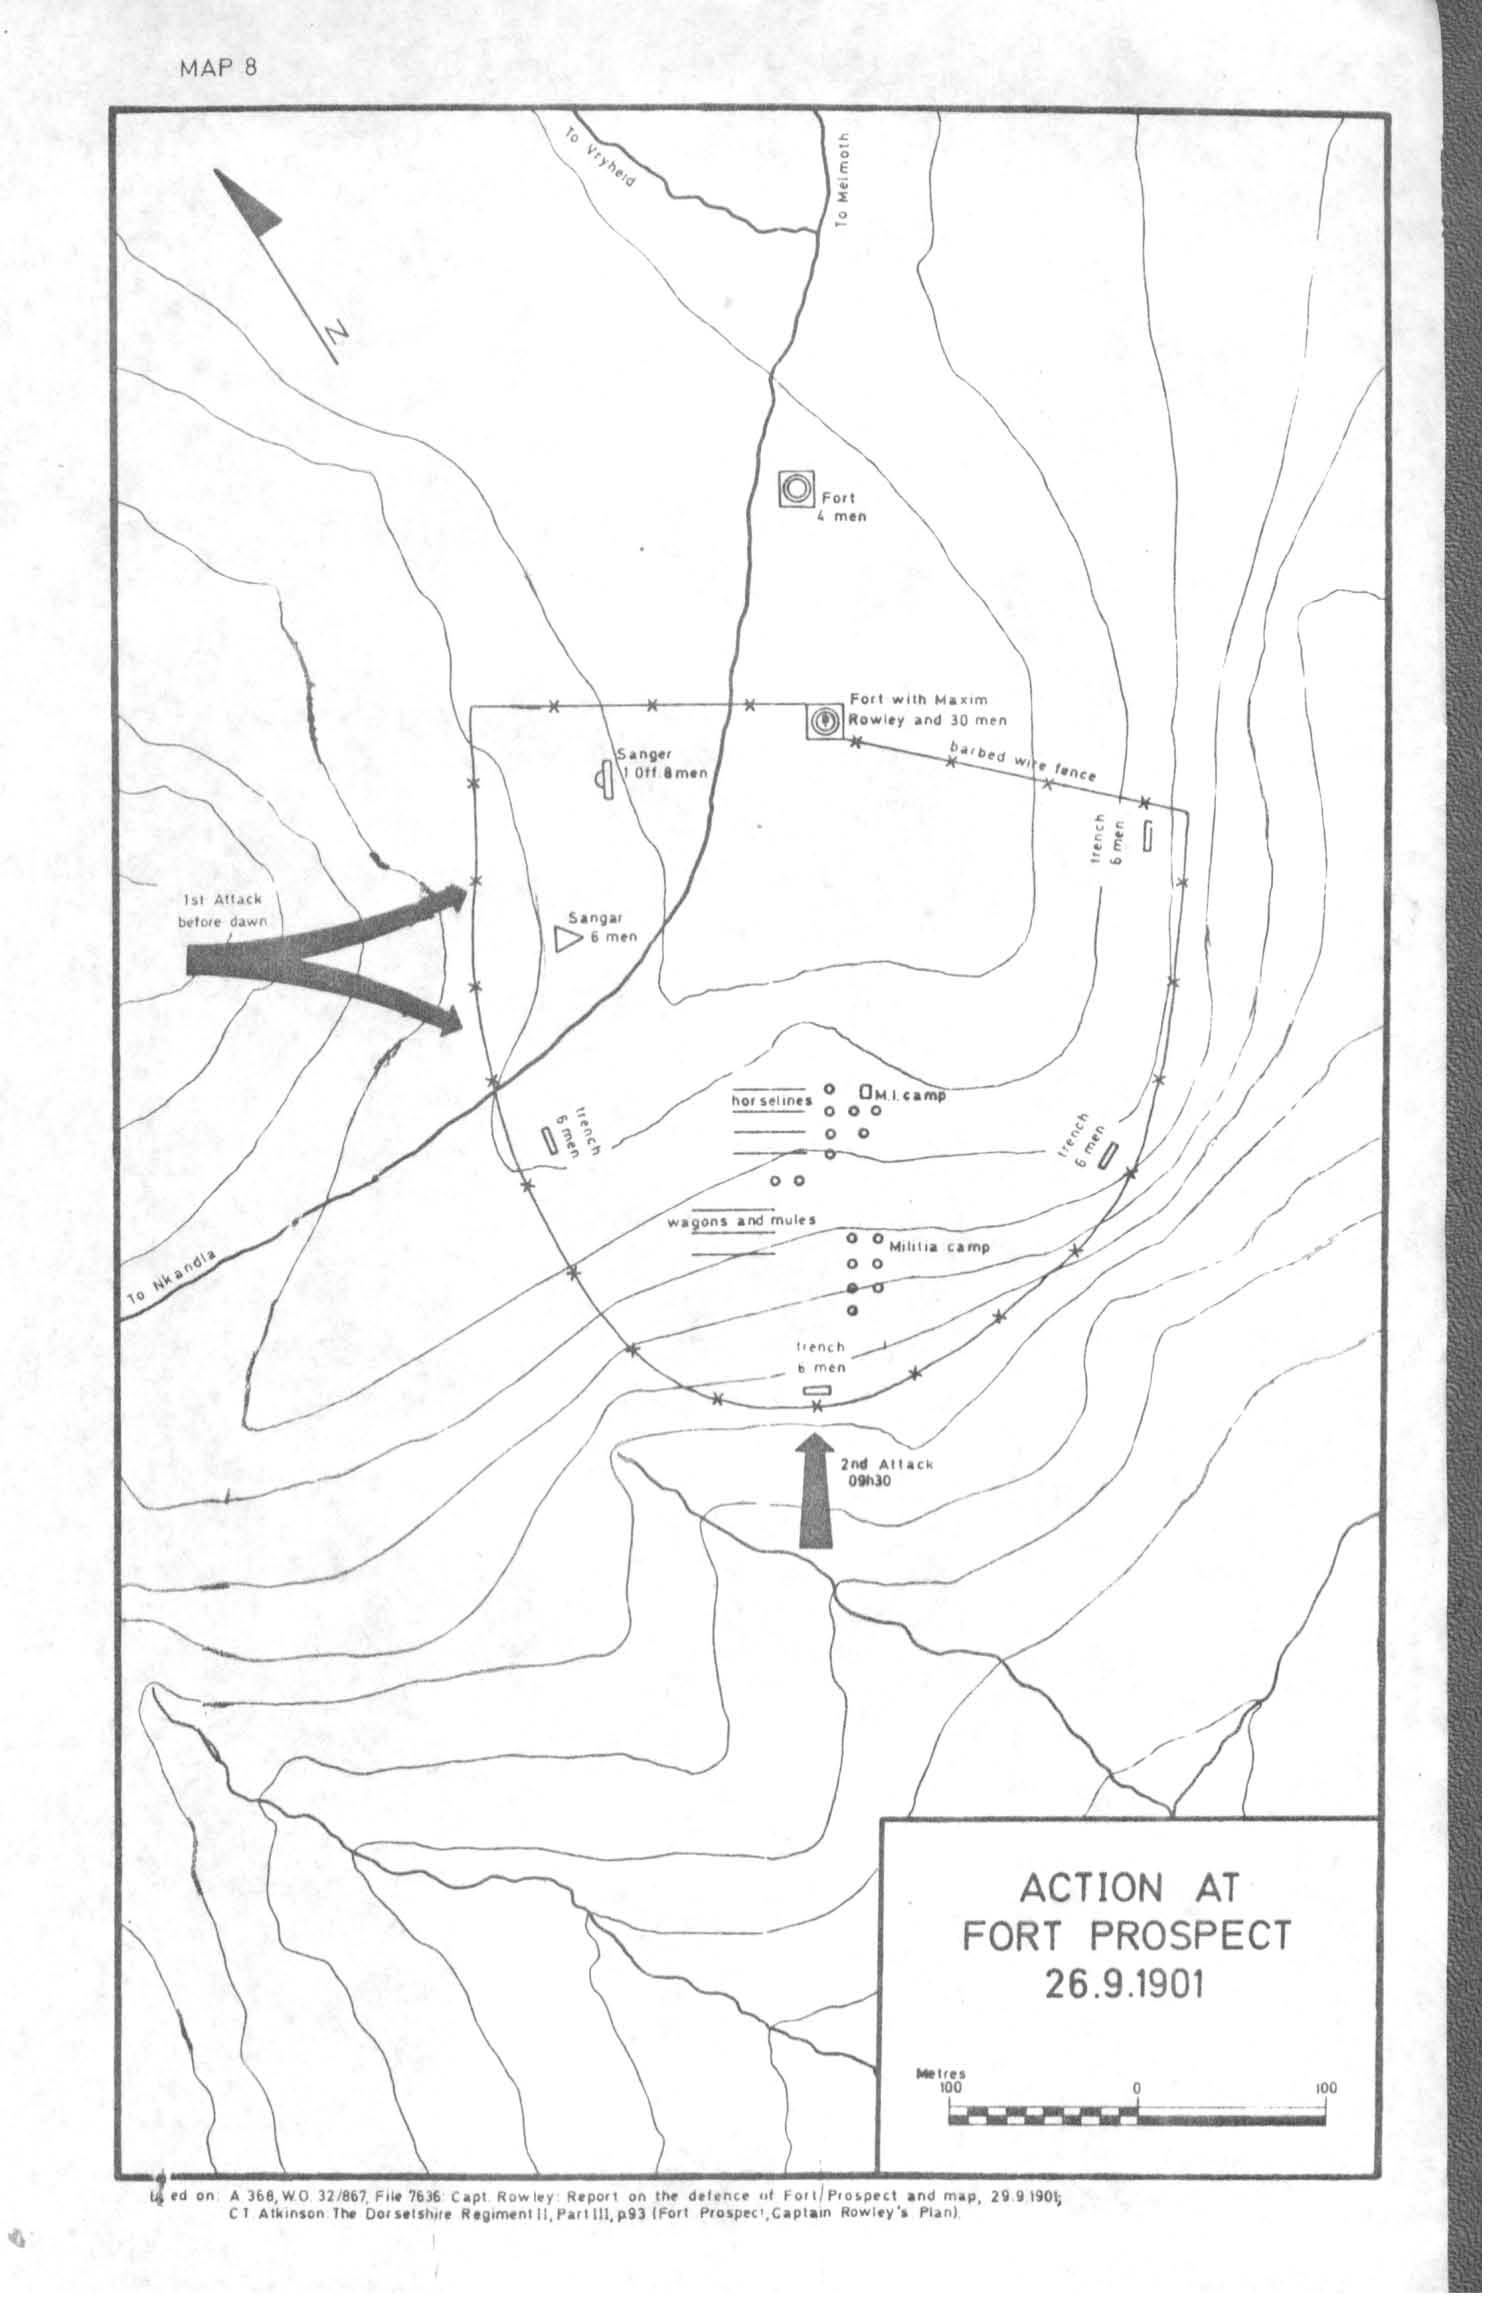
5.1. Terrain and British Defences
This post makes an interesting contrast with the Itala camp. The site was well chosen on high ground. The defenders were well entrenched and the positions on the outer perimeter enjoyed the fire support of the Maxim fort.
Map 8 - ACTION AT FORT PROSPECT
26.09.1901
5.3. The Boer Attackers
General Botha sent the Carolina and Ermelo Commandos under the command of Generel Cherry Emmett against Fort Prospect. Estimates of the Boer strength vary between 150 and 600. Warned by the firing at Itala, Rowley had time to prepare for an attack. At 04hl5 Rowley received further information of approaching Boers from a Zulu scout.
5.4. The Attack
The first attack came from the north-west under cover of a fast retreating darkness and a heavy mist. This attack came to within 20 metres of the sangars. The sudden lifting of the mist at dawn revealled that the Boers had [10] actually attacked up an exposed slope even leaving their horses exposed to the fire of the Maxim. At 09h30 a second attack was launched against what the Boers thought to be the weakest point of the defences, the trench at the open end of the horseshoe valley. Sgt. F. Doyle and his five men successfully beat off the attack by l0h00. The Boers then settled down to firing upon the British position from a distance. Unlike Itala, Fort Prospect was not dominated by any high ground and the Boer fire during the day was largely ineffective. The total British casualties being only one killed and nine wounded. Botha reported two wounded at Fort Prospect.
5.5. Lyttelton's Comment
In his autobiography General Lyttelton described both Itala and Fort Prospect as "The best bit of defensive work which came under my notice in the war."
Note - numbers in square brackets [] refer to page numbering on the original article.
Return to Journal Index OR Society's Home page
South African Military History Society / scribe@samilitaryhistory.org