
 The South African
by G.A. Chadwick
Copyright 1978
In order to place the events of the war in the north eastern part of Natal in the proper perspective it is necessary to remind oneself that in 1899 the present districts of Vryheid and Utrecht were part of the South African Republic. The border ran along the upper reaches of the Buffalo River to its confluence with the Blood and then northwards along the latter to branch off eastwards and southwards to include Babanango and a large area north of the White Umfolozi. Newcastle and the surrounding area formed a narrow wedge of the Colony of Natal which could be threatened by the republics on each side.
For weeks before the war as relations between Britain and the republics deteriorated the South African Republic had been concentrating troops in the Volksrust area while the Orange Free State did likewise in the vicinity of Harrismith at Van Reenen's Pass. Comdt Gen Piet Joubert was in command at the former place while Comdt Prinsloo was in charge at the latter. The British plan was to strike northwards from the Cape and as can be expected, the main British concentrations were in this area while the main Orange Free State forces were marshalled to oppose them. Lt Gen Sir George White, the British Commander in Chief in Natal had his headquarters at Ladysmith where approximately 8,500 troops were stationed while Gen Sir W. Penn-Symons commanded some 4,000 troops at the advanced post of Dundee. Approximately another 2,000 troops were strung out at various other points between Durban and Ladysmith bringing the total to almost 16,000.
When the ultimatum delivered to the British by the republics expired on 12 October 1899 the Boer forces commenced to invade Natal, a well-planned move to divert the British from their northwards thrust through the Cape. The forces of the South African Republic moving via Laing's Nek and Botha's Pass reached Newcastle, which they occupied without opposition on 15 October 1899. At this time the Boer Commandos from Utrecht and Vryheid commanded by Gen Lucas Meyer were moving towards De Jager's Drift on the way to Dundee.
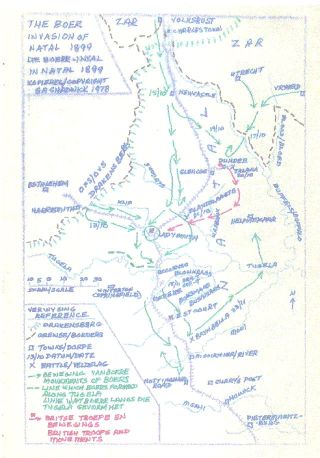
Map 1 - The Boer Invasion of Natal 1899
THE BOER MOVEMENTS
On 17 October the Commandant General held a council of war at which it was decided that the main force commanded by Gen D.J.E. Erasmus should move via Dannhauser with the object of co-operating with Gen Lucas Meyer in an attack on Dundee while Gen J.H.M. Kock should occupy the Biggarsberg, cut the line between Glencoe and Ladysmith to prevent assistance being sent to the garrison at Dundee and co-operate with the Free State Commanders. By 18 October Erasmus had reached a point near the Impati mountain and some 9km from Dundee. A strong British patrol was encountered but it withdrew. Contact was made with Meyer's officers but not with Meyer himself and a plan to attack Dundee from three sides was drawn up. This involved an attack by Meyer on the left, i.e. from Vryheid. Erasmus in the centre, i.e. from Dannhauser and Impati and Weilbach on the right, i.e. Glencoe.
The plan was approved by Gen Joubert. In the event it appears that co-operation was not very effective. At 21h00 on 19 October Meyer crossed the Buffalo River at De Jager's Drift and during the same night Erasmus scaled the western slopes of Impati. Weilbach was still at Hattingspruit and did not move until the following day.
Because of the wet roads Meyer avoided them and moved across the open veld. However, he did not avoid the vigilance of the British patrols. He exchanged shots with a detachment of mounted infantry (2nd Dublin Fusiliers) [-2-] under Lieut C.T.W. Grimshaw which fell back on Smith's Nek. Meyer' moved forward to occupy Talana and Lennox with 1,500 of his force which numbered 2,900 and was composed of the Utrecht, Middelburg, Wakkerstroom, Vryheid, Piet Retief, Krugersdorp and Bethal commandos. Approximately 900 men with 3 cannon (two 75mm Krups and one 75mm Creusot) and a pom-pom were on Talana while 500 were stationed in Smith's Nek and Lennox. The remaining 1,400 with 3 pom-poms and a field piece were kept in reserve.
During the night Erasmus had occupied the Impati mountain with the Pretoria commando and placed a 120mm howitzer and a 75mm cannon in position. Trichardt occupied the N.E. slopes with Ermelo commando as well as 7 cannon, a pom-pom and a maxim.
THE BRITISH
The troops available to Gen Penn-Symons were the 18th Hussars. 607, Artillery 516 (3 batteries of 6 guns each) 1st Leicester Regiment 944, 1st King's Royal Rifles 1031, 1st Royal Irish Fusiliers 878, 2nd Royal Dublin , Fusiliers 1,002, total 5,028. In the case of the 1st Leicestershire Reg., 1st King's Royal Rifles and the 2nd Royal Dublin Fusiliers, one company of each was organised as mounted infantry. Gen White was reluctant to have his troops dispersed at various points but political considerations forced him to allow the troops to remain at Dundee. On 18 October he had decided to withdraw the garrison to Ladysmith but Gen Penn-Symons expressed his complete confidence in being able to hold the town or repel any Boer attack.
The British camp lay on the ridge to the west of the town of Dundee:which in those days covered a small area. The position is occupied today by the sweet factory and traffic department. Some units were near the present hospital. This position lay in a basin surrounded by hills to the North East and South with a fairly level plain towards the West but Penn-Symons was confident that he could hold it.
THE BATTLE
The morning of 20 October dawned misty with low cloud covering the Impati mountain but when the mist cleared over Talana Gen Meyer's troops became visible to the British. At 05h50 the Boer cannon on Talana commenced to fire causing confusion in the Boer camp. The clouds continued to cover Impati and Gen Erasmus' men took almost no part in the action.
Despite the Boer fire and confusion caused by bolting horses the British troops fell in and made ready for the attack. The artillery made ready to answer the Boer fire. An advance by the Boers from the Nek to get within range of the British was driven back by a few well-placed shells and very soon the shells were falling on Talana.
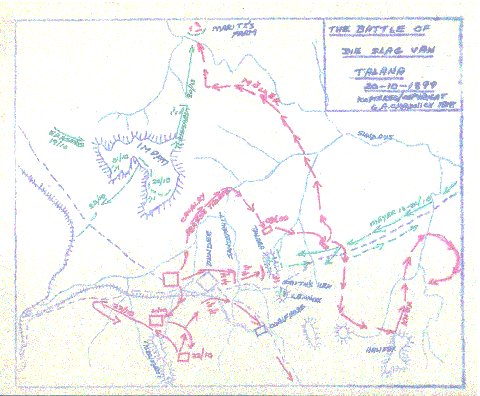
Map 2 - The Battle of Talana 20-10-1899
High resolution pdf version of mapThe 1st Leicestershire Regiment, the 67th Battery R.A. and one company of each of the other regiments was left in camp to guard against a flank attack while the rest of the infantry with the Royal Dublin Fusiliers in the lead, moved along what is now Union Street to take up positions in the Sand Spruit. Gen Yule commanded the attack which was led by the Royal Dublin Fusiliers with the King's Royal Rifles on their right and the Royal Irish Fusiliers as reserve but further to the right. Their first objective was Smith's farm, surrounded by trees, at the foot of Talana but to reach this they had to cross some 800 metres of open country. The attack commenced at 07h20 and although the range was too far (1,200 to 2,000 metres) for accurate fire by the Boers some casualties were suffered and the companies became confused. The plantations offered shelter but it was impossible to sort the companies out.
[-3-] Near the plantation a stone wall ran North-South along the foot of Talana and this wall was joined to a similar one which ran along the first ledge by several East-West walls. The Dublin Fusiliers reached the lower wall and were joined by several companies of the King's Royal Rifles. The Royal Irish Fusiliers were in the plantation where shorter walls offered cover. Towards the Northern end of the plantation the Dublin Fusiliers found a donga along which 3 companies made some progress but soon came under fire from the ridge. Three companies of the King's Royal Rifles near the farmhouse attempted to advance but were caught in a crossfire from Lennox and forced to retire to the lower wall despite support from three maxims firing from the plain below.
When Gen Penn-Symons noted the lack of progress he brought the artillery forward to near the present chemical works to give a more concentrated fire on the Boer positions. This was successful in silencing the Boer artillery but could not drive the burghers from their positions. Despite orders to attack the British made no progress and Gen Penn-Symons, deaf to the protests of his staff, rode forward to the plantation to take charge. Near the northern end of the plantation Maj Hammersley, one of the staff officers, was wounded and at 09h30 when he was climbing over a stone wall the general fell mortally wounded.
Gen Yule assumed command and immediately pressed forward with the attack. On the British right 4.5 companies of the King's Royal Rifles reached the ledge and shelter of the second wall. Their success and signals encouraged the Dublin Fusiliers to move forward to the same position. The Boer failure to effectively occupy and hold this wall cost them dear but as they held the crest of the ridge the British advance bogged down at 10h00.
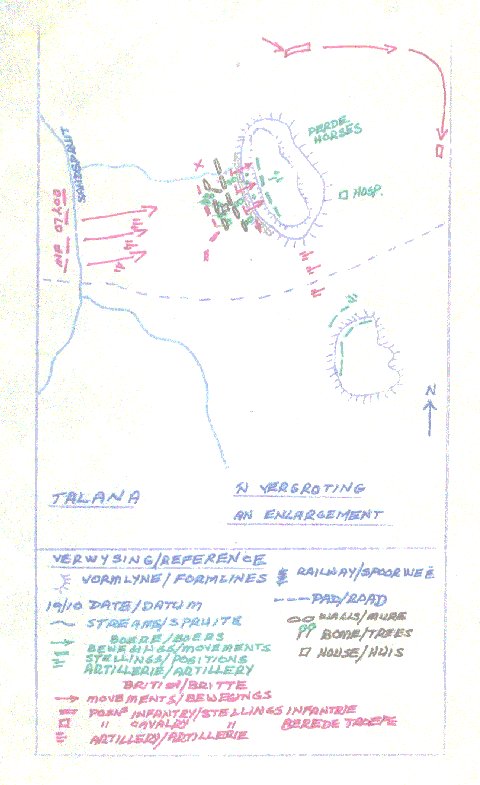
Map 3 - An Enlargement of The Battle of Talana 20-10-1899
In the meantime the British cavalry commanded by Lt Gol Moller left camp and rode behind the Talana hill and took up a position some 1,500 metres to the North-west of the Boers. Maj. Knox was sent eastwards with two squadrons to cut off the Boer retreat. There were various skirmishes and a Boer ambulance was fired on but Boer rifle fire forced the British to withdraw. Knox went eastwards towards Malonjeni but Moller, missing the route in the mist rode northwards.
The threat from the rear, the absence of any help from Erasmus and the worsening weather conditions caused some burghers to slip away and Gen Meyer to decide to break off the action. As the Boer fire became less intense the British decided to attack. The artillery moved across the spruit and despite Boer rifle fire covered the crest of Talana with bursting shells. The British infantry charged forward and despite effective Boer fire, managed to storm the crown. Unfortunately for them the British artillery opened fire again, wounding several of their own men. By 14h00 the British were in possession of the hill. The artillery moved forward to Smith's Nek but no effective measures were taken to bombard or pursue the retreating Boers.
Knox returned to the camp at 19h00 but Moller moving East of Impati clashed with some of Danie Theron's men and the Ermelo commando. He rode further north and took up a position at Maritz's farm "Adelaide". Here he was attacked by the Boers and when Trichardt moved artillery forward to bombard him he was forced to surrender. Losses were:
| Killed: | 8 men |
| Wounded: | 3 officers and 20 men |
| P.O.W. | 9 officers and 205 men |
| TOTAL: | 245 |
[-4-]
THE BRITISH EVACUATION OF DUNDEE
Gen Yule did not intend to evacuate Dundee but on 21 October moved his camp about 2 metres [miles?] southwards to near the Durham's farm on a spur of the Induneni mountain. This was 7,000 metres from Impati but when the weather cleared in the afternoon it came under Boer fire from Impati. Luckily for the British the mist saved them from heavy casualties. On 22 October the British camp was moved further south and a force was sent out to near Glencoe but it became obvious that the Boers were in strength and the position was untenable. Only the mist saved the British from suffering heavily from Boer artillery fire. That night he gave orders to retire and, lead by Dartnell, the whole British force set off via Beith for Ladysmith.
| British LOSSES | ||||
| Killed | 11 officers and | 40 other ranks | = | 51 |
| Killed | 23 officers and | 180 other ranks | = | 203 |
| P.O.W. | 9 officers and | 237 other ranks | = | 246 |
| TOTAL | 500 | |||
N.B. Boer sources give much higher figures and mention 250 unburied bodies. This is not borne out by the graves register. The above includes the losses at Maritz's farm. Note the discrepancy in P.O.W. figures.
The British lie buried at the foot of Talana, behind the Wesleyan Church, Mackenzie Street and in the main cemetery.
| BOER LOSSES | |
| Killed | 31 |
| Wounded | 66 |
| Missing | 30 |
| TOTAL | 127 |
Most of the Boers lie buried next to the Dutch Reformed Church where a very impressive plaque commemorates the battle.
THE BRITISH OCCUPATION OF NORTHERN NATAL AND VRYHEID
INTRODUCTION
After the relief of Ladysmith on 28 February 1900 General Buller concentrated his forces in the Sunday's River and Waschbank valleys while the Boers fell back to the crest of the mountainous semi-circle formed by the Biggarsberg and Helpmekaar-highlands. Here they constructed a comprehensive defensive system of sangars, trenches and gun positions with the intention of disputing any further British advance.
Buller moved very slowly but after some skirmishes and abortive advances a force of Lancers and Mounted Infantry was successful in storming Van Tonder's Pass on the Helpmekaar which was lightly held by the Boers and deploying on to the plateau. This outflanked many of the Boer positions. As a result a retreat was decided upon and after a series of minor skirmishes the main Boer force withdraw to Botha's and Laing's Nek passes near Newcastle to dispute the British advance along the main road to Pretoria. Elements of the Vryheid, Swaziland and Utrecht commandos fell back to the area of Vryheid and Paulpietersburg.
[-5-] The British were able to occupy Dundee on 15 May 1900 and immediately set about consolidating their positions in the vicinity. Numerous patrols were sent out but it was not until 18 September that they were in a position to occupy Vryheid which had originally been the capital of the Nuwe Republiek (New Republic) established in 1884. An immediate start was made with the extension of the railway line from Talana to Vryhaid and by the time the town was attacked on 11 December 1900 the task was nearing completion.
ACTION AT SCHEEPER'S NEK : 20 MAY 1900
Although the Boers had evacuated Dundee scattered groups remained in the vicinity and on 16 May 1900 Bethune was ordered to pursue some of these who were reported to be in the vicinity of Nqutu. His mounted infantry found no Boers at Nqutu but hearing of a commando in the Blood River valley moved off northwards in pursuit. By 20 May he was in the vicinity of Scheepers Nek where a small force of Boers was concentrated.
<
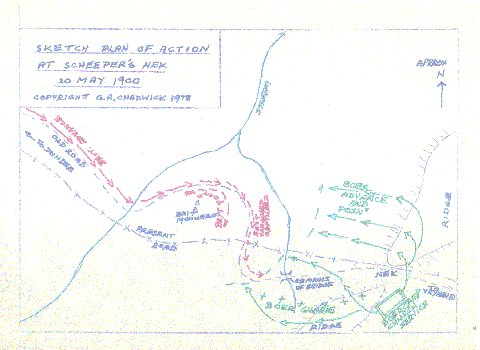
Map 4 - Action at Scheeper's Nek 20 May 1900
Some members of the Vryheid commando and 75 men of the Swaziland commando, the latter under Comdt Koot Opperman were in a valley near the neck where Dom. E.C. Anderson was conducting a service, the 20th being a Sunday. It is not quite clear how the action started but it would seem that one of the officers of the advance squadron, of Bethune's Mounted Infantry rode-up to the Boer guards without noticing them, giving them the opportunity to disperse before the British could attack.
Capt Goff who was in command of the leading squadron which was considerable in advance of the rest of the force found himself in an exposed position on a slope where antheaps formed the only cover. The Boers deployed to ridges on the East and North and their fire created havoc amongst the British horses. The dismounted infantry replied as best they could and made good use of the maxim gun. However, the hot Boer fire forced the British to withdraw before the main body arrived. British losses were approximately 30 killed (including Capt Goff and 2 subalterns) and 30 wounded. British sources mention that 6 prisoners were taken but Boer sources place the figure much higher. Only one Boer was killed.
As a result of tho action Bethune fell back on Nqutu and eventually to Dundee.
THE BOER ATTACK ON VRYHEID - 11-12. DECEMBER 1900
BRITISH FORCES AND POSITIONS IN VRYHEID
The town was fortified and eventually there were 5 Blockhouses protecting it but initially the British occupied the Vryheid mountain known by them as Lancaster Hill in some force. Lt Col Gwane commanding the 2nd Royal Lancaster Regiment was in command with his headquarters in the town where some 200 men were stationed.
The military headquarters was on the hill where some 550 men of the Royal Lancaster Regiment under Maj G.A. Carleton, were stationed. A company of the 5th Division Mounted Infantry occupied the south-west spur while 21 men were at a small post far to the west, shown on the map as M.I. Post.
In all the occupying forces numbered some 900 men, comprising one company of 5th Division Mounted Infantry (Lancaster Fusiliers and Royal Lancasters), two 12 pounders Royal Artillery and six companies 2nd Royal La.ncaster Regiment.
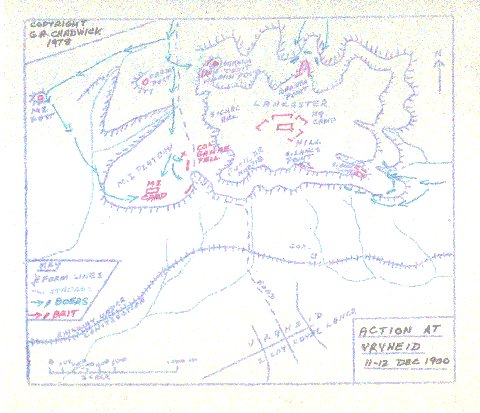
Map 5 - Action at Vryheid Nek 11-12 December 1900
[-6-]
THE BOER ATTACK
Towards the end of 1900 the Boer forces launched a general offensive against British positions in the Eastern and Southern Transvaal. Gen Louis Botha concentrated the local commandos quietly. Early in December minor attacks were launched on Utrecht and Wakkerstroom but the most serious was directed at Vryheid.
At about midnight on 11 December 1900 Comdt Botha advancing from the north along the Piet Retief road, launched an attack on the hill from the north with some 1,200 burghers. The Mounted Infantry outpost was occupied and the Mounted Infantry camp overrun but the various detachments of the Mounted Infantry on the spur, including Farm Post managed to hold out. Max:im Point and North Gun Post, defended by the Royal Lancasters, were hard pressed but repulsed the attack. A Boer encircling attack on Barrow Point drove the British back but they held out behind walls near the top of the hill. The Boer attack on South Gun Point was unsuccessful. By late afternoon on the 12 December the Boers withdrew.
| LOSSES | |
| British | 9 killed (including Col Gwane), 20 wounded and 30 missing. |
| Boers | Unknown. |
GEN. LOUIS BOTHA'S ATTEMPT TO INVADE NATAL : SEPTEMBER - OCTOBER 1901
INTRODUCTION (See Map 7)
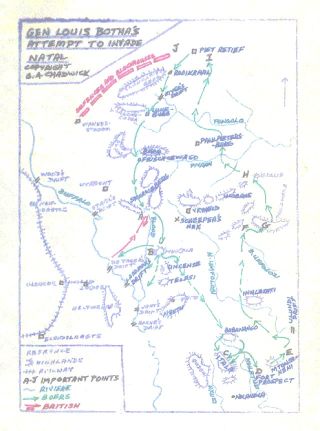
Map 7 - Gen Louis Botha's attempt to invade Natal
With the coming of the spring rains in 1901 and the improved prospects of grazing for the horses, Gen Louis Botha, who had been unable to launch a similar attack during the previous year, decided to invade Natal to cause what:disruption he could. Smuts had already broken into the Cape Colony and Kritzinger intended to follow him. If Botha could make significant progress the British communications would be thrown into chaos, thus relieving pressure on the commandos operating on the highveld.
BOTHA CONCENTRATES HIS FORCES
In anticipation of a spring campaign Botha had concentrated his burghers at the farm Blaaukop.near Ermelo. By August 1901 the various elements of the Bethal, Middelburg, Ermelo, Carolina and Standerton commandos had concentrated here numbering approximately 1,000. Shortly before his departure General Botha handed over the command of the Eastern Transvaal to General Ben Viljoen.
On 7 September 1901 Botha left Blaaukop with a commando of approximatefy 1,000 and on 10 September the commando passed Piet Retief. By 11 September he reached the main concentration point at Rooikraal in very rainy weather. Contingents from Piet Retief and Wakkerstroom joined the other commandos at this juncture.
THE BRITISH COLUMNS
By now the British had news of the concentration of Boer forces but were not sure of their intention. As a precautionary measure armed columns, accompanied by ox-wagon, transport were sent out to areas which might be threatened. by the Boer advance. One column moved through Volksrust and proceeded to Wakkerstroom in an attempt to cut off any commandos in this area. Another concentrated at Dundee and moved towards De Jager's Drift to [-7-] prevent a possible threat to the town. From Ermelo a column struck south while Amsterdam in the Southern Transvaal was strengthened. A glance at the map will indicate that Botha's forces had already advanced to a point at which only the Dundee column posed an immediate threat. In order to strengthen their position the British commenced building a defensive system, including some hastily constructed blockhouses between Wakkerstroom and Piet Retief. By 10 October 1901 this line had almost reached the latter town but by then Botha was already back on the highveld.
BOTHA'S ADVANCE AND BLOOD RIVER POORT
On 12 September Botha left Rooikraal, on the 13th he was at Luneburg and on 14 September he passed through Frischgewagd near the headwaters of the Pivaan River. Here he was met by elements of the Utrecht Commando, bringing his total strength to about 1,700. However, his horses were suffering severely from the rainy weather and some of his burghers were forced to remain behind. From here he sent a message to Cherry Emmett instructing him to join the commando. Accordingly Cherry Emmett and his commando of 300 moved to Scheepersnek. With this addition Botha's force numbered about 2,000 but many were ineffective because of the condition of the horses and took several days to catch up with the main commando.
Col Gough, who was at De Jager's Drift got wind of the Boer movements and on 17 September 1901 advanced first towards Scheepers Nek and then to Blood River Poort (See A on Map). Here he saw the Boer horses out grazing but not realising their strength and dispositions attacked with his mounted force and artillery across the open plain. The Boers replied with a flank attack, mounted and dismounted (somewhat exceptional in open country). As a result they rolled up the British flank and rear. British casualties were 6 officers and 38 men (44) killed or wounded and 6 officers and 235 men (241) prisoners and 4 guns captured. The Boer losses were negligible.
THE CHANGE OF PLAN
From here Botha advanced to the Mundla highlands where Cherry Emmett joined him. Rain and the bad condition of his horses still dogged Botha. On 22 September (See B on Map) and the days following he made several reconnaisances to the Buffalo River drifts but the floods prevented him from attempting to cross even those which were lightly guarded by the British. As a result he decided to move south via Babanango towards Melmoth and Eshowe where rivers were unlikely to impede his progress. By 24 September with approximately 2.000 burghers under his command he was at Babanango.
ITALA AND FORT PROSPECT
The British had two outposts on the border of the South African Republic (Z.A.R.), one at Itala (C on Map) held by about 80 men. At Itala the British had a fortified camp at the base of the hill, sangars near the peak and outposts on the eastern slopes. Botha, probably under the impression that they would be easily overrun, decided to attack the British position. In fact he could easily have bypassed them.
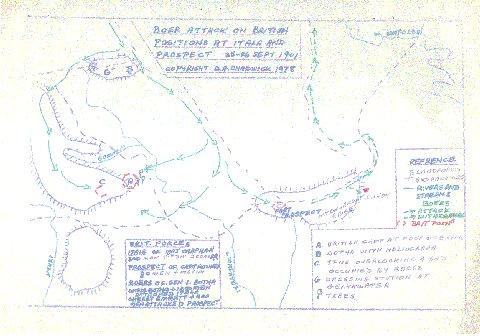
Map6 - Action at Itala and Fort Prospect 25-26 September 1901
On the evening of 25 September 1901 the Boers attacked Itala from three direction with a force of about 1,700 burghers. The attack from the north-west along the top of the ridge was led by Comdt Chris Botha. General Botha remained at Babanango where the farmhouse at Gelykwater was used as a hospital. From his vantage point shown as B on the map Botha could overlook much of the battlefield and communicate with his forces by heliograph. The peak was overrun but although very hard pressed the British [-8-] managed to hold their base at the foot of Itala. By nightfall on the 26 September Chris Botha withdrew. British losses were 19 killed and 2 wounded while Boer casualties are placed at 18 killed and 40 wounded although some evidence indicates a number of unidentified graves at the foot of Itala. The Boer wounded and all the identifiable dead were taken to Gelykwater. The dead lie buried in the family plot. These may be those of Boers. During the night of 26/27 September the British withdrew to Nkandhla. (See map D)
After the Boer withdrawal the British dead were buried in several plots on the slopes of the mountain.
Cherry Emmett with approximately 400 burghers failed to take the position at Fort Prospect. The losses were:
British : 1 dead and 8 wounded.
Boers : Unknown, but probably 2 dead and 18 wounded.
(See D on Map)
BACK TO THE TRANSVAAL
Botha now decided to retire by way of the Umfolozi Valley and moved his commando to the Mtonjoneni Heights. Near here he captured a British convoy on 29 September (E on Map).
By now several British columns were advancing into the area and to avoid them Botha led his forces east of the Inhlazati mountain to concentrate at Boschoek on 2 October 1901 (See F on Map). From here he passed through very mountainous country to the Geluk defile where he eluded his pursuers on 3 October (See G on Map).
Realising that Botha was now moving back to the Transvaal the British attempted to head him off east of Hlobane but he siezed a strong position at Goedhoek on 8 October (See H on Map), repelled a British force and succeeded in gaining the safety of the Pivaan Valley. He passed Piet Retief on 10 October well beyond the reach of the pursuing columns. (See I on map) and to the east of the uncompleted line of fortifications (See J on map).
HOLKRANS
INTRODUCTION
Towards the end of the war a number of Boer families in the vicinity of Vryheid were harassed by the local Zulu tribes while there were cases of theft, assault and even murder. By this time the British were in full control of the towns such as Vryheid and Piet Retief, but the Boer commandos were still moving around the countryside. During April 1902 Gen Louis Botha issued orders that the kraals of the Chief Skobuko should be burnt and his cattle confiscated as punishment for the murder of some Boers.
Field Cornet J. Potgieter (Jan Mes) who was stationed at the farm "Vrede" near Hlobane carried out this order by burning several kraals and confiscating about 60 head of cattle. As a result the Zulus awaited an opportunity to take revenge. Shortly after this Y.C. Potgieter moved with his commando to a farm on the northern slopes of the Zinguin mountain, not far from the spot where the hut burning had taken place. By the beginning of May 1902 the strength of the commando had grown to 73, mainly as a result of a number of older men joining the group.
As an armistice had been declared as a preliminary to the peace negotiations to be held at Vereeniging the Boers took very few precautions against a [-9-] surprise attack. However, Zulus had been seen on the mountain on 3 May and many burghers were concerned for their own safety. Jan Mes was urged to move to another site. On 5 May some of the burghers rode away with the intention of sleeping elsewhere but later returned to the camp. Only Willem Els who had gone to visit friends at Skurweberg was absent on that night.
THE ATTACK
The Boers posted no guards although two men were detailed to take charge of the horses. The camp was not compact and the men lay down to sleep in an irregular line some 300 metres long stretching from a kraal near the foot of a rise down the slope to the low ground beside a stream. Although the incident is known as Holkrans and many of the persons concerned thought they were on the farm "Holkrans" it would appear that the encampment was in fact on the farm "Bloemendal".
Shortly after 04h00 on 6 May 1902 some of the burghers were awakened by a shot which may have been fired as a warning by the Zulu who had warned them a few days before. Almost immediately after, hundreds of Zulus, many of whom were armed with guns attacked the sleeping burghers in the pitch darkness. In the noise and confusion of the first rush many of the Boers were killed but Field Cornet Potgieter made a valiant effort to rally his men. Some managed to group themselves near the ridge but those lower down had little chance. Fierce hand to hand fighting ,developed with the Boers using their rifle butts to strike down their attackers.
Resistance proved futile against such heavy odds and 56 of the burghers were murdered. Thirteen managed to escape. Three were taken prisoners by the Zulus who handed them over to the magistrate at Vryheid where they were imprisoned.
EPILOGUE
It would appear that the first person on the scene after the massacre was Gen Manie Labuschagne who gives a heartrending account of dead bodies, some badly mutilated, stretching over a distance of about a kilometre. A group of burghers of the Utrecht Commando under Field Cornet J.W. de Jager from Makateeskop also arrived on the scene. Two wagons were procured and the bodies of all but three were taken to the farm Mooihoek where they were buried in a communal grave. Field Cornet Potgieter and his brother were buried in the family cemetery on the farm Bloemendal. Jan Harm Labuschagne was also buried in a separate grave.
In 1905 the remains from the communal grave were exhumed and reburied in the grounds of the Dutch Reformed Church at Vryheid and a monument was erected over the grave. On 6 May 1970 the remains of Field Cornet Potgieter and his brother L. Potgieter were reinterred under the monument while on the same day in 1973 the mortal remains of Jan Harm Labuschagne were also laid to rest with his comrades.
The names of all concerned appear on the monument in the grounds of the Dutch Reformed Church in Vryheid as well as on the monument which was erected to mark the site of the attack. According to some authorities this monument does not stand on the spot where the attack took place but was erected at a nearby convenient spot. As can be imagined this attack which occurred after the armistice had been declared aroused deep resentment on the part of the Boers and is referred to as a "murder". It was the most unfortunate closing incident of the Anglo-Boer War of 1899-1902.
Note - numbers in square brackets [] refer to page numbering on the original article.
Return to Journal Index OR Society's Home page
South African Military History Society / scribe@samilitaryhistory.org