
 The South African
Commandant Ben Viljoen of the Johannesburg Commando was promoted to the rank of general soon after the battle of Diamond Hill, which had taken place in the hills east of Pretoria on 11 and 12 June 1900. He took command of the Krugersdorp, Germiston, Boksburg and Johannesburg commandos as well as the Zuid-Afrikaansche Republiek Politie (ZARP) mounted police (Viljoen, 1902, p105). Viljoen was one of the youngest Boer generals, being only 30 at the time of his promotion. After the Boers were driven into the lowveld, Viljoen trekked with elements of this force and some others to Pietersburg (now Polokwane). His route took him through what is now the Kruger National Park, dry, arid and unhealthy terrain, where many of his men suffered and died from typhoid, dysentery and malaria (Viljoen, 1902, pp132-145).

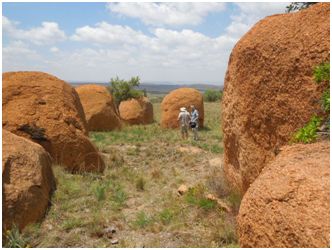
The area with the huge granite boulders, the ZARP position.
To the right the ridge with the Johannesburgers.
Viljoen's HQ visible just right of the tree.
Rhenosterkop in the far distance.
Krygsraad at Nylstroom
On arrival in the Highveld, Viljoen and his men were able to recover and replace their clothes and boots. The area was still under Republican control, 'all the officials ... in their proper places ... and the Vierkleur (the Republican flag) flying from the Government buildings' (Viljoen, 1902, p146.) The railway was intact and the telegraph was still operating as far as Warmbad (now Bela Bela). Viljoen travelled by train to Nylstroom (now Modimolle), in November 1900 the southern frontier of republican territory. President Marthinus Steyn of the Orange Free State had arrived in the village a day or two before which had caused quite a commotion. A public meeting was called to hear stirring patriotic speeches from Steyn and Commandant-General Louis Botha whereupon Steyn departed for the western Transvaal to meet with General Koos de la Rey (Viljoen, 1902, pp149-50 mentions the public meeting and the krygsraad - a council of war. See also Maurice, Vol III, pp 436-7). Steyn's 'fiery counsels had a strong effect upon the policy of the sister-state' (Chilvers, Vol V, p 60). Certainly, Steyn's fervour was a considerable factor in persuading the Transvaalers to reorganise their remaining forces and continue the fight for their independence.
…massive granite boulders, some almost as large as houses…
The Boers held a krygsraad in a hall at the Nylstroom Hotel on 27 or 28 October. Botha ordered Viljoen to march with his command to the area north and east of Pretoria while Botha himself would make his way to the Highveld between the Natal and Delagoa Bay railways. Viljoen was to reorganize the commandos there and maintain law and order. This was no easy task as the commandos themselves had differences. Commandant Dircksen of the Boksburg Commando had surrendered to the British and negotiated a limited armistice. He had returned to his commando, climbed onto a wagon and addressed them, suggesting that they do likewise, but they refused! Chris Muller, who was to become an able officer, was elected commandant in his place.
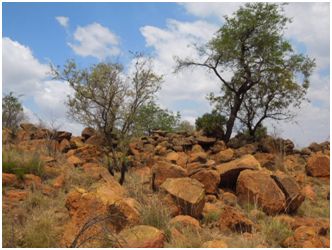
Ancient Matabele structures were ready-made fortifications.
A further problem was the presence of General Daniel Erasmus, Viljoen's superior officer during the early fighting around Ladysmith, a year previously. He was not now inclined to take orders from Viljoen and he was no longer respected by the men of the Pretoria Commando. Erasmus was apparently planning to surrender and held a krygsraad to discuss the eight-day armistice while peace terms were discussed. Muller and others objected to this and Erasmus found himself no longer commandant of the Pretoria Commando (Muller, 1936 [2002] p59).
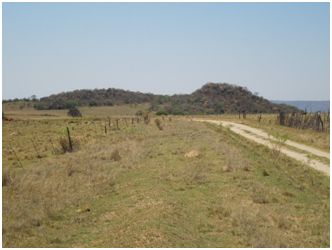
The small hills where Viljoen located himself with a heliograph.
He could see the whole battlefield from there.
In the vicinity were a number of Boers who had surrendered, derisively named 'hensoppers' by the fighting Boers. They had passes from the British authorities allowing them to return to their farms but were required to report any burghers or a commando who came close. Viljoen rounded up fifteen of these dissidents and arranged a court martial in the churchyard at Rhenosterkop. The main offender was one van Schalkwyk, who was sentenced to two years' imprisonment and all of his portable property to be confiscated. As the Boers had no prison, Muller commented that such people merely returned to their families (Muller, 1936 [2002] p63; Viljoen, 1902, p153).
Preparations
Viljoen initially based himself at Witnek on the edge of the rugged area of hills known as the Gouwsberge. He had a force of about 1,200 men at his command (Maurice, Vol III, p 438.) With him were the Johannesburg and Boksburg commandos as well as a detachment of the ZARPs, survivors of their gallant action at Bergendal in September. The Pretoria Commando, split up into several groups as a result of their strife with Erasmus, was in the area. The Krugersdorp Commando, with its very able commandant, Jan Kemp, had been sent to the west and now took orders from General Koos de la Rey, the Deputy Transvaal Commandant-General.
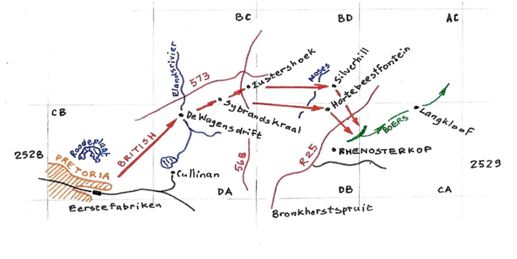
Map (numbers and letters correspond to 1:50 000 topographical survey maps
of the South African Survey General) showing the British advance to Rhenosterkop.
The British force
Attacks on stations on the Pretoria-Delagoa Bay railway line at Balmoral and Wilge Rivier on 19 November alerted the British to the presence once more of a strong Boer force in the vicinity. British accounts say that the attacks 'both failed' but the Balmoral station building was damaged, the telegraph instrument was smashed and a stretch of railway line was torn up. An outlying post was captured by the Boers, who took 43 men captive but who were soon released (Chilvers, Vol V, p 61; Maurice, Vol III, pp 445-6; P C Coetzee has compiled British and Boer accounts and drawn maps of the attack on Balmoral Station).
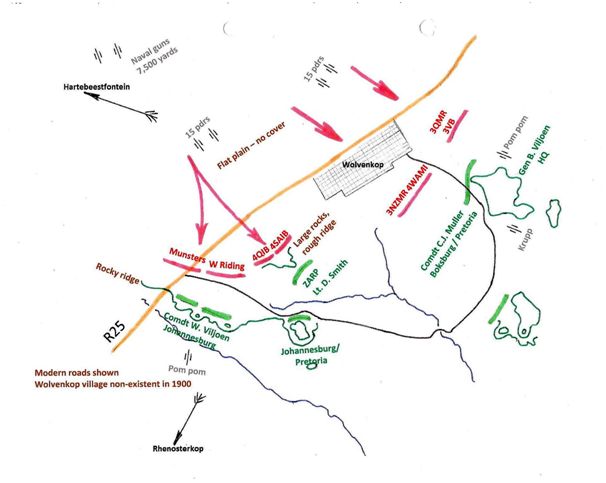
British and Boer positions (based on 1 :50 000 topographical survey map)
Major-General Arthur Paget was ordered to deal with Viljoen, whose force was reported to be near Rhenosterkop, north of Bronkhorstspruit. Told to cooperate was Major-General Neville Lyttelton, commander of a number of columns along the Pretoria-Delagoa Bay railway line. Paget was then at Rietfontein, west of Pretoria after operating north of Pretoria in September and October. (It was Paget who had interviewed Commandant Dircksen about 27 September, ... accepted his surrender, and permitted him to return under an armistice to his commando [Maurice, Vol III, p374]). At Eerstefabriken, thirteen miles (21 km) east of Pretoria, he was joined by Brigadier-General Herbert Plumer with a mounted column on 21 November. Paget's infantry force comprised seven companies of the 1st West Riding Regiment and five companies of the 1st Royal Munster Fusiliers. The artillery attached to the column amounted to four guns each of the 7th and 38th Batteries Royal Ancient Field Artillery and two Naval 12-pounders of the Royal Garrison Artillery.
Plumer commanded two brigades of Australians and New Zealanders: Colonel T E Hickman with the 4th South Australian Imperial Bushmen, the 3rd Queensland Mounted Rifles, the 4th Queensland Imperial Bushmen, the 3rd Victorian Bushmen, the 4th West Australian Mounted Infantry and some men of the 3rd Tasmanian Contingent of 1st Imperial Bushmen as escort for the guns. The 3rd New Zealand Mounted Rifles under Lieutenant-Colonel M Cradock completed the column of mounted men. The whole force numbered approximately 2 500 officers and men with ten guns and two Vickers-Maxims (Maurice, Vol III, p 448, but see also Murray). Field-Marshal Lord Roberts was on the point of leaving South Africa, believing as he did that the war was 'practically over' (Roberts's own words at a dinner in Durban in December 1900, quoted by LieutenantColonel Sir Henry Rawlinson in his diary; see also Pakenham, p 458.) His orders to Paget to attend to Viljoen at Rhenosterkop were about the last that he issued as Commander-in-Chief (Chilvers, Vol V, p 61). Paget intended to approach the position from the north, driving Viljoen and his mer:l south and east. Lyttelton was informed of Paget's operation but coordination was near impossible because of the difficult terrain east of Rhenosterkop.
Rhenosterkop
Paget marched on 25 November to De Wagens Drift and on the following day to Sybrand's Kraal, a familiar place for Paget since his column had camped there at the end of September. Near here the first clash with the Boers took place, with the Pretoria Commando still seemingly under Erasmus. Paget was able to 'compel Erasmus to fall back on Viljoen at Rhenosterkop' (Maurice, Vol III, p 448), although this is difficult to reconcile with Poortjiesnek, Viljoen's escape route to the north-east, being watched by Erasmus and 400 burghers of Pretoria (Chilvers, Vol V, p 62). A clash with a patrol of the Pretoria burghers under Max Theunissen is likely what happened. The only evidence for this is scanty, but Theunissen's men joined the Johannesburg Commando's men on 29 November, the day of the battle of Rhenosterkop (Schikkerling, p1 04). Thus they were not with the other Pretoria burghers who were watching the line of retreat.
Plumer and the mounted men headed north out of Sybrand's Kraal towards Suster's Hoek. Commandant Chris Muller had hastened to this place with the Boksburg Commando. Here they clashed with the mounted column. Muller (p65) said the 'enemy was so strong -there were four thousand mounted men and many guns' that they were forced into a fighting retreat back to Rhenosterkop (see also Viljoen, p159). In Chamberlain and Drooglever (p 355) is a graphic account of that day's skirmishing with the Boers, evidently at Sybrand's Kraal, Suster's Hoek and further, by Captain D J Ham of the 3rd Victorian Bushmen. Captain H L D Wilson's letter to his wife bears witness to a fight with artillery at Albert Silver Mine to his left. He says that he was 'five miles off on a ridge' and that they 'went on a little further and went into camp' (letter published in Border Watch, Mount Gambier, South Australia).
There was no element of surprise; the British shelled the Boers that night and one of their men lost his way, blundering into the Boer lines and was captured. He told them that his general was Paget and that Lyttelton was expected from the east the next day (Schikkerling, p1 04). The British camp was on the farm 'Hartebeestfontein', about 2 miles (3.2 km) away from the Boer laager, which was to the north of Rhenosterkop 'in a depression among massive granite boulders, some almost as large as houses' (Schikkerling, p103). This place can be positively identified today. Orders were received by the various units at 20:00 on 28 November and the troops moved out at daybreak on the following day. Viljoen and his officers were able to see the advancing British Infantry and mounted Australians and New Zealanders in a dawn ride along the lines. No doubt influenced by what Muller had told him, he estimated that his enemy was 5 000 strong. His own strength was '500 at the outside' (Viljoen, p160) but they occupied very strong positions. The complete Boer line stretched about 4 miles (6.4 km).
The Johannesburgers, commanded by Viljoen's younger brother, Wynand, occupied a line of small ridges strewn with big boulders. Ahead of them was a flat plain or glacis which was totally without cover of any sort, giving them an excellent field of fire. Behind them there was a small ravine and a stream in which they sheltered their horses. The British infantry advancing towards them would have to face a storm of fire yet scarcely see a single Boer.
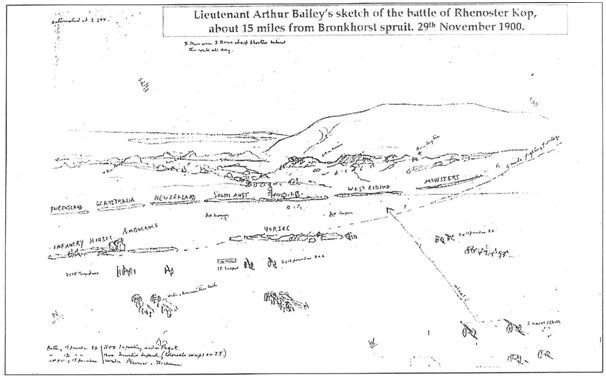
Lieutenant Bailey's sketch is the only known drawing of the battle.
The battle
It was the British infantry who attacked on their right against the Johannesburg Commando, 'thinly strewn in twos and threes, behind boulders' (Schikkerling, p104). There would have been several hundred men in this line. They got to within seventy paces before the Johannesburgers opened fire. Those who survived fell flat and were unable either to advance or fall back. A second attempt was made with the same result, in spite of the efforts of Lieutenant-Colonel G E Lloyd of the West Ridings. (Apparently wounded in the leg, he propped himself up with a rifle and continued to shout his orders until he was shot down. Viljoen [p162] tells of placing flowers on Lloyd's grave some months later. Muller [p66] tells that he had a very loud voice and 'we could always hear when he gave the order to charge'). Artillery, in the form of two 15-pounder field guns, supported them and a number of Boers were hit by shrapnel (Schikkerling, p104, writes: 'Three shrapnel bullets lodged in the back of Polly Burger .. .'). The Munsters and the West Ridings were obliged to sit tight in their position for the whole day. Any movement attracted heavy fire and movement forwards or back was thus out of the question.
Nevertheless, part of the Boer line felt itself to be under severe threat. Some of the Johannesburgers and Field-Cornet Max Theunissen's Pretoria burghers were occupying 'a stony koppie slightly ahead of our regular front' (Schikkerling, p1 04). The Jeppestown Commando, on the far right of the Johannesburgers, was assailed by 'a large body of enemy horse, taking advantage of the concave nature of part of the ground ...'- presumably some of the 4th Queenslanders. Other Johannesburgers galloped to their assistance (Schikkerling, p105).
In the centre of the Boer position were the mounted police of the ZARP. These men were members of a trained paramilitary force, some of the best trained men that Viljoen had under his command. They occupied an outcrop covered in enormous boulders which was well-nigh impregnable to a frontal attack. Their commander was Lieutenant D Smith who was killed not long after Rhenosterkop. The advance guard, the 4th Queensland Imperial Bushmen (QIB), was It was the British infantry who attacked on their right against the Johannesburg Commando, 'thinly strewn in twos and threes, behind boulders' (Schikkerling, p104). There would have been several hundred men in this line. They got to within seventy paces before the Johannesburgers opened fire. Those who survived fell flat and were unable either to advance or fall back. A second attempt was made with the same result, in spite of the efforts of Lieutenant-Colonel G E Lloyd of the West Ridings. (Apparently wounded in the leg, he propped himself up with a rifle and continued to shout his orders until he was shot down. Viljoen [p162] tells of placing flowers on Lloyd's grave some months later. Muller [p66] tells that he had a very loud voice and 'we could always hear when he gave the order to charge'). Artillery, in the form of two 15-pounder field guns, supported them and a number of Boers were hit by shrapnel (Schikkerling, p104, writes: 'Three shrapnel bullets lodged in the back of Polly Burger .. .'). The Munsters and the West Ridings were obliged to sit tight in their position for the whole day. Any movement attracted heavy fire and movement forwards or back was thus out of the question.
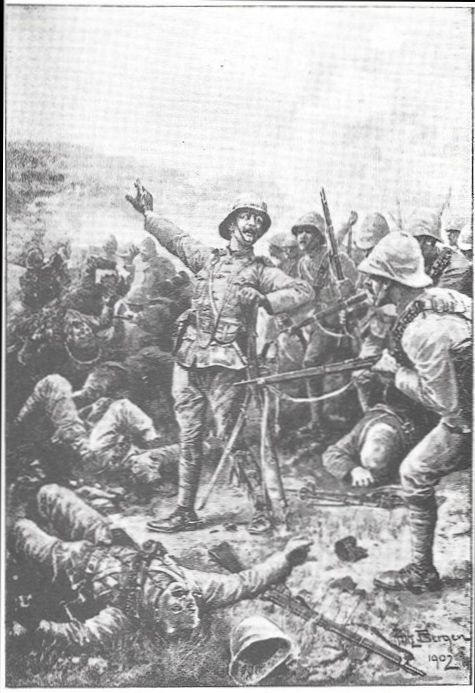
The death of Colonel Lloyd at Rhenosterkop
The 4th South Australian Imperial Bushmen were with the main body. It was still only 05:30 when a staff officer arrived to inform their commanding officer, Colonel James Rowell, that the Queenslanders needed assistance. Captain H L D Wilson was ordered to take his squadron forward. They advanced past the Queenslanders and crept up through the long grass to within 300 yards (274 m) of the Boer police. Wilson's line was stationary and he asked for artillery support. Shrapnel showered the rocks in front but the South Australians could only advance a short distance further as the enemy fire was too hot. Just at dusk, Wilson heard the Boer commandant giving the order 'Voorwaarts!' ('Forward!'). He pulled his men back 50 yards (46 m) and they poured a volley over the ridge which discouraged any further advance from the Boers. (Captain Wilson's letter is an excellent account of the 4th SAIB's action that day when they were forced to lie flat for 13½ hours, concluding that '[w]hen one looks over the battlefield one wonders how we were not all killed').
On the Boer right, placed in more rough ground, were Muller's men, with the Boksburg Commando with some of the Pretoria burghers. The Boers' only Krupp gun was placed behind them. 'Early in the morning of 29 November, just as it began to get light', Muller led a number of mounted Boers in a sally against the advancing British. They took their Krupp gun with them and opened fire with four shots before they were forced to limber up and gallop back to their line. Muller (p 65) wrote that these made inroads in their ranks - 'Ons skiet paaie in hulle .. .' - but Lieutenant Arthur Bailey of the 4th QIB (an extract of whose diary is quoted in Chamberlain and Drooglever, p 352) and who quaintly names the Boer general 'Bill John', writes that they 'could see the Boers on the skyline. Suddenly a shell fell fair quickly followed by three more. No one was hurt.'
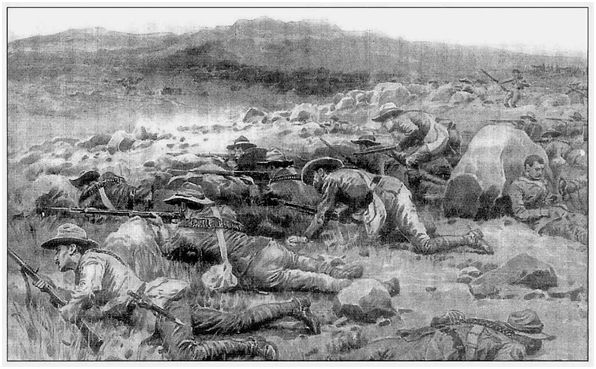
Picture by Frank Dadd, showing the '4th Queenslanders in a tight place'. The hill to their front is not Rhenosterkop but the kop where Viljoen had located his headquarters and heliograph.
To attack Muller's position the mounted brigades had to advance up an incline with no cover apart from some scattered anthills. Plumer was looking for a gap in the Boer line but their right was protected by a deep ravine. Hickman's brigade, with the 3rd Queensland Mounted Rifles, the 3rd Victorian Bushmen, the 4th West Australian Mounted Infantry, and Cradock's 3rd New Zealand Mounted Rifles could only make a frontal attack and quickly lost four men killed and a number wounded. There was sporadic gunfire throughout the day but they could make no forward progress (Stowers, p 29, has a description of the New Zealanders' fight and the evening counter-attack by Muller's men. See also Muller, p 68).
When night fell, the British dug trenches, expecting to be attacked the following day, 30 November, but the Boers had left during the night. Viljoen had only decided to make a stand in order to allow his guns and wagons to escape to the north to Poortjiesnek and the Langkloof. Viljoen was aware that Lyttelton had been informed of Paget's movements. Commandant Thys Pretorius's commando was sent to watch the Waterval Drift, the only feasible crossing over the Wilge River to the east of Rhenoster Kop. Lieutenant-Colonel G D Carleton and his column of the 18th Hussars captured his laager and Pretorius himself had a narrow escape, and occupied a position commanding the drift. The Hussars were unable to contact Paget, although they were a relatively short distance away (Burnett, pp 123-5; Maurice, Vol III, p 455).
When the British approached their positions of the previous day, they found that the Boers had gone. The 3rd Victorians realized then what a strong position the Boers had held. They commented too that the Boer losses must have been great. In the rocks were dead horses, blood-stained clothes and a Boer's head in a hat, the body nowhere to be found (Captain D J Ham's account in Chamberlain and Drooglever, p 357). On 30 November, a party of Queenslanders, Victorians and New Zealanders under Major W H Tunbridge followed the tracks of the retreating Boers. Muller (p 69) writes that he had placed a rearguard at Engelbrecht's Drift, about three miles (4.8 km) from where they had fought the battle. A nervous Boer opened fire when the Australasians were still a thousand yards (914 m) away. Lieutenant R H Walsh of the 3rd Queenslanders said 'they wheeled round and went, as the kiddies say, "like anything" with bullets flying around us'. Tunbridge had strict orders not to bring on a fight and returned to camp (Harvey, p 83).

Maj W H Tunbridge, 3rd Queensland Mounted Infantry
The cost
Paget's losses were 87 with 21 killed and 66 wounded. Viljoen claimed that two Boers were killed and 22 wounded. He said 'the exact loss of the enemy was difficult to estimate. It must, however, have amounted to some hundreds' (Viljoen, p164). The Boers headed to the Bothasberg, east of Lydenburg, where they knew they could find good grazing for their horses and where they would not be molested by the British for some weeks.
Casualty List
(See Steve Watt, In Memoriam, 2000) for complete details:
| Number | Rank | Name | Unit | Fate |
|---|---|---|---|---|
| 435 | Corporal | R Devereux | 2nd New Zealand Mounted Rifles | KIA |
| 394 | Private | W A Jennings | 2nd New Zealand Mounted Rifles | KIA |
| 306 | Private | H E Oppenheim | 2nd New Zealand Mounted Rifles | KIA |
| 418 | Sgt Farrier | R E Smith | 2nd New Zealand Mounted Rifles | DOW |
| 734 | Private | G Hyde | 3rd New Zealand Mounted Rifles | KIA |
| 717 | Sergeant | F M Russel | 3rd New Zealand Mounted Rifles | KIA |
| 296 | Private | A E Wright | 4th Queensland Imperial Bushmen | KIA |
| 70536 | Driver | J Blower | U Battery, Royal Horse Artillery | DOW |
| 577 | Sergeant | C E McCabe | 4th South Australian Imperial Bushmen | KIA |
| 48 | Trooper | A S Page | 4th South Australian Imperial Bushmen | KIA |
| 509 | Trooper | A R Mackenzie | 3rd Victorian Bushmen | KIA |
| 1700 | Sergeant | A G K Buckingham | 5th Victorian Mounted Rifles | KIA |
| 1509 | Private | W Andrews | 1st West Riding | DOW |
| 5284 | Private | W Edwards | 1st West Riding | KIA |
| 1637 | Private | T Gilby | 1st West Riding | DOW |
| 5832 | Private | J Harrison | 1st West Riding | KIA |
| Lt Col | G E Lloyd | 1st West Riding | KIA | |
| I | Lieutenant | H J C Oakes | 1st West Riding | DOW |
| 3176 | Private | W Roberts | 1st West Riding | KIA |
| 3612 | Private | S Venables | 1st West Riding | DOW |
| 5142 | Private | J Wilkinson | 1st West Riding | KIA |
| KIA | Killed in action | 15 |
| DOW | Died of wounds | 6 |
| Wounded: | 66 | |
| 4th Queensland Imperial Bushmen | 8 | |
| 5th Victorian Mounted Rifles | 1 | |
| 4th South Australian Imperial Bushmen | 2 | |
| 2nd & 3rd New Zealand Mounted Rifles | 17 | |
| 1st Royal Munster Fusiliers | 13 | |
| 1st West Riding Regiment | 25 |
Bibliography
Return to Journal Index OR Society's Home page
South African Military History Society / scribe@samilitaryhistory.org