
 The South African
The wars in South Africa during the second half of the nineteenth century witnessed many aspects of the evolution of military technology and military tactics. They also witnessed a revolution in military photography. From around the middle of the nineteenth century, pioneering photographers had struggled to carry cumbersome equipment to scenes of warfare. A number of daguerreotypes were taken during the Mexican-American War of 1846-48, but it was the photographs taken by Roger Fenton, James Robertson and others during the Crimean War of 1854-1856 that have been called 'the first serious photographic record of a military campaign' (Lee, 1985). The rudimentary technology of the day, requiring long exposure times during which the subject had to remain still, meant that Fenton and his contemporaries, including pioneering 'war' photographers such as Felice Beato, mainly had to photograph portraits of those involved in numerous conflicts around the world or static scenes where significant battles had recently taken place. As photographic technology continued to develop slowly, however, the social impact of war photography took a major leap forward during the American Civil War of 1861-65 when Matthew Brady and Alexander Gardner took their photographs in the immediate aftermath of battle. Their photographs of the dead of the battle of Antietam (1862) caused a sensation and set a new benchmark for bringing the realities of war to the public (Lossing, 1996).
The photographic history of two significant conflicts that took place in South Africa in the late nineteenth century neatly captures this progression of both taste and technology. Despite an increasing number of photographers finding opportunities to travel with armies, relatively few of the many campaign photographs taken in the second half of the century survive. Glass negatives broke, or deteriorated in storage or were sometimes lost at sea during shipping home, while early prints readily faded unless carefulIy preserved (Hodgson, 1974), Thus few contemporary photographs survive from, for example the Anglo-Zulu, War of 1879. The short duration of that war may also have contributed to the scarcity of images 'from the battlefield'. Some important scenes were nevertheless captured, including a number depicting the inglorious aftermath of episodes during the conflict. But the Anglo-Zulu War took place just too early for the major advances in both printing and camera technology that were about to revolutionise the utility of photography as a medium and point to the development of photo-journalism as we know it today. With the invention of the half-tone process in the 1880s came the ability to reproduce photographs directly in print media. Fast on the heels of this printing revolution, in 1888, came the launch of Kodak's box camera, which used rolled paper film, and made the art of photography accessible (at a price) to all.
Specifically aimed at the amateur market, Kodak's cameras meant that at the outbreak of the Anglo-Boer War of 1899-1902 many soldiers possessed cameras and used them freely at any opportunity. For example, General Sir Henry Colvile reportedly carried a small camera with him during the Modder River Campaign (Hodgson, 1974). A literal army of amateur photographers was ready to record scenes from the theatre of war for the first time (Lee, 1985). An example was Lt-Col Percival Marling VC, 18th Hussars, who, besieged in Ladysmith with his men, records in his autobiography: 'Monday, March 6th [1900]: My birthday, thirty-nine today. "B" [his wife Beattie] and I drove to Colenso yesterday in a springless country cart with tilt over it and a cane chair Iashed under it, all over Buller's battlefields. We took six dozen photos to be developed today' (Marling, 1931).
Coupled with a large number of professional photographers ,commissioned by specialist magazines such [as]Black and White Budget or Navy and Army Illustrated, the number of cameras in that theatre of war means that there are today many more photographs from the Anglo-Boer War than from the Anglo-Zulu War of just twenty years earlier. Indeed, the sheer number of photographers unfortunately means that many of their names are sadly now lost to history. Importantly, however, the reproduction of their photographs in print means that the historic images they took have fortunately survived.
The proliferation of photographic equipment near or even at the front line led to a number of early 'action' photographs being taken during the Anglo-Boer War. But still most photographers tended to capture largely posed subjects and static scenes. This perhaps limits the dramatic effect of such photographs to modern eyes, but it brings one major advantage: it is often possible to identify the precise spot at which the photographer stood while pointing his lens at a battlefield, and compare the scene he saw then with that same location today. This 'then and now' comparison can be further enhanced through the use of photographic software, which enables the historic and current day views to be superimposed to produce a 'blended' photograph that provides a window on a lost world.
I was recently part of a tour of a number of the Zulu and Boer War battlefields of KwaZulu-Natal. The tour was organised by Ian Fletcher Battlefiled Tours (IFBT) and guided by the South African Military History Society's own Ken Gillings. On a previous IFBT tour, to the Crimea, I had been able to locate the site of a number of Fenton's historic photographs and I thought the process of superimposing these on the modern photographs I had taken from the same location produced interesting results. So, in advance of the KZN tour, I researched a number of historic photographs from both the Anglo-Zulu War of 1879 and the Anglo-Boer War of 1899-1901 in the hope of finding the spot from which they were taken and being able subsequently to produce a further set of 'blended' photographs. The results are published with this article; I hope they may be of wider interest.
THE ANGLO-ZULU WAR, 1879
Rorke's Drift and iSandlwana
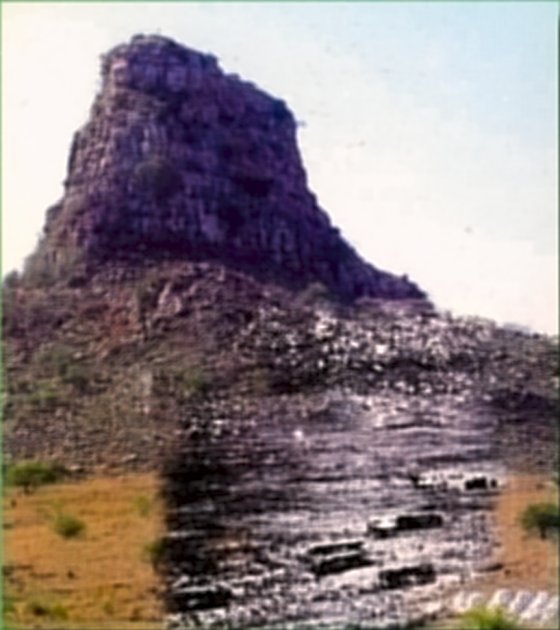
The British invasion of Zululand was launched in January 1879. One of the three major columns that comprised the attack, the 'Centre Column', comprising men of the British 24th Foot together with Colonial and Native Contingent Troops, crossed the Mzinyathi (Buffalo) River at Rorke's Drift and eventually made camp at the foot of the hill of iSandlwana. On 22 January 1879, a significant proportion of the British-led force was surprised there by a major Zulu attack; casualties were high on both sides and few of the British and Colonial forces survived. Some months later, the scene was revisited by British troops for the purpose of recovering abandoned wagons and burying the dead. A photographer, Frederick Lloyd, accompanied the troops and captured the scene at the foot of the iconic hill, with a number of the wagons still standing where they been had left in the heat of battle (Knight, Castle, 1993). The highly distinctive shape of iSandlwana makes it easy to trace the exact spot where Lloyd stood. Photo 1 is the result of blending Lloyd's original photograph with mine.
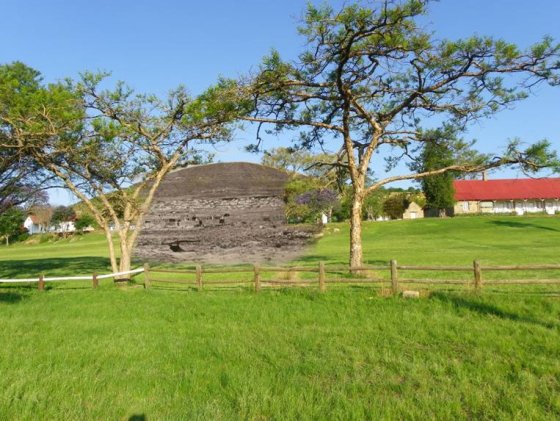
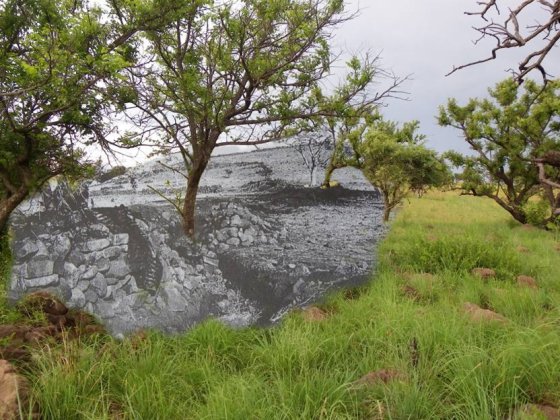
Following up their triumph at iSandlwana, Zulu forces also attacked on the same day the mission station at Rorke's Drift, where a small number of British troops and a number of sick personnel had been left to guard supplies and the river crossing that the Centre Column had used during the invasion. A series of Zulu attacks were repulsed, lasting over the night of 22/23 January 1879; the action passed into British military folklore. Some weeks later the post had been fortified and a photographer, possibly one James Lloyd, captured the scene of the action and some of the buildings damaged during the fight. That photograph, blended with my present day shot from the same angle, is seen here as Photo 2 of this article.
Before the battle of iSandlwana, as the men of the 24th Foot approached their designated campsite, they reportedly (Knight, 1992) noted the coincidental similarity between the shape of the mountain and their regimental symbol - a sphinx awarded as a Battle Honour following the regiment's part in helping to defeat Napoleon's army in Egypt in 1801. The sphinx was worn on the uniform collar of every man in the regiment. Perhaps this indicated a sense of foreboding: the site was soon to become one of the most infamous I]attlefields in the history of the British Army. In the excellent museum at iSandlwana today is a sphinx collar badge found on the battlefield, no doubt from the jacket of one of the unfortunate victims of the highly successful Zulu attack. In Photo 3, I have superimposed that badge onto the iconic hill itself, in acknowledgement of the bravery of those on both sides of the fight that day.
THE ANGLO-BOER WAR, 1899-1902
The Siege and Relief of Ladysmith
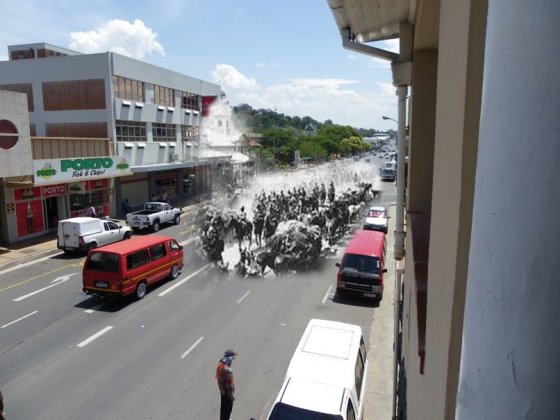
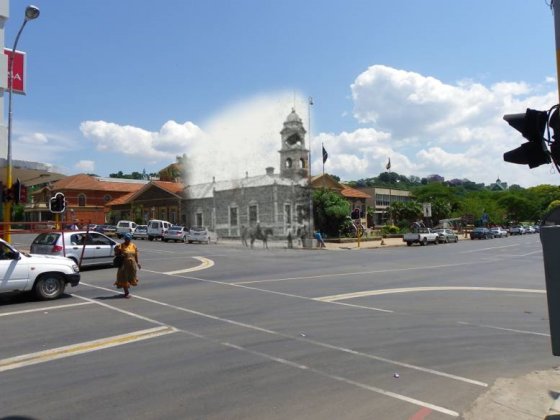
Twenty years after the Anglo-Zulu War, British troops were again engaged in major conflict in KwaZulu-Natal. This time they faced a different enemy. British attempts to impose governance systems on the Afrikaner population of South Africa had resulted in numerous disputes and culminated in the outbreak in October 1899 of what was quickly to become the most significant struggle in the series. In the KZN theatre of that war, following significant battles at Talana and Elandslaagte, British forces withdrew to Ladysmith. After attempted delaying actions at Farquhar's Farm and Nicholson's Nek, the troops entered the town. As they did, the British Mounted Infantry were photographed riding along Murchison Street by Horace Nicholls. Nicholls' photograph was taken from the first floor balcony of the Royal Hotel. During my visit, the staff of the hotel very kindly agreed to allow me access, through one of the hotel bedrooms, to the same balcony so I could line up a modern photograph from the very same spot where Nicholls had once stood. The blended result is Photo 4 - which suggests the troops would have not a little trouble with traffic if they tried the same thing today!
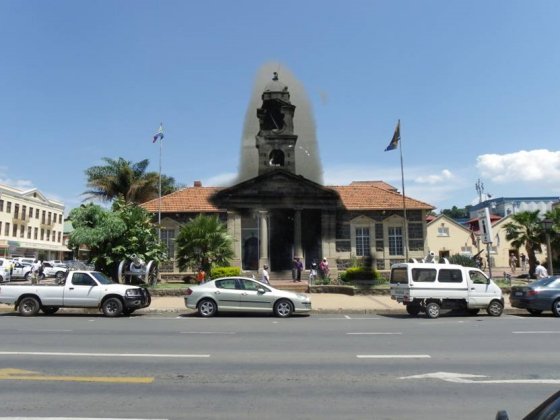
The British subsequently became trapped in the town and attempts by the British Commander, General Redvers Buller, to relieve them were to be a focus of British efforts for the next five months. The iconic Town Hall in Ladysmith, now the home of an outstanding museum, was damaged by Boer artillery fire during the siege of the town. Two contemporary photographs depict the damage to the Town Hall's clock tower. Blended with photographs I took from the same spot today, the results are Photo 5 and Photo 6. In both cases, citizens of today's town 'mingle' with those frozen in time over 100 years before - including one on horseback in Photo 5.
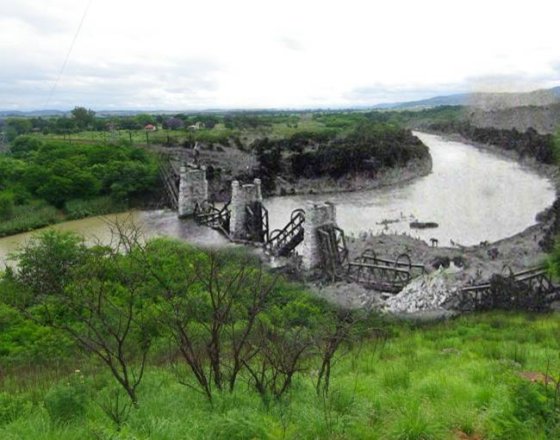
Buller's efforts to relieve Ladysmith comprised a succession of significant battles as the British attempted to breach the lines of Boer forces surrounding the town. In the first attempt, which took place outside Colenso on 15 December 1899, Buller's forces unsuccessfully tried to cross the Tugela River. While this was a failure, it prevented the Boers from springing a trap that could have seen the British pinned down with their backs to an obstacle that could not government, the site of the photograph is readily identified today, as be crossed. Part of the Boer plan had been to destroy all available river crossings except one, which would, in turn, be destroyed once the British forces had crossed it, effectively leaving them with no way back. The destruction of the railway bridge at Colenso by Boer forces was part of this plan. A number of contemporary photographs of the damaged bridge exist, including one taken from Fort Wylie, a hilly eminence to the north of the town. A modern bridge now stands almost on the same site, but the piers of the original bridge remain and enabled me (after a bit of a climb!) to line up my present-day camera shot perfectly with the period original. The blended result is Photo 7. The area around the bridge can be seen to be little different today from that at the turn of the century, with the exception of a significant growth of shrub.
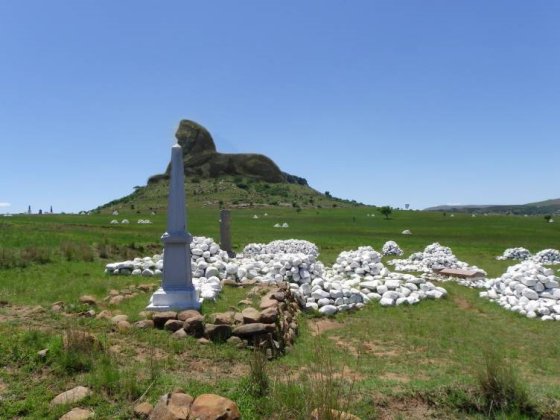
Buller made another attempt to break the siege of Ladysmith at Spioenkop on 23/24 January 1900. Another disastrous failure followed as his troops found themselves pinned down on the summit of the hill under murderous Boer fire. Arguably the most iconic photograph of the Anglo-Boer War is that of British casualties lying in an open trench after the battle of Spioenkon. Taken by an unknown Boer photographer and used as propaganda by the Boer government, the site of the photograph is readily identified today, as it comprises one of two large mass graves containing British casualties. The blended photograph, Photo 8, suggests that the bodies in the trench were largely just covered up where they lay; the grave follows perfectly the original trench line.
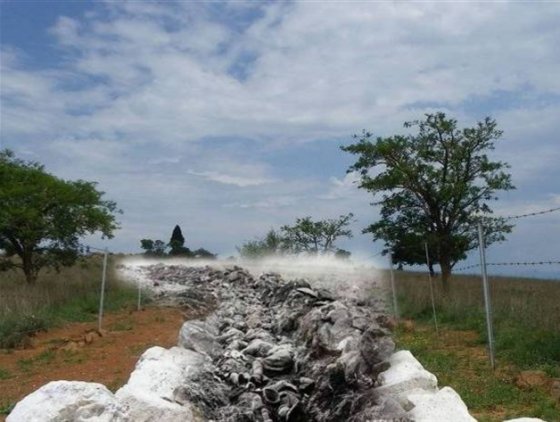
The area surrounding Ladysmith today contains the remains of numerous earthworks from the Anglo-Boer War period. Examples are the well-preserved Boer trench works on the slopes of Hart's Hill, part of the Buller's last, successful attack that saw his forces finally break through Boer lines in the battle of the Thukela Heights. Lasting from 12 to 28 February 1900, this was arguably the biggest battle fought by the British in Africa (Gillings, 2012). There is a contemporary photograph of part of these works in Ken Gillings' excellent book on the battle (Gillings, 2012). This photograph is blended with one I took from the same spot to produce Photo 9. A small hillock with a tree growing out of it in the middle distance of both the old and new photos still looks absolutely identical - except that the tree that is growing there now is in a slightly different position, probably a descendent of the original. I decided to leave both today's tree and its ancestor in the blended photo.
[Correction from Ken Gillings published in Vol 16 No 2, December 2013: 'Lasting from 12 to 28 February 1900, this was arguably the biggest battle fought by the British in Africa until the Second World War (Gillings, 2012)']
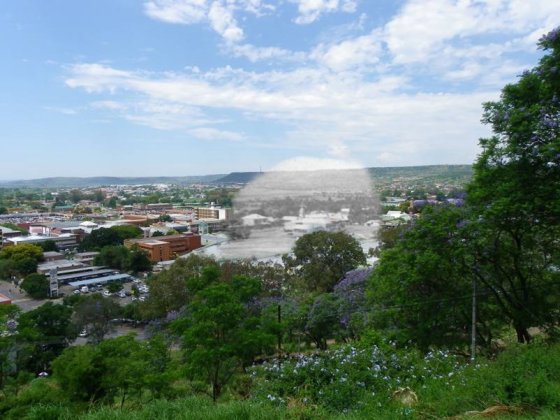
Ladysmith was finally relieved at end of February 1900. The fame of the siege and relief of Ladysmith attracted many, now, sadly, mostly nameless, photographers. Another of their shots that can readily be located today was taken from one of the hilly ridges that surrounds the town. The distinctive shape of Ladysmith Town Hall is central in the blended photograph (See Photo 10). This image shows clearly the extent of the town's urban development over some 110 years. What in 1900 was an important but small town in the middle of the veldt is today a sprawling metropolis.
The development of photography during the second half of the nineteenth century, coupled with a boom in illustrated magazines that it helped to generate, changed the face of mass communications. People in their homes hundreds or even thousands of miles away were able to view the actual scene of the most recent struggle, bringing them seemingly closer to the front line. The survival of these same, historic photographs to the present day still has the same effect: We are closer to the events of those days and can perhaps feel some of the atmosphere through the grainy photographs taken by often anonymous early photographers who were there at the time. Many of these photographs also offer the present-day enthusiast the chance to follow in these pioneers' footsteps, tracing the very same spot on which they took the photograph, and witnessing the changes to the landscape that have taken place over the intervening years. Through the blending of these histories and contemporary photographs, we can peek though a window into history.
Bibliography
Lee, Emanoel, To the Bitter End - a photographic history of the Boer War, 1899-1902 (Penguin Books, 1985)
Lossing, Benson, J Matthew Brady's Illustrated History of the Civil War (Portland House, 1996)
Hodgson, Pat, Early War Photographs (Osprey Publisging Ltd, 1974)
Knight, Ian and Castle, Ian, The Zulu War - Then and Now (Battle of Britain Prints International Ltd, 1993)
Knight, Ian, Zulu - Isandlwana and Rorke's Drift, 22-23 January 1879 (Windrow and Greene 1992)
Gillings, Ken, While they kept the flag flying- The Relief of Ladysmith - Battle of Thukela Heights, 12th to 28th February 1900 (2nd edition, Just Done Productions. 2012).
Acknowledgements
I should like to acknowledge warmly Ken Gilling's encouragement to write this article and his very helpful contribution to the text. I am also grateful to Susanne Blendulf, editor of this journal, for her enthusiasm for the idea and her help in shaping this article.
Return to Journal Index OR Society's Home page
South African Military History Society / scribe@samilitaryhistory.org