
 The South African
Note: The first part of this article was published in Military History Journal, Volume 15 No 5, June 2012, pp 175-9.
Here, the story continues. The bibliography for both parts of this account appears at the end of this article.
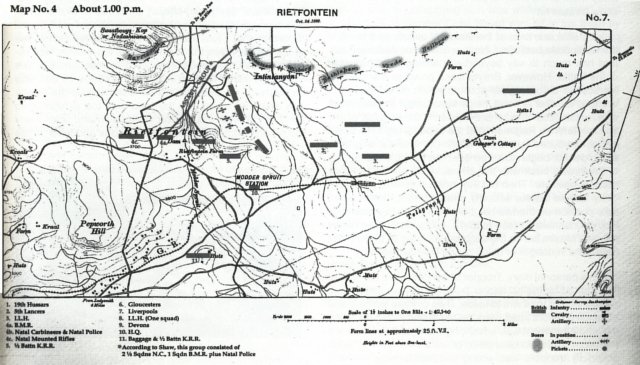
The battle of Rietfontein took place in a hamlet just north of Ladysmith, in what was then the Colony of Natal, between six Free State burgher commandos (under A P Cronje) and a British/Colonial Flying Column from Ladysmith (commanded by General Sir George White) on 24 October 1899. It was a fierce battle that took place during General Yule's retirement towards Ladysmith after the catastrophic first clash with the Boers at Talana (Dundee) on 20 October. When Boer forces tried to block General Yule's route back to Ladysmith near the farm, Rietfontein, the Flying Column was despatched to deal with the threat. The first shot was fired at mounted British troops at 07.11 in the morning on 24 October, followed soon thereafter by a violent exchange of artillery fire. In the mid-morning, British and Colonial cavalry and infantry units began to advance on the Boers, who had occupied the Rietfontein Farmhouse and the surrounding hills known as Swaatbouys Kop (Nodashwana) and Intintanyoni...
It was reported from a number of sources that the artillery barrage by the British guns firing on Intintanyoni had caused the dry grass of the veld to catch fire, a condition that continued throughout the afternoon, thereby creating Rietfontein's own 'fog of war'. Sadly, very little is known about how events unfolded on the right, where the 5th Lancers and the 19th Hussars engaged the Bethlehem, Vrede and Heilbron commandos. In the centre of the line, up on the ridge, the British infantry blazed away at the Kroonstad and Winburg commandos, while an abandoned and wrecked Boer supply wagon sat in the valley below. Smoke from the burning veld impaired vision. George Lynch, a photo-journalist for the Illustrated London News, spent much of his time on the firing line, taking photographs. He did manage to get a picture of the 5th Lancers apparently under fire, but it seems that 'shell bursting among the Lancers' was airbrushed in for a dramatic effect, as, during the whole of the nine hours' engagement, only four Lancers were wounded.
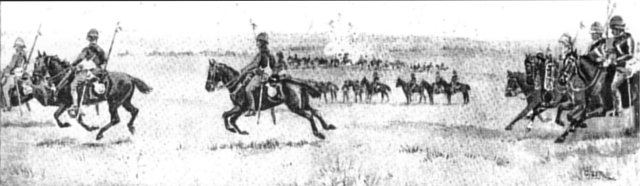
The 19th Hussars similarly suffered only one fatality and two wounded, suggesting that both regiments had a 'quiet day' (Farrier-Sergeant W Mee killed, Privates C Boston and H Churchill wounded). Most of the British infantry remained out of sight, hidden below Rietfontein Ridge, quietly resting while approximately one or two companies from each regiment went up on the ridge to make up the firing line, only to be rotated once the ammunition ran out or the troops became fatigued. George Lynch's second picture suggests as much.
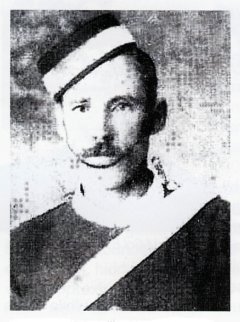
Sometime in the afternoon, perhaps around 13.00, according to Radice's account, the Gloucestershire Regiment suffered their second tragedy of the day with the loss of their officer commanding, Lieutenant-Colonel E P Wilford. Nobody witnessed him getting hit and the regiment did not realise its loss until the retirement began. After 35 years of loyal service, this was Wilford's first and last battle. His death was deeply mourned within the regiment. What little we know of the tragedy comes from a letter, now in the Gloucestershire Regimental Museum, written by Captain S Wilcock, who had fought at Rietfontein, to his colleague, Captain A C Lovett, in England. Wilcock writes: 'Poor old EP died a soldier's death in the firing line. No one saw him get hit, the bullet went in the back of his head and carried away most of his face, 'til the retirement began we did not know he was hit'.
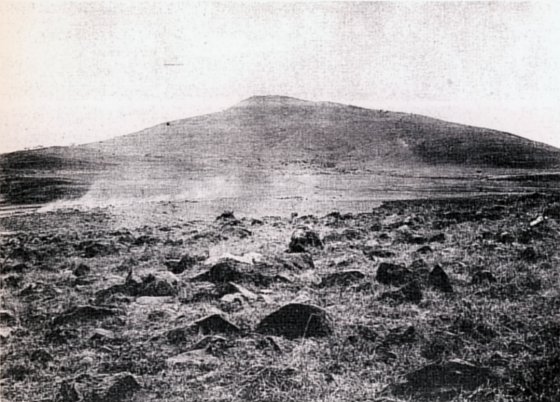
Very little is known of the timing of events on the left of the Rietfontein battlefield. Neither Shaw nor Watkins-Pitchford has much to say beyond mentioning the 07.11 start of the battle. However, Breytenbach provides a somewhat inarticulate chronological account which, when cross-referenced to other actions, helps to construct the sequence of events. According to Breytenbach, the repulse of the Gloucestershire Regiment and the Imperial Light Horse did not go unnoticed by the Harrismith Commando, who, thus emboldened, began to surge down on the Volunteers, only to be thrown back with the arrival of the NMR from their reserve position. Then Col Royston's Volunteers (it is unlikely that he led the assault), charged from Rietfontein to take position on the two heights at the foot of Swaatbouys Kop (Nodashwana) (see Map 4). From there, they rained rifle and Maxim fire on the commando, firing so heavily that they were in danger of being cut off themselves.
In his personal diary, Trooper Shaw describes the action: 'We started for the hill nearer the enemy in our direct front, and called out to others to follow. Two or three were up and advancing before I had seen the move and joined on. Soon the whole regiment was advancing. I am, of course, aware that from a professional point of view such spontaneous action by troopers was wrong and indefensible. When I think of it the droll aspect of the action always forces itself uppermost. Happily for the fortunes of the day it turned out to be the right thing, just the thing that was wanted. As we approached the intervening fences the bullets began to fall very thickly. I was "hung up" by my equipment in the first of the fences for about a minute. Our wire-cutters had been left behind on the saddles. A man at my side was shot through the leg but managed to reach the foot of the hill for which we were making. Under its friendly shelter we paused for a couple of minutes to regain our breath and then began climbing further up the mountain slope. The bullets were striking all around, like the first heavy drops of a December thunderstorm'. (As a matter of interest, this fence, or at least its posts, still exists and runs in a north-easterly direction from the foot of Intintanyoni to the dog-leg in the De Beer's Pass road).
Then, according to Breytenbach, 'White, in support of the volunteers, had an additional six guns (then on the left of the line) from the 42nd Battery directing their fire from at least two of its guns onto Swaatbouys Kop'. When the grass caught fire, the commandant of the Harrismith Commando was forced to withdraw his burghers, not only those threatening the British left flank, but also the Kroonstad men on the burning face of Intintanyoni. They were forced to position themselves on and behind Intintanyoni. Having forced the withdrawal of the Harrismith and Kroonstad commandos, albeit through a combination of rifle fire, artillery shot and veld fire, the surviving members of the Volunteers' assault group then had an opportunity to make their way across the 500 yards or so (457m) of flat ground to the base of the western edge of Intintanyoni.
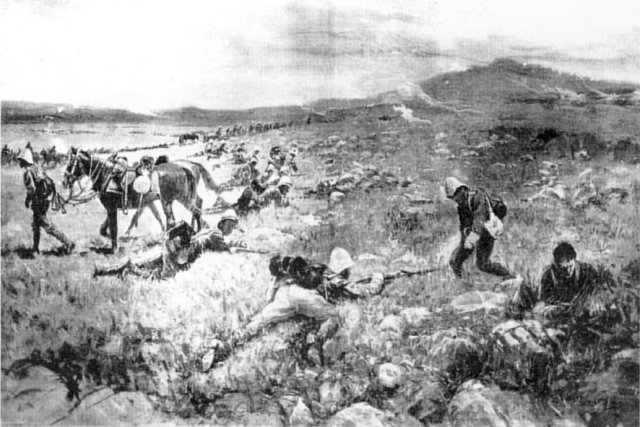
Trooper Shaw recalls (in his personal diary): 'Our R[egimental] S[ergeant]-M[ajor] and three or four of us simultaneously reached the furthest practicable point up the mountain-spur. From this point we commanded the reverse of the hill on which the main body of the enemy was assembled. Their saddled horses were in great numbers. The RSM then asked for four volunteers - others by that time had arrived - to descend the hill and carry up the Maxim gun which we could see the crew was too exhausted to bring any further. Four of us went down and after many tribulations returned with the gun, tripods and belts. While fixing the gun in position one of the tripod's feet slipped; the tube striking a stone was bent, and the gun was useless. From our position we found we were still as important as before to do damage to our proper section of the enemy, but for enfilading the enemy's centre the position was ideal and very soon our rifle barrels were hot with the heavy firing. A few of the enemy were using black powder and they must have had a very warm time for as soon as they fired everyone would mark the spot. The damaged Maxim gun was replaced by that of 'B' Squadron and the effect was all that could be wished. It was played upon the Boers and upon their horses. We could see the latter falling, and, anon, Boers in parties of twos and threes withdrawing from the hill. [There soon] followed a general sauve qui peut to our individual and general delight and satisfaction. Many of the horses of the fleeing Boers must have carried two riders. In the excitement of the moment we were most anxious to change and occupy the position, but the bullets from the unit on the hill above us were altogether too plentiful for our arbour.'
This, the climax of the battle, probably took place at about 14.00. There were veld fires scattered over the battlefield along with dead and wounded men and horses, spent artillery shells, broken wagons and Maxim guns. Then the heavens began to open with the onset of a thunderstorm. The day that had dawned 'blood red' then gave way to darkgrey skies and pouring rain, much to the relief of many.
The withdrawal, 14.01 - 19.00
It had always been the primary objective of the Fighting Column to prevent the Free State and the Transvaal armies from either singularly or collectively becoming a threat to Yule's Column of 4 000 or so troops withdrawing into Ladysmith. The fine weather in the early part of the day made it possible to operate a heliograph. According to Amery (Temple-Wilcox, W, 1981, p222), '[at] midday Sir George White, having secured heliographic communication with General Yule's column at Wasbank, considered that he had attained his objective and under cover of the guns, the infantry was withdrawn'.
The unfortunate Gloucestershire Regiment were the first to leave the field: 'At about 2pm the retirement commenced and the battalion gradually followed the Liverpool Regiment and became rear guard. Ladysmith was reached at about 3.30pm, after a sixteen mile (25km) march in torrents of rain' (Jackson, 1908, p21). Trooper Radice confirms that there were other troops covering their retreat: 'Boer fire had practically ceased and the battalion was no longer in danger of being cut off, and our column was ordered to fall back on Ladysmith. The battalion fell back to the road covered by troops on its left and, re-forming when out of range, marched back to Ladysmith and reached camp without further incident'.
With regard to the artillery, Captain Thwaites (1983, p40) writes that they 'got back to Ladysmith in pouring rain at about 5.00pm, having been out thirteen hours, seven of which we were in action. My battery fired 350 - odd that day, and I had to call on the ammunition column to fill up two empty wagons. One can only imagine that 42nd Battery and the 10th Mountain Battery were in close accompaniment. It was therefore left for the Natal Volunteers on the left and the Imperial Cavalry on the right to provide distant cover for the withdrawal.'
Major Watkins-Pitchford, who served in a supporting capacity, says (1964, p8) that the Volunteers began their withdrawal at about 15.00 and that it was covered by the Natal men who were the last to leave the field. There is no mention of the 'armoured train' with large white flags attached to its funnel. This had somehow got caught up in the battle while on its way to Elandslaagte to recover the fallen from the battle, probably waiting patiently at or near Modderspruit Station. At a guess, it may well have been used to transport the more seriously wounded back to Ladysmith.
According to Lt B W Martin, Durban Volunteers, part of the BMR (personal diary, Siege Museum, Ladysmith), 'Orders to retire from our position were received at 4.00pm. When we reached the place where our horses had been linked I found that my mount had broken away from the rest, when the linked animals were shelled by the Boer artillery, and had galloped back to town. I was, however, carried from the battlefield, pick-a-back on the horse of Corporal (later Major) F O Howes. To get clear and out of rifle range we had to gallop across terrain without cover of any sort and during that dash Howes' horse was hit in its tail but was not seriously hurt. Our route back to town took us through the farm of Mr Walter Pepworth, which had been hurriedly evacuated by its owner. We found there a stock of beer and lost no time in consuming it. It was while "swigging" from the bottle that Trooper Colin Stuart was hit in his thigh by a spent Boer bullet. We suffered several casualties during the operation at Intintanyoni but only Trooper S Brown of our Harding troop was killed.'
Assumptions can also be made as to the order of the withdrawal of the Volunteers by reference to Trooper J B Nicholson's personal diary in the Siege Museum, Ladysmith. The Natal Carbineer trooper writes: 'After about four hours the whole force withdrew having driven the Boers off one kopje and silenced his artillery, but not defeated them as they still held the ridge. We then got to Rietfontein where two or three volleys rather surprised us, but it was only the NMR covering the retreat. The BMR were having a fine old tuck in at base, fruit, etc, at Wally Pepworth's house, and we got mighty little. There we heard of poor Colville's death, also Brown and Nilson BMR. We then covered the retreat from a small kopje and then retired into Ladysmith amidst pouring rain and thunder.'
However, events did not go so smoothly on the right with the Imperial Cavalry (ILH, 5th Lancers and 19th Hussars). From an unpublished account left by Trooper Wallace of the ILH in the Aulkon Collection, it is apparent that, led by 'Major Karri-Davies in temporary command following the death of Colonel Scott Chisholm, four squadrons of Imperial Light Horse marched out at 4.00am with the Natal Volunteers under General French. "C" Squadron were left supporting the [half] battalion of KRR guarding the baggage train'. As described earlier, 'D' Squadron had been in support of the Gloucestershire Regiment on their ill-fated attack on Intintanyoni earlier in the day. The two as yet unaccounted for squadrons, 'E' and 'F', were located one mile (1,6 km) west of Intintanyoni and one mile (1,6km) east of the railway line just beyond Modderspruit Station and had spent the best part of the day engaged with the Boers of the Bethlehem Commando. Once the battle had died down, 'C' Squadron would have continued to guard the baggage train as it lumbered into Ladysmith. From their respective positions on the battlefield, 'D', 'E', and 'F' squadrons would most likely have followed on the heels of the artillery, arriving in Ladysmith at about 19.00. Douglas Haig (p130) recalls: 'The evening set in very wet and it rained all night. The ILH had one squadron ("B" Squadron) on outpost duty all night'. Wallace corroborates this story.
Patrolling with British Mounted Infantry to the left of the road and railway between Rietfontein Farm and Modderspruit, 'E' and 'F' Squadrons ILH engaged riflemen at 1 400 yards (1 280m) and forced them to retire. Attached to the rear screen, most of the ILH reached Ladysmith at about 19.00 with the last of the returning troops. Trooper Phillip Tucker (Wallace S, Aulkon Collection) wrote: 'We, "B" Squadron led by Captain Knapp, patrolled the battlefield all night after the fight. It rained all night and we were miserable, having been something like 28 hours without sleep and little food and almost all the time in the saddle'. The only ILH casualties in the battle of Rietfontein were three troopers in 'E' Squadron who were wounded.
The 5th (Irish) Lancers, however, did not have an easy withdrawal. According to Breytenbach (Volume 1, p295): 'Things did� not go so well for (General) French and the mounted infantry, who earlier that morning had marched past the Boer left flank to the furthest right wing of White's force. When they began withdrawing from their position secured that morning, the burghers fired at them in a lively manner and followed them from ridge to ridge. They were forced to retreat often amid chaos, and only after several hours did they succeed in getting out from under the Boers' bullets. The fighting during their retreat was [such] that the last of the mounted infantry only reached Ladysmith at 7.00pm, two and a half hours behind the infantry'.
Maurice confirms this and agrees exactly with the timings in addition to the Lancers' difficulties. This final comment from Captain Temple-Wilcox (1981, p222) states that '[t]he regiment retired by a succession of squadrons from the kopje they had been holding. As soon as they left the cover of the kopje they came under severe fire which dropped a few men and horses. During the return march to Ladysmith the Regiment acted as rear guard to the column'. This ended the battle of Rietfontein.
The aftermath, 25 and 26 October 1899
The following day, concerned that the Free Staters might move east and join the Transvaalers and thereby pose an additional threat to Yule's retreating column, then still eighteen miles (29km) from Ladysmith, a relief column under Lt-Col Coxhead, Royal Artillery, was dispatched. 'This force,' writes Breytenbach (Volume 1, p289), 'consisted of 5th Lancers, half a battalion of the 2nd Gordon Highlanders, half a battalion of the 1st Manchesters and the 21st Field Battery RFA'. According to Stirling, 'the whole of the Mounted Volunteers' were in attendance'. Temple-Wilcox was also present, noting that 'A' Squadron was detached from the relief column and they eventually made contact with Yule's column later that afternoon at the Sunday's River', ie, at 17.00 (TempleWilcox, 1981, p223).
The next morning the Regiment marched out along the Helpmekaar road to the Modderspruit, just east of Mbulwana. From there, 'A' Squadron was sent on towards the retiring Dundee Column, whom they met in the afternoon at Sunday's River. The Lancers were met with loud cheers and great enthusiasm from Yule's tired soldiers. At 18.00, the Column again started for another night march, the squadron of Lancers acting as its rear guard. This last march of the retiring column was a frightful ordeal to the hungry and weary soldiers from Dundee, having to toil through streaming torrents of rain all night and inches of mud. Oxen and horses fell in their tracks and were left to die. 'It sometimes took hours to cover a hundred yards', wrote Temple-Wilcox (1981, p223). However, the men and animals crawled steadily on through mud and rain and, at daybreak, reached the Modderspruit, where the remainder of the 5th Lancers were in bivouac, awaiting them. From there, a short march brought the column into Ladysmith.
Haig (p130) states that the '[officer commanding, 19th Hussars] was warned to turn out his regiment at 04.00 that morning in order to join 'B' Squadron, ILH, to keep an eye on the Boers at Rietfontein and prevent them joining up with the Transvaal Army, returning to Ladysmith, cold and wet at 7.00pm that evening'. Lt Radice of the Gloucestershire Regiment was also out and about in Rietfontein with a small burial party, searching for the comrades killed in the previous day's unfortunate tragedy. 'Next day,' he wrote, 'I was detailed for the unpleasant duty of taking a small party out to Rietfontein, under a flag of truce, and bury the dead of the Battalion. Four men were told to accompany me, and we were allowed a pack mule to carry our tools and the blankets which were to serve as winding sheets, my towel, tied to a pole, had to do duty for a flag truce, and of course we were not allowed to carry any arms. We set out along the road traversed the day before in no very happy frame of mind. I was very doubtful of the protection our improvised white flag would give us; however, my fears were not realized. We reached Rietfontein without seeing a soul outside our outpost line. We had no difficulty in finding our five casualties. The bodies had been rifled, pockets and haversacks emptied, and the boots had been taken, but in one case the man's towel had been placed over his face. We dug one common grave for the five men, but did not finish our task until nearly sunset as the ground was as hard as iron. While we were working four young Boers rode up to us, each with a Mauser slung across his back and spoke to us in English. I felt happier when they had ridden off'.
The Casualties
| Unit | No Killed | No wounded |
|---|---|---|
| 5th (Irish) Lancers: | 4 | |
| 19th Hussars: | 1 | 2 |
| 42nd Battery RFA: | 2 | |
| 53rd Battery RFA: | 3 | |
| 10th Mountain Battery: | 2 | |
| Ammunition Column: | 2 | |
| 1st Devonshire Regiment: | 1 | 5 |
| 1st Gloucestershire Regiment: | 14 | 47 |
| Border Mounted Rifles: | 2 | 10 |
| Natal Mounted Rifles: | 3 | |
| Natal Carbineers: | 2 | 9 |
| Total number | 20 | 89 |
| Total casualties: | 109 |
Victory or defeat?
Rietfontein was a tactical victory for both sides, yet a strategic defeat for the British. Both sides fought very well, particularly the Boers of the Harrismith, Win burg and Kroonstad commandos, who, although outnumbered by almost ten to one and outgunned by eighteen to one, had held out for most of the day only to be driven back by the veld fire and overwhelming fire power of the British force. They did not retreat, but withdrew to their laager behind Intintanyoni. Neither the Imperial Cavalry nor the Gloucesters got into the Boers' laager, but the Natal Volunteers did, only to be withdrawn at the fateful moment.
At the end of the day, the Free State forces held the battleground. Six days later, at the battle of Lombard's Kop, both sides fought well but the culmination was a British withdrawal into Ladysmith and the imposition of a three month siege from 30 October 1899 to 28 February 1900.
BIBLIOGRAPHY
Return to Journal Index OR Society's Home page
South African Military History Society / scribe@samilitaryhistory.org