
 The South African
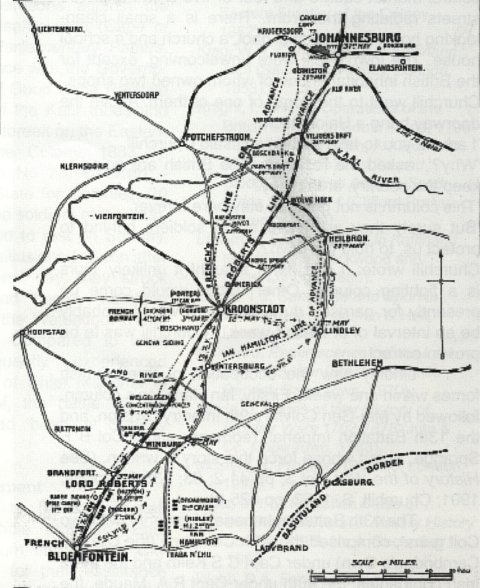
On 3 May 1900 Lord Roberts' force left Bloemfontein while a new division, led by Lt-Gen Ian Hamilton, marched away to the east. This column of 15 000 men and 38 guns had fought at Houtnek on 7 May 1900 and, in turning the flank of the Boers at Zand (Sand) River on 10 May, had suffered less than 100casualties. On 18 May the column approached Lindley, which had been proclaimed the new provisional Boer capital of the Free State after Kroonstad had fallen to Roberts on 12 May. When Hamilton's vanguard neared Lindley, however, the town had been abandoned by President M T Steyn and his government.
On 19 May 1900, Hamilton's force entered Lindley. With them was a young correspondent, Winston Churchill, working for The Morning Post. He describes what he saw: 'The houses - white walls and blue-grey roofs of iron, were tucked away at the bottom of a regular cup, and partly hidden by dark Australian trees ... [It] is a typical South African town, with a large central market square and four or five broad unpaved streets radiating therefrom. There is a small clean-looking hotel, a substantial gaol, a church and a school house. The town's folk were unwelcoming, except for the British inhabitants one of whom owned two shops.' Churchill went to the home of one of them. Above the doorway hung a Union Jack.
'I advise you to take that down', said Churchill.
'Why?' asked the resident, 'The British are going to keep the country, aren't they?'
'This column is not going to stay here forever.'
'But surely they will leave some soldiers behind to protect us, to hold the town?'
Churchill wrote: 'I told him I thought it unlikely. Ours is a fighting column. Other troops would come up presently for garrison duty. But there would probably be an interval of at least a week'. Churchill was to be proven correct.
Lindley saw the occupation of three British forces within one week: Firstly, Ian Hamilton's column, followed by Maj-Gen Colvile's 9th Infantry Division, and the 13th Battalion Imperial Yeomanry under Col B E Spragge, about whose force this story is written. (See History of the War, Vol 3, pp 41-2; 63; 538-9; Colvile, 1901; Churchill, S, 1962, pp 525-6).
The 13th Battalion Imperial Yeomanry, with two Colt gunsa, comprised the 47th Company (the Duke of Cambridge's Own) under Capt C S Keith and the three Irish companies: the 46th under Capt R A Maude, the 54th under Capt J F Humby, and the 45th under Capt the Earl of Longford. The first three companies were made up mostly of men of wealth, who paid for all their equipment and handed their pay over to military charity. (Times History, Vol 4, pp 252-3; South African War Casualty Roll: March-July 1900, p 20).
a A Colt machine gun, mounted on a tripod, was also known as the 'Potato Digger' for the gun's tendency, whilst firing, to push the tripod's rear into the ground. Calibre: 6 mm; Mass: 18,1 kg; Muzzle velocity: 770 metres per second.
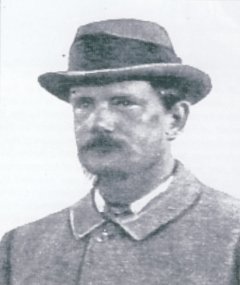
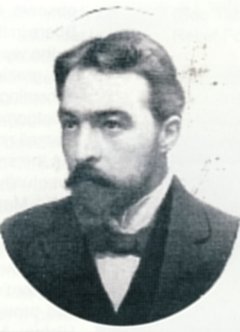
DE WET, Pieter Daniel
After he saw action in Natal and northern Cape and southern Free State, he was instrumental in the defeat of the 13th Bn Imperial Yeomanry near Lindley on 31 May 1900. He was at odds with his brother Christiaan as to how to conduct the war. During the latter half of 1900 he entertained doubts of continuing the war but not before laying down his arms in July 1900. Lord Kitchener was to utilize his new ally to become chairman of the Burgher Peace Committee which tried (unsuccessfully) to undermine the Boers fighting in the field. When it became evident that nothing had been achieved by Kitchener's proclamation of August 1901 which threatened the Boers with exile and confiscation of property unless they surrendered, de Wet was given the command of the Orange River Colony Volunteers (ORCV). This unit was limited to the role of raids and reconnaissance. These activities induced a hatred amongst fellow Afrikaners. This was exacerbated when a gratuity was paid to members of the ORCV. In 1903 de Wet withdrew from public life and devoted the remainder of his life to farming near Lindley. He is buried in Lindley. (Photo: With the Flag to Pretoria.)
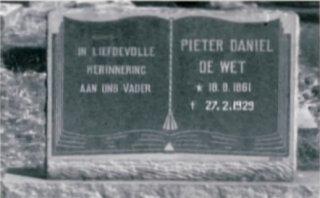
Pieter Daniel de Wet's tombstone in Lindley
COLVILE, GENERAL Sir Henry Edward (1852-1907).
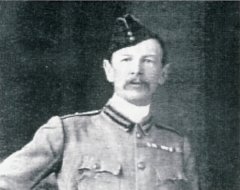
COLVILE, GENERAL Sir Henry Edward.
At the outbreak of the Anglo-Boer War, Colvile arrived in South Africa in command of the Guard's Brigade. He saw action in the battles for the relief of Kimberley besieged by the Boers. The arrival of Field Marshal Lord F S Roberts as the new Commander-in-Chief brought the reorganisation of the army, and Colvile was given command of the 9th Infantry Division. He took part in the battles for the relief of Bloemfontein. On 31 March 1900 Gen R G Broadwood was defeated by Gen Christiaan de Wet at Sanna's Post, and although Colvile was within reach of the battlefield, he lacked initiative to hasten to Broadwood's aid. He was implicated as not being co-operative when he remained inactive to come to the aid of the 13th Imperial Yeomanry at Lindley when it was forced to surrender to Gen Piet de Wet. When the 9th Division was disbanded, Roberts asked him to return to his former command at Gibraltar. He returned to Britain in November 1900 and gave his version of the events to the press. He incurred displeasure with the War Office and was compelled to take his discharge from the army. Shortly afterwards he published The Work Of The Ninth Division (London 1901) in which he defended himself against his critics. His death a few years later was as a result of a motor accident. (Photo:Times History)
On 23 May, Col Spragge's battalion departed by rail to join Lt-Gen Sir H E Colvile's column (originally a full division but then reduced) at Ventersburg. Colvile, tasked to collect any Boers swept aside by Hamilton's force, proceeded independently on 24 April from Springfield (near Bloemfontein) via Winburg and Venters burg and arrived in Lindley on 26 May. Owing to the delays in supplying the 13th Battalion IY with forage, it was not possible for Col Spragge to join Colvile at Ventersburg. Instead, his battalion proceeded, by order, to Kroonstad where it arrived on 25 May. The route taken caused a division in the battalion: The 47th Company forded the Sand (Zand) River since the railway bridge was destroyed and marched to Kroonstad, while the 45th, 46th and 54th Companies, departing a day later, crossed the river via the deviation bridge and proceeded directly by rail to Kroonstad. (See Map A; History of the War; Vol 3, p 115; Times History, Vol 4, p 253; Reckitt,1973, pp 11-12).
Map annotated from Churchill, W, Ian Hamilton's March;
Colvile, H E The Work of the 9th Division;
Reckitt, F N The Lindley Affair.
Spragge received instructions 'to join General Colvile at Lindley on 26th [May] latest'. This order was unknown to Colvile. On the evening of 25 May, having obtained two days' rations, the whole of the 13th Battalion of 468 men of all ranks began its march from Kroonstad to Lindley, a distance of 75 km. The next day they met some Boers who told them that Colvile was in Lindley. Instead of holding these men as prisoners of war, they were disarmed and instructed to return to their farms. 'We afterwards found to our cost what a mistake this was, as there was no doubt they were spies and forewarned their friends at Lindley of our approach', wrote Frank Norman Reckitt (Reckitt, 1973, p 14; Times History Vol 4, p 254). Trooper Frank Norman Reckitt, No 14130 of the 47th Company 13th Bn Imperial Yeomanry and the author of The Lindley Affair, was captured and marched into captivity - a long trek on foot - to Pretoria. Upon his release he saw no further service in South Africa and returned to England. In the First World War (1914-1918) he served in the Middlesex Regiment and saw active service in France with the rank of major. He died in 1940.
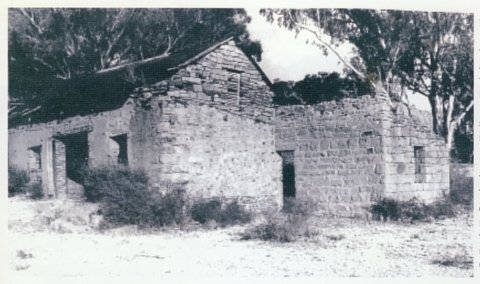
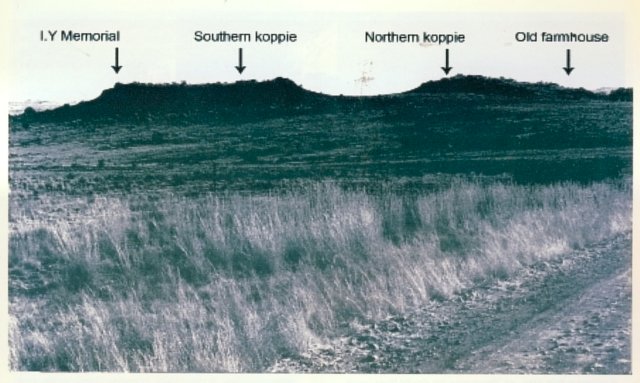
Farmhouse, now derelict, at the foot of Yeomanry Koppies
which served as a British command post and a temporary hospital.
On Sunday, 27 May, the Yeomanry arrived at Lindley. They saw, at a distance, the dust of a column heading northward, which, they were told in Lindley, had left that morning. This was indeed Colvile's column, which the 13th Bn Imperial Yeomanry had been instructed to join. While the town seemed deserted, the Boers had reoccupied it after Colvi!e left and then moved to the hills to the south, waiting for the Yeomanry. Rifle fire was opened on the leading squadrons almost as soon as they entered the town, and Spragge, fearing a trap, placed a few troops as a covering force while the remainder were ordered to join the main force on the road to Kroonstad, 3,5 km distant (Times History, Vol 4, p 254).

Map B - THE ACTION AT YEOMANRY KOPPIES 27 - 31 May 1900
About 4 km north-west of Lindley, Spragge chose a position for defence. An area containing the road to Kroonstad and two groups of hills was separated by a valley through which a stream flowed into the Vals River. The northern group of hills contained a boulder-strewn plateau, while, to the east, rose a rocky hill called Platkop. Situated across the valley of the Vals River stood two stony koppies, 300 metres apart, and these were, as it turned out, the key to the position. To the south, the ground rises gradually to an elevation, which would, at a distance, command the koppies. Spragge kept his horses and transport in the valley where there was water and pasture. The koppies were assigned for occupation to the 47th Company for defence, while a farmhouse at the foot was occupied as an outpost. A stone kraal near the farmhouse, to be defended by the 45th Company, was occupied to provide shelter to the horses. Spragge established his headquarters alongside. Positions to the west were occupied by the 46th Company. The 54th Company was kept in reserve and as a guard to the transport and horses. (See Map B;Times History, Vol 4, pp 255-6).
A view of Yeomanry Koppies looking south-west (Photo: S Watt)
Lindley, prior to the occupation by Colvile, was the headquarters of Gen Marthinus Prinsloo. On 26 May there were, in and around Lindley, the commandos of Smithfield under Cmdt Potgieter, and part of the Bethlehem Commando under Cmdt Michael Prinsloo, in all about 800 men. On Colvile's approach, Potgieter attempted to check the march, but without success. The two Prinsloos then left town, while Potgieter joined Gen Piet de Wet, who was in laager to the north with 1 200 men. The next day de Wet sent Prinsloo with orders to harass Colvile, but, finding the 13th Imperial Yeomanry attempting Northern koppie to bar their entry into Lindley, he prepared to surround Spragge (History of the War; Vol 3, p 118).
On the evening of 27 May, Spragge sent a message to Colvile, which was received at 07.00 on the following morning: 'Found no one in Lindley, but Boers; have 500 men but only one day's food. Have stopped three miles [4,8 km] back on Kroonstad road. I want help to get out without great loss.'
Lt-Gen Rundle with the 8th Infantry Division occupied Senekal from 25 to 28 May, when a messenger whom he had sent to Lindley returned with a message from Spragge (similar in content to that sent to Colvile). Rundle decided that as Spragge had only one day's supply, Lindley could not be reached in time to assist him. The best form of assistance Rundle could offer would be to draw off the Boers in front of him. This action at Biddulphsberg on 29 May 1900 cost the British 185 casualties. (See S A Watt, The Skirmish at Senekal: The Battle of Biddulphsberg, May 1900' in Military History Journal, Vol 8 No 6, December 1991 ).
Darkness approached, Spragge's men having secured their positions. Trooper Reckitt left a graphic account of his experiences of that night of 27 May. Assigned to guard duty at the stone kraal with a fellow soldier, he was to endure an uncomfortable night with only two hours' sleep: There was a cold wind sweeping over the hill and we crouched down and kept each other awake'.
Soon after sunrise on 28 May, the Boers commenced firing from positions occupied by them to the south, west and north of the British position where the 47th Company and Lord Longford's 45th Company came within rifle range. They replied in kind and were joined by a Colt gun. Trooper Reckitt was one of a party sent to water the horses in the stream near the farmhouse: 'The Boers soon saw what we were doing and we were treated to several bullets on the journey. On returning we were ordered to graze [the horses] under the side of the hill'. The kraal then became the target of intensive riflefire. By then it was also being used as a dressing station for several wounded soldiers, but it was soon abandoned (Reckitt,1973, pp 17-18).
Meanwhile, the British casualties increased, including the deaths of Capt Keith, the commander of the 47th Company, Cpl Galpin and two others. The dead were brought down the hill and placed in a shed near the farmhouse. The farmhouse was a three-roomed dwelling. Inside were a Boer woman and two children. The husband was held prisoner in the kraal, which was being used as a command post and a temporary hospital. Nearby, a small party of gravediggers spent all night preparing the graves of the four men. Similar graves were dug on the following two nights, the dead being buried each morning and Col Spragge reading the service just before daylight (The Lindley Affair, p 19).
GALPIN, Cpl Francis Walter
POWER, LIEUT Sir John Cecil (1870-1900), died in Lindley on 1 June 1900 from wounds received at Yeomanry Koppies on 29 May 1900. He was a whiskey baron from Ireland but volunteered for active service and joined the 46th company IY in February 1900 with the rank of lieutenant. He is buried in Lindley. (Photo: ILN /Graphic).
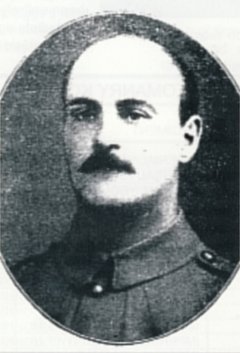
POWER, LIEUT Sir John Cecil
Early on the morning of 29 May, Trooper Reckitt was ordered to join his comrades on the koppie: 'Halfway up I found the signallers and they warned me that men were usually fired at when going up. I was evidently seen by some of the enemy a little further up ... As soon as I reached the top, I was greeted with shouts of "get down". A bullet whistled over me so I got down and crawled to the opposite side where fifteen men were lying in a trench under a wall they had built with loose stones. This was only three feet [90 cm] high, so one had to lay in the trench and fire through the loopholes when opportunities offered. The enemy had got our range accurately and the bullets pattered up against the wall and whistled overhead all day ... [Later] as it got dark we were able to get up and walk about'. (Reckitt,1973, pp 19-20).
Although casualties continued to increase, Spragge remained confident in his ability to hold his position. He sent a message to Rundle on 30 May, reiterating the concerns he had expressed on 27 May, but also drawing attention to the plight of his men who were surrounded and under attack by the Boers. A homestead observed to be fiying a white flag was thought to be used by the Boers as a sanctuary to fire on the British position. Elements of the 46th and 54th companies were sent to evict the occupants. Under cover provided by rifle fire, the homestead was attacked and some Boers were driven out of it. For a second time, the veld was set ablaze that evening. In a sortie to another farm, three Boers were disarmed. Some provisions were found and the raiding party returned with five sacks of mealies, some bread and a flock of sheep, which, despite the fear that their bleating would arouse the Boers, were driven back to the British position (The Lindley Affair, p 23).
By the evening of 29 May, de Wet arrived with three guns and a Vickers Maxim. Prinsloo also approached Lindley, leaving some of his men to observe Colvile at Heilbron. Before his arrival, the Boers in the vicinity had already made demonstrations to the west of the British position. Spragge found that the grazing ground for his sheep and horses was becoming restricted. In an attempt to enlarge it, Lt H F Montgomery, with sixteen men, was ordered to seize a small ridge held by the Boers. The ridge was taken but the small party, exposed to fire for two hours, was eventually surrounded and captured. On the morning of 31 May, Capt the Earl of Longford, with fifty men, was sent to recapture the position. The Boers were surprised and driven off by a bayonet charge. By then, however, Spragge was compelled to recall Lord Longford's men closer to his headquarters, as Prinsloo had brought a gun into position near Lindley (Times History, Vol 4, pp 255-6).
Soon afterwards a Boer gun opened fire from Platkop, 2km to the north-east. Spragge's Colt guns returned fire. The Boers then brought concentrated artillery fire to bear on both the koppies. Trooper Reckitt takes up the story of the bombardment on the stony koppie: 'A few moments after the last boom there was a deafening crash and a piece of rock and helmet entirely disappeared in a confused volcano of smoke and dust. They got our range and our minutes were numbered'. Reckitt was temporarily stunned by the explosion, but the explosion of another shell brought him out of it. 'The wall just behind me had been entirely destroyed and the cavity exposed me to the bullets against which the destroyed wall alone had been a shield for the last two days' (Reckitt, 1973, pp 27-8).
Memorial to the 13th Bn Imperial Yeomanry on Yeomanry Kop.
Under cover of this fire, Michael Prinsloo with 200 men galloped up to the southern koppie which was being held by a few men under Lt R Alexander. They ensconced themselves amongst the boulders on the lower slope. Coming under concentrated rifle fire, Alexander retreated to the second koppie, which was held by Lt C M Robin. Between the two koppies was a small post of a few men, one of whom decided to raise the white flag as a token of surrender. This man was shot by his comrades. Reinforcements from the 54th Company arrived, but it was too late to save the position (Times History, Vol 4, pp 256-7; History of the War, Vol 3, p 120; Breytenbach, Vol 6, pp 212-14).
With the southern koppie already in Boer hands, Lt Robin, under the mistaken notion that he was bound by the white flag of his subordinate, ordered a ceasefire. This brought the valley in which the transport was parked into Boer hands. The remainder of the British position became untenable. Seeing the futility of further effort, Spragge also surrendered. Lord Longford, with the 45th Company to the north, and Capt Maude, with the 46th Company in the west, held out for a little longer but they too finally surrendered. All firing ceased at about 14.00.
The British casualties during the five days' fighting amounted to 80, of whom 23 were fatal. Amongst these was Lord Craigavon, Sir John Power, a whiskey baronet. The Boers lost one man killed c (Times History, Vol 4, p 257; History of the War, Vol 3, p 120; Watt, 1999; Pakenham, 1999, pp 436-7). Of Spragge's men, 379 were marched into captivity, three managing to escape. There were 28 British wounded left in hospital in Heilbron, seven of whom had suffered mortal wounds. (See Table: British fatalities at Yeomanry Koppies and Relief Force).
c According to theTimes History, Vol IV, P 257, the Boers 'had about 30 men killed and 40 wounded during the engagement', and Breytenbach quotes the Boer losses as given in theTimes History. It is the opinion of the writer that the Boer loss of one killed, as given by Mr Botha, is closer to the truth.
BRITISH FATALITIES AT YEOMANRY KOPPIES AND RELIEF FORCE
| REGT. NO | RANK | NAME | INITIALS | REGIMENT | CASUALTY | PLACE | DATE | INTERRED | MNMT | REMARKS |
|---|---|---|---|---|---|---|---|---|---|---|
| 14155 | TPR | BACKHOUSE | TR | IMPERIAL YEOMANRY,13,47 | KIA | LINDLEY,YEOMANRY KOP | 31-05-1900 | LINDLEY | 1 | LINDLEY, YEOMANRY KOP |
| 9588 | LCPL | BERRY | LCH | IMPERIAL YEOMANRY,13,54 | D | LINDLEY | 13-07-1900 | LINDLEY | 1 | |
| 9673 | PTE | BLAKE | AN | IMPERIAL YEOMANRY,13,45 | KIA | LINDLEY,YEOMANRY KOP | 28-05-1900 | LINDLEY | 19 | LINDLEY, YEOMANRY KOP |
| 9678 | PTE | BYRNE | JE | IMPERIAL YEOMANRY,13,45 | KIA | LINDLEY,YEOMANRY KOP | 28-05-1900 | LINDLEY | 19 | LINDLEY, YEOMANRY KOP |
| 775 | PTE | CLARKE | EA | IMPERIAL YEOMANRY,3,10 | DOW | LINDLEY,YEOMANRY KOP | 28-05-1900 | LINDLEY NR+ | 19 | BETHLEHEM |
| 3421 | PTE | CUNNINGTON | JW | IMPERIAL YEOMANRY,3,12 | DOW | LINDLEY NR | 26-06-1900 | LINDLEY NR | U1 | WO1-06-1900 |
| 14096 | CPL | De LAUNE | HF | IMPERIAL YEOMANRY,13,47 | KIA | LINDLEY,YEOMANRY KOP | 30-05-1900 | LINDLEY | 18 | LINDLEY, YEOMANRY KOP.A25 |
| 9668 | PTE | FENNER | NF | IMPERIAL YEOMANRY,13,45 | KIA | LINDLEY,YEOMANRY KOP | 31-05-1900 | LINDLEY | 19 | LINDLEY, YEOMANRY KOP |
| 14147 | CPL | GALPIN | FW | IMPERIAL YEOMANRY,13,47 | KIA | LINDLEY,YEOMANRY KOP | 28-05-1900 | LINDLEY | 13 | LINDLEY, YEOMANRY KOP |
| CAPT | KEITH | CS | IMPERIAL YEOMANRY,13,47 | KIA | LINDLEY,YEOMANRY KOP | 29-05-1900 | LINDLEY | 15 | LINDLEY, YEOMANRY KOP.A37 | |
| 3380 | PTE | LEARMAN | H | IMPERIAL YEOMANRY,3,12 | KIA | LINDLEY NR | 01-06-1900 | LINDLEY NR | 1 | LINDLEY, YEOMANRY KOP |
| 9473 | PTE | LECKY | T | IMPERIAL YEOMANRY,13,46 | KIA | LINDLEY,YEOMANRY KOP | 31-05-1900 | LINDLEY | 1 | LINDLEY, YEOMANRY KOP |
| 9404 | PTE | MARTIN | J | IMPERIAL YEOMANRY,13,46 | KIA | LINDLEY,YEOMANRY KOP | 30-05-1900 | LINDLEY | 19 | LINDLEY, YEOMANRY KOP |
| 9571 | PTE | McCLURE | RS | IMPERIAL YEOMANRY,13,54 | KIA | LINDLEY,YEOMANRY KOP | 31-05-1900 | LINDLEY | 1 | LINDLEY, YEOMANRY KOP |
| 9370 | PTE | McLAUGHLIN | G | IMPERIAL YEOMANRY,13,46 | KIA | LINDLEY,YEOMANRY KOP | 30-05-1900 | LINDLEY | 19 | LINDLEY, YEOMANRY KOP |
| 5001 | PTE | MEAD | DS | IMPERIAL YEOMANRY,10,38 | KIA | LINDLEY NR | 01-06-1900 | LINDLEY | 1 | LINDLEY, YEOMANRY KOP |
| 14153 | PTE | MILLER | TB | IMPERIAL YEOMANRY,13,47 | KIA | LINDLEY NR | 31-05-1900 | LINDLEY | 14 | LINDLEY, YEOMANRY KOP.A33 |
| 9716 | PTE | PORTER | AZ | IMPERIAL YEOMANRY,13,45 | DOW | LINDLEY, YEOMANRY KOP + LINDLEY | 1-06-1900 | LINDLEY | 1 | W29-05-1900 |
| 9614 | PTE | POWER | CW | IMPERIAL YEOMANRY,13,45 | DOW | YEOMANRY KOP | 28-05-1900 | LINDLEY | 13 | LINDLEY, YEOMANRY KOP |
| CAPT | POWER | JEC | IMPERIAL YEOMANRY,13,46 | DOW | LINDLEY, YEOMANRY KOP + LINDLEY | 01-06-1900 | LINDLEY | 13 | W28-05-1900. A29 | |
| 9694 | PTE | ROBINSON | HJ | IMPERIAL YEOMANRY,13,45 | DOW | LINDLEY, YEOMANRY KOP + LINDLEY | 01-06-1900 | LINDLEY | 14 | A24.W29-05-1900 |
| 9659 | PTE | SMITH | J | IMPERIAL YEOMANRY,13,45 | DOW | LINDLEY, YEOMANRY KOP + LINDLEY | 31-05-1900 | LINDLEY | 1 | W29-05-1900 |
| 7323 | PTE | SMITH | CE | IMPERIAL YEOMANRY,5,16 | KIA | LINDLEY NR | 01-06-1900 | LINDLEY | 1 | LINDLEY, YEOMANRY KOP |
| 748 | SGT | TOMLINSON | AF | IMPERIAL YEOMANRY,3,10 | KIA | LINDLEY NR | 01-06-1900 | LINDLEY | 1 | YEOMANRY KOP/KROMDRAAI |
| 9399 | PTE | WALKER | T | IMPERIAL YEOMANRY,13,46 | KIA | LINDLEY, YEOMANRY KOP | 30-05-1900 | LINDLEY | 19 | YEOMANRY KOP |
| 9517 | PTE | WARREN | W | IMPERIAL YEOMANRY,13,54 | KIA | LINDLEY, YEOMANRY KOP | 29-05-1900 | LINDLEY | 1 | LINDLEY, YEOMANRY KOP/ KWAGGAFONTEIN |
| 14118 | TPR | WATSON | GJ | IMPERIAL YEOMANRY,13,47 | DOW | LINDLEY, YEOMANRY KOP + LINDLEY | 01-06-1900 | LINDLEY | 13 | W31-05-1900 ON HIS BIRTHDAY |
| 9705 | PTE | WILMOT-CHETWODE | EE | IMPERIAL YEOMANRY,13,45 | DOW | LINDLEY, YEOMANRY KOP + LINDLEY | 05-07-1900 | LINDLEY | 14 | W29-05-1900.A22 |
When Colvile received Spragge's message that he had sent on the night of 27 May, he was 29 km from Lindley. After he and a staff officer had questioned the message bearers closely, Colvile concluded that there had been no firing when they had left Lindley and that his proper course was to adhere to his instructions to reach Heilbron by 29 May. He sent the following message to Spragge in reply: 'Your message received 7 am. I am 18 miles [29 km] from Lindley and twenty-two miles [35 kilometres] from Heilbron which latter place I hope to reach tomorrow. The enemy are between me and you and I cannot send back supplies. If you cannot join me by road to Heilbron you must retire to Kroonstad, living on country, and if necessary abandon your wagons' (History of the War, Vol 3, p121). Both messengers returned at dusk, but they failed to reach Spragge. By then, Colvile had proceeded northwards towards Heilbron.
Had Spragge been able to hold out for another two days, relief would have been at hand. A force of three battalions of Imperial Yeomanry, sixteen guns and an infantry brigade under Lt-Gen Lord Methuen had departed from Kroonstad on 30 May to assist Colvile. That afternoon, a halt was called, during which Methuen was informed of Colvile's arrival in Heilbron. He then received a message from Kroonstad from Lord Roberts, advising him to proceed to the assistance of Spragge. Methuen hurried to Lindley. On 31 May, he received a message from Spragge that he could hold out until 2 June. The next day, Methuen came into contact with the Boers at Paardeplaats,13 km south of Lindley. At the same time, he learnt that Spragge had surrendered the previous day. Having reconnoitred Lindley Methuen's Imperial Yeomanry then attempted to surround the Boer force and their captives. One of his sections, the 3rd Bn Imperial Yeomanry under the command of Lt-Col G J Younghusband attempted to capture the convoy transporting the prisoners of war. In this, he was partly successful, managing to capture the sixteen wagons and two guns taken from Spragge's force. Calls were made for reinforcements but none arnved; the Imperial Yeomanry were too busy trying to clear the Boers off the high ground. At 14.00, they were ordered to break off the engagement, with a loss of 26 men including five fatalities. The British guns and wagons of Spragge's force were intercepted, escaped, and eventually joined the Boer convoy (History of the War, Vol 3, pp 124-5).
Capt the Hon Douglas Loch, who was with Methuen, described his experiences: 'The town is full of our own sick, many of Spragge's men - among others L[or]d Longford who was shot through the neck. It was a close shave but he is practically right now, walking and riding about looking quite fit' (Lord Carver, 2000, pp 164-5).
Trooper S Peel, serving with Methuen's force, entered Lindley on 1 June and observed: 'Every house almost seemed to be flying the Red Cross ... at every turn you came across a truculent looking ruffian with a Red Cross on his arm who said he was an orderly in the Boer hospitals ... There were of course a good many wounded Boer and British' (Peel, S, 1901 p 88-9).
Time was spent visiting the scene at Yeomanry Koppies. In describing what he saw, Trooper Peel writes: 'A melancholy s[ight] met our eyes. Several dead bodies of Yeomen lay about; one poor fellow had taken out his first-aid dressing but had died before he could unroll it; another tried to write a message, but in his case too the pencil had slipped from his failing fingers. Farther on we came to where the defenders had tried to build schanzes of small stones, then to the place where the central laager had been. Here was a broken-down wagon, and round it scattered debris, helmets, a few shirts, other remnants of looted stores, and the usual tins' (Peel, 1901, p 84).
What went wrong at Lindley?
Acting under orders to join Lt-Gen Colvile's division, Lt-Col Spragge, with the 13th Bn Imperial Yeomanry, proceeded from Bloemfontein to Kroonstad, arriving there on 25 May 1900. Colvile had been ordered by Lord Roberts to be in Heilbron by 29 May as a part of a concentration of troops needed for the advance on Pretoria. At Kroonstad, Spragge had received a telegraph message from Lindley, addressed to him personally, which read: 'I am greatly in want of mounted troops. Come to me here at once. Colvile'. At the time, Colvile was on his way from Ventersburg to Lindley. Had Spragge been suspicious of the message, he might have questioned the use of his name in the address, rather than 'Officer Commanding Yeomanry'. Furthermore, the staff at Kroonstad would have been able to tell him that Colvile was at Ventersburg on 23 May. In fact, Lindley was then in the hands of the Boers. Later it was discovered that a Boer telegraphist in Lindley, named Bell, had tapped the lines and sent the message. Colvile, who firmly denied that he had sent the message, had little doubt that the message was deliberately intended to lure the Yeomanry into a trap. He did not know Spragge by name. (See Colvile, 1901, p 177-90).
Who was to blame?
Several enquiries followed as to the cause of the demise of the 13th Bn Imperial Yeomanry. There is no available record of any action taken against Cpl L E Jacques, the man who allegedly, without orders, raised the white flag. He was, however, to forfeit his campaign medal.
On 6 September 1900, Captains Lord Longford, Humby and Robin appeared before a Court of Inquiry held in Pretoria. Trooper Thomas McCree had been one of a party under Humby going up the koppie, when they had met Robin, who was heard ordering the 'Cease Fire' after 'some of his men had raised the white flag'. Humby said he had known nothing about this. Robin went to the farmhouse at the foot of the koppie, waving a white handkerchief and was shot in the hand while doing so. The Court exonerated all concerned. Confirmation was not, however, given in the case of Robin, and Headquarters decided to withhold from him his war gratuity and medals. This was reversed on appeal on the grounds that the first white flag was hoisted by a corporal without orders and that the second was hoisted by Robin under a misapprehension that he was bound to respect the white flag hoisted by Jacques. His 'want of military knowledge' and subsequent good service were taken into consideration and his war gratuity and medals were issued to him.
On 21 September 1900 Lt Alexander faced a Court of Inquiry in Kroonstad. He had acted under Lt Robin's orders and was exonerated. The next to face questioning was Lt-Col Spragge with eight officers and 36 other ranks held at Barberton on 25 September 1900. Spragge told of the receipt of the message to join Colvile at Lindley, saying that it was addressed to the Commandant at Kroonstad. If this were so, then Spragge's unquestioning acceptance of it was the more understandable. He recalled how a soldier had put up the white flag without orders and how his surrender had followed. He had thought he could have held out until nightfall on 31 May had it not been for this soldier's action. This information was corroborated by his second-in-command, Lt-Col A G Holland, and the Court concurred with his statements. The officers and men, whose cases were under investigation, had been taken prisoner by the chances of war and no blame was laid on them. But the Commander-in-Chief, Lord Roberts, had no doubt where the blame lay. Lt-Gen Colvile had already erred at a previous engagement at Sanna's Post and the debacle at Lindley appeared to be another example of his incompetence. Colvile was nominally in command of a division, but this had already been reduced to the size of a brigade because of Lord Roberts' lack of confidence in him.
When Colvile reported to Roberts, he was told that the Commander-in-Chief was dissatisfied with his conduct and that he must relieve him of his command. Colvile requested to return to England. He was, however, sent to Gibraltar to resume command of an infantry brigade, but the matter did not end there. The Secretary of State for War, after discussion with Roberts, concurred with him that Colvile had been 'mainly responsible for the surrender of 13th Yeomanry'. Colvile was instructed to resign his command and quit Gibraltar. This he refused to do and was informed that his command had ceased. In February 1903, Colvile was called before the Royal Commission on the War in South Africa, and was asked to give his views, inter alia, of his conduct at Sanna's Post and Lindley. He reiterated his reasons for not returning to the assistance of the Yeomanry on 29 May 1900 and denied having sent the telegram calling Spragge to Lindley. His denial was accepted and the Commission virtually exonerated him from all blame in the following words: 'We have now the statement which you have headed "Sanna's Post and Lindley". You quite understand with regard to the matter, Sir Henry, that we are quite willing to accept your statement of the matter. We do not propose to go into it in detail either as regards strategy, tactics or personal conduct, but if this is the statement you wish to put before us on this subject we will accept it' (Royal Commission on the War in South Africa, Minutes of Evidence, pp 400, 416-17).
For the remainder of the war there were no major engagements in the district of Lindley. Skirmishing, however, was frequent and the graves of the Imperial fallen were to be found in fifteen localities. The mortal remains of these were exhumed and buried in the cemetery at Yeomanry Koppies alongside those of the 13th Bn IY. However, all the graves were exhumed in August 1959 and re-interred alongside their 38 comrades in Lindley, bringing the total number of graves to 122.
A short distance from Lindley is the Geloftefeesterrein in which is a memorial listing the names of eleven Boers who died in the district during the Anglo-Boer War. The sole Boer fatality at Yeomanry Koppies, W J Human, does not appear on the memorial. (Information supplied by Mr K Botha).
What is the situation today?
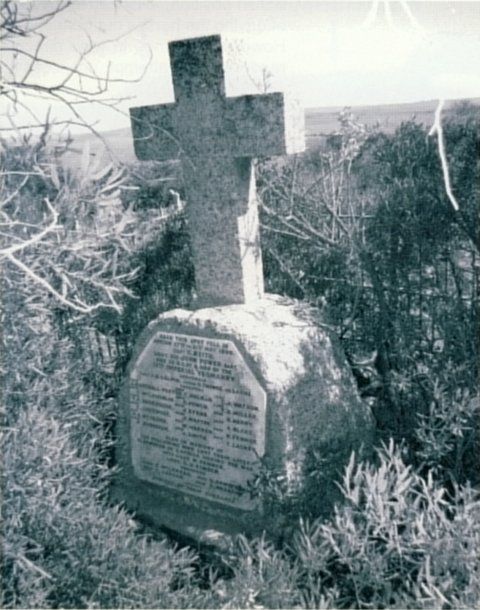
There is little evidence of defensive positions made by the Yeomanry on the koppies. At the extremity of the southern koppie stands a memorial listing the names of men of the 13th Imperial Yeomanry who lost their lives in the, war, most of whom were fatalities at the Yeomanry Koppies.
Acknowledgement
The writer is indebted to the late Mr Urbanus Human for a tour to the site in May 2003. In addition, Mr Kota Botha and Mr Benjamin Mabula accompanied him over the battle site in August 2009. All shared their knowledge without which this account would have been incomplete.
SOURCES AND FURTHER READING
Appendices to the Minutes of Evidence taken before the Royal Commission on the War in South Africa (London,1903).
Asplin, Kevin J, The Roll of the Imperial Yeomanry, Scottish Horse & Lovat Scouts, Second Boer War; 1899-1902< (Salisbury, United Kingdom, 2000).
Breytenbach, J H, Die Geskiedenis van die Tweede Vryheidsoorlog, Vol 6 (Pretoria, 1996).
Carver, Field Marshal, Lord, The National Army Museum Book of the Boer War (London, 2000).
Churchill, Winston S, Frontiers and Wars (London, 1962).
Colvile, Major-Gen Sir H E, The Work of the Ninth Division (London, 1901).
Dooner, Mildred, G, The Last Post (Reprint, London, 1980).
History of the War in South Africa, 1899-1902, Vol 3 (London, 1908).
Hogg, Ian & Batchelor, John, The Machine Gun (Purnell's History of the World Wars, London, 1976).
Pakenham, Thomas, The Boer War (Johannesburg & London, 1979).
Peel, The Hon Sidney, Trooper 80081Y (London, 1901).
Reckitt, Frank Norman, The Lindley Affair. A Diary of the Boer War (Hull, United Kingdom, 1973).
The South African War Casualty Roll, The South African Field Force: 11th Oct 1899-June 1902 (Polstead, United Kingdom, 1982).
Watt, Steve, In Memoriam: Roll Of Honour Imperial Forces Anglo-Boer War 1899-1902 (Pietermaritzburg, 1999).
Times History of the War in South Africa, 1900, Vol 4 (London, 1906).
Return to Journal Index OR Society's Home page
South African Military History Society / scribe@samilitaryhistory.org