
 The South African
There were many small conflicts in southern Africa during the nineteenth century which have largely been forgotten. At the time they loomed large in the eyes of those who fought and died in them. The siege of Moorosi's Mountain was one such conflict.
Background
Moorosi was chief of the BaPhuthi clan. The clan was of Nguni origin and had lived for several generations in what is now southern Lesotho. During the Mfecane, Moorosi earned himself a reputation as a freebooter and cattle thief. Moorosi's father submitted to Moshweshwe's authority in 1825. However, he seems to have maintained a measure of autonomy. He was a constant source of trouble to his neighbours and, during the 1840s and 1850s, gave sanctuary to San cattle raiders. Moorosi's own reputation as a cattle thief lasted into the 1870s. This is probably one reason why the Cape colonial government decided to deal with Moorosi. The BaPhuthi, like many clans, had taken advantage of the availability of firearms at the diamond fields. This made them an ideal test case for the enforcement of the Cape's new disarmament laws. One wonders if they h'ad taken note of Natal's troubles in 1873 with Langalibalele's Hlubi.
The pretext was provided by the behaviour of Moorosi's son, Doda. Doda persuaded some of the BaPhuthi not to pay their hut tax. Mr Austin, the local magistrate then arrested a few of the supposed ringleaders and Doda said that he would rescue them. When he arrived at the magistracy, Austin tried to arrest him with only a few policemen to support him. He had to back down. Even worse, Doda had sufficient men to free those whom Austin had already arrested. Realistically, the Cape colonial government could not ignore the challenge to its authority that Doda presented.
Doda retired to his father's lands and a troop of the Cape Mounted Riflemen was sent to support Magistrate Austin. The CMR were promptly attacked. Moorosi was ordered to hand Doda over or be considered a rebel. When the Cape troops entered Moorosi's territory, they found that the outlying homesteads and fields had been abandoned and that Moorosi had fortified his mountain with great skill.
Moorosi's Mountain
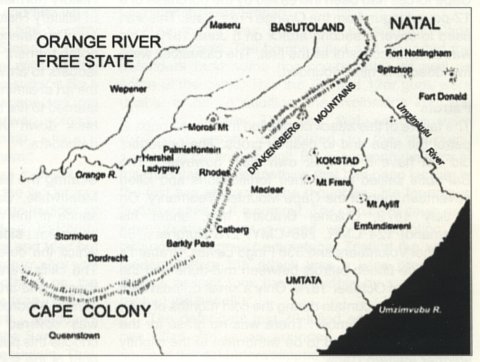
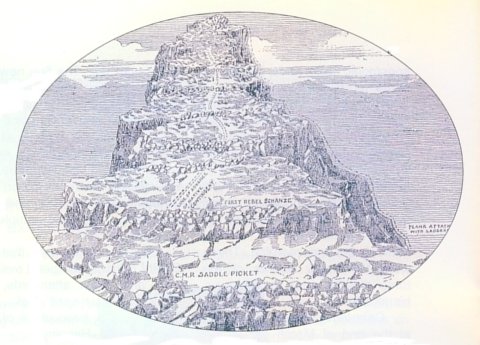
The mountain stands on a bend in the Orange River. Three sides are perpendicular cliffs and the fourth is a slope of about a mile (1,6km). Across this slope, Moorosi had arranged the construction of a series of nine loopholed walls or schanzes. The walls were very strongly built. Access to the mountain was via a slope on the opposite height, which formed a nek, which led to a saddle, then a slope to the heavily fortified lip. Behind the lip was a gully and in the gully was a cave called the 'commandant's cave'. The nek had been quickly occupied by the Cape Mounted Riflemen at the beginning of the dispute. Two troops of the CMR were in position when the Cape forces started assembling for the first attempt on the mountain.
As a result of their experience during the 9th Cape Frontier War, the Cape colonial government had reformed their forces. The Frontier Armed and Mounted Police (FAMP) had been militarised and had become the Cape Mounted Riflemen. They were to be supported by three regiments of mounted yeomanry. The idea was that the yeomanry regiments would be easily and quickly mobilised to support the CMR. The problem, in 1879, was that the regiments were still being organised. They had not yet reached the required strength and would never do so. In many cases, the yeomanry troops were simply a mounted volunteer unit renamed. By early 1879 the three regiments had their headquarters in King William's Town (1st Regiment), Queenstown (2nd Regiment) and Uitenhage (3rd Regiment). In addition the colony could call upon about 2 500 volunteers. Furthermore, the government took great comfort from the fact that they could call upon about 40000 burgher commandos and 75 000 black clan levies. These forces would take time to mobilise as they were completely unorganised.
The first attack was made on 8 April 1879. Col Griffith had under his command 97 CMR, 541 men of 2nd and 3rd Regiments Cape Mounted Yeomanry, 56 Herschel Mounted Volunteers, 42 Aliwal North Volunteers, 101 men of the Herschel Fingo Levy and about 600 Sotho clansmen. Griffith had about 557 men at or near the mountain. The rest were covering his communications.
Estimates of Moorosi's force vary from 200 to 1 500. He probably had between 500 and 1 000 men. The higher figure is probably true for the beginning of the siege and the lower for the end. The inhabitants of Basutoland were knowledgeable about firearms. Moorosi's men would have had few flintlocks and some percussion muskets, but mostly muzzle-loading and breech-loading rifles.
The battle begins
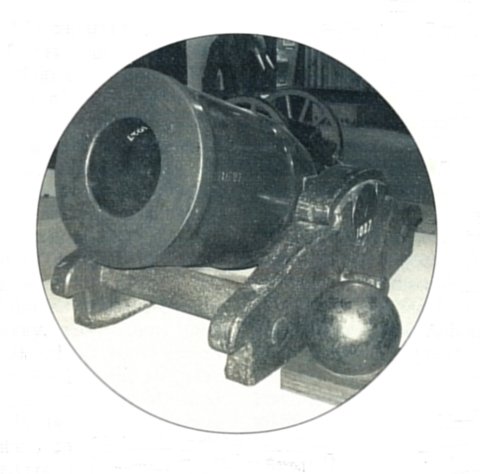
Griffith had two 7-pounder RML mountain guns, similar to that on display on a colonial carriage at the Ditsong: National Museum of Military History in Johannesburg. These guns were completely ineffective. They had little impact on the stone walls and certainly did not keep anyone's head down. Nevertheless the assault was launched. Thirty-nine men of the CMR and a hundred of the Cape Mounted Yeomanry attacked. They ran into heavy fire and a rain of rocks. The reserves from the 2nd CMY were ordered forward. They, too, were pinned down. At this point, Trooper Peter Brown (Swedish-born) won the Victoria Cross. Some of the wounded were calling for water. At last Brown could stand it no longer. He rushed to them with water bottles and, while he was giving them water, was hit in the arm and leg. He collapsed among the men he had been trying to help. The BaPhuthi fire was heavy and, in combination with the stone walls, made the Cape forces' attacks futile. The attack cost Griffith's force five dead and twenty wounded. Some of the wounds were serious. The courageous Trooper Brown was invalided out of the CMR and retired on pension. He died in 1894, in his sixtieth year. While Trooper Brown was trying succour the wounded, another attack was being made on the stone walls. Sergeant Robert Scott of the CMR and three of his men attempted to use 7-pounder shells as hand grenades. One of the shells exploded before Scott could throw it and he was badly injured. However, he ordered his men to wait until nightfall before they withdrew. This order was a tribute to Scott's courage and the effectiveness of the BaPhuthi marksmen. Scott was also awarded the Victoria Cross.
After this failed attempt to capture the stronghold, the Cape forces built sangars and cut the mountain off from the outside world. Moorosi had foreseen this and had ample supplies of grain together with a large herd of cattle on the mountain.
A second attack
On 11 April 1879, Colonel Brabant arrived with the headquarters and right wing of the 1st Cape Mounted Yeomanry. These reinforcements amounted to about sixty men. Colonel Brabant took over command of the siege and Colonel Griffith returned to his administrative duties. Patrols on 28 and 29 May 1879 cleared some caves in which some of Moorosi's clan had been hiding. The artillery available to the Cape forces had been increased by the purchase of a 12-pounder gun from the Orange Free State. This was used to cover a second attack on 5 June 1879. This was as unsuccessful as the first. The casualties were five dead and nine wounded.
Patrols
The failure of this attack compelled the Cape troops to patrol the area and to destroy crops. The besiegers did not have it all their own way, however. The BaPhuthi sallied out of their fortifications and killed seventeen men of the Cape Mounted Yeomanry. On 1 July 1879, Colonel Brabant had, under his command, 124 CMR, 266 CMY, 278 Burghers, 50 Herschel Volunteers and 338 Fingo Levies. Brabant's men made fifteen patrols between mid-June and the beginning of October 1879. Only a small outpost kept watch on the mountain during the cold months of July, August and September. There was no grass for the horses and these had to be withdrawn to the slightly warmer eastern Cape.
Then, on 24 October, Colonel Bayly of the CMR took over command. The Cape Mounted Yeomanry were sent home and replaced by volunteers and black levies. Bayly had, under his command, 358 men of the CMR, 103 Stockenstrom Volunteers, 102 men of the Stockenstrom Contingent, 310 men of the Herschel Native levies, 23 men of the Berlin Volunteer Cavalry, 54 Queenstown Volunteer Rifles, 15 Cradock Mounted Rifles, 121 Basuto Native Contingent, and 30 Herschel Mounted Fingoes. The force mustered just over 1 100 men.
The mortar
The most significant reinforcement was to Bayly's artillery. An 8-inch Iron Land Service Mortar, the 9 cwt (457 kg) version, was found in Cape Town and sent to Moorosi's Mountain. The mortar's performance is as follows:
Shell Weight: 21 kg (46lbs)
Range, 623g (1lb6oz) gunpowder charge:1 097m (1 200 yards)
Range, 710g (1Ib90z) gunpowder charge:1 573m (1 720 yards)
The arrival of the mortar dramatically changed the situation at Moorosi's mountain. Although the mortar was thirty years old, having been made in 1849, it could, unlike the 7pr and 12pr guns, drop its shell just behind the stone walls. Also, the gunpowder charge could do some damage to the walls themselves. This very mortar is on display in the Adler Hall at Ditsong: National Museum of Military History (formerly the South African National Museum of Military History) in Saxonwold, Johannesburg.
The defences were then subjected to a prolonged bombardment while Bayly waited for his scaling ladders to arrive. The gunners very quickly mastered the art of aiming and fuze-setting for the mortar. They learned to fire the shell over the wall and then let it roll back down the mountain to explode among the defenders.
Scaling the heights
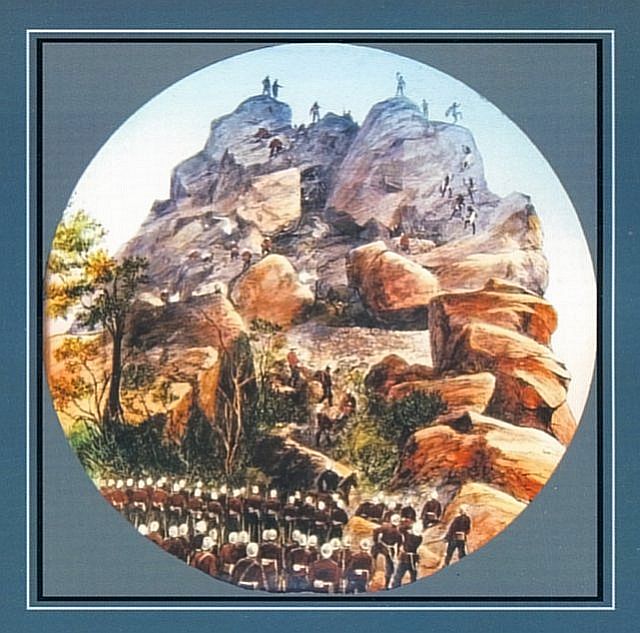
Meanwhile, Bayly conducted a careful reconnaissance of the mountain. He discovered that, on the south-east side of the mountain, there was a spring which the defenders used as their source of water. The cliffs were lower at this point and there was a rugged and broken path leading over boulders to the spring. Moorosi had not neglected this path, which was covered with loop-holed stone walls. Bayly choose this path for one of his storming parties. To the right of the spring, about 150 metres away, the cliffs were low enough to be climbed with the aid of the scaling ladders. A second storming party was assigned to attack at this point. A third storming party was assigned to attack at the point which had been designated the 'Commandant's Cave'. The fourth storming party was to attack at the Lip, once the other storming parties had achieved a lodgement. They had a difficult task because the Lip was where the two previous attacks had failed. The fifth storming party was assigned to infiltrate up the Gully to distract the defenders from the other attacks.
There were problems with the scaling ladders when they arrived. They were initially unable to take the weight of a man, so they were reduced in width and the rungs and sides were tied up with strips of rawhide, which hardened in the sun. The Cape forces then had their scaling ladders.
The storming parties assembled and moved to their starting points on the night of 19 November 1879. They moved to their positions at 23.45 with the intention of attacking an hour before dawn. The storming parties were deployed as follows:
No 1 Storming Party was under Captain Bourne with 171 men of the CMR at a low point in the cliff known as 'Bourne's crack'. No 2 Storming Party, 104 men under the command of Captain Montagu of the CMR, was to attack at the 'Commandant's Cave'. No 3 Storming Party comprised the Fingo Levy under Commandant Maclean with 150 men. No 4 Storming Party had Lieutenant Muhlenbeck in command of 40 men of the Wodehouse Border Guard and few volunteers. Captains Hook and Tainton commanded the 260 Fingoes and Tambookies of No 5 Storming Party.
The signal for the attack was the firing of three rockets. The attackers immediately ran into trouble. The men detailed to carry the ladders and water of No 1 Storming Party dropped their loads and fled when the first shot was fired. The CMR men had to carry their own ladders. Meanwhile, No 2 Storming Party found that they could not climb the cliffs at the 'Commandant's Cave' and so moved to support No 1 Storming Party. Finally, Captain Hook suspected that the Tambookies of No 5 Storming Party were going to defect, so he sent them back to camp, where a nervous camp guard kept an eye on them.
No1 Storming Party's ascent was headed by Lieutenant Sprenger, who climbed up the ladder into 'Bourne's crack'. There, he climbed a large boulder, at the top of which he encountered a BaPhuthi clansman, who threatened to shoot him and tried but missed during the attempt. Sprenger's return shot was fatal and soon the CMR had a foothold on the mountain which grew more secure as time passed. There was no BaPhuthi counter-attack. Maclean's Fingoes had a difficult struggle up to the Spring, but they, too, broke through to the upper mountain. They lost one man killed and one man wounded. Maclean led from the front. The Wodehouse Border Guard was very reluctant to advance. Hook and Tainton, with Storming Party No 5, managed to get their men across the danger zone and into the defences. Soon there were enough men on the summit to form a line. They charged the rallying BaPhuthi, who found that a rifle and bayonet are an unnerving weapon. Hand-to-hand fighting followed and the BaPhuthi broke and ran. Some were shot as they fled, while others fell to their deaths as they ran over the cliffs. Then the attackers divided into three parties and started to search for Moorosi and Doda.
The defence
One trooper, named Whitehead, was fired upon by a BaPhuthi clansman, who managed to shoot the cap off his head. Whitehead shot his opponent in the neck. The man crawled away to die. He was Moorosi. Five of his sons died in the fighting for the mountain. Doda threw himself down the mountain side and escaped. The attackers were stunned to find how well prepared the BaPhuthi were for a siege. There were stone houses on the top of the mountain and large stocks of food in caves.
Moorosi had made good use of the accumulated knowledge of the Sotho in defending hill and mountain tops. He also showed considerable expertise in increasing the effectiveness of the firearms at his disposal while negating the effectiveness of those used by the Cape forces. The main problem facing the Cape colonial forces was a lack of troops trained to attack a fortified position. The success of the CMR conceals the fact that most of the men were Frontier Armed and Mounted Policemen and not mounted infantry. The failure of the Cape Mounted Yeomanry is as much a result of lacking of training as it was of unimaginative leadership.
The mortar was one of the keys to the Cape forces' success. The bombs killed and wounded the defenders (and some non-combatants) as well as some of the cattle. This the 7pr and 12pr guns were unable to do. In addition, the explosions kept the defenders awake. The fact that sentries were exhausted greatly contributed to the attackers' success in the final assault. Bayly's reconnaissance of the mountain was something that had been lacking in the first two attacks on the mountain. He found two further routes to the summit. The choice of dawn as a time of attack was a good way of negating the defenders' firepower advantage. Testing the scaling ladders before the attack was a wise precaution. Bayly's assault took the defenders by surprise and reaped the benefits.
The defenders lost 70 killed and the attackers, one killed and seven wounded. It is probable that some of the defenders slipped away during the winter of 1879 when the approaches to the mountain were less well guarded.
Conclusion
Although Moorosi had been defeated, the BaSotho learnt a number of lessons from his defeat. The first was that the Cape forces were not invincible and the second was that their mountain fortresses were difficult to take. The Cape Colonial Government did not learn from the weakness of their military resources and this would be a major cause of their defeat in the Gun War. The Cape colonial forces simply did not have the weapons needed to wage war in mountainous terrain. The 8-inch mortar, with its ammunition, was awkward enough to move around on an ox-wagon, not to mention its deployment in action!
In technological terms, the gap between BaPhuthi and Cape forces was small enough to give the BaPhuthi a real chance. Where Moorosi miscalculated was in the level of determination of the Cape Government.
Bibliography
A Colonial Officer (Woon H V), Twenty-Five Years Soldiering in South Africa (A Melrose, London,1909).
Couzens, T, Battles of South Africa (David Philip, Claremont, 2004).
Gordon Maj-Gen, C G, Report on Colonial Forces, (W A Richards [Cape Colonial Government], CT, 1882).
Hughes, B P, British Smoothbore Artillery, The Muzzle Loading Artillery of the 18th and 19th Centuries (Arms and Armour Press, London, 1969).
Hall, D D, 'The Artillery of the First Anglo-Boer War 1880-81', Military History Journal, Vol 5 No 2, 1980 pp 52-8.
Knight, I, 'Storming Moorosi's Mountain', Military Illustrated, No 172, September 2002.
Tylden, G, The Rise of the Basuto (Juta, Cape Town, 1950).
Uys, I S, For Valour, The History of South Africa's Victoria Cross Heroes, (I Uys, Johannesburg, 1973).
Wright, J B, Bushman Raiders of the Drakensberg 1840-1870 (Univ of Natal Press, Pietermaritzburg,1971).
Illustration on the back cover of this issue:
As the Moon dipped, our positions we took
To capture the Mountain, and bring Morosi to book.
The place was impregnable, many declared.
To test that assertion, we now were prepared.
Long rifles and bayonets were served to us all
And seventy rounds each man had of ball.
The big guns on the 'schanzes' were laid
And for daybreak we fervently prayed.
For well we all knew at break of day
We all would be surely wending our way
Upwards with scaling ladders in hand
Few in number, but truly a resolute band.
The plan of attack was a feint up the front
In which the 'Border Guard' bore the chief brunt.
Twas only meant as a delusion and snare
To draw the 'Baphutis' from out of their lair.
Then up the 'Gully' the Tambrookies were sent
Would to God their services had never been lent.
They proved to be cowards and a treacherous lot
And for mutinous conduct ought to have been shot.
Our Fingoes were told to attack in the rear
Of their want of pluck we hadn't much fear
Their leader we knew to be second to none
Pluck, dash and experience all rolled into one.
Up the left and the right the CMR poured
And with fixed bayonets they drove back the horde.
They soon cleared the mountain and planted the flag
The Union Jack on top of the crag.
The old rebel Morosi by Whitehead was shot
And most of his men shared the same lot
The rebellion was crushed, war brought to an end
And the Colony on us can now safely depend.
Deeds of Valour on that day were performed
By one and all as the Mountain they stormed.
The first on the top was Springer by name
His 'Captaincy' he gained for being the same.
Two previous attacks had utterly failed
At last we with pride a victory hailed.
Both officers and men worked together so well
No wonder the Mountain to them quickly fell.
Our Artillery being also very well served
Helped greatly to make the enemy unnerved
As into their midst fell shell after shell
Doing the work of Destruction too well.
Three successful campaigns the Corps has been through
Surely 'ere this a War Medal's their due.
Let Government loosen the string of their purse
And for services rendered their money disburse.
Return to Journal Index OR Society's Home page
South African Military History Society / scribe@samilitaryhistory.org