
 The South African
The writer is a lawyer by profession (BL(Hons)LLB), but is now retired, having served as Legal Adviser and later Town Clerk of the City of Pietermaritzburg and previously as a senior magistrate in Matabeleland, Zimbabwe. Part One of this article describes the organisation of No 10 Mountain Battery, Royal Artillery, the first and, until 1899, the only permanently established mountain battery of the Royal Artillery to serve in South Africa, and reviews the first ten years of its service. Part Two, which follows in Military History Journal, Vol 14 No 5, June 2009, describes the battery's ordnance, equipment and uniforms. Sources for both parts will appear at the end of Part Two.
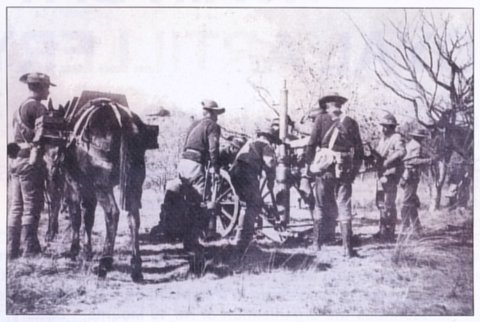
A gun of No 10 Mountain Battery, Royal Artillery, at Thaba-zaka-Mambo, 1896.
This is said to show the men moving the gun whilst under fire from the kopjes in the background.
The barrel was up-ended and placed in the dismounting block where it was secured by
the shifting bar in preparation for being unscrewed. The three men in the blue jerseys were from
No 10 Mountain Battery and the remainder from the Bulawayo Field Force.
Introduction
The most familiar image of British mountain artillery is probably that of the khaki-clad gunners of the 1890s serving their 'screw guns' in the mountainous country of India's North-West Frontier districts; men who, according to Kipling, warned the hill tribes that they should,

No 10 Mountain Battery, Pietermaritzburg, 1896.
The battery is halted with all six guns in a gully about half a mile (800 m) from Fort Napier. The gully is on the slopes
of Signal Hill and runs down to the site off Mayor's Walk where the Battery's mule establishment was once situated.
The men are dressed for the field in dark blue undress uniforms, but instead of the gaiters worn in Britain
by No 4 Mountain Battery, they are wearing blue puttees and also the white cork helmet with a brass ball finial.
They are carrying white cloth haversacks over the right shoulder and a water canteen on a leather strap over the left.
Inset: enlargement from above scene
Although Nos 4 and 10 Mountain Batteries were the only mountain batteries, as such, to serve in South Africa, No 23 Coy, Royal Garrison Artillery, based at Cape Town, was especially armed with 'screw guns' before it was hurriedly sent to Kimberley in 1899 to assist in the town's defence.
In 1889, Mks III and IV of the steel, 7-pounder rifled muzzle-loader (RML) still equipped most mountain batteries in India, but it would appear that the ten Royal Artillery mountain batteries established that year were all armed with 'screw guns' from the outset and retained them for the whole of the period under review. The gun was known officially as the 2,5 inch RML Steel (Jointed) Gun. (It will be referred to as the 2,5-in RML in the remainder of this article ).
Organisation of the Battery
Personnel
A Royal Artillery mountain battery was commanded by a major assisted by a captain and had a subaltern for every two-gun division. In Natal, a battery establishment included a battery sergeant major, a quartermaster sergeant, a farrier sergeant, six sergeants, six corporals, six bombardiers, two trumpeters, nine artificers and 147 gunners.
The service of the Cape Boy Corps against the rebels in Matabeleland in 1896 left nobody in any doubt that these men made first rate soldiers.
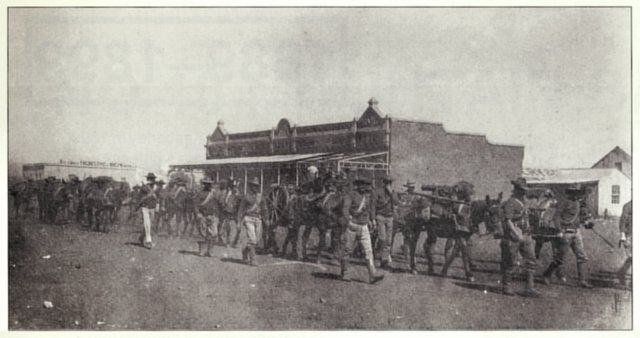
Guns of No 10 Mountain Battery, Bulawayo, 1896.
Here the Battery is seen marching down Main Street, presumably en route to the Matopos.
Transport
Every Victorian battery had a great deal of equipment, ammunition and baggage to move and, in a mountain battery, it all had to be carried on animals, that is to say, mules. Mules are not only surefooted, but also tough and enduring and, contrary to the widespread belief that they are stupid, vicious and obstinate by nature, they are intelligent animals. It is clear that mountain gunners generally recognised these qualities and treated their mules with respect and even affection. The mules most sought after for mountain service were mature animals of six years of age and only standing 14 hands, as the frequent necessity for the gunners to lift heavy loads onto and off the mules' backs made the use of bigger animals problematic.
In addition to the guns themselves, the mules carried everything required by the Battery, including forge charcoal, water, tools, the men's kits, tents and other baggage, spare saddles, harness and other equipment, ordnance stores and ammunition. A mountain battery required 219 mules in all. Of these, 138 were ordnance mules and 81 were baggage and spare mules. The ordnance mules included 36 in the first (fighting) line, 36 in the second (relief) line, 30 in the third (ammunition) line, and 33 in the fourth (artificers') line. Of the first line mules in a 2,5-in RML sub-section, one gun mule carried the 199 lb (90 kg) Mk I chase and a second, the 201 lb (91 kg) Mk II breech.
The axle mule carried the 86 lb 3 oz (39 kg) carriage axle, two boxes of ammunition, and ordnance stores, and the wheel mule, two
153lb wheels (69,4 kg each) and the 41 lb 14 oz (19 kg) elevating gear. The carriage mule carried the 196 lb (89 kg) Mk II carriage, and the first ammunition mule, two boxes of ammunition with a total mass of 228lb (103,4 kg).

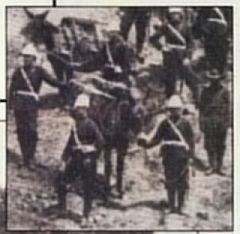
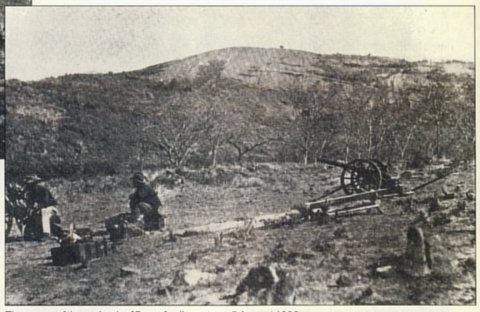
A gun is being directed at the kopjes at the mouth of the M'chabezi Gorge, probably on 1 August 1896.
Although No 2 appears ready to ram, the gun was certainly not prepared for firing as the check rope,
which should have been hooked to the wheels, was still hooked to the rings on the cap squares.
The men are all from the Bulawayo Field Force.
The Battery's service history
The Battery was first garrisoned at Fort Napier in Pietermaritzburg where the original defensible post had been established in September 1843. (Two ranges of this post survive as part of Fort Napier Hospital, on the spur below Signal Hill). The artillery barracks of the 1890s, of which almost nothing now remains, lay to the south of the original defensible post, most of which had, by then, been given up for administrative purposes. The Battery's extensive mule establishment was situated some distance from the barracks in the Swartkop Valley, close to the site of the old SAR foundry off Mayor's Walk.

Map 1. Zimbabwe in 1896. (McCulloch had brought his guns to Bulawayo from Mafikeng
via Botswana, Tati and Mangwe. From Bulawayo, he had marched north with the Matabeleland Relief Force
to Thaba-laka-Mambo and thence south via Bulawayo for the campaign in the Matopos).
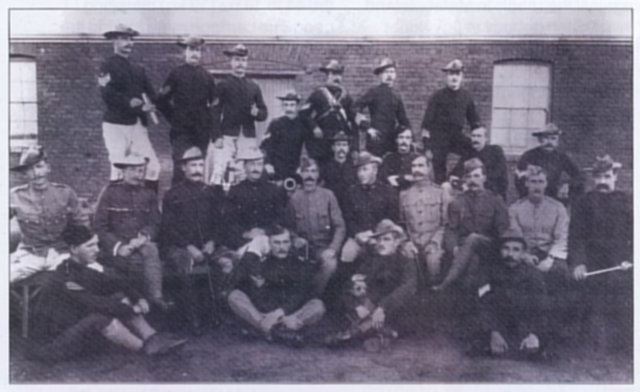
Officers of the Matabeleland Relief Force and Rhodesia Mounted Police, at the police barracks,
Bulawayo, 1896, just after the end of the rebellion in Matabeleland. In the second row are, among others,
Capt H Llewellyn (fifth from the right), Lt McCulloch (third from the right), and Lt Fraser (second from the right).
No 10 Mountain Battery's battery sergeant is seated on the ground, third from the left.
The NCOs standing in dark tunics at the back are from the Rhodesia Mounted Police Artillery Troop.
The Battery did not see any service until 1896, when a two-gun division was attached to the Matabeleland Relief Force (MRF) commanded by Lt Col H Plumer. This had been raised by the Imperial authorities at the expense of the British South Africa Company (BSA Coy) to go to the assistance of the beleaguered guns were under the command of Lt R H F McCulloch, RA, assisted by Lt N W Fraser, who, rather strangely, was an infantry officer serving with the Duke of Wellington's Regiment. Both officers were to be made members of the Distinguished Service Order for their service in Matabeleland. Included in McCulloch's command were a battery sergeant and ten other regulars of the Battery, and 30 muleteers with 40 mules. On arrival at Bulawayo, the strength of McCulloch's command was augmented by 23 local volunteers of the Bulawayo Field Force, who had been trained as gunners in the artillery troop of the recently disbanded Rhodesia Horse (Volunteers). McCulloch could also rely on the assistance of Capt H Llewellyn of the BSA Coy's Rhodesia Mounted Police, who had command of the police artillery troop.
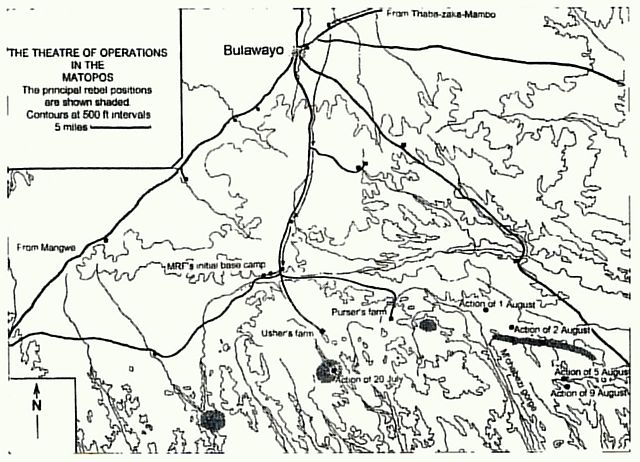
Map 2. Theatre of Operations in the Matopos, 1896
As to the division's service in Matabeleland, it was recorded at the time that ' ... the Mountain Battery was a very business-like corps. The prompt manner in which the guns were limbered up and brought into action, the absence of all fuss and confusion, and the discipline prevailing, were noticeable characteristics of this branch of the force. The mules were a fine lot, regularly groomed and fed, and their smart appearance was all the more marked by contrast with the poor, half-starved and much belaboured animals of the Transport.' (Sykes, 1897, p 239).
The division's first action was at Thaba-zaka-Mambo, north of Bulawayo, where a major rebel faction, holding a group of kopjes, was attacked by Plumer on 5 July 1896. The guns opened fire at 800 yards (730 m) at rebel positions amongst the kopjes and then shelled a kopje at 350 yards (320 m), putting a shell into a cave where it killed 27 of the enemy. Five ring and 25 shrapnel shells were fired. After the success at Thaba-zaka-Mambo, the MRF was sent into the Matopos Hills south of Bulawayo where the principal Matabele rebel indunas were all holding strong positions in very difficult hill country. The induna Babyaan's kopje stronghold was attacked on 20 July, but there the Battery only fired five shots at what was then the long range of 2 500 yards (2 285m). On 1 August, the Battery shelled enemy positions on the heights at the mouth of the M'chabezi Gorge, firing seven ring and two shrapnel shells at a range of 2 500 yards. The next day, at the induna Nyanda's kopje stronghold, the guns opened fire at ranges of between 300 and 1 000 yards (274 to 914 metres) and fired five ring and seventeen shrapnel shells.
Until this time, the division had never been in much danger from the enemy, although it had come under fire at Thaba-zakaMambo, but things turned out rather differently on 5 August, when Plumer launched an attack on positions held by the induna Sikombo. Whilst the force was camped between two tall kopjes, known as T'shalimbe and T'shongwe, it became apparent that its intended route to Sikombo's stronghold was flanked on the right by a rebel-held kopje called Malumika. Plumer ordered Capt Beresford to take McCulloch's guns, in company with Llewellyn's artillery troop and some infantry, and ascend a huge granite mass called T'shingongoma, from which the guns could bring plunging fire to bear on the rebels on Malumika. However, whilst making their way up a rocky slope to gain the base ofT'shingongoma, Beresford's party was ambushed. The rebels attacked frontally and on both flanks and made a determined rush on the guns, coming within thirty yards (27 m) of them, but were driven back by eight rounds of case shot fired at point-blank. Learning of Beresford's difficulties, Plumer was obliged to make what amounted to a diversionary attack on Malumika with the main body of the MRF. Although costly, this proved successful and caused the rebels to withdraw from around Beresford's position. By this time, both McCulloch and Fraser had been wounded and Llewellyn had assumed command of their guns. He fired three ring and 21 shrapnel shells into the enemy as they retreated southwards over T'shingongoma. Plumer then withdrew the MRF to a camp just outside the hills.
The scene of the ambush of Beresford's party on 5 August 1896.
Included are one of the 2,5-in RMLs, on the right, and a Hotchkiss gun of the Rhodesia Mounted Police.
T'shingongoma is in the background. The intended position of the guns was on the skyline above the man seated on the ammunition boxes.
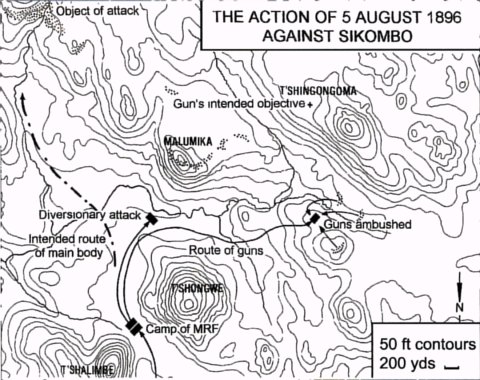
Map 3. Action against Sikombo, 8 August 1896.
Umlugulu, who was holding kopjes not far from Sikombo, was the next induna to be attacked by the MRF. After a chaotic night march from their camp, the troops arrived at Umlugulu's kopjes on 9 August. Still under Llewellyn's command, the guns fired twelve ring and fourteen shrapnel shells into the enemy positions, but there was little sign of enemy activity and the troops halted for the night high up amongst the kopjes. There they came under attack in the evening and Llewellyn fired a round of case shot to help disperse the not very enthusiastic rebels. This was the last action involving the guns as the rebels in the Matopos made peace soon afterwards.
McCulloch and his men were sent back to Bulawayo whence they returned to Pietermaritzburg before the end of the year. They left their two guns and all the mules at Bulawayo with the recently re-organised Rhodesia Mounted Police Artillery Troop. The battery sergeant also remained behind for a while to assist Llewellyn in training the police gunners. (The same two guns formed part of the equipment of the British South Africa Police Artillery Troop which, under Llewellyn's command, was included in Plumer's forces during the AngloBoerWar).
When war with the Boers threatened in 1899, the whole of the Battery, which had been made up to six guns again, was sent from Pietermaritzburg to reinforce the garrison at Ladysmith. Not long after its arrival, the Battery was involved in the disastrous affair originally known as the battle of Farquahar's Farm. At night on 29 October, the Battery accompanied a column of infantry commanded by Col Carleton, which marched from Ladysmith to cooperate with two brigades in an attack planned for the next morning on the supposed positions of the Boer forces then closing in on the town from the north and north-east. One brigade was to attack Long Hill on the British right, which was believed to anchor the Boer left flank, whilst the second was to await the success of the first and then attack the centre of the Boer position on Pepworth Hill.
Carleton was to seize and hold Nicholson's Nek, a pass on the Boer right by which it was thought the enemy would attempt to retreat once they had been forced off Long Hill and Pepworth Hill. The following brief account of the action is based in part on one published by Mr R Drooglever in Soldiers of the Queen, No 88, March 1997, p 28.
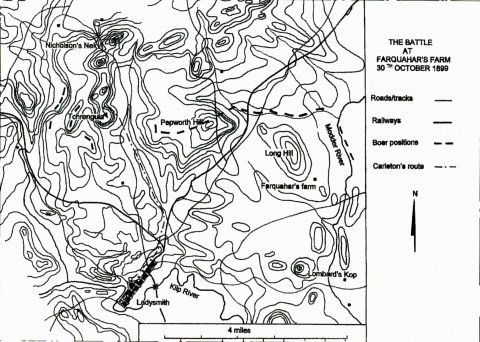
Map 4. The battle of Farquahar's Farm, 30 October 1899.
What actually happened has never been adequately explained, but it appears that, in the early morning of 30 October, as Carleton began to ascend the hill on his left, known as Tchrengula, which would give access to the heights above Nicholson's Nek, some sudden surprise caused the infantry's relatively untrained ammunition mules to panic and stampede downhill. They took many of the Battery's mules with them and all careered into the infantry, who were following. In the ensuing confusion, it seems that most of the Battery's mules, with at least one officer and about 88 men, became separated from the rest of the Battery and, having lost contact, made their way back to Ladysmith. Once a semblance of order had been restored, Carleton led his men up onto the southern end of Tchrengula, intending to continue, at dawn, on to his objective, which lay just to the north. The next morning, the attack by the first brigade on Long Hill failed, partly because the enemy on the British right had abandoned their positions on the hill and taken up better ones on the Modder River, and both brigades were then somewhat ignominiously withdrawn to Ladysmith, leaving Carleton and his men cut off from the town.
Soon after the sun had risen that morning, Carleton became aware that the Boers had taken possession of hills on both his flanks. They were also soon to occupy the heights above Nicholson's Nek. Before long, the British position was being swept by accurate rifle fire from both flanks and the heights to the north, which further demoralised the already jittery troops. The survivors of the Battery could not bring a single gun into action as in every case essential parts had been lost with the stampeded mules. In the course of the next few hours about ten of the gunners were killed and, at midday, Carleton's infantry began to surrender. All five of the Battery's officers present, various parts off our guns and the surviving gunners and mules on Tchrengula fell into the hands of the Boers. No Victorian mountain battery had suffered so serious a disaster since the loss of a half of Capt Backhouse's battery in Afghanistan in January 1842.
Some five weeks later a few men of the Battery managed to retrieve some of its reputation by their participation in the successful sortie against a Boer battery on Lombard's Kop during the night of 7/8 December. How many of the gunners were involved in the sortie is not clear, but, in a photograph of those involved, taken after the action, there are fourteen men. The circumstances of the incident are too well known to require repetition here. Suffice it to say that the sortie resulted in a Boer 155 mm Creusot gun and a 120 mm Krupp howitzer being put out of action, at least temporarily, and the capture of a Maxim machine-gun.
The end of 1899 saw the surviving men and two guns of the Battery besieged in Ladysmith. Their guns were not to play a significant part in the defence of the town, nor in the remainder of the war, for, being essentially only short-range anti-personnel weapons, they could have but little effect against an enemy so adept at bringing to bear accurate long-range fire from well-selected and concealed positions.
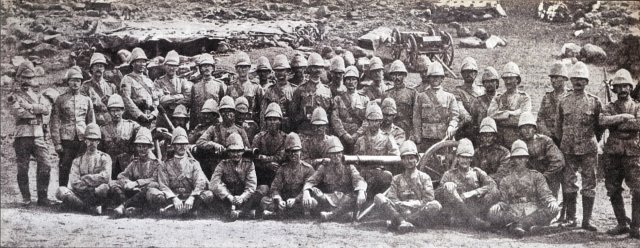
Survivors of No 10 Mountain Battery in Ladysmith, Natal, November 1899.
End of Part One
Return to Journal Index OR Society's Home page
South African Military History Society / scribe@samilitaryhistory.org