
 The South African
* Known by the British as 'Bankkop'
On 4 January 1902, on a ridge overlooking a fertile valley on the farm Onverwacht, the advance guard of a British column settled down for a midday meal. The commander of the detachment of 110 men of the 5th Queensland Imperial Bushmen, together with a company of mounted infantry of the Hampshire Regiment and some Imperial Yeomanry, was Major John Maximilien Vallentin of the Somerset Light Infantry. Major Vallentin had been in South Africa since before the war and had been brigade major in Ladysmith when hostilities began. He had enjoyed a varied career in South Africa, behaving with 'conspicuous gallantry' at Elandslaagte on 20 October, 1899 and later, in Ladysmith, while serving as ADC to Brigadier General Ian Hamilton. He had contracted enteric fever but had recovered to rejoin Hamilton in Bloemfontein later in 1900. Then, as Commissioner of Heidelberg, he had lived with a Boer commando in that neighbourhood for a week while Field Marshal Lord Roberts's Proclamation was under discussion (M G Dooner, pp 393-4). His name was mentioned in despatches four times and he is described in the Times History as an 'officer of proven gallantry and capacity' (L Amery, V, p 456).
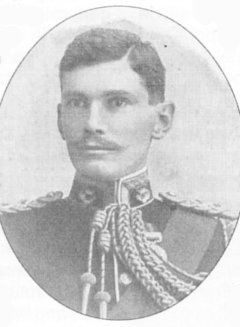
Major J M Vallentin
Vallentin had halted his men on a flat area on the summit of the Bankkop range of hills, 30km east of Ermelo. Here, pans (small depressions where water collects since the underlying strata do not allow it to drain away) provided some refreshment for the horses and the men, so they off-saddled and prepared a meal. In order to prevent being caught by surprise, Vallentin placed pickets along the ridge running a few hundred metres to their front in a line stretching about three kilometres. This was a very strong position, secure from attack in front by the steep ridge while behind them were the soldiers of the Hampshire Regiment and the rest of the 19th Company of Imperial Yeomanry, Scots from the Lothian and Berwickshire. Attack from behind across the flat ground was thus highly improbable. Not far away, in the direction of Ermelo, was the column of Brigadier General Herbert Plumer, nearly a thousand men with mounted infantry and artillery. Even closer, to the east of them, was another column of similar strength commanded by Scots Guardsman Colonel William Pulteney.
During the previous month, eight British columns under the energetic leadership of Major General Bruce Hamilton had been searching for General Louis Botha who was known to be in the area with a force of about 700 men. Botha had been leading something of a charmed existence of late, coming close to capture on 4 December 1901 when Colonel Sir Henry Rawlinson raided the farm Oshoek at dawn and captured more than a hundred Boers, wagons and supplies. Botha's men were driven eastwards and Plumer and Pulteney made contact again at Kalkoenskraal on 6 December, Botha again evading capture (Amery, V, p 453-4). Now the British knew Botha to be somewhere along the upper Vaal River, a well-watered area of hills and ravines, and the search for Botha's force intensified. Hamilton and four columns were to the east of Ermelo. Two more columns moved south from Carolina and a number of small laagers were successfully raided during December. However, on 19 December, General Coen Brits had succeeded in ambushing part of Brigadier General J Spens's column on the farm Holland and inflicted 140 casualties, most of them captured (Amery, V, p 455; F P du P Robbertze, Chapter 20; After Pretoria, p 938). Brits evaded encirclement a few days later as three columns, Plumer, Pulteney and Spens, closed in on him and on 26 December he joined up with Botha.
On 1 January 1902, the three British columns headed south-east out of Ermelo. Spens returned to Begin-der-Lyn to guard the blockhouse line between Ermelo and Standerton, while Plumer and Pulteney moved along the Piet Retief road. On the night of 2 January these two columns, comprising more than two thousand men with guns and transport, camped on the farm Maviristad, uncertain of the precise whereabouts of their enemy. The Boer force was not far away, camped on the farm Windhoek (owned by the widow Ernst, whose husband had been killed early in the war in the fighting along the Tugela River) (H S Oosterhagen, p 16).
The next morning patrols were sent out into the hilly surrounding countryside, its kloofs and gullies affording ideal hiding places for the Boer commando. One of these patrols, consisting of men of the New Zealand Mounted Rifles, was surprised and surrounded by Boers from General Opperman's commando on the farm Rotterdam. Twenty-eight were captured, disarmed and released. It is said that Opperman gave their officer a horse to help him make his way back to the camp at Maviristad (Albert Schmidt). Another patrol was attacked that day on the farm Vlakfontein, along the Vaal River, and five of their number were cornered in a kraal and forced to surrender (Robbertze, p 74; Oosterhagen, p 16). The intelligence gained from these two incidents gave Plumer a clear indication of where Botha's force might be hiding. On the morning of the 4 January, Plumer's column marched north along the Vaal River while Pulteney followed the lower road that would take him past the farms Waaihoek and Vlakplaas and onto the eastern edge of the Bankkop range of hills. The intention was to encircle the Boers in the Bankkop hills.
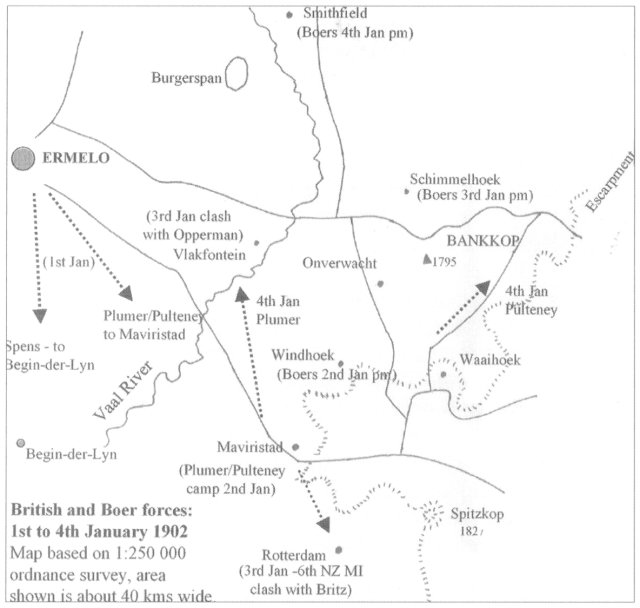
British and Boer forces: 1st to 4th January 1902
Map based on 1: 250 000 ordnance survey, area shown is about 40kms wide
The events of 4 January have been well documented. In addition, there is a sketch map in a letter by a young private of the 5th Queensland Imperial Bushmen, David William Priest, to his father and brother, which, as far as is known, is the only contemporary diagram of the action in existence. Recent exploration of the site has turned up a number of the features described on Priest's map and this has proved to be the key to understanding what happened on that day. In the letter, Priest states that they 'moved off at 5am with light transport and guns only. Q[ueensland] I[mperial] B[ushmen]'s advance guard on left and Pulteney's corps on the right about 6 miles [10km] from us, snipers were shooting at us all morning. No one hit.' Clearly, the Boers were watching the advance closely, but not too closely, if they were unable to hit anyone all morning.
The Boers had spent that night on the farm Schimmelhoek, where there is a sheltered kloof. Five or six hundred horsemen and their mounts were easily accom[m]odated there (Robbertze, p 74). In the morning, General Botha told Brits, Opperman and Chris Botha that he had received information that the advance guard of a British column was approaching and he advised withdrawal. His generals were not in favour and advocated a strike against the enemy. In true Boer democratic fashion, the three juniors prevailed over their commander and Brits planned the attack and the placing of the commandos. They were from Wakkerstroom (Chris Botha), Swaziland (Koot Opperman), Standerton (Brits) and Ermelo (Commandant Bosman). Brits, as the originator of the plan, would be in field command (Robbertze, p 76).
The trap was carefully planned and as Vallentin's force arranged their pickets along the ridge, General Brits deployed the Boer force. About 500 men were hidden in a kloof which has since been dammed and stocked with fish. In other ravines to the south-east were other Boer forces. Below the ridge where the British pickets were watching for any sign of Botha's force was a flat shelf about a kilometre square. There were ravines on two sides and the western edge dipped down to the small river running north westwards to join up eventually with the Vaal River.
A decoy was arranged, comprising fifty cattle with a few Boers to herd them along the flat ground and down over the rim towards the stream. The Boers in the kloofs remained out of sight of the Queensland men on the ridge, but the decoy was spotted and reported to Major Vallentin who decided to investigate. Leaving some of the men on the ridge in a secure position, the rest headed off down a roadway leading over the ridge and down onto the lower level. (David Priest's sketch clearly shows the road which can be identified even today although now disused. A pom-pom, mounted on artillery wheels and drawn by horses, could not simply be dragged over the veld; some kind of road or track was needed). The decoy disappeared over the edge of the plateau just over a kilometre away and Vallentin's force chased after them with the Yeomanry as the advanced screen. The Queenslanders followed with orders to support the Yeomanry. Suddenly, from the right flank, the Boers opened fire and emerged from the ravine where they had been hiding. They made for the pom-pom but Lieutenant Reese of the QIB was ordered to dismount his men and form a defensive line. They opened fire with the pom-pom, but it jammed after firing only five shots. Lieutenant H R Johnstone of the Yeomanry was shot and Major Vallentin was hit as they tried to get the pom-pom away. Two of the gun horses were shot, but QIB Sergeant Major Frank Knyvett rallied the men in its defence, apparently including Private Priest, and the gun was dragged back up the road and hidden in a small donga.
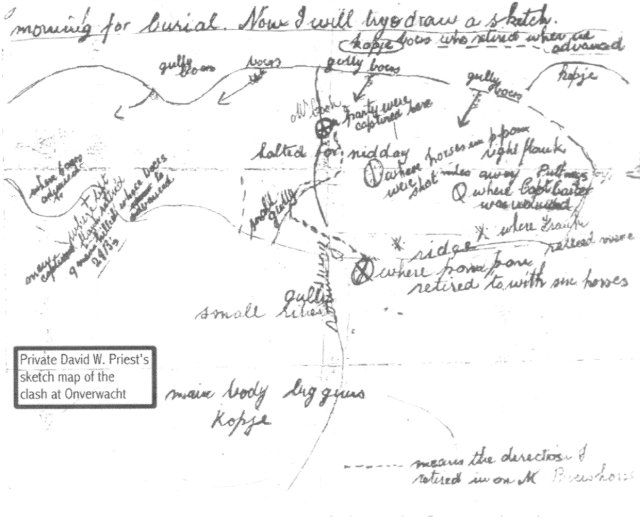
Private David W. Priest's sketch map of the clash at Onverwacht
Major F W Toll of the QIB, then the senior officer present, managed to organise a defensive line and send some of the horses back up the ridge. A group of men on the left flank, under Lieutenant B W Cook, were taken prisoner, but the rest of the force was pushed back up the ridge to a spur on the north-east. The Boers heavily outnumbered the Queenslanders, the few Yeomanry, and some of the men of the Hampshire Regiment who had arrived to assist. On the right, some of the QIB, among them the wounded Captain Carter and Lieutenant Higginson, managed to retire up the ridge and join those who had remained on the right of the picket line. A galloper was sent to summon the columns; Colonel Pulteney's column on Bankkop to the east was closer than Plumer's who had followed the line of the Vaal River.
Major Toll and his men were then cut off from the rest of the force. The Hampshires had left their horses in a little hollow behind the spur, but the Boers managed to work their way around and attack from the rear. There was absolutely no cover and, with nine of the Bushmen and eight of the Hampshires killed and the Boers managing to get in close, further resistance was suicidal. On the Boer side, in spite of heavy losses and it being only a matter of time before more than 2 000 men from the British columns arrived, the attacks were pressed home with great bravery and even desperation.
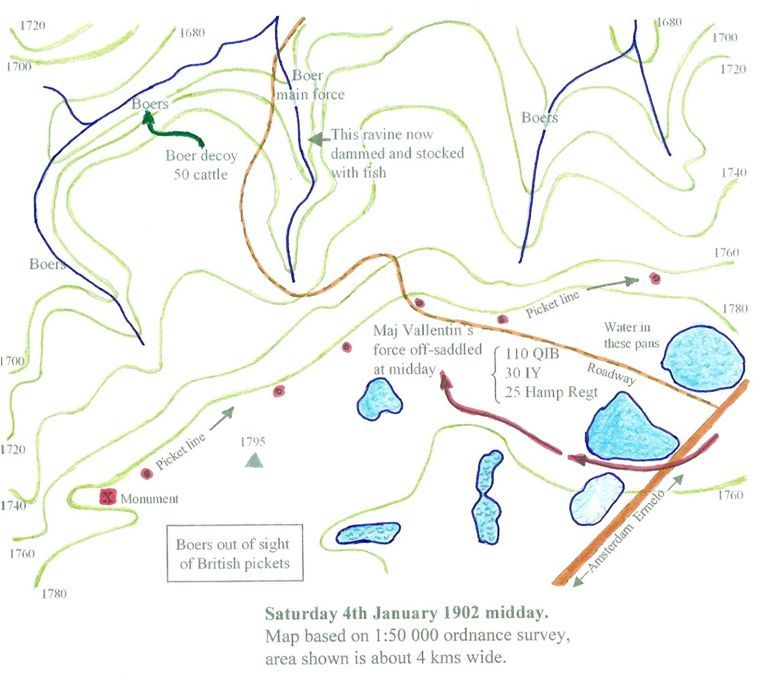
Saturday 4th January 1902 midday.
Map based on 1:50 000 ordnance survey, area shown is 4km wide.
General Koot Opperman was killed, shot in the forehead as he urged his men forward. His body lay on the field and his adjutant, M W Coetzer, and Willem Collins battled to load the 120kg body onto a horse. By then, the British columns were arriving at the top of the ridge and the Boers now became subjected to artillery fire. In spite of all their efforts, they failed to recover the general's body which was left on the field. (Today it lies buried in Vryheid cemetery)(Stolp, 1948). Another casualty was the young Mosie van Buuren who was in charge of Louis Botha's young son. Shot in the stomach, he died later in the day and is buried on the nearby farm, Mooiplaas. During the last assault on the spur, Field Cornet Manie Swart complained to General Brits that they could not shoot at the English because they could not see over the edge of the ridge. Brits then ordered them to throw stones over the ridge to make the enemy keep their heads down. This enabled the Boers to climb over the ridge and to jump right into the few remaining British soldiers (Robbertze, p 77). The Boers captured thirty unwounded horses, but very few rifles and little ammunition, the Queenslanders and the British having hurled their weapons into the long grass and there being no time to search for them.
Sergeant-Major Weston of the Hampshires was wounded, fatally as it turned out, hit by a bullet that came over his shoulder, striking his bandolier and bursting two or three cartridges. Taken to hospital in Charlestown, he died there on 22 January. Louis Botha was on the field in person and, although he allowed no looting, he asked the wounded Hampshire Regiment's Captain Leigh for his binoculars. Apparently, he was much amused to discover that they had been smashed by a bullet (M C Jackson, pp 308-13).
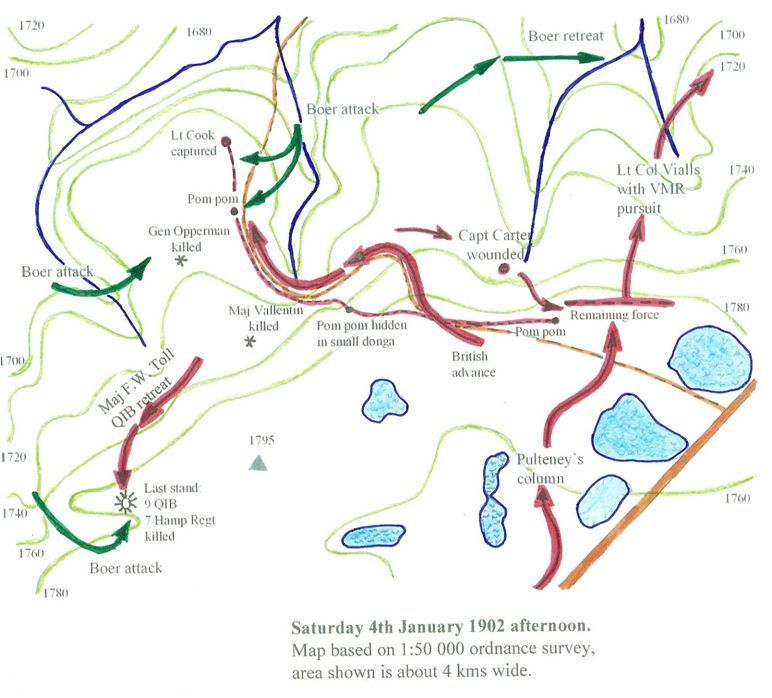
Saturday 4th January 1902 afternoon.
Map based on 1:50 000 ordnance survey, area shown is 4km wide.
Boer casualties were heavy and almost certainly more than the 23 killed on the British side (one Imperial Yeomanry officer, eight men of the Hampshire Regiment and thirteen Queenslanders, including their commander, Major John Vallentin.) Only five Boers were named as casualties. Jackson writes that Sergeant-Major Weston told him that the British prisoners, some seventy-nine of them, were used as a burial party and to get the wounded away, 'a favourite game of theirs'. Priest, too, tells how the Boer doctor whose offer of assistance was refused by the British had said that the Boers had had forty-seven killed and sixty-eight wounded.
By then the balance of Vallentin's force, perhaps forty Queensland Imperial Bushmen and a number of Hampshire Regiment had rescued the pom-pom from the donga and, unjamming it, they opened fire on the Boers retreating down the valley towards the farmhouse of Onverwacht. The advance element of Pulteney's column had arrived on the scene, having ridden in from the east over the Bankkop hills. Again, the Boers charged the Queenslanders, but again they were driven away by Pulteney's Victorian Mounted Rifles under Major Vialls. Shortly afterwards, Brigadier-General H Plumer and Lieutenant Colonel F Colvin and the remainder of the columns arrived from east and west.
Lieutenant-Colonel Vialls with the Victorians and other mounted men were ordered to give chase but the Boers had scattered in various directions. Viall's men made contact some four kilometres away, where they were charged by the Boers, but they drove them off with ease. Some of the Boers headed for the Vaal River and escaped to the north where they spent the next day on the farm Smitfield, not to be disturbed by the British, who probably had no idea they were there. Jan Moerdyk's diary for Sunday, 5 January, wrote that, 'after the punishment meted out to them yesterday the enemy left us in peace today', seeming to epitomise the indomitable Boer spirit for their cause which was now clearly hopeless.
During the month of January, the British under Bruce Hamilton continued with their night-raiding tactics, but Lord Kitchener's focus was shifting towards efforts to capture Christian de Wet in the eastern Orange Free State and to deal with Koos de la Rey in the western Transvaal. Columns were reorganised and manpower was reduced. Louis Botha remained in the area, but soon realised that the denuded landscape with the few farms still standing was not adequately able to support his force. The British recognised that to surround and capture him was not even to be attempted. In mid-February, Botha and his followers by-passed the Wakkerstroom-Piet Retief Blockhouse line by marching through Swaziland and headed into the mountains around Vryheid. Brits went back to the Standerton area and his base at Bloukop. Onverwacht was the last aggressive action of Botha's commando in the eastern Transvaal. He and his men remained at large in the Vryheid area until the commencement of peace negotiations in April 1902 (Amery, V, pp 459-60).
After the battle, four graves were dug on the ground near the spur - eleven men of the Queensland Imperial Bushmen were buried in one; seven from the Hampshire Regiment in the second; five Boers in the third; and Major Vallentin in the fourth. Some years later, Vallentin's family arranged for a monument to be erected over the grave. This monument was organised, on behalf of the family, by Captain Siemssen of General Louis Botha's personal staff. The bodies were exhumed and reinterred in a Garden of Remembrance in Ermelo Cemetery on Saturday, 5 May 1962. Monuments erected over the original graves were also moved and now stand in Ermelo. Members of Major Vallentin's family and a representative from the Australians attended the reinterment ceremony.
In February 2002, the local community erected an impressive monument on the original grave site. This monument, made from stone corner posts, bore the names of the five Boers who had been buried there, and the 2/14 Australian Light Horse Regiment laid a brass plaque bearing the names of their dead. Only a fragment of the original cast iron cross erected over the Hampshire Regiment dead with the inscription 'For King and Empire' remains, cemented into the base of the monument. Because the monument site is on private land and carefully guarded by the local farmer, vandalism has been avoided thus far. It is a fitting memorial to the brave men of both sides who fought it out along the ridge more than a century ago.
Sources
After Pretoria
Amery, L (ed), The Time History of the War in South Africa, Vol V.
Cilliers, Mrs Gretchen, pamphlet compiled and issued on the occasion of the unveiling of the monument at Onverwacht, 2002.
Eloff, C C (ed), Oorlogsdagboeki van H S Oosterhagen (HSRC, Pretoria, 1976).
Moerdyk, Jan Leendert, 'Diary of the First War of Independance', translated from High Dutch by his son, Pieter Cornelius Moerdyk.
Murray Cosby Jackson, A Soldier's Diary, (The Royal Hampshire Regiment Museum Trustees 1999, reprint of the 1913 original).
Murray, P L , Official Records of the Australian Military Contingents to the War in South Africa.
Priest, Private David W, 5th Queensland Imperial Bushmen, letter to his father, now in the hands of his son, Bill Priest.
Robbertze, F P du P, Generaals Coen Britz en Louis Botha 1899-1919.
Schmidt, Albert, ' Jacobus Daniel (Koot) Opperman", unpublished article written for the unveiling of the monument on Onverwacht farm in 2002.
Stolp, C G in Fleur, 1948, quoted in the inauguration pamphlet.
The South African War Casualty Roll (J B Hayward & Son, 1982).
Wallace, R L, The Australians in the Boer War (The Australian War Memorial, Canberra, 1976).
Return to Journal Index OR Society's Home page
South African Military History Society / scribe@samilitaryhistory.org