
 The South African
‘Urgent Imperial service’
On 9 July 1915 the German forces in South-West Africa (now Namibia) surrendered to the Union Defence Forces under the command of the prime minister of the Union of the South Africa, General Louis Botha. The Union Defence Forces had barely been in existence for three years when they secured what was seen at the time as the first major allied success of the First World War. This victory was achieved with a minimum of casualties in a war which has become a byword for slaughter. This and the ascendance to power in South Africa in 1924 of the National Party/Labour Party Alliance meant that the campaign would be largely forgotten, the National Party having opposed South Africa’s undertaking the campaign on behalf of the British Empire. Even today, very little has been published on this campaign and copies of the two main works, Collyer’s 1937 staff history and the 1991 popular history by L’Ange, are difficult to obtain.
This begs the question: why should we revisit the German South-West Africa Campaign? There are several reasons. Firstly, it was the only major campaign undertaken by a Dominion with very little Imperial support - mainly in the form of the provision of Royal Navy protection, a unit of Royal Navy armoured cars, aircraft for the South African Aviation Corps, and 20 000 Portuguese Model 1904 Mauser-Vergueiro rifles and twelve million rounds of ammunition. Secondly, owing to the young age of the Union Defence Forces, to fight the Germans, South Africa had to rely on the expertise and skills developed by the Cape colonial forces, Natal militia, Transvaal volunteer force and the commandos of the former Boer republics of the Transvaal and the Orange Free State. There was also the question of mobilising men who had been on opposing sides only twelve years earlier, during the Anglo-Boer War of 1899 to 1902, many of whom perceived Germany to have been one of their major supporters during that conflict and some of whom saw the First World War as an opportunity for the former Boer republics to regain their independence. Those who were closer to the seat of power saw things differently. Botha and Smuts considered that the terms of the Treaty of Vereeniging were generous and that oaths of allegiance were binding. With the formation of the Union of South Africa, they felt that independence had effectively been achieved. Amongst those of British descent, the cause of the Empire enjoyed wide support.
The ‘urgent Imperial service’ which was requested of the Union of South Africa involved the capture of the ports of Lüderitz Bay and Swakopmund and the silencing of the radio transmitters there and especially of the powerful one in Windhuk which, when conditions permitted, was capable of sending signals to Nauen in Germany. The ports could be used as bases for German raiders, controlled and fed intelligence via the coastal wireless transmitters. These facilities, positioned as they were on the jugular vein of the British Empire, had to be denied to the German Reich. Capturing the ports called for an amphibious operation, which presented its own difficulties. For the Union Defence Forces, this type of operation was entirely new, but a land attack from the south was a logistical nightmare. The South African railheads at Steinkop and Prieska were between 80km and 480km from the border with German South-West Africa. In either case, the campaign would entail crossing a desert barrier before the more hospitable inland highlands could be reached. With military transport beyond the ports and railheads still dependent on animal traction, the pace of the campaign would be determined by the ability of the South African logistical apparatus to bring water to the forward troops and the provision of water would depend on how quickly railway lines could be constructed or repaired.
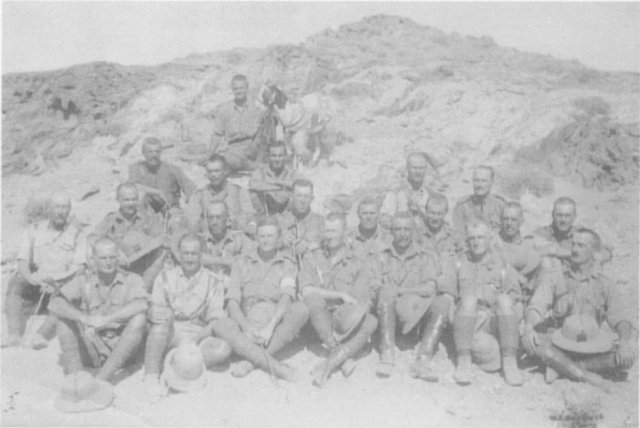
Officers of the Pretoria Regiment pose in front of a dune,
Lüderitz Bay, German South-West Africa.
(Photo: By courtesy, SANMMH).
The offensive in the south
At the senior officers’ meeting, the decision was taken to occupy Lüderitz Bay and to use naval gunfire to destroy the wireless station and harbour facilities at Swakopmund. Another force, Force A, was to land at Port Nolloth and operate against the southern border of German South-West Africa while Force B, based in Upington, was to apply pressure to the German colony’s eastern border. Force B, to be composed of mounted rifle units and machine guns, was to assemble at Upington under the command of the district staff officer of Military District No 12 (Prieska), Lt-Col S G Maritz. Mobilization of the Active Citizen Force (ACF) had already begun on 6 August and many ACF units were concentrating in Cape Town.
On 31 August 1914, Force A, consisting of two 4-gun artillery batteries, five regiments of South African Mounted Riflemen (three squadrons each), the Witwatersrand Rifles, a section of engineers and an ammunition column under the command of Brig-Gen H T Lukin, began landing at Port Nolloth.
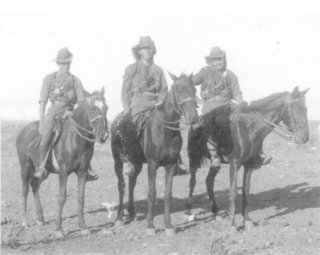
Mounted units, such as the Witwatersrand Rifles (above),
faced considerable challenges in the desert.
(Photo: By courtesy, SANMMH).
The third force, Force C, was assembling in Cape Town and was waiting to go to Lüderitz Bay. The Union Parliament convened on 9 September and, on 11 September 1914, adopted a motion (92 votes to 12) which assured the King of the Union’s continued loyalty and support and endorsed all measures necessary to cooperate with the Imperial Government to maintain the security and integrity of the British Empire. Military preparations started to gain momentum, but so did those of the group who were opposed to South Africa’s participation in the war on the side of the Allies.
On 14 September, the South African Mounted Riflemen (SAMR) took Raman’s Drift. The next day Brig-Gen C F Beyers, commandant-general of the Active Citizen Force, and Major J C Kemp, district staff officer, Military District No 7, resigned their commissions. That evening, General Koos de la Rey was killed when Beyers’ car drove through a road block. This event delayed Kemp’s and Beyers’ plans. On 16 September, the Vrij Korps, a unit of Afrikaners who had refused to accept British rule and had gone into exile in German South-West Africa offering their services to Germany, attacked the South African Police Station at Nakob. The six-strong SAMR detachment was overwhelmed.
Meanwhile, a naval bombardment on 14 September had destroyed the wireless station at Swakopmund and, on the following day, Force C, consisting of one six-gun battery, a squadron of the Imperial Light Horse, the Transvaal Scottish, the Rand Light Infantry and a section of engineers, sailed from Cape Town, landing its scouts on the evening of 18 September and making an unopposed landing the next morning. Thus far, the Union Defence Forces’ plans were working. However, a disastrous advance to Sandfontein saw Col Grant’s SAMR, supported by two guns of the Transvaal Horse Artillery, surrounded and overrun on 26 September, while, at Upington, Maritz refused to move, claiming that his men were ill-equipped, untrained and not strong enough to operate against the Germans. His refusal to move contributed towards the Germans' ability to destroy Grant’s force at Sandfontein.
Maritz’s behaviour meant that action had to be taken. The Imperial Light Horse (ILH) was despatched to Upington from Cape Town and the Durban Light Infantry (DLI) was sent from Durban. The two units met at Prieska and reached the railhead, 198km from Upington, on 2 October. On being informed that reinforcements would be arriving, Maritz replied that he did not need them to defend Upington. That afternoon he proceeded towards the border with German South-West Africa. He went into open rebellion on 9 October, the day on which the DLI reached Upington. Maritz’s rebellion triggered a wider rebellion in South Africa which diverted troops who were to be deployed in German South-West Africa. On 8 December, the rebellion in the Orange Free State was over and by mid-December it had ended in the Transvaal.
Meanwhile, on 26 September 1914, Force C eliminated the German outpost at Grasplatz. In the aftermath of the defeat at Sandfontein, Force D, consisting of two ACF mounted rifle regiments and a further five infantry battalions, a six-gun battery of field artillery and two four-gun heavy artillery batteries, landed at Lüderitz Bay, allowing a slow advance to be undertaken inland to Aus, to where the Lüderitz Bay wire transmitter had been moved. To get there, however, the combined Forces C and D had to cross a 129km stretch of desert.
The Germans believed that, with their aid, the desert would destroy Central Force. Owing to superior logistics, however, Central Force triumphed. The main challenge lay in rebuilding the railway so that water could be supplied to the front line troops. On 8 November 1914, Central Force was able to take Tschaukaib and although no German soldiers were captured, 32km of intact railway line and an intact overhead water tank fell into South African hands. There the advance halted until 13 December 1914 when Central Force made its next advance. Three battalions of infantry were brought up to Tschaukaib in preparation for a raid on Garub. The raiding party encountered a well-entrenched German position which included two Maxim guns and a Pom-Pom. With no artillery, the raiding force could not dislodge the Germans and a stalemate ensued until a large force was seen leaving Aus. As it was likely that this force included artillery, the South Africans decided to withdraw and to consolidate the Tschaukaib position. Difficulties in providing water forced the replacement of the mounted rifle regiments with infantry. The Tschaukaib garrison also had to deal with intense heat, prolonged sandstorms, and intermittent air attacks.
Garub was finally occupied, unopposed, on 22 February 1915. To turn it into a base for the attack on Aus, the water holes had to be developed. By 22 March, the daily yield from the Garub wells was 270 000 litres of water and three mounted brigades were finally brought forward to Garub in preparation for the attack. On 26 March, General Louis Botha conferred with Brig-Gen McKenzie at Lüderitz Bay. Operations in the north had yielded documents indicating that the Germans had stripped the southern theatre in order to face the northern thrust from Walvis Bay. On the night of 28 March, the wireless transmitter went silent, further evidence of the imminent abandonment of Aus by the Germans. The last Germans departed on the night of 30 March, when Central Force left Garub. Aus, its formidable defences abandoned, was entered without opposition.
The Germans retreated northwards and the scene was set for a prolonged pursuit. It took nine days before the wells at Aus were able to support Central Force’s mounted troops. On 14 April a flying column was formed, consisting of three brigades of mounted rifles (two regiments per brigade) and one field gun battery. Leaving Aus on 15 April 1915, it covered 185km in four days, the mounted brigades having to move at intervals of a day to conserve water. The column followed the railway line to Kuibis, after which it cut across country to Bethanie and on to Besondermaid, where it surprised a group of six German soldiers. After a six hour rest, the advance continued, Berseba being reached at dawn on 22 April 1915. Here, two German officers and 28 men were rounded up after a chase. An NCO, who managed to escape, reported the presence of South African troops at Berseba, but the Germans were doubtful and a force approaching Berseba was surprised to find that South African troops were indeed in possession. Rifle fire provoked an instant pursuit which, after several hours, resulted in the capture of several prisoners.
At Berseba, the mounted brigades were united and the pursuit continued with the troops on short rations. On reaching Grundorn on 26 April, they found the telegraph line to be intact, enabling the interception of German telephone messages, which revealed that the Germans were unaware of the proximity of the South African flying column and intended leaving Gibeon that night. If the Central Force column moved fast enough, it might trap the German force. Scouts reported that a train was getting up steam in Gibeon Station and that there was much movement of supplies from the village to the station, but the Germans took their time leaving, not realising how close the Central Force was. The attack opened when a party of South African scouts and engineers was sent forward to blow up the railway line to Windhuk. Three mounted rifle regiments, the Umvoti Mounted Rifles, the 2nd Imperial Light Horse and Natal Light Horse, under the command of Col J P Royston, moved in after the demolition team.
Royston’s orders were to cut the German line of retreat, but he made several mistakes in deployment. The most serious of these was that he positioned his force too close to where the railway line had been blown up. A German patrol, sent to investigate the explosion, soon located his force, which was also unwisely deployed parallel to, rather than across, a possible German retreat. Poor reconnaissance on the part of Royston’s force also enabled a German machine gun to wreak havoc on the South African position from a nearby railway culvert. Inexplicably, too, Royston himself then went to the rear to bring up the Umvoti Mounted Rifles. In his absence, the commander of the 2nd ILH gave the order to retreat to the horses. When Royston returned, he ordered a general withdrawal. In the confusion that followed, a squadron of the inexperienced Natal Light Horse, left behind, was forced to surrender shortly after dawn. Royston withdrew his men 4,8km to the east to await daybreak.
The defeat of Royston’s force led the Germans to believe that they had removed the immediate threat to their position at Gibeon. The stocks of captured rifles were smashed and attention was given to the wounded. There were celebrations and a shaking of hands, but these were short-lived because already Brig-Gen McKenzie was beginning his attack from the south. By dawn, McKenzie’s men were closing in on Gibeon Station. A train in the station with steam up was immediately shelled by the 15-pr guns of the 12th Citizen Battery. The train crew surrendered immediately because the train was packed with explosives which, had they been detonated, could have destroyed everything within a range of 0,8km. The capture of these explosives was the first significant South African success during the battle for Gibeon. A running fight ensued when McKenzie tried to pin the Germans with his centre while attempting to outflank them on the left and right. The return of Royston’s force gradually forced the battle to the west. The pace of the action forced the Germans to abandon their artillery and machine guns and, eventually, after losing a quarter of their force, both field guns, and four of their six Maxim machine guns, they made good their escape. The South Africans lost 24 killed and 66 wounded, but recovered the captured men of the Natal Light Horse. The outcome of the action was that it cleared the southern regions of the German forces, preventing the onset of guerrilla operations there or a German threat to the flank of South Africa’s northern thrust.
The northern offensive
In the north, the early German victory at Sandfontein and the armed rebellion in South Africa had caused a delay in the defence of Walvis Bay and the securing of Swakopmund. On 25 December 1914, two infantry brigades (three battalions per brigade), a mounted rifle regiment, and seven field artillery guns, landed at Walvis Bay. Swakopmund was occupied, unopposed, on 3 January 1915. General Louis Botha arrived there on 10 February. On the following day, he assumed command of Northern Force with an additional two mounted brigades and a field gun which allowed the field artillery to be organized into two field batteries, one for each of the mounted brigades. Two more infantry battalions also arrived, and six heavy guns, forming one four-gun battery and a two-gun section. Except for the 1st ILH, Botha’s mounted troops consisted of commandos. On 23 February, having familiarised himself with the terrain and the strength of the German forces, Botha ordered Col P C B Skinner’s infantry and Col Alberts’ mounted brigades to move forward from Swakopmund. Skinner’s force captured Nonidas without incident, but the mounted brigade experienced some losses in a rearguard skirmish after its scouts lost their way, delaying the advance and enabling the Germans to slip away. At Heigamchab, 40km up the Swakop River, two options opened up for Botha: to advance along the Swakop River or along the railway line. He opted for the river route, a decision marked by a good omen - the Swakop River had one of its rare floods. In addition, wireless intercepts revealed that heavy rain had fallen inland and as far south as Keetmanshoop and Aus, raising hopes that there would be grass for the horses of the mounted brigades at Riet. The main difficulty lay in the shortage of transport. To sustain the advance, the daily lift of supplies from Walvis Bay had to be increased, entailing the suspension of either the railway construction or the river advance. Accordingly, Botha halted railway construction from 23 February to 3 March 1915. All mounted troops except the Imperial Light Horse were withdrawn to Walvis Bay so that they could be fed.
Infantry garrisons were in place at Goanikontes, Heigamchab, and Husab, and Skinner’s brigade was covering the construction of the railway line, but the Germans failed to interrupt the South African supply route up the Swakop. This may be attributed to a different approach to the defence of South-West Africa by the more passive Major Victor Francke, who replaced the late Colonel J von Heydebreck, architect of the trap at Sandfontein. The interception of German wireless messages also greatly facilitated Botha’s plans.
By 18 March 1915, the South Africans were ready to advance on Riet and Pforte, positions held by the Germans. The Riet position was strong, the Germans having made good use of the banks of the Swakop River and the Langer Heinrich range of hills. By dawn, 20 March 1915, the South Africans were in position to strike, success depending on the effectiveness of flank attacks. The South African right flank attack stalled because the Langer Heinrich proved to be impassable to horses. The attack on the Pforte position was more successful, Col Alberts launching attacks simultaneously on the railway gap on the South African left and on the nek at the foot of Husab Berg. Artillery fire kept the attack on the railway at bay, but the nek was taken and two commandos were immediately rushed up to consolidate the position and to launch further attacks. Dust and uncertain light played havoc with the effectiveness of the German machine guns and eventually the railway was occupied and the German line of retreat was cut. This forced the Germans to redeploy, ending their artillery fire and thus enabling the commandos to capture part of Pforte Berg. The reserves and the artillery moved through the captured nek and, at 08.30, after two hours of fighting, the German force surrendered. Col Alberts’ men captured 209 Germans and two guns; additional prisoners were taken when a small group at the railway gap surrendered after being subjected to artillery fire.
In the third action of the day, the long outflanking movement by the left wing of the 2nd Mounted Brigade under Col W R Collins led to the cutting of the railway line just west of Jakkalswater and a brief skirmish with the German reserve. Forty-three men, whose horses had been killed by artillery fire, were taken prisoner. The victory at Pforte led directly to the German withdrawal from the Riet position but pursuit was out of the question owing to a lack of water and the spent condition of the South Africans’ horses. On 21 March 1915, the South Africans made a reconnaissance to Modderfontein. The result was the capture of the camp there together with a large quantity of supplies and, most significantly, documents showing that most of the German forces were in the north. Again, logistics prevented pursuit - the expected grass at Riet had failed to materialise and the mounted troops had to be withdrawn to Swakopmund so that the horses could be fed from the ships. The mining of water holes and other places frequented by soldiers added to the delay. An infantry garrison (DLI) replaced the mounted brigades and a commando was placed on reconnaissance duty.
Supplies had to be built up at Riet before an advance could be attempted. In the meantime, the Northern Force was forced to eat the oxen of the heavy artillery. Logistic concerns continued to plague Botha when he ordered the resumption of the advance on 26 April 1915. Some relief came in the form of the arrival at Swakopmund of the Royal Navy’s No 1 Armoured Car Division, the vehicles requiring less water than an equivalent number of mounted riflemen.
On the night 25/26 April 1915, the Germans attacked the railhead at Trekkopies. Out on reconnaissance when a force was detected marching towards his camp, Col Skinner left two troops to shadow the enemy while he returned to camp and ordered the Rhodesian Regiment and two heavy guns to be brought forward from Swakopmund. At 05.45 the Germans blew up the railway line to the north of Skinner’s camp, but failed to cut the South Africans' line of communications. At 07.40, the Germans launched an attack with artillery and mounted infantry, advancing on foot from the north and west, but were repulsed by the infantry and the Royal Navy’s armoured cars. Skinner began a counter-attack at 10.30, but, owing to a lack of artillery, it failed to make much of an impression. The South Africans suffered nine killed and 32 wounded to seven Germans killed, fourteen wounded and thirteen unwounded prisoners left on the battlefield.
The strike from Riet had been entrusted to the 1st and 2nd Mounted Brigades under Brig-Gen C J Brits, and the 3rd and 5th Mounted Brigades under the command of Brig-Gen M W Myburgh. Brits’s force mustered 4 273 rifles and the equivalent of two artillery batteries. Myburgh controlled 4 595 men and two artillery batteries. There was also an infantry brigade available for field operations. The lines of communications were protected by an infantry brigade, two infantry battalions, two squadrons of the Southern Rifles (a dismounted rifle regiment serving in the infantry role), the Royal Navy armoured cars, the Imperial Light Horse, and four guns.
By 28 April 1915, Northern Force’s preparations were complete. Setting its sights on Tsaobis, Gen Myburgh’s force began to advance along the edge of Khomas Highland. General Brits’s objective was Kubas, with support provided by Col Wylie’s infantry brigade. By the following day, Gen Myburgh’s men had taken Kaltenhausen after undertaking a march without much water over heavily-mined terrain. Losses were slight, mainly owing to the alertness of the troops and their bypassing of the narrow parts of the tracks. Water was obtained from the Swakop and grazing at Otjimbingwe, which was reached on 30 April 1915. As the South Africans moved northwards, the Germans retreated north of the Swakopmund-Windhuk railway line, abandoning Windhuk to prevent being caught between the Northern Force and the Southern and Central forces, thus prolonging their campaign. On 12 May, Windhuk surrendered to General Botha, fulfilling the requirements of the urgent Imperial service, but it then became necessary to eliminate the remaining German forces.
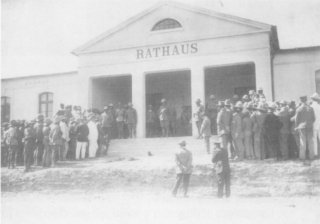
After the surrender of Windhuk,
General Louis Botha reads out the proclamation at the Rathaus.
(Photo: By courtesy, SANMMH).
The South Africans then prepared a strike force consisting of the 1st, 2nd, 5th and 6th Mounted Brigades, the right wing of the 3rd Mounted Brigade, and the 1st Infantry Brigade, supported by five field batteries (each comprising four 13-pr quick-firing guns), a battery of 4-inch guns, a battery of 6-inch guns, a battery of 6-inch howitzers, two 12-pr naval guns, and two 5-inch howitzers. Logistic support was provided by 532 wagons and, for the first time in the campaign, units had more than two days’ supplies on hand. By 17 June 1915, the strike force was ready to be deployed.
On the left, at Klein Aus, was Brig-Gen Brits’s force (Colonel-Commandant L A S Lemmer’s 1st Mounted Brigade). Brig-Gen Lukin’s 6th Mounted Brigade was at Usakos and Col P S Beves’ 1st Infantry Brigade was at Erongo. On Lukin's right, Brig-Gen H W N (Manie) Botha's 5th Mounted Brigade was based on Johann Albrecht’s Hohe and Brig-Gen Myburgh’s command (Colonel-Commandant J J Alberts’ 2nd Mounted Brigade and Colonel-Commandant Jordaan’s right wing of the 3rd Mounted Brigade) held positions between Wilhelmstal and Okasise.
The advance began on 20 July 1915, Myburgh’s command embarking on a long outflanking drive which would take them past the Waterberg, through Grootfontein, and finally to Tsumeb, effectively preventing a German retreat north of Khorab. Lukin’s command moved up the railway line to attack the Germans at Kalkveld, but before they reached this position, the Germans had retreated. Meanwhile, Brig-Gen Brits moved his brigade from Otjiwarongo to Etosha Pan and then turned south-east to prevent a German retreat in that direction. The pursuit along the railway continued and on 1 July 1915, the South Africans caught up with the Germans at Otavi before they could properly deploy their 3 400 men, 36 guns and 22 machine guns against 3 200 South Africans and eight guns. Four men were killed and seven wounded before the South Africans forced the Germans to abandon Otavi and to retreat to Khorab. The South Africans then paused to recover their strength.
On 3 July 1915 an emissary arrived from the German governor, bringing a proposal that the German forces and their equipment be interned until the end of the war. This was flatly rejected by General Botha, who immediately set about continuing his preparations to advance, South African aircraft monitoring the German position at Khorab. A second emissary from the German governor then arrived, asking for South Africa’s terms for a cessation of hostilities and requesting a meeting. General Botha agreed to this and the meeting was conducted at Kilometre 500 at 10.00 on 6 July1915. General Botha’s terms were that regular officers would be released on parole, other ranks would be interned, and reservists would be allowed to return home. All machine guns, artillery, stores and transport, however, were to be handed over. The Germans had three options: to surrender, to resume fighting to the end, or to resort to guerrilla warfare. They were very unhappy about handing over their artillery and requested an extension of time. Eventually, however, Botha lost patience and informed them that unless the terms were accepted by 02.00 on 9 July 1915, fighting would resume. Acceptance of the terms was received at 02.30 and at 10.00 the Germans formally surrendered.
South Africa celebrated wildly. The British Imperial Forces in France cheered the victory. However, in a war marked by blunder and butchery, the low casualties of a campaign of manoeuvre would ensure that the victory would be forgotten, and the triumph of the Pact Government in South Africa in 1924 would consign the first permanent Allied victory of the First World War to virtual oblivion.
Sources
Return to Journal Index OR Society's Home page
South African Military History Society / scribe@samilitaryhistory.org