
 The South African
by D C Panagos
Military History Society Johannesberg BranchWitpoort is situated 38 km south-east of Pretoria at the eastern end of the Bronberg range of hills. Two other passes occur in between, namely Swavelpoort and Tierpoort. Witpoort consists of three small hills with the lowest in the middle and it lies north-east of the old wagon road to Natal (now the R50). On the westem hill, the longest and highest ridge, are still to be found the remarkable remains of a string of small two and four man stone breastworks (or 'sangars', a name which the British Army brought from India) There are 51 of these stone shelters, which stretch for more than a kilometre from Trig Beacon No 302, south-east of the railway. They are placed at intervals of roughly twenty paces, some being grouped together at shorter intervals, and they face north-east. The larger sangars, with three or four loop-holes, are approximately two metres wide and 0,8 metres high and are placed directly on the sky-line. These sangars played an important part in the one-day battle of Witpoort on 16 July 1900, but they are quite unlike other Boer skantzes used in similar circumstances.
Lord Roberts had marched into Pretoria on 5 June 1900. After the failure of negotiations for peace held at Eerste Fabrieken with Gen Louis Botha, Roberts moved to attack the Boer positions at Diamond Hill - a battle which lasted from 11 to 13 June. On being outflanked on the afternoon of 12 June, the Boers rapidly moved eastwards along the Delagon Bay Railway Line. Gen Botha regrouped at Balmoral.(1) On 7 June, Gen de Wet had cut the British Army's supply line at Roodewal near Kroonstad and, because of this, Lord Roberts showed no intention of following up his victory at Dinmond Hill. Consequently, groups of Boers under the command of Gen Botha moved back to the vicinity of Pretoria and Springs, threatening the recently repaired railway between Johannesburg and Pretoria.(2) Aware of this, Roberts sent Gen Hutton, from Derdepoort, with his 1st Mounted Infantry Brigade, south to Irene Station, where he assembled on 4 July.
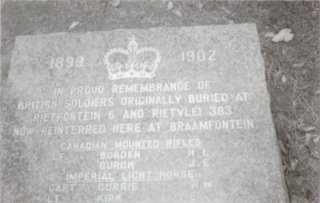
The grave of British Soldiers who died at Witpoort,
Braamfontein Cemetery
Col Pilcher was already at 'Rietfontein', when Gen Hutton arrived, according to the Official History, and the Times History of the War in South Africa, edited by Leo Amery, states that Hutton was 'encamped west of Swavelpoort'. This places the first bivouac on the farm Rietfontein near Irene, not to be confused with two other 'Rietfonteins' and a 'Rietvlei' in this area. (To make matters more interesting, the Canadians refer to a 'Rietvleifontein'). This problem was only solved when the author was taken to the Braamfontein Cemetery by Mr Maurice Gough-Palmer and shown the monument to the soldiers killed at Witpoort. The inscription on the monument identifies Hutton's position at the time of the battle of Witpoort as Rietfontein No 6 and Rietvlei No 383. Thus, it would appear that, on 5 July, Hutton had marched from Rietfontein and Rietvlei near Irene, along the old Natal wagon road, past Bapsfontein, and had then camped on the two farms Rietfontein 6 and Rietvlei 383, just south of Witpoort. The British Army was using Jeppe's Farm Map of 1896. Early in June, Col Jackson ofthe Royal Engineers had set up an office of the Field Intelligence Department in Pretoria, to produce 'heliozincographed' copies for use by the military. The farm numbers referred to above are from Jeppe's map.
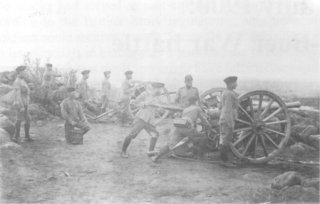
British 15 pounders. A two-gun section.
(Photo: SANMMH)
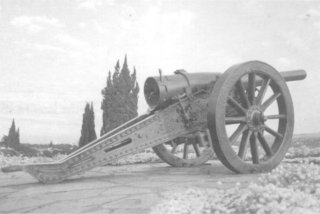
Royal garrison artillery 5-inch gun. It fired Lyddite shells,
a precursor of High Explosive. It stands at the
Union Buildings, Pretoria. (Photo: D C Panagos)
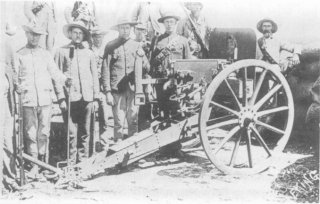
Boer Maxim-Nordenfeldt Pom-Pom. 1 pdr
(Courtesy of the SANMMH)
To the east of Pretoria, Pole-Carew's XI Division, with the Guards Brigade, stayed virtually in the same positions they had taken at the battle of Diamond Hill, with posts at Derdepoort, Pienaarspoort, Donkerhoek, and Boschkop. All of these lay to the north of the Bronberg range of hills.
The weather was described as '... blistering hot during the day and freezing at night' by Captain Stradford St Leger of the Mounted Infantry, and the British troops were not prepared for this. 'The water was all turned to ice, and in the morning the ground was white', according to the somewhat surprised writer of the history of 'G' Battery RHA.
Maj-Gen T E Hutton was an officer who had served in the Zulu War in 1879, the First Anglo-Boer War in 1880-1, in Egypt in 1882, and along the Nile in 1884. In 1875, as a major, he had been placed in charge of the new School of Mounted Infantry at Aldershot. He had then travelled to Australia and Canada, where he had origanized their respective militias. In March 1900 he had left Canada in order to take command of the 1st Brigade Mounted Infantry.(7) His late entry to the South African campaign, unlike General French, may explain some of the problems his command experienced at Witklip and Witpoort in the weeks to follow.
Gen Botha, aware that Gen Buller was at last moving up the Natal railway line, attempted to re-group the Boer commandos after their retirement to the east. They were stretched from the Pienaars River Station north of Pretoria, in a crescent around to the east to Springs. The Official History states that '... the eastern Transvaal had large hostile bodies [of burghers] commanded by Gen Botha [and] ... threatened danger.'(8) The Boers had 'entrenched [positions] along the Tigerpoort range as far as Witpoort and Kafferspruit [sic - Koffiespruit].'(9)
Ben Viljoen was then promoted to the rank of general and Roland Schikkerling gives a wry picture of the movement of his scattered commando around Elands River Station after the fall of Pretoria and Diamond Hill. Gen Viljoen commanded elements of the Rand commandos(10), consisting of the Boksburg (Commandant Dirksen), Germiston (Commandant Gravett), the Johannesburg, Fordsburg, and Jeppestown commandos (Commandant Pienaar), together with the Krugersdorp and Middelburg commandos and the Johannesburg Police.(11)
The skirmish at Witklip, 7 July 1900
By the afternoon of 5 July 1900, Gen Hutton was encamped east of Bapsfontein at Rietfontein No 6. On the following day, he moved out, leaving Pilcher with the Queensland MI and the Canadians on the Bronberg hills near Tierpoort. Simultaneously, Mahon was sent forward with part of the MI and 'M' Battery RHA. He was attacked, but fortunately the forward elements of the artillery and infantry drove off the attacking Boers. Mahon was then sent to help Pilcher, who had also come under attack.(12) Hutton's movements were obviously not only going to be observed, but Viljoen was also certainly prepared to attack any unwary British detachments. This is exactly what happened on the following day.
Early on 7 July, Hutton ordered Mahon to 'strike south to Witklip', beyond Bapsfontein, while the main body of the brigade would follow at a distance of three miles (4,8 km).(13) On the next day, the Suffolk Regiment arrived at Tierpoort to relieve Col Pilcher.(14) The Times History claims that 'bad scouting by the ILH' resulted in Mahon falling into a trap and 'losing 35 men'. The Canadian history states 'the ILH failed to detect the Boers on the ridges [and] ...the ILH twice stupidly stormed the ridges.(15) The same source also notes that Hutton failed to send reinforcements and that discipline began to break down, According to the Times History, Mahon was 'tardily reinforced by Hutton'!(16) This is the first hint that subordinates were not happy with Hutton's command. The Canadian history quotes a British gunner with a Maxim gun crew who wrote that 'the soldiers who were supposed to support us turned and ran and left us to limber up alone. That's your English Tommies.'(17) (It should be noted that, at this stage of the war, the initial eagerness to fight for King and Empire had been dimmed by the British reverses suffered in Natal and the Cape Colony and there was actually a lot of bad feeling between the colonial mounted regiments and the regular British regiments.(18) The former did not hold a high opinion of British officers in particular, who had a tendency to stand up under fire and, as a result, were often shot immediately. Once their officers were out of action, the rank and file were not inclined to show any initiative and this annoyed the accompanying colonials.'(19)
It was Mahon's left flank which had come up against the Boers and he ordered 'M' Battery RHA to support the ILH. After accidently shelling the colonials at first, the battery raised their sights onto the Boers. At the same time, Mahon ordered the ILH to withdraw, which they did with difficulty, losing more men in the process.(20)
Gibson's history of the actions of the ILH on these two days is understandably scathing about the bad press which they received in the above-mentioned sources. He comments that the 'account [in the Times] is inaccurate and singularly unfair to the ILH, doing poor justice to the gallantry displayed by them on that day.'(21)
According to the ILH account, on 7 July Gen Hutton sent Mahon along the old Natal road to Witklip. 'C' Squadron ILH was in advance and they soon reported mounted Boers on the left. At 10.00, 'A' Squadron took over the advance and Col Wools-Sampson ordered 'B' Squadron, under Capt Currie, to the left where the enemy had been reported. Scouts of 'A' Squadron had already been fired at and Mahon and Wools-Sampson were warned that the enemy was in 'force on the left'. 'B' Squadron was not warned, however, owing to the difficulty of signalling to them. Neither the heliograph nor the other methods - Morse flag or semaphore signalling - could be used under fire, as all three methods required the unfortunate signaller to stand up while sending messages! (During the defence of Fort Zuikerbosch, near Fortuna Station along the Heidelberg line, a signaller, Private Farrelly, was awarded the Distinguished Conduct Medal [DCM] for sending signals during the battle 'conducted practically in the open ... projectiles falling all around [him]... ')(22)
British and Boer positions, 4 July 1900
At the time that 'B' Squadron ILH had been fighting alone, the Boers had opened up on the main column with three guns. It was known that Gen Botha was in the vicinity with several guns and this consideration may have influenced Hutton not to become embroiled in a general action. However, this did not impress the ILH. They were also unimpressed with their commander, Col Wools-Sampson, who said later that the action was intended as a reconnaissance. Had that been the case, the ILH argued that there would not have been any losses. They had been under fire from 10.00 until 15.30 and only arrived back at camp at 20.00. (23) A monument to the ILH was erected at Witklip and this was later moved to the Braamfontein Cemetery.
The monument to the Imperial Light Horse at Braamfontein
Cemetery. This monument was originally erected at Witklip.
(Photo: D C Panagos)
On 9 July, the guns on either side exchanged fire. It is probable that the Boer guns in action on that day were the three previously mentioned 75 mm Krupp Quick-Firing (QF) guns which had a range of 4 400 yards (4 023 m). The Boers also had 75 mm QF Creusots with a range of 6 800 yards (6 217 m).(25) Thus, it is clear that the field guns of both the RFA and RHA were vastly outranged! Of course, Hutton also had the two 5-inch 'Cow Guns' at his disposal, which he seemingly used to good effect, because a remarkable incident happened on the following day.
While the ILH patrolled ahead of the main column on 9 July, they reported a group of Boers moving to the north. The British guns opened fire on the Boers. The ILH history records that 'some members of this commando went to a little homestead ... a shell hit a big willow tree behind which they had taken cover, and piercing the bole, blew 7 of them to atoms ... the tree became known as the Lyddite Willow.'(26) On page 376 of his fictional story, Rags of Glory, Stuart Cloete incorporates this incident, writing '... had off-saddled near a farm ... and took cover behind a willow tree. A shell hit the tree and, passing through, killed five Boers.'
The main British concentration was then at a pan on the farms Rietfontein and Rietvlei. Gen Ben Viljoen placed Hutton's camp in what he refers to as a 'donk'. The position was a 'large entrenched stretch of ground entirely occupied and fortified'.(27) From 8 to 10 July, Hutton's brigade was 'practically surrounded and worried by the enemy'.(28) Lord Roberts was alarmed at this state of affairs(29) which The Times History summed up as 'an unsuccessful attempt to drive the Boers out of Witpoort'. Roberts therefore sent 'French to take over the command'. The implications of this decision are most interesting, suggesting that Brig Mahon's objections to carrying out pointless orders had reached the ears of the headquarters in Pretoria!
General French attacks and gains the Witpoort Pass, 11 July 1900
On 10 July, Gen French moved up very quickly with Porter's cavalry brigade in order to assist Gen Hutton. French had a well-earned reputation for his mobility in comparison to other British generals, notably Gen Sir Leslie Rundle who was fondly known to the rest of the British Army as 'Sir Leisurely Trundle'! With a force of some 7 500 soldiers, French launched an all-out attack on the Boers along the Bronberg range and, by the end of the day, had succeeded in driving them right off the range.
Gen French moved the troops from Hutton's camp to face the Bronberg with his infantry - the Connaughts, the Border Regiment, and the Royal Irish Fusiliers. At the same time, he sent Alderson with the Canadians, the Imperial Yeomanry and the New Zealanders to the north, over the range, probably through Swavelpoort, which had remained in British hands. Then, with the help of Pole-Carew's Mounted Infantry, the infantry attacked the Boers' right flank, while Porter's cavalry attacked the Boers' left flank at Leeupoort, east of Witpoort. French then pressed forward with the infantry, clearing the neks at Tierpoort and Witpoort, and as far as Koffiespruit. The Connaught Rangers gained the summit at Witpoort at 13.15, just as the Boers moved off towards Elands River Station.
Battle of Witpoort, 11 July
The ILH's version of the skirmish at Tierpoort states that 'on the 11th [they] moved out at dawn and with Pilcher's column advanced under cover of the guns'. Upon occupying the last Boer position as far east as Koffiespruit, Mahon's brigade was ordered back to Pretoria, and the ILH arrived in the town, with both men and horses exhausted, at 02.00 the next morning. They had marched and fought for twenty hours covering a distance of 50 km! Immediately after this successful action, Gen French, with the two infantry battalions and the nearly insubordinate Brig Mahon and his mounted infantry, were withdrawn to the west of Pretoria.
Line Of Boer skantzes east of Tierpoort.
(Photo: D C Panagos)
Low Boer skantz, situated east of Tierpoort.
(Photo: D C Panagos)
The battle at Witpoort, 16 July 1900
The stage was set for the one-day battle of Witpoort, which so nearly became another Silkaats Nek disaster. There is some disagreement among the sources concerning the date of this battle. Roland Schikkerling, for example, puts it down for 17 July and, according to Ben Viljoen, it was fought on 14 July. The Times History plumps for 15 July. All the other sources place the battle on 16 July 1901. The Canadians received a telegram from Lord Roberts on 17 July, in which he congratulated them for their bravery during the battle on the day before. This telegram would serve as confirmation that the battle occurred on 16 July.
After French had departed with the Connaught Rangers and the Border Regiment, leaving behind only two infantry regiments, the Royal Irish Fusiliers and the Suffolks, Gen Hutton proceeded to place small outpost detachments at Tierpoort, Witpoort, Koffiespruit and Hekpoort. The Suffolk Regiment was left at Tierpoort, joining hands with Pole-Carew's outposts, while most of the remainder of the brigade was positioned at the Rietfontein/Rietvlei fortified camp. There Hutton had four companies of the Royal lrish Fusiliers, the 1st Mounted Infantry, which was made up of the 1st and 2nd Canadians (who had arrived in camp on 15 July), as well as the Australians of the Queensland Mounted Infantry. The force was supported by six 15-pounders of the 66th Battery RFA and six 12-pounders of C' Battery RHA, together with one of the 5-inch 'Cow Cuns'. 'T' Battery RHA and the other 5-inch gun went to the right flank with the 1st Cavalry Brigade under Col Clowes, who had replaced Col Porter. They were posted at Koffiespruit and on the farm Hekpoort.(30) Three companies of the Royal Irish Fusiliers (or four, according to 'G' Troop) and 60 troopers of the New Zealand Mounted Rifles were placed on the three hills straddling the Witpoort Pass, under the command of Maj Munn. He placed himself with one company of the 2nd Royal Irish Fusiliers and a 'Pom-Pom' on the central kopje, the New Zealanders and some of the Irish on the highest western ridge, and the other companies of the rifles on the eastern hill. They had one 'Pom-Pom'.(31)
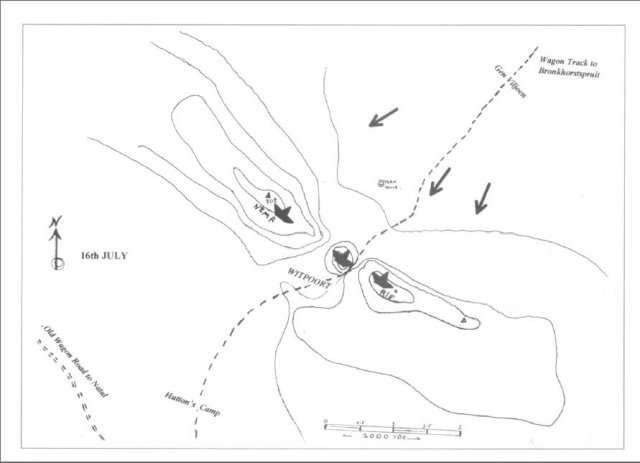
Battle of Witpoort, 16 July 1900
Gen Ben Viljoen had positioned his burghers during the night of 15 July and then launched a three-pronged attack on the British positions at davbreak. He had a 75mm Krupp and a 75mm Creusot QF gun on his left, targeting the eastern hill, an Armstrong 15-pounder firing at the hill, and another Krupp and some 'Pom-Poms' firing at the western hill. He ordered a 'general storming of the enemy's entrenchments'. The Official History states that the battle opened at 06.45 with an attack on the pickets at Rietvlei and heavy shelling on Maj Munn's three hills.
Roland Schikkerling and his comrades had started on the road to Witpoort from a farmhouse on the Bronkhorstspruit road early on the morning of the battle. He had, as his rations, a bag of 'vetkoeks' which he had fried the day before! They rode to a position aboot 2 000 yards (1 828 m) to the north of the New Zealanders' ridge and then charged under heavy rifle fire right up to the dead ground at the bottom of the hill. Dismounting, the Boers took cover in the rock-strewn terrain and returned a deliberate fire at the British sangars. Today, a wattle plantation covers the line of their charge, but one can observe clearly that the sangars could not command the dead ground at the foot of the hill. Schikkerling writes that, during their charge, the British opened fire, some of the soldiers standing up in their shelters and shooting over rather than through the small loopholes. The Boers dodged the fire, scrambling from one outcrop of rocks to the next, and 'came to a little level area, on which were the enemy's schantzes, and here at 30 yards [27,4 m] we fought'.
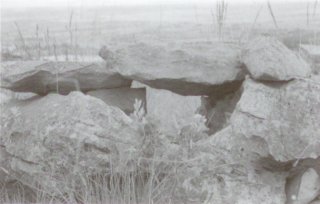
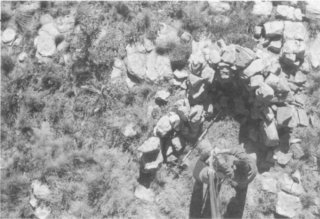
Two of the sangars facing Gen Ben Viljoen's right flank at
Witpoort. Roland Schikkerling and his comrades followed
Cmdt Serone in a mounted charge across this terrain, ending
up out of sight under the rock ridge in the centre of the photo.
The wattle plantation is post-war. (Photo: D C Panagos)
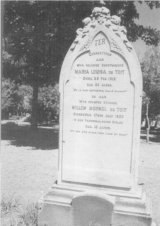
Grave of Willem Morkel du Toit, killed at Witpoort,
Braamfontein Cemetery. (Photo: D C Panagos)
The Royal Irish Fusiliers describe the battle fleetingly - 'the Boers still had plenty of fight in them and surrounded two hillocks held by three companies, under Maj Munn, and some New Zealanders and nearly overran them'. They were rescued by the Canadians.(34) The New Zealanders' record by D O W Hall merely states that on 16 July they had an 'arduous day's action in the Rietvlei area against mostly superior forces'. No mention is made of the men captured. Another source, Kiwi versus Boer, refers to the position as 'Funk Hill'. Gibson, in the ILH history, records that Gen Viljoen attacked the Royal Irish Rifles under Maj Munn 'who were occupying two rocky kopjes'.
On the Boers' left flank, the Canadians and the cavalry were attacked at Hekpoort and Koffiespruit Pass at sunrise. Their pickets were driven in and they all fell back to a native kraal. There they held the Boers off, providing an opportunity for the rest to escape at 'a slow trot'. When the New Zealanders surrendered, the Boers were in possession ofthe higher hill which commanded the lower middle hill.
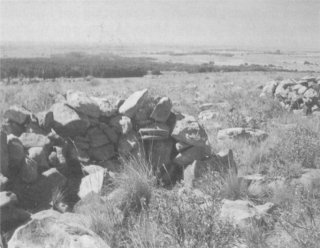
Sangar No 37 (Photo: D C Panagos)
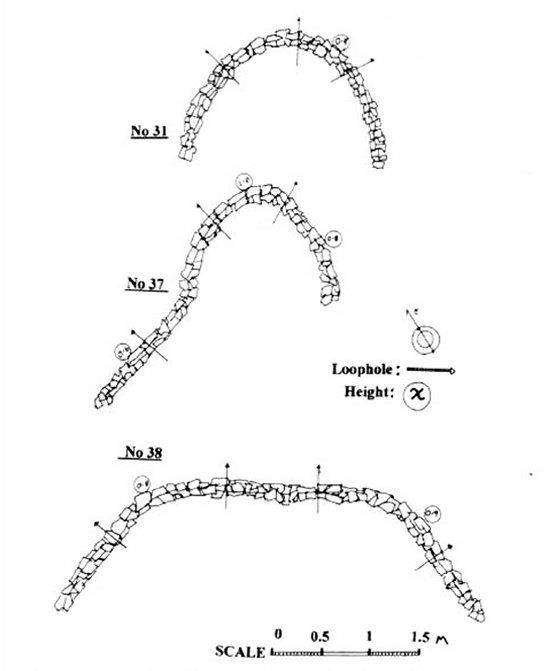
Three examples of the sangars at Witpoort.
They are numbered from Trig Beacon 302.
Maj Munn threatened on both flanks, faced disaster. Had Roland Schikkerling and his comrades been able to hold on and had they received reinforcements, the middle hill would have been enfiladed. They were only prevented from doing so by the well directed shrapnel from "G" Battery'.(35) Gen Viljoen records that 'it was my right flank which met with stubboni resistance from a strongly fortified position held by a company of Australians [sic - the New Zealand sangars!]' He was also strongly opposed by the Irish Fusiliers on the other hill and the Boers charged right into the trenches 'where hand-to-hand combat took place'. Schikkerling actually witnessed this fight, stating that, on the 'adjoining hill there [was] hand-to-hand fighting with clubbed rifles'. He disapproved of this method of fighting, believing that it was for 'the excited and unskilled' and should only be resorted to if out of ammunition! Gen Vijoen explains that although they had captured a British Pom-Pom on the eastern hill, they were unable to move it away because the flat ground on the left flank was exposed to British gunfire. He writes that 'they had brought up a battery of guns and in this flat field a charge would have cost too many lives' - fourteen years before the First World War! The guns of 'G' Battery had pushed forward in time to give much needed support to the hard-pressed Irish.(36) Four of their guns fired on the eastern hill and two guns were sent to help Maj Munn. Lieutenant Walthall brought these into action about 100 yards from the Boers and 'the effect was electrical'. Roland was hit in the back by an almost expended shrapnel bullet, fortunately without harm. His commando came under attack from two sides and they were forced to retire. 'I bounded down the hillside like a chamois', he writes.(37)
The counter-attack
Col Alderson sent two squadrons of the Canadians to assist 'the Irish on the kopje which had been vacated by the New Zealanders' and, with the fire from the guns, the position was regained.(38) 'B' Squadron of the Canadians climbed up to the rim of a rock outcrop, from which they charged the Boers under Pienaar, capturing the top and holding it with the help of 'C' Squadron. Their losses were heavy and included Lt Borden, the son of the Canadian Minister of Defence. He is buried at the Braamfontein Cemetery, not far from the grave of Willem Morkel du Toit! On the other flank, the 2nd Canadians under Col Evans scrambled across a small stream and hastened Roland and his friends off the hill of sangars.
The burghers were under fire not only from 'G' Battery but also the 5-inch gun at the camp.(39) Nevertheless, while Viljoen held this position his own gunners were able to 'land several shells into the enemy's laager'. His losses amounted to two killed and seven wounded. Apart from Du Toit, Schikkerling mentions a German, shot dead next to him before they had charged the sangars.
Before the Canadian counter-attack, the Boers were so close to Munn's position that they had repeatedly called on him to surrender.(40)
At 14.00, Hutton (possibly stung by criticisms in the days preceding this action) moved all of his available troops onto the desperately regained positions and, by sundown, the battle of Witpoort had ended. His losses were seven killed, with 30 wounded. Two officers and 22 soldiers had been taken prisoner!
Witpoort - A heritage site?
There are very few battlefields of the Anglo-Boer War which present such well preserved traces as does Witpoort with its 51 sangars built by the New Zealanders. The long line of stone shelters makes it possible for one to stand there and visualise the mad charge made by Roland Schikkerling and his fellow Johannesburgers. There Willem Morkel fell and his riderless horse brushed roughly against Roland and 'with empty saddle and stirrups swinging in all directions remained in the charge'. One can also crouch behind the rocky ridge thirty to forty meters below the sangars and then walk over the ground once swept by the New Zealanders' fire. There Schikkerling took his prisoners, one of whom he describes on p 34 as 'all begrimed with dust to his eyes, he approached holding his hands in the air'.
On the south of the ridge one can see the country across which Col Alderson led his Canadians in their counter-attack toward the captured position. Today, this area is a well tended farm and in the north, the level ground over which the Boers charged is now a wattle plantation! Both the author and Mr Maurice Gough-Palmer feel strongly that this battle site, with its clearly identifiable sangars, deserves to be declared a Heritage Site under auspices of the new National Heritage Commission, to whom they intend submitting a report making a specific request to this effect.
Acknowledgements
The author is most grateful to Mr Maurice Gough-Palmer for his invaluable help at the Braamfontein Cemetery which eventually cleared the confusion surrounding the three Rietfonteins and the two Rietvleis in the area south-east of Pretoria! A very special note of appreciation is also extended to Mrs Betty de Lange, librarian at the South African National Museum of Military History in Saxonwold, Johannesburg, who was able to provide records of all the British units which took part in the battle, including those of 'C' Troop RHA. Thanks are also due to Miss Gerda Viljoen, the Museum's photo-archivist, who was able to provide copies of the photographs of the 15-pounder and the 'Pom-Poms'. A copy of the relevant section of Kiwi versus Boer was kindly posted all the way from Perth by Midge Carter. The gift of a computer and printer from the author's brother-in-law, John Moore, made the preparation of the manuscript possible, considering the author's handwriting! The author was taken to the hill of sangars in the mid-1980s by a colleague at the Transvaal Museum, Mrs Tamar Cassidy, who, finding these stone shelters during her study of secretary birds, and knowing of the author's interest in the Anglo-Boer War, told him about them. Then there are Mr Rudolf Opperman and Mr and Mrs Saaiman, who readily gave permission to visit the hills on their respective farms. A sincere thanks to all and, last but not least, thank you Mary and Tony.
References
1. R W Schikkerling, Commando courageous: A Boer diary, p25.
2. Maj Sir F Maurice, The History of the War in South Africa, 1899 to 1902, Official History, p 309.
3. L S Amery (ed), The Times History of the War in South Africa, 1899-1902, Vol IV, p 388.
4. Maurice, The War in South Africa, p 308.
5. D Hall, 'Guns in South Africa, 1899 to 1902', in Military
History Journal, Vol 2, No 1, pp 8-9,
6. Surgeon T T Jeans, The Naval Brigades in the South African War, 1899 to 1902, p78.
7. H W Wilson, With the flag to Pretoria, Vol 11, p 649,
8. General B Viljoen, My reminiscences of the Anglo-Boer War, p108; Maurice, The War
in South Africa, p309.
9. C Miller, Painting the map red, p 246.
10. Viljoen, My reminiscences of the Anglo-Boer War, p 108.
11. Schikkerling, Commando courageous, p 25.
12. Maurice, The War in South Africa, p 310; Schikkerling,
Commando courageous, p 32; G F Gibson, The History of
the Imperial Light Horse, p 198.
13. Maurice, The War in South Africa, p310.
14. Lt-Col Webb, The History of the 12th (The Suffolk Regiment), p 354.
15. Miller, Painting the map red, p 246.
16. Amery, The Times History of the War in South Africa, p 389.
17. Miller, Painting the map red, p 246.
18. H W Wilson, After Pretoria: The Guerrilla War, Vol 1, p 196.
19. W Woods, The Northumberland Fusiliers, pp 159, 165.
20. Maurice, The War in South Africa, p 310.
21. Gibson, The History of the Imperial Light Horse, p 197.
22. C F Romer and A F Mainwaring, The Royal Dublin Fusiliers, p 119.
23. Gibson, The History of the Imperial Light Horse, p 201.
24. Gibson, The History of the Imperial Light Horse, p 204.
25. D Hall, 'Guns in South Africa,1899 to 1902', pp 41-2.
26. Gibson, The History of the Imperial Light Horse, p 203.
27. Viljoen, My reminiscences of the Anglo-Boer War, p 108.
28. J Stirling, The Colonials in South Africa, p 310.
29. Miller, Painting the map red, p 247.
30. Maurice, The War in South Africa, p 315.
.
31. Maurice, The War in South Africa, p 316.
32. Miller, Painting the map red, p 247.
33. Schikkerling, Commando courageous, p 33.
34. H Harris, The Royal Irish Fusiliers, p 76.
35. Maurice, The War in South Africa, p 316.
36. Maj H M Davison, RHA, The Story of 'G' Troop, RHA, p 62.
37. Schikkerling, Commando courageous, p 36.
38. Miller, Painting the map red, p 248.
39. Maurice, The War in South Africa, p 316.
40. Maurice, The War in South Africa, p 316.
Bibliography
Amery, L S (ed), The Times History of the War in South Africa,1899-19O2, Vol IV, (Sampson, Louw, Master& Co Ltd,
London, 1906).
Clark, Maj Rex, '1st Queensland Mounted Infantry Contingent
in the SA War', (Military History Society of Australia).
Davison, Maj H M, RHA, The Story of 'G' Troop RHA, (Royal Artillery Institution, Woolwich, 1914).
Gibson, G F, The History of the Imperial Light Horse, (C D & Co, 1937).
Hall, Maj Darrell, 'Guns in South Africa, 1899 to 1902' in Military History Journal, Vol 2,
No 1, and Vol 4, No 3.
Hall, D O W, The New Zealanders in South Africa, (War History Branch, Wellington, New Zealand. 1949).
Harris, H, 'The Royal Irish Fusiliers' in Sir Brian Horrocks
(ed), Famous Regiments, (Cooper, London, 1972).
Jourdain & Fraser, The Connaught Rangers, (London, 1924)
Jeans, Surgeon T T, RN (ed), The Naval Brigades in the South
African War, 1899-1002, (Sampson. Louw, Master & Co. London, 1901).
Miller, Carman, Painting the map red, (McGills, Queens University Press, Montreal, 1994).
Maurice, Maj Sir Frederick (ed), The History of the War in South Africa, 1899 to 1902, The Official History,
His Majesty's Government, (Hurst and Blackett, London. 1906).
Maxim, Sir Hiram, The Devil's paintbrush (R Goldsmith. Toronto, 1989).
Schikkerling, Roland William. Commando Courageous: A Boer's diary, (Keartland. 1964).
Stirling, John, The Colonials in South Africa, 1899-1902, (Polstead, Suffolk, 1907).
Stowers, Richard, Kiwi versus Boer. (Hamilton, New Zealand. 1992).
Sutherland, Douglas. Tried and Valiant: The story of the Border Regiment.
Viljoen, General Ben, My reminiscences of the Anglo-Boer War, (Hood, Douglas and Howard, 1902).
Webb, Lt-Col, The History of the 12th (The Suffolk Regiment), (Spottiswoode, London, 1913).
Wilson, H W. With the flag to Pretoria, Vol 2. (Harmsworth Bros Ltd, London, 1901).
Wilson, H W. After Pretoria: The Guerilla War, Vol I, (Harmsworth Bros, London, 1902).
Woods, W, The Northumberland Fusiliers. (Grant Richards. London, 1901).
Return to Journal Index OR Society's Home page
South African Military History Society / scribe@samilitaryhistory.org