
 The South African
by Stephen Miller
By early November 1899, the British forces in South Africa had positioned themselves to launch a three-pronged attack on the Boers. In the east, Sir Redvers Buller, the general officer in command, would lead one division to relieve General George White and his besieged troops in Ladysmith and to block further Boer penetration into Natal. In the centre, General William Gatacre was assigned to take his small force to the northern edge of the Cape Colony to prevent any Boer thrust into the Colony and to draw off Boers from the Ladysmith vicinity. In the west, Lord Methuen, commanding the 1st Division, would advance towards Kimberley to relieve the beleaguered garrison. After supplying the garrison with guns, ammunition and food, his plan was to return to the Cape with all non-combatants residing in and around Kimberley, including all Uitlander women and children and more than 10 000 Africans. Methuen was not expected to meet much resistance.
As advised by his superior, Redvers Buller, Methuen would proceed by the safest and surest route which cut northward along the Western Railway from Orange River Station to Kimberley. Methuen believed that it was necessary to stay in close proximity to the railroad for two reasons. Firstly, a lack of fresh water and a lack of supply animals made the railway his only safe and reliable supply line and, secondly, since Buller had ordered the removal of all civilians from Kimberley, he had to control the railway since it was the only means of transport available to effectively move a large group. Along this course, the Boers awaited the British approach, first at Belmont, then at Graspan, and then at Modder River. At each encounter, the Boers displayed a deep resolve and a willingness to present a stiff resistance to the British advance. As will be shown below, despite Methuen's outdated tactics, which he had learned as a veteran of colonial warfare and which were sustained by British military training, the overwhelming numerical superiority of the infantry and the destructiveness of the artillery gave the British the ground at the end of each battle.
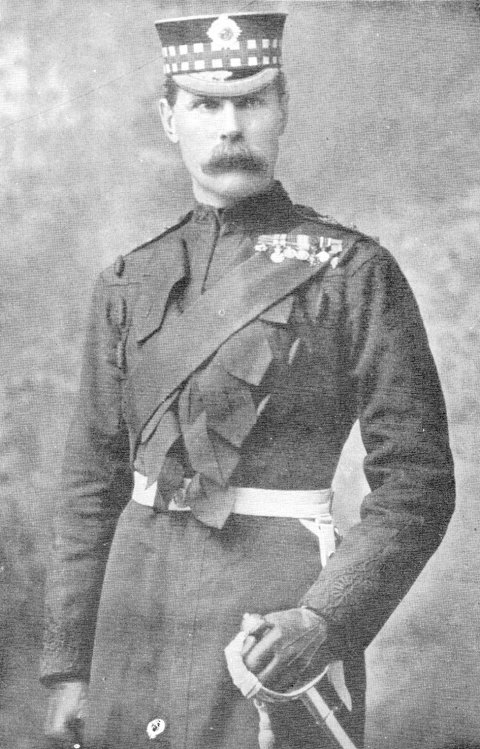
Lord Methuen commanded the 1st Division during the British advance
towards Kimberley.
(Photo: by courtesy of the South African Nationals Museum of Military
History)
Methuen was anxious to begin the advance towards Kimberley. H S Gaskell wrote: About only one thing was [Lord Methuen] more anxious than the comfort of his horses and men, and that was, to get into touch with his enemy, and keep there.' He would have liked to have started immediately, but Buller told him to wait for the arrival of the Naval Brigade and their 4,7-inch quick-firing guns. With its arrival, the march of the 1st Division to Kimberley began on 21 November.
Accompanied by a seemingly sufficient number of infantry,(2) a weak
force of cavalry,(3) and a superior
number of field batteries,(4) Methuen and the 1st Division departed
from the Orange River Station on 21 November.
Methuen's course was well plotted out. It was clear to all observers
that he was heading for Belmont, marching
parallel to the railway line which ran north to Kimberley and from
there to Mafeking and into Rhodesia. If
Kimberley was to be relieved and its inhabitants were to be brought to
safety, the railway had to be safeguarded.
In his testimony to the Royal Commission on the War in South Africa,
Methuen later stated:
I had to relieve Kimberley, throw in a large supply of provisions,
clear out the non-combatants, [about 11 000
Black Africans], and return to the Orange River. To fulfil these
conditions, it would not have been an easy
matter to march through the country with a large force, because of the
limited amount of mule transport (I had no
ox transport), and the small supply of water in the country I had to
traverse.'(5)
For these reasons, Methuen saw little choice but to take Buller's advice and follow the course of the railway to Kimberley. He was aware that once Kimberley was relieved, it would be impossible to march a large group of civilians across the veld with little water. This was not a viable choice for Methuen.
Methuen's decision to advance along the railroad, although often criticized, was set in stone. Leo Amery wrote: We let the existence of the railroad completely paralyze our movements. [It] induces a mental paralyze [sic] on all our generals: it is so simple and obvious to stick to it - to improvise other transport requires thinking out afresh as it was not in the original programme [sic] and so it isn't done.'(6) In this instance, Methuen had little choice in determining his course. His lack of supply and his task of returning so many people to the Cape Colony could only have been accomplished if the safety of the railway was ensured.
Everyone knew this, including the Boers. As Charles S Goldmann has noted, the British did little to deceive their enemy as to the timing and the course of their advances. 'There is nothing more remarkable in the early stages of the campaign than the neglect on our part of any attempt to deceive the enemy as to our intentions. That Lord Methuen proposed to advance upon a certain date towards Kimberley by Belmont was known to the readers of every London paper for some days before he started...'(7) Only a few hours after the 1st Division departed the Orange River Station, newspaper readers in Johannesburg became aware that the march to Kimberley had begun.(8)
Methuen expected the first encounter with the enemy to take place about nineteen miles (30 km) away, just north of Belmont Station, where a Boer laager of 2 500 men and five guns was waiting. A reconnaissance party led by Col B Gough had spied the Boers in that vicinity in early November. A force that size could not be avoided. Had Methuen gone around them to speed the relief of Kimberley, he would have faced a large enemy presence on his flank. A substantial Boer force with the advantage of reliable intelligence and time to dig in was not to be taken lightly. Although they had proven themselves to be fierce fighters in Natal at the battles of Glencoe, Elandslaagte, Dundee and Lombard's Kop in October, neither the British press nor the public took them seriously. Methuen had known the Boers for over fifteen years. He respected them as sturdy adversaries, but he had complete confidence in his force. From his experience at Dargai, Methuen held the British soldier in high esteem and believed him capable of defeating any adversary. This force, he was certain, could carry out its orders. He declared to one staff officer before the attack at Belmont, 'My good fellow, I intend to put the fear of God into these people. '(9)
The Boers knew Methuen was heading towards Belmont. They also knew the size and the composition of the British force.(10) The British knew the Boers were at Belmont, but they had no adequate intelligence to inform them of their exact number nor of their composition. Methuen's mounted forces were limited in number and his reconnaissance was poor. The Boers were free to take the defensive positions in the hills or kopjes. These circumstances plagued the relief of Kimberley from start to finish.
Meanwhile, the Boers worked out their defensive strategy. The Boer forces were commanded by an inexperienced Free Stater, Jacobus Prinsloo. He and his 1 500 burghers joined T van der Merwe, a Cape Afrikaner, and some 500 men on 20 November near Belmont. By 22 November, the British had begun their march and their plan was unfolding as the Boers expected. Detachments were sent out to all of the kopjes surrounding the railway. Veggeneraal de la Rey and 800 burghers from the Western Transvaal hurried to join the Free Staters and arrived on 23 November, the day of the battle.
Jacobus Herculaas de la Rey, more commonly known as Koos, was 52, two years younger than Methuen. The two men's paths would cross several times between 1899 and 1902, when they would earn each other's respect and after the war they would establish a very amicable friendship. De la Rey was a veteran of the First Boer War, when he had served as the youngest ever veldcornet. When the war broke out in October 1899, he was appointed as an advisor to Gen Piet Cronje, Commandant for the Western Transvaal. Cronje, unable to work with De la Rey because of different opinions on how the war should be conducted, sent him to the Kimberley area to delay the British by directing guerrilla raids on the railway. When news arrived that the British advance had begun, De la Rey and his troops rode for Belmont. To their surprise, Methuen had reached Belmont Station sooner than expected.
Throughout the war, the mobility of Methuen's troops set an example for the rest of the British Army. His men would be called the 'Mobile Marvels', the 'Mudcrushers' and the 'Salvation Army', because of the speed and endurance they showed in relieving garrisons and pursuing the enemy. In the later stages of the war, during the two great De Wet chases, Methuen alone was able to keep up the pace set by his adversary. The many campaigns of his earlier years had taught him the importance of mobility. Although he was tied to the course of the railway in the first stage of the war, he still made the hest of the situation. The field packs of the soldiers carried nothing but essentials: field cap, flannel shirt, canvas shoes, socks, towel, soap, worsted cap, housewife, laces and grease-pot.(11) No tents were provided and the men had to sleep in their greatcoats. In Methuen's division, the officers would get no special treatment. They were subject to this tenet and carried only what was necessary. Methuen led by example and slept at night on the veld in a Mexican poncho.
For the officers, it became more than just a question of mobility when determining what they should bring with them or what they should have carried on the march. It became a necessity for every officer to appear as if he was just an ordinary soldier. Before Methuen had reached the Orange River Station to take command of the 1st Division, a British reconnaissance party, led by Col Gough of the 9th Lancers, had skirmished with a small Boer raiding party. Of the six British casualties, four were officers. The officers were all fatally wounded. The Boers were well known for their experienced marksmanship, a necessary requirement for growing up on the veld surrounded by potentially hostile African neighbours. They were able to distinguish between officers and men and then hit their selected targets. Methuen, with Buller's approval, ordered his officers to carry and wear nothing that would distinguish them from the regular troops.(12) Buttons, belts and other marks of rank, once brightly worn, were now dulled with mud or painted brown. Officers were allowed to carry rifles rather than swords. To further confuse the Boers and to conserve water, shaving was abandoned by most officers. Methuen led by example. He wrote, on 19 November, 'As likely as not, I may have to see no more tents this side of January or my plum pudding. No officer has a sword, all rifles, no marks on their [uniforms], and [look] like the men. I am in a Boer hat, a pair of Norwegian slippers, khaki trousers, and short sleeves, looking the most disreputable man in camp...'(13) Two days later, the 1st Division broke camp and headed towards Kimberley in the direction of Belmont.
The battle of Belmont witnessed the first time Lord Methuen commanded a force larger than a battalion in battle. At Belmont, Methuen hoped to achieve a decisive victory. He relied on the basic tenets of the British commanding officer in 1899; these were the methods of classic nineteenth century warfare. Accordingly, he would seek to get his troops close enough to the enemy to conduct a bayonet or 'cold-steel' charge. Although tactical writers like Wilkinson-Shaw, C E Callwell, and Gen Francis Clery, who was commanding the 2nd Division in Natal, argued that fire action was no longer just a preparation for the bayonet charge but the crux of the attack itself, most of the British Army, trained during an earlier time when rifles did not shoot as far and as accurately, when charges obscured vision, and before magazines increased the rate of fire,(14) relied on, as their main tactic in battle, that the charge would be preceded by volley fire.(15) Therefore, the purpose of firepower was simply to establish a position close enough to the enemy to enable a bayonet charge to be launched.(16)
Volley fire had proven very effective in Africa and Asia. It was used against irregular forces especially in defending against the frontal attack. It provided necessary discipline and courage for soldiers who otherwise had received poor training perhaps due to financial restraints. But most military theorists, by the outbreak of the South African War, had become aware of the dangers of massing troops in close order. Technical changes had made the square anachronistic. Increasingly, military critics advocated the use of independent fire. But independent fire in extended order, to be successful, required properly trained and drilled troops. Officers were less able to command the individual soldier as the firepower of weapons improved and lines extended along wider fronts.
Better training and drill were needed, not only to keep up with the handling of modern and more advanced weaponry, but also to fill the gap left behind by the departure from close order which heretofore had provided good morale. This improved training was never adequately provided. No drill prepared the British troops to meet the challenge of the Boers and their new tactics.(17) British soldiers through the 1890s, unlike their German counterparts, continued to fire at their rifle ranges standing and kneeling. Targets were stationary. The order for individual fire was given at roughly 485 yards (443 m). In Germany, the army was being trained at distances of up to 1 050 yards (960 m).(18) Therefore, because of the poor training of the soldiers and their own training as instructors, most officers continued to employ volley fire.(19)
Methuen did indeed get his bayonet charge at the battle of Belmont and, to an extent, he achieved his victory by winning the ground.(20) The victory at Belmont, however, is usually considered a Pyrrhic one, since the British suffered many more casualties than did the Boers.(21) The victory Methuen achieved was not the decisive victory he had aimed for due to two reasons, the first of which was a matter of tactics, the second, supply.
The first reason why the British did not achieve a decisive victory at Belmont was Methuen's decision to employ a night march. After providing the men with hot coffee, night operations were launched just after midnight. Many years earlier, Methuen had been at Tel-el-Kebir when he watched his commander, Sir Garnet Wolseley, conduct a successful night march which caught Arabi's forces by surprise and led to a relatively easy victory over the Egyptian troops. Methuen, always the admirer of Wolseley, had been a good student. This would be the first of Methuen's night marches. Others would follow at Graspan and Magersfontein.
The advancement of military technology towards the end of the nineteenth century rendered many tactics anachronistic. However, the night march did not seem to fit that category. In fact, with the increasing devastation of modern firepower, night operations, successfully employed, could bring the advancing force much closer to the enemy with a much smaller risk. Night operations also provided the offence with the opportunity to surprise the enemy. But critics of the night march, like Herbert Gall, were correct in addressing the reliability of the manoeuvre. In the dark, on unknown terrain, the march could break down and lead to panic and to unnecessary delays. It, too, could limit the individual soldier's ability to continue fighting through the rest of the day as fatigue set in more quickly.(22)
Nevertheless, the tactic of the night march still seemed to be the best chance to get a large force, in relative safety, close enough to the enemy. At close range, the infantry could then attach their bayonets to their rifles and charge the enemy. The charge would produce a shock to the defenders' morale and, according to the plan, their lines would crumble as they lost heart and ran. This would prevent an orderly retreat and allow for a successful rout of the enemy and a decisive victory. As Maj A R Mead accurately wrote in 1904, 'the British, looking to the assault as the final deciding factor of the contest, and seeing their main difficulty lie in getting their troops into a close position from which to deliver it, were naturally led to attempt night attacks...'(23) Methuen was but one of many British officers in the Boer War who employed this tactic. He is, perhaps, the one most criticized for it.(24)
Methuen has been unfairly criticized for his use of the night march. Indeed, at Belmont, prior to his attack, he failed to locate the exact position of the enemy's flank. He may also be criticized for relying on faulty maps. But even as Maj Mead concluded, although the majority of British night operations in the Boer War failed to bring about decisive victories and often led to defeats, the tactic, employed under the right conditions, as it had been at Tel-el-Kebir, was still worthy of use. That it failed disastrously at Magersfontein, as will be seen, and caused considerable confusion at Belmont was not the result of the choice of tactic but rather of the conduct of the manoeuvre.
In addition, the relative ineffectiveness of the night march at Belmont related to the use of artillery to clear the ground just before the advance.(25) This alerted the Boers and removed the element of surprise. However, after weighing the advantages and the disadvantages, Methuen decided that the risk of alerting the Boers to the possible night march was not as great as the danger of leaving the enemy's artillery fully functional. As a result of Methuen's decision to open fire, the Boer artillery was forced to retreat from the range of the British fire and its role was diminished in the battle the following day.
Although the Boers were alerted to the British preparations, the night march still came very close to providing Methuen with the position he needed to conduct a decisive bayonet charge. In his opinion, it also saved the lives of many of his soldiers. He telegraphed to Buller that, had he attacked later in the full light of the day, he would have incurred far greater losses.(26) The darkness of the night provided valuable cover for his advancing troops. To a greater extent than any observer could have expected, the operation did succeed in surprising the Boer troops. Methuen wrote, 'The attack was a complete surprise, for they did not know I had moved from Witte Putt to Belmont, and expected an attack in three or four days.'(27) However, where the night march failed was in delivering the troops to their correct positions.
Methuen's main force left the Orange River Station on 21 November 1899. A reconnaissance party, consisting of the 9th Lancers and Rimington's Guides, was ordered in advance to scout the area in the vicinity of Belmont. Heading out from Fincham's Farm, they spied several hundred Boers climbing up a kopje at Belmont. The following day, the British reached Thomas's Farm, two miles (3,2 km) south of Belmont. The advance party was fired upon. Methuen ordered the artillery forward to return fire and the Boer fire ceased. At midnight, the troops bivouacked and prepared for battle.
On the morning of 22 November, Methuen reconnoitred as far as possible from his position at Thomas's Farm. Because of the strong position held by the Boers at Belmont and the absence of sufficient British cavalry, it was impossible to learn about the area in detail. Therefore, Methuen did not have information on the exact position of his enemy nor details on the topography of their emplacements. This was the greatest challenge to the success of the night operations.
Methuen's plan for driving the Boers from their position in the kopjes was relatively simple. Some two miles (3,2 km) to the south-east of Belmont Station, the Boers had positioned themselves in two lines of broken kopjes which ran more or less parallel with the railroad. The Boer position to the west was closer to the railroad; it rose on the average about 100 feet (30 metres) above the plain. Methuen decided to attack this position first and focus on two points, Gun Hill and, just to the north, Table Mountain. Once these positions were taken, the British troops could continue to advance eastwards to the next range of kopjes, where Sugar Loaf Hill and Razor Back lay in the south, and where Mount Blanc loomed in the north, another 100 feet (30 metres) above Table Mountain. Mount Blanc was the key to controlling the area since it overlooked all the surrounding kopjes and the railroad.
The success of Methuen's plan therefore required that the night march get the two brigades into their assigned positions. The march was undertaken in extended order at intervals of at least five paces, 'a formation more extended than any practised at the same period in broad daylight by continental nations.'(28) Even Leo Amery, the well known journalist and editor of the flints History of the War in South Africa and a harsh critic of Methuen's tactics, praised Methuen for conducting this radical manoeuvre on the battlefield which showed his 'insight into one of the chief features of modern warfare'.(29) Methuen's experiences during the Tirah Expedition, a few years earlier, had taught him the dangers of close order in the age of modern firepower.
The battle of Belmont
Methuen had planned to give the 9th Brigade the lion's share of the
fighting that day. At 03.00, as the Guards
Brigade was ordered to advance upon Gun Hill, supported by the Naval
Brigade, the 9th Brigade was ordered to
advance upon Table Mountain. Mounted troops were sent to guard the
right flank of the Guards Brigade and
the left flank of the 9th Brigade. Batteries would clear the ground
before the advance. Then, in the dark of the
night, the men were to march across the open plain and arrive at a
position close enough to charge the enemy at
daybreak. After securing Table Mountain, the 9th Brigade would swing
around to the left and attack the
Boer flank on Mount Blanc. The Guards, after seizing Gun Hill, would
conform to the advance of the 9th
Brigade and would hold the Boers' front. In the meantime, the mounted
troops would move to the rear of the
enemy to cut off any path of retreat.(30) Methuen, from the rear of
the centre of the two advancing brigades, watched
as his plan unfolded.(31)
With the Northamptons on the right, the Northumberland Fusiliers on the left and the King's Own Yorkshire Light Infantry (KOYLI) in reserve, the 9th Brigade advanced on the Boer position at Table Mountain in darkness. While the Northumberland Fusiliers temporarily held their ground, the Northamptons, although exposed to a heavy fire from Gun Hill, concentrated volley fire on the Boer flank and, after a minor action, were able to drive them from the crest of the hill. The Northumberland Fusiliers were then able to continue their advance. By dawn, the 9th Brigade was in a position to seize the last few ridges held by the Boers on Table Mountain and advance upon Mount Blanc.(32)
The advance of the Guards Brigade did not go as well. The Grenadier Guards lost their way. The Guards Brigade had assembled at 03.20, twenty minutes later than scheduled.(33) To make up for the lost time, they hastily rushed towards Gun Hill. To make matters worse, their maps were faulty. Gun Hill was some 1 000 yards (914m) farther than expected. Although Methuen blamed no one in his report, Lt Col Eyre Crabbe, commanding the Grenadiers, mistakenly led his battalion away from the face of Gun Hill and towards the western face of the kopje.(34) As a result of this misdirection, the Grenadier Guards discovered themselves not at the exposed flank of the Boers as was planned, but at their front below a steep incline. The earlier delay now proved costly. The morning sun revealed the advancing Guards and the Boers poured fire down from the heights of the kopje. Casualties were high, but thanks to their extended order, the heavy fire of the Boers was not as costly as it may have been. The Grenadiers, nevertheless, were able to reach the summit and, at the point of bayonets, drive the Boers from their position. The Scots Guards, to the left of the Grenadiers, without much incident, also advanced successfully on Gun Hill. The Guards Brigade was then in a position to support the 9th Brigade's advance upon Mount Blanc from Table Mountain.
In spite of Crabbe's blunder, the first stage of the battle was a success for Methuen; he had chosen his tactics well. Admittedly, errors due to misdirection and poorly drawn maps did lead the Grenadier Guards to attack from a dangerous position. The resulting positioning of the Guards, due to the misdirection of Lt Col Crabbe, did force a frontal attack.(35) However, the night march allowed the Guards to advance to within 350 yards (320 metres) of the enemy without any shots being fired. Methuen had not planned a frontal attack and knew the likelihood of the high casualty rates which generally accompanied one, but, because of the position reached, Methuen chose not to call off the attack and accepted his predicament.
'... [Because of the misdirection] the Brigades were leaving each other, the enemy was surprised and firing everywhere, and I was going straight for enormous precipices instead of going for A [the point of attack chosen for Gun Hill]... an awful movement, no retreat available, and a brave enemy ready to destroy us. I did not lose my head. I saw I was committed to a frontal attack, and sent one ADC to get the Guards straight, and another to [the] 9th Brigade...; all was right in ten minutes.'(36)
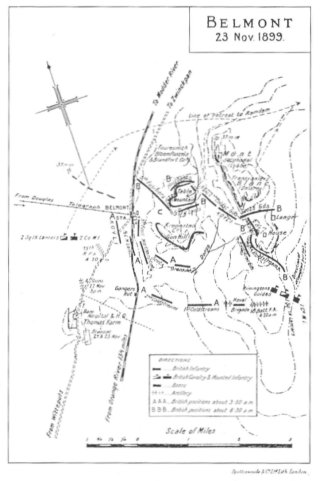
Unforeseen problems did not shake Methuen. At this point, he employed a new tactic which ensured that casualties would be limited, in spite of the frontal attack. He had given orders for the advance to be conducted in an order much more extended than that which had been practised at Aldershot. Five years of conducting drill and manoeuvres on the groomed parade grounds in England had not permanently harnessed his ability to improvise. Ian Hamilton, another veteran of Tirah, employed this manoeuvre at Elandslaagte in October with similar good results.
The second stage of the battle, the advance on Mount Blanc, began with the opening of British artillery fire on the Boer position at 04.50. Getting the guns into an advantageous position on the newly gained high ground of Table Mountain was a very difficult operation. The horses needed for the task had not yet recovered from their five week sea voyage, nor had they had sufficient rations since reaching South Africa.(37) As a result, although the British managed to drag a few field artillery pieces onto the heights, the heavier pieces, such as the horse artillery, could not ascend the steep slopes and therefore British firepower could not drive off the Boers. Methuen later stated at the Royal Commission on the War in South Africa that, had a battery of horse artillery been able to get to the heights, they could have fired on the Boers as long as they liked. (38)
The 9th Brigade, now visible to the Boers in the full light of the sun, encountered stiff resistance. The Boers remained on the north and south-east ridges of Table Mountain and supporting fire from Mount Blanc contin- ued to pour down on the advancing British. The British plan to advance by sweeping across from Table Mountain to the northern ridge of Mount Blanc proved unworkable in the face of this crossfire. Maj Gen G S R Fetherston- haugh, the brigadier of the 9th, was wounded in the shoulder and Col C G C Money of the 5th Fusiliers took over the command. Eventually, bayonets drove the Boers from the southern ridge of Table Mountain just before 06.00. Methuen had to change his plan midway through the battle. It had become clear by 06.00 that the 9th Brigade was not going to get the 'lion's share' of the work that day.(39) It was the Guards Brigade who were in the thick of it. Because of the misdirection of the Grenadier Guards, several companies of the Coldstream Guards, which were to reinforce the advance on Gun Hill and to support the 9th Brigade's advance, were too far to the right to aid in the advance of the 9th Brigade because they had conformed to the Grenadier's line. As a further consequence of this shift to the right, they found that they were the targets of a heavy Boer fire directed from Razor Back and Sugar Loaf hills. Three companies of the 2nd Coldstream Guards, along with the remaining KOYLI and two companies of Mounted Infantry still in reserve, were diverted by Methuen to conform to the Guards attack on Mount Blanc, but the remainder of the 2nd Battalion and all of the 1st Battalion were needed to seize Razor Back and Sugar Loaf hills. With the 9th Brigade pinned down on Table Mountain, and the majority of the Coldstreams attacking the two hills to the south, the Scots and Grenadier Guards were forced to attack the Boer front at Mount Blanc from a dangerous position below the Boer line without the benefit of a strong flanking attack.
To minimize the casualties, the British troops were marched between the two lines of kopjes as quickly as possible in three extended lines.(40) Casualties, however, were still high.(41) Methuen threw in the last of his reserves to aid the attack. The Naval Brigade, with their large 4,7-inch quick-firing guns, bombarded the heights of Mount Blanc. As the Boers began to retreat from their positions on Table Mountain, the 9th Brigade slowly joined the wide advance. By 06.00, the heights of Mount Blanc had been cleared and the enemy was seen 'in large numbers galloping into the plains'.(42)
The problems which the British faced in the second phase of the battle, which was the capture of Mount Blanc, were primarily the results of poor reconnaissance and the misdirection of the Grenadier Guards in the first phase. Poor reconnaissance, the product of a weak mounted force and a strong well-covered Boer position at Belmont, is a feature of the war which beset almost every British operation. One colonel of the Guards reported to a fellow officer, 'It seems to me that our leaders find the strongest position of the enemy, and then attack him on front.' The other officer replied, 'It appears to me that they attack him first and find out his position afterwards.' At Belmont, poor reconnaissance led Methuen and his staff into believing that the 9th Brigade would be able to advance easily past the Boer positions on Table Mountain and onto Mount Blanc. This proved false. Even after the plateau at Table Mountain had been gained, Boer troops were still well fortified on the north and south-east ridges. These positions continued to receive support from Mount Blanc.(43)
The other problem in the second phase of the battle was a result of the Grenadier Guards getting lost and attacking the position which the Coldstream Guards were to have advanced upon. As a result, the Coldstream Guards were forced to shift further to the right, losing touch with the 9th Brigade. From their new position, they came under the fire of Boers situated atop Razor Back and Sugar Loaf hills and could no longer support the 9th Brigade. Clearly, the bulk of the regiment could not conduct a flank attack upon the Boer position at Mount Blanc because of the Grenadiers' loss of direction.
In spite of these problems, the battle of Belmont was still a victory for Methuen and the 1st Division. The operation secured the railway and protected the division's flank and the British advance towards Kimberley could continue. It was not the decisive victory, however, which Methuen had hoped for, but, nevertheless, the Boers were successfully driven from their fortified position. Although, the British had forced the Boer retreat, they could not turn their victory into a rout because of a lack of mounted troops. Methuen had only 900 mounted men out of a division which comprised 10 000 men. This force was too small to cut off the Boer retreat, protected as it was by the numerous kopjes along the way. Any attempt to conduct a sufficient, bold pursuit of the Boer troops was equally impossible. This was a problem which Methuen well understood and could not have avoided. The inability to achieve a decisive victory at Belmont allowed the orderly retreat of the enemy and gave them the opportunity to return to battle in force two days later at Graspan.
The battle of Belmont, as Gen Henry Colvile described it, was 'a soldier's fight'.(44) In Colvile's opinion, the battle was well planned, but, because of the circumstances which arose, planning failed and only the 'sheer pluck' of the men brought victory. In his judgement, 'the men did for themselves what no general would have dared ask of them.'(45) However, to take credit away from the commanding officer is unjust. As Methuen pointed out to his wife, 'sheer pluck and military knowledge won the day.'(46) The night march succeeded to a great extent. As Hippolyte Langlois pointed out in Lessons from the recent wars, against an enemy in depth, a night march can only succeed against the front line.(47) Methuen knew this. The aim of the night march was to get the bulk of his advancing troops as close to the enemy's first line as he could with minimum resistance. This came very close to fruition. If Methuen can be blamed for this incomplete victory, it is because he conducted the operation with insufficient knowledge of the terrain and of the enemy position, but this information could not be acquired. It is to Methuen's credit that the reserve troops were committed when they were and that the plan was altered to compensate for the misdirection of the Grenadier Guards.
What disturbed Methuen more than the outcome of the battle was an unethical act on the battlefield by a Boer soldier. Methuen had always admired the courage and skill of the Boers. As a 'Christian Knight', he placed honour, duty and justice above all else and he believed that the Boers possessed these traits. He was one of the first of the British officers to publicly praise them.(48) Likewise, no one, Briton or Boer, ever questioned these traits in him. Therefore, these reports greatly disturbed him. 'Their tactics and their courage are indisputable, and it is only to be regretted that they are guilty of acts which a brave enemy should be ashamed of.'(49) In his official report to Buller, Methuen made mention of the fact that, while the 9th Brigade was struggling to dislodge the Boers on Table Mountain at the point of the bayonet, a Boer had improperly used the white flag, the accepted symbol of surrender. With the appearance of the flag, the British troops ceased fire. A Boer then fired. This was not the last time that the Boers (and later the British too) would be accused of this treacherous act.(50)
The victory at Belmont was costly. Nearly 300 British and perhaps 150 Boers were wounded or killed at Belmont. (51) Throughout the war, Methuen was deeply disturbed by the loss of human life. None of his previous battle experience had prepared him for such high casualty rates. He wrote 'People congratulate me; the men seem to look on me as their father, but I detest war the more I see of it. I do admire them.'(52) After the battle, the dead were buried. The wounded and those too ill to continue, including Maj Gen Fetherstonhaugh, were sent back to Orange River Station. The severely wounded were sent back to Cape Town. The remainder of the 1st Division continued on up the railway toward Kimberley. Their second encounter with the Boers would occur only two days later.
Even with this delay at Belmont, Methuen expected to relieve Kimberley by 27 November. He believed that the main Boer force was north of the Modder River. He expected that this group would attempt to block his division's final advance on Kimberley. On 24 November, Methuen heard news that there were 400 Boers and two guns in the kopjes just to the north-east of Graspan Siding.(53) The Boers under Prinsloo had fallen back, after the battle, some 13 miles (20,9 km) behind the border of the Orange Free State to the town of Ramdam. De la Rey and his Transvaal commando, which had arrived at Belmont late in the morning and played only a small role in the conflict, had retreated 11 miles (17,7 km) to the north and taken up a defensive position at Graspan. Knowing that Methuen would continue his advance along the railroad, he asked Prinsloo for more men. While Prinsloo would not commit the bulk of his force, he did dispatch T Van der Merwe and 800 Free Staters. The Boers, numbering not 400, but 2 000 to 2 500 strong, once again dug in to fortified positions in the kopjes and awaited the British advance.(54)
Methuen could not sweep around these Boers anymore than he could have skirted the Boers at Belmont. They would prevent the safe passage of the railway necessary to transport the non-combatants from Kimberley to the Orange River Station. Indeed, on 24 November, Boer forces shelled the British armoured train which had advanced up the line. Methuen knew that there was also a tactical risk in leaving a potentially destructive enemy force on his flank. There was, of course, also the problem of water. Between Belmont and the Modder River, a distance of 32 miles (51,5 km), there was scarcely any water.(55) In his opinion, Methuen did not have the necessary animal transport to abandon the railway, it being his only reliable supply line.(56) Methuen therefore chose to follow Buller's advice to advance along the railroad and to meet the Boers at Graspan.
Late in the afternoon on 24 November, Methuen's main force, composed of the 9th Brigade, the Naval Brigade, and the artillery, marched towards the Boer position at Graspan in the direction of Swinkpan. The mounted troops guarded their flanks. The 1st Bn Scots Guards and two companies of Munster Fusiliers remained at Belmont Station to guard against the chance of a Boer raid on the lines of communication. The remainder of the Guards Brigade marched straight towards Enslin, accompanying the baggage.
Methuen accompanied the mounted reconnaissance in person. He found nothing to suggest that there were more than the originally assumed 400 Boers. Based on his findings, he developed a simple and straightforward plan. Under the cover of darkness, the artillery, accompanied by the infantry, would advance close enough to the Boers to conduct a barrage and drive them from the kopjes. The mounted troops, stretched far on his flanks, would then capture the fleeing Boers, something they had failed to do at Belmont. Only if necessary would the 9th Brigade and the Naval Brigade be used to assault the enemy's position. Their role was to protect the guns.(57) Whereas the emphasis of the night march at Belmont was to get the infantry into a position to implement a bayonet charge, at Graspan, a night march was planned to push the artillery forward under the safety of darkness.
The battle of Graspan
The night march to Enslin began at 03.30. The artillery came into
action at 06.30. By 07.00, Methuen had a
rude awakening. He realized that he had underestimated the Boer
strength considerably. Well hidden in the
kopjes above Rooilaagte Farm, some 150 to 200 feet (45-60 m) above the
surrounding veld, commanding the
approaches to the south, east and west, was De la Rey and his
commando.(58) He heliographed Colvile to bring
the Guards up to protect his right flank and rear, where Maj Rimington
had reported the movement of at least 500
more Boers.(59) The artillery continued to fire for over two hours
(one battery alone firing off over 500 rounds),
before Methuen was satisfied that the ground had been adequately
prepared for the assault. The naval guns,
brought north by armoured train, joined the fire. Despite this effort,
the Boers, thanks to their fortified position,
were little affected by the British artillery. To take the kopje and
thus continue the advance along the railway
towards Kimberley, Methuen was forced to attack with his infantry.
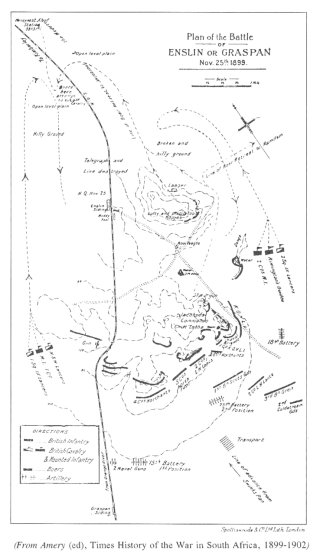
After the battle, Methuen would be criticized, as he was after the battle of Belmont, for launching a frontal attack. However, as at Belmont, Methuen's main thrust was made on the Boer flank. Five companies of the Northumberland Fusiliers were ordered to hold the left and the centre, while the rest of the 9th Brigade, including the Naval Brigade which had feigned a frontal attack, attacked from the right. The advance was supported by artillery fire. The shrapnel was effective in pinning down many of the Boers, but their mobility and their ability to act independently of their officers allowed the rapid reinforcement of the left flank. The Boer line was extended and, as a result, what had been the Boer left flank was now part of the Boer front. The attack which followed around 09.00 degenerated, once again, into a frontal attack.
Methuen, personally conducting the operation, gave the orders to assault the eastern kopje. The Naval Brigade would 'at last have a "show" all to herself.'(60) Under the cover of artillery fire and the volley fire of the 2nd Battalion KOYLI, the Naval Brigade advanced towards the kopjes in rushes of 50 to 60 yards (45-55 m). The fire of the Boers was deadly. Among the first to fall was the commander of the Naval Brigade, Capt Prothero. Before the day was out, 44% of the Naval Brigade, sailors and marines, would be lost. Nearly half of the first line fell before it reached the kopje.(61) As Julian Ralph wrote, there was just 'no room for the bullets to miss'.(62) According to Methuen and Lt Col Money, the excessive losses were caused by a tactical error. Although ordered to attack in extended order, the Naval Brigade had manoeuvred in too close and the impact of modern firepower was clearly displayed.(63)
While the Boers concentrated their fire on the Naval Brigade, a company of the KOYLI and the 1st Bn Loyal North Lancashire Regiment from the left, and the remainder of the KOYLI regiment from the right, were able to advance upon the Boer position. As they approached to within 25 yards (23 metres) of the top, the Boers abandoned their sangars and fled. The British captured the ground. Methuen then ordered the artillery to advance up the hill, so it could fire down on the retreating Boers. The Boers, however, were too quick. Their mobility allowed a rapid descent from the kopje. Methuen recorded:(64)
'The heights gained, I found I had taken the whole Boer force in flank, and had entirely cut them off from their line of retreat. My guns played on the masses of horsemen, but my few cavalry, dead beat were powerless, and for the second time I longed for a Cavalry Brigade and a H[eavy] A[rtilleryl Battery to let me reap the fruits of hard fought action.'
For the second time in two consecutive battles, Methuen had his opportunity for a decisive victory taken from him by the lack of mounted troops. The path of the Boer retreat crossed the open veld and Methuen had posted his mounted troops in a position to intercept them. A large mounted force could have wrought havoc on the retreating Boers, but the numbers were just too small and the horses were already worn out from a full day of reconnaissance to take advantage of the situation. In fact, Methuen's cavalry was threatened by the retreating Boers, and had to be rescued by the mounted infantry. Once again, the Boers fled with light losses. The commando headed north-east, more or less intact, towards Jacobsdal. As Frederick Maurice has pointed out, the operation strengthened the Boers' belief that they could face superior British numbers and, thanks to their mobility, they could avoid any disaster.(65)
At Belmont, Methuen's advance had turned into a frontal attack due to the misdirection of the Grenadier Guards. At the battle of Graspan, Methuen again attempted a flanking movement and once again he was forced to fight the Boer front. This alteration was caused by the ability of the Boers to rapidly change their own front. Methuen was well aware of the problem of countering the mobility of the Boers. To defeat them in the future, he knew that he would have to counteract their mobility. In his address to his troops after the battle of Belmont, he said:(66)
'Comrades, I congratulate you on the complete success achieved by you this morning. The ground over which we have to fight presents exceptional difficulties, and we had as an enemy a master in the tactics of mounted infantry. With troops such as you are, a commander can have no fear as to the result.'
Even to his men, Methuen could not avoid the subject of mobility. L March Phillipps wrote, 'Want of frigates was to be found in Nelson's heart... and I'm sure want of cavalry must be written in poor Methuen's.'(67)
En route to Kimberley, Methuen was plagued by the problems of advancing a large cumbersome force against an agile adversary. Hampered by the urgency to remain close to the railway and by his limited number of mounted troops, Methuen simply had to face the inevitable. He concluded that, with the resources he had, only British firepower could counter the effects of Boer mobility:
'There is far too great risk of failure in making flank and front attack in the case of a position such as lay before me at Belmont. The very first element of success is to keep touch between the brigade from the first. Nor is there any question of taking the enemy in flank as on horses he changes front in 15 minutes as will be shown in the next fight. Shrapnel does not kill men in these koppies, it only frightens, and I intend to get at my enemy.'(68)
Almost everyone, including Methuen, expected the destruction caused by the artillery fire to be far greater than it was. The effects of shrapnel on the enemy were, however, minimal. To Methuen, the battles of Belmont and Graspan provided proof that a heavy artillery barrage could not drive the Boers from well fortified positions. The lessons of Belmont and Graspan encouraged him, therefore, to rely on the frontal attack.
So as not to give the Boers much time to regroup, Methuen continued the British advance on 27 November after the 23 dead and 165 wounded were cared for.(69) The scarcity of water also encouraged Methuen to move out as quickly as possible. He wanted to get his men and animals to the Modder River, about 20 miles (32 km) away. The lack of rest caused one sergeant of the Guards to muse, as the war correspondent Alfred Kinnear overheard, 'Why are we like the early Christians? Because "Paul" gives our feet much to do.'(70)
The 1st Division marched towards Modder River. On 27 November, they camped at Wittekop. There the command of the 9th Lancers was transferred to Maj M O Little (71), and Maj Gen R Pole-Carew, affectionately called 'Polly' by Methuen, who had been a colonel on Buller's staff, took over the command of the 9th Brigade.(72) Methuen ordered Rimington and Little to reconnoitre the surrounding areas while he personally rode to examine the Modder River bridge. Methuen had no idea that, while he examined the bridge, between 6 000 and 8 000 Boers watched on, the closest of whom were only 300 yards (274 m) away.(73) The Boers held a front approx- imately five miles (8 km) long. Not one shot was fired. Methuen returned to the base camp unaware of the Boer position which he would attack the next day.
The commander of the awaiting enemy force at the Modder River was Gen Piet A Cronje. An impatient and nervous 65 year old Transvaaler, Cronje was an experienced veteran who had led the Boers into battle at Potchefstroom in 1880 during the First Anglo-Boer War.(74) Cronje had not yet met Methuen in battle, but he knew he could expect two things. Firstly, he expected that Methuen's advance along the railroad would bring the British to the vicinity of the Modder River railroad bridge. And, secondly, from talks with Prinsloo and De la Rey, he expected a frontal attack. Cronje ordered his force to deploy around the Modder River bridge.
De la Rey planned the overall deployment of the Boer forces. De la Rey respected Methuen as a commanding officer. Methuen, in his words, was 'one of the bravest soldiers England ever chose to place against me'.(75) At Belmont and Graspan, he had witnessed Methuen's artillery shell strong positions in the kopjes with excellent marksmanship. He decided not to give the British gunners easy targets at the next confrontation. He convinced Cronje that the location most suitable to defend against a man was where the Modder and Riet rivers met. The ground approaching the rivers from the south was flat with the only cover a few giant ant hills. No crests of kopjes provided good targets for the British gunners. With the assistance of German volunteer officers, the Boers constructed trenches on both sides of the river, and dug in, concealing themselves on the slopes of the river- banks. Lying on the slopes of the river-banks, the Boers could get the full range out of their Mausers. De la Rey, wanting to make a stand against Methuen, also knew that this position would be very difficult to retreat from or, in the case of Prinsloo and the Free Staters, who he did not respect, run from. The Boers also constructed bomb- proof shelters for their mounts and dug several gun emplacements, so as to get the most from their few batteries. Their position was nearly impregnable.(76)
28 November 1899 was an exceptionally hot day with temperatures reaching 108oF (42oC). Methuen was well aware of the problems of fighting with little water and high temperatures. He had marched alongside Wood towards Coomassie in 1874 and had rode with Buller at Ismailia and Kassassin in Egypt in 1882. He knew that high temperatures and little water would put unbearable strains on his men. Indeed, the lack of water would be a problem for many British soldiers pinned down by Boer fire. Many British soldiers would die in desperate attempts to bring in water. To cite the oft quoted words of Lord Methuen, the battle of Modder River 'was one of the hardest and most trying fights in the annals of the British army.'(77) This citation, if somewhat exaggerated, accurately depicts the battle as a desperate struggle; one fought not just against the Boers, but against the climate. W Baring Pemberton depicted the battle as more than just a battle against the Boers and a battle against the climate, but also as a battle of tradition against technology. It was a 'farewell to the 19th Century, Modder River was the Waterloo of the Victorian Age.'(78) This battle clearly demonstrated the use of nineteenth century military tactics against an enemy armed with twentieth century weapons. Had Cronje not lost heart and retired late in the battle, the results would have sounded an alarm. As it was, Methuen and the 1st Division would once again win the ground.
When Methuen drew up the plans to cross the Modder River, he had little knowledge of the Boer position. Even after the battle began, he could not pinpoint their position. He wrote to his wife:(79)
'My Darling Ettie, I do not suppose a harder fight, or under more trying conditions, ever took place than that on the Rivers. I honestly admit it was a surprise to me, for I thought the enemy had cleared off, as did everyone else, whereas Kronje [sic], De la Rey, and 9 000 men were waiting for me in an awful position. I never saw a Boer, but even at 2 000 yards [1 800m] when I rode a horse, I had a hail of bullets round me.'
Maj Little estimated that 4 000 Boers, at least, were in and around the village just to the north of the river preparing for its defence.(80) Methuen, however, was convinced that the bulk of the Boer forces were a few miles to the north at Spytfontein. He believed that the men defending the passages over the Modder River were simply put there to delay the British advance.(81) Even after a local English-speaking resident transmitted a message during the night that 'the Boers were in force in the village and were digging themselves in like rabbits',(82) Methuen still did not believe that this was the main force which had kept Kimberley under siege. After some hesitation, he chose not to march east and avoid the confrontation, but to cross the river near the Modder River bridge and, if necessary, conduct a frontal attack against the Beers who held the position. If this was indeed a strong force, Methuen did not want to leave it on his flank.(83) Nor did he want to wait, because if the Boers were digging in, every hour was critical.
The battle of Modder River
The battle of Modder River began early on 28 November 1899. The
British entered the battle with little knowledge
of the exact whereabouts of the enemy. Nor did they march forward with
a detailed battle plan. Methuen had
decided not to commit to any plan until he could discover the location
of the enemy. To do this, the 9th Lancers
were sent forward at 04.00. At about 05.30, they located the Boer
position on the right. They were prevented
from reconnoitring further by Boer fire. Maj Little reported back to
Methuen that the Boers held a strong
position between the bridge and a group of poplars to the east. The
farms on the southern bank of the river were
well fortified, as were the nearby villages of Modder and Rosmead.
What the mounted troops could not see was
that west of the bridge, as well as further east of the poplars, the
river-banks were also well fortified.
Methuen's maps and intelligence had indicated that the Modder and Riet rivers could be forded at any point.(84) The intelligence, inscribed in British maps, was totally erroneous. The rivers were not fordable. After the bridge had been dynamited by the Boers, the only places where the British could cross were four miles (6,4 km) to the east at Bosman's Drift and six miles (9,6 km) to the west at Rosmead's Drift. The British had no knowledge of either of these places.(85) Methuen did not have enough mounted troops to carry out a sufficient reconnaissance of the area. To make matters worse, the course of the Riet River had also been improperly drawn. In fact, just about every detail on Capt W A O'Meara's roughly drawn map was inaccurate. Baring Pemberton was correct: As a result, the British would pay a huge cost for their victory that day.(86)
Methuen had hurriedly ordered the Guards and 9th brigades out of camp early in the morning at 04.30. Many did not have a chance to take their coffee and eat their breakfast. This had a most unfortunate consequence, since the battle would last most of the day. After marching in close order for two hours, at 06.30 they were ordered to extend. By 07.00, most had entered the battle. The 9th Brigade advanced on the left, to the west of the railway, with the Argyll and Sutherland Highlanders in reserve. They advanced towards Rosmead, which, unbeknown to them, had been fortified by Prinsloo and the Free Staters. To the right of the railroad, the Guards Brigade advanced towards the junction of the two rivers, where De la Rey's commando awaited them. There, Methuen believed, the Guards could extend and hit the Boer left flank. Both British flanks were protected by mounted troops. The two field artillery batteries, the 75th and 18th, as well as the naval guns, stayed in the centre along the railway. The 62nd Battery, Royal Field Artillery, arrived later in the battle from the Orange River Station and was deployed on the far left.
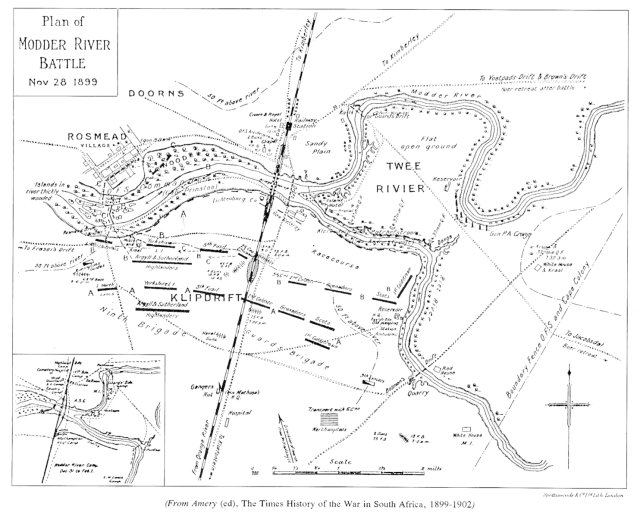
The deployment of the Guards was directed by Gen Colvile. They were formed into two lines. On the front line, the Scots Guards advanced on the right, the Grenadiers in the middle, and the 2nd Bn Coldstream Guards on the left. The second line, consisting of the 1st Bn Coldstream Guards, stayed behind in reserve. Although the Guards had not yet located the enemy, they cautiously advanced towards the river in extended order.
About 1 200 yards (1 097m) from the river, the Boers opened fire. A hail of bullets came over the force. Had the Boers waited for the British to come in closer, the casualties, no doubt, would have been far greater than they were.
Lord Methuen and his Chief of Staff and close friend, Lt Col H P Northcott, who were inspecting the ground, trying to locate the Boers, were caught in the deluge. They both escaped from the encounter unscathed. Later in the battle, Northcott, while riding Methuen's horse, was mortally wounded in attempting to deliver a message to Colvile.
The Guards Brigade attempted to advance directly into the Boer fire zone. Colvile ordered the Coldstream Guards to move further to the right and envelope the Boers' left flank. Lt Col Alfred Codrington, comman- ding the 1st Bn Coldstream Guards, soon realised the Boer flank was protected by the Riet River. The British maps had inaccurately shown its course. Detachments were sent down the river to scout for fords, but none could be located. The Coldstream Guards could not get at the Boers. The Guards were left without options: they had to make a frontal attack. The heavy Boer fire prevented the force, with the exception of an odd heroic but costly rush, from getting any closer than 1 000 yards (914m). From roughly 07.00 until nightfall, when the battle ended, the Guards remained where they were. Their only cover was provided by friendly artillery fire; accordingly, their casualties increased and their ammunition decreased.
Commanded by Maj Gen Pole-Carew, the 9th Brigade was likewise in action all day. Pole-Carew was ordered by Methuen to advance towards the railway bridge. Pole-Carew soon realised, however, that due to the extended order of the Guards, he could not risk sending the Northumberland Fusiliers to hit the railroad bridge from the east, or they would overlap the Guards. This would cause confusion and risk the chance of being caught in close order. The rest of the force, the KOYLI in the centre and the Loyal North Lancashires on the left, were then forced west to make room for the Northumberland Fusiliers. At about 07.30, as the Northumberland Fusiliers were crossing the railroad tracks, the Boers opened fire. With the Northumberland Fusiliers pinned down on the right, the other two battalions advanced on Rosmead Village. The poor intelligence reports again resulted in heavy losses as Pole-Carew attempted to ford the river. The British were able to locate and occupy a donga, a small ravine with steep sides, extending into the river towards the Boer trench.
Methuen, like Wellington at Waterloo, was seen everywhere that day on the battlefield. He believed that he could do more good on the battlefield raising the morale of the men, than he could from a safe, distant point directing the overall battle with field glasses. As Conan Doyle wrote: '... his own personal gallantry and unflinching resolution set the most stimulating example to his troops. No general could have done more to put heart into his men.'(87) On the left of the railway, Methuen personally led one of the rushes to reinforce the captured donga. This position proved significant. Under Methuen's guidance, a small party of Argyll and Sutherland Highlanders, safe in the donga, along with the artillery, provided covering fire for a detachment of the KOYLI which successfully seized the Boer trench on the south bank of the river. This gave the British their first foothold on the Modder. Methuen then returned to the other end of the battlefield to assist Colvile.
From the position captured on the south bank, the British were now able to advance across the river. Pole- Carew led a successful rush across the 300 yard (274m) wide river, where the men at times had to wade up to their armpits, and seized Rosmead Village.(88) As De la Rey feared, Prinsloo and the Free Staters fled. More soldiers of the 9th Brigade were eventually able to cross the river and reach the safety of the northern trench. However, due to heavy Boer artillery fire, they could not get to Pole-Carew to reinforce him. Pole-Carew made one gallant rush to reach the Boer guns, but was forced to retreat and entrench in Rosmead. Although the British artillery fired well all day, they could not knock out the well entrenched Boer guns.
By late afternoon, the British troops were tiring. The heat, the weariness from the long day of battle, the fatigue of fighting three battles in less than a week, and the lack of water had sapped the British troops of their energy. To make things worse, just before 16.30, Methuen was wounded by a bullet. The shrapnel entered his thigh and he was forced to leave the battlefield. Much of the British morale went with him. Command of the division devolved to Colvile. Arthur Paget took command of the Guards.(89)
Colvile, at first, wanted to continue the battle. Although his own Guards Brigade had not been able to advance, Pole-Carew's capture of Rosmead gave the British a strong position on the north bank of the river. But, with Methuen injured and the men too tired to attempt another river crossing, he postponed the attack. He decided that he would continue the attack the next day at dawn. Methuen agreed with his decision.(90) Colvile's preparations were for naught for at 20.00 that night, Cronje decided that, because of the departure of Prinsloo and his men, he could not hold his position and retreated towards Jacobsdal. The next morning, the British crossed the Modder River without interference and made camp.(91) There they stayed for the next week. Kimberley would not be relieved according to Methuen's timetable.
The Modder River battle was another victory for Methuen and the British, but it was also, relative to the other colonial wars of this era, another extremely costly one. More than sixty British were killed and another 300 were wounded - a casualty rate of 7%.(92) The faulty maps and insufficient reconnaissance were responsible for much of this loss, but they certainly do not explain everything that happened that day. Methuen's most vital error was in his underestimation of the situation. He refused to accept the information that the Beers were entrenched at the Modder River in force, believing instead that the force at the Modder River was simply a small skirmishing party.
Another criticism made against Methuen was his lack of overall direction of the battle. It has been suggested that there was no plan of attack. Because the location of the enemy was not entirely known, only a general plan was formulated before the advance. Methuen did not send out more reconnaissance parties to obtain this information, because he did not want to delay the British advance. Regardless, the troops were laid out in battle order with specific assignments based on the limited information available.
The criticism made by Amery and others that, once the battle began, Methuen failed to take control and issue specific orders is not entirely accurate. Methuen can, in part, be blamed for some of the miscommunication or lack of communication. It is true that his personal conduct was admirable by leading rushes and directing movements on the battlefield, but, in taking part in these small actions, he seldom could be reached at headquarters during the day, and therefore few orders were issued. However, in his defence, orders that were issued were also not always successfully delivered. As Methuen emphasized in his report, it was very difficult to relay information across the battlefield. 'It seems like "Dante's Inferno" out of which men hope someday to emerge.'(93) Unprepared for facing an enemy equipped with modern weapons capable of producing enormous firepower, the War Office had not supplied Methuen's division with runners. This made intercommunication virtually impossible, since the bulk of both brigades was constantly under fire. Methuen, therefore, had to rely on his aides for transmitting information, but he hesitated in sending them into dangerous situations. Northcott was killed in one such attempt and Methuen took the news of his death personally, blaming himself.(94) As a result of poor communication, Colvile did not become aware that he had assumed command of the division for at least thirty minutes after Methuen's injury. It was not until after dusk that Pole-Carew heard that Colvile had decided to stop the battle.
As Pemberton has pointed out, the lack of a signal corps also hindered communication.(95) Those detachments of the 9th Brigade which successfully crossed the river were often endangered by friendly artillery fire. Pole- Carew had to retreat more than once to escape that hazard. Without a signal corps, he could not transmit the position of the Boer artillery to his own artillery. As a result, the British could not penetrate any further. These failures cannot be blamed on Methuen's personal leadership but only on the inefficiency of the War Office to adequately prepare to meet the challenges put forth by new technology.
At the battle of Modder River, Methuen conducted a frontal assault against an enemy fortified in an unknown position. His decision to do so can justly be criticized. Was this decision connected to Methuen's training and experiences of the previous thirty years? The answer is a decisive yes. Battles waged at Amaoful, Tel-el-Kebir, Dargai and elsewhere reinforced the belief that the British soldier was capable of turning the enemy regardless of his position. It is true that Methuen learned valuable lessons at Belmont and Graspan. He learned the difficulties of trying to conduct a flank attack against the much more mobile Boer. He learned that a frontal assault without an accomplished flank attack could be dangerous. He learned that the frontal assault was the only available tactic to ensure contact with the enemy. But his belief in the invincibility of the British footsoldier remained unshaken and, in light of this, to carry out his orders, he felt that his men could bring victory through a frontal attack no matter what the odds.
Had Methuen known the exact number of the Boer forces, he still would have had to assault their position, or leave them on his flank. He believed that the force at the Modder River was only a small party attempting to delay the British. He expected the main Boer force to be busily entrenching further north at Spytfontein. There- fore, Methuen had greater reason to believe that the surest and fastest way to drive the Boers from the Modder River was with a frontal attack.
Conclusion
Lord Methuen had expected to reach Kimberley by 27 November 1899. By
28 November, his command was still
20miles (32km) away. Ahead of him, at Magersfontein, the bulk of
Cronje's forces was busy entrenching in the
kopjes. Methuen could no more avoid these forces than he could the
Boers at Belmont, Graspan and Modder
River. His course along the railway was etched in stone and the
railway traversed directly through Magersfontein.
To evacuate Kimberley of all its non-combatants required the entire stretch of railroad from the Orange River Station to Kimbarley to be in the hands of the British. The lack of water in the veld in the hot summer and the lack of supply animals also necessitated his dependence on the railway as a supply line. Had the rail not gone through Magersfontein, it would still have been necessary to engage the enemy. Although wrongly criticized, it would have been poor strategy to have allowed a large enemy force to remain unchecked on his flank. Although his choice of tactics has been criticized justifiably, Methuen was not a poor strategist.
Methuen had demonstrated both good and bad qualities of leadership. His personal bravery and his care for his men were amply demonstrated in the three encounters. His ability to use the three arms of his division, the infantry, artillery and cavalry, in unison, can also not be denied. His ability to improvise at times, such as his employment of extended order at Belmont, was admirable. Bet he also had his faults. His aptitude in commanding 10 000 men should be questioned. Despite the inaccurate maps, the scarce reconnaissance intelligence, and the inability to transmit information across the battlefield, by attempting to officer as a major or even captain at Modder River, Methuen could not coordinate the movements of his entire division. Methuen's use of the night march before each of the three encounters can also be criticized. With his limited intelligence, partly as a result of a weak mounted force and partly a result of poor British preparation prior to the outbreak of hostilities, Methuen chose to enter into three battles without full knowledge of the enemy's position. At both Belmont and Modder River, this led to great confusion. But, clearly, the greatest fault he had so far demonstrated was his general reluctance to deviate from the lessons he had learned from serving in many successful colonial expeditions.
Lord Methuen and the 1st Division had so far encountered the Boers three times en route to Kimberley. The Boers retreated at the end of each of these encounters. For the British Army, the history of warfare decisively changed along the way, although many of its top officers were not cognisant of this. For the first time, British troops in the open faced the full fire of modern weapons. The effects were devastating. No matter how good the British soldier was, he could not withstand modern firepower. The frontal assault as the main tactic for conducting a battle should have been laid to rest by the British Army at the Modder River; it was not. Military tactics certainly had not yet caught up to the new technology, but Methuen's employment of traditional tactics and the end results which they delivered still made it seem that it was not necessary to change the British Army to win.
References
                      officers/men	officers/men  men
                       killed	   wounded	    missing
Staff	                 -		  1/0
9th Lancers              -		  0/4
18th Battery, RFA        -		  0/1
3rd Bn Gren. Guards     2/19		  7/98		  2
1st Bn Coldstream Gds	0/7		  1/20
2nd Bn Coldstream Gds	 -		  2/6.
1st Bn Scots Guards     0/9		  3/35
1st Northumb. Fus.	2/10		  4/36
2nd KOYLI	         -		  0/5
2nd Northampton. Regt	 -		  1/14
South African Reserve   0/1		  0/3
List of casualties at Graspan, 25 November 1899:
                  officers/men	officers/men      men
                    killed	      wounded        missing
2nd Bn KOYLI         0/7		3/37           6
9th Lancers          0/1		0/8
75th Bty, RFA         -	   		0/1
1st Bn Northumb. Fus. -	   		0/3
1st Bn Loyal North
 Lancashire Regt     0/1		1/19
2nd Northampt. Regt  0/1		0/4            1
Naval Brigade        3/2		0/13
Royal Marine Arty.   1/5		0/55
Royal Marine L.I.    2/0		0/22
List of Casualties at Modder River,	28 November 1899:
            officers/men	officers/men	men
            killed	           wounded	    missing
Staff                 1/0	       1/0	       -
9th Lancers            -	       0/1	       -
l8th Battery, RFA        -	       1/19	       -
62nd Battery, RFA     0/1	       0/4	       -
75th Battery, RFA     0/2	       3/11	       -
7th Coy, RE            -	       1/2	       -
3rd Grenadier Guards  0/8	       3/41	       4
1st Coldstream Guards  -	       0/21	       -
2nd Coldstream Guards 2/10	       1/56	       -
1st Bn Scots Guards   0/10	       2/37	       1
1st Northumber. Fus.  0/11	       0/34	       -
1st Bn Loyal N. Lanc. 0/3	       1/16	       -
1st Argyll & Suther.  0/15	       2/98	       2
RAMC	               -	       1/1	       -
South African Reserve  -	       0/1	       -
Rimington's Guides     -	       0/3	       -
Return to Journal Index OR Society's Home page
South African Military History Society / scribe@samilitaryhistory.org