
 The South African
(incorporating Museum Review)
by
Mark Coghlan
KwaZulu-Natal Provincial Museum Service
Vryheid, in northern KwaZulu-Natal, was, during the South African War (1899-1902), a prominent centre in the south-eastern Transvaal Republic. The Vryheid district, in the then Zuid-Afrikaanse Republiek (ZAR), had been one of the springboards for the Boer invasion of the colony of Natal in October 1899. By 18 September 1900, when British troops occupied Vryheid,(1) the formal chapter of the war had closed. The Boer capitals had been captured - Bloemfontein on 13 March and Pretoria on 5 June 1900 - and the government apparatus of the two republics dispersed.(2) Between March and June 1900, General Sir Redvers Buller's Natal Field Force had driven the Boers from northern Natal,(3) but there is only circumstantial evidence as to why Vryheid itself was only occupied in September.
During March, when the Boers defended the Biggarsberg Range, some 80 km south-west of Vryheid, the Vryheid Commando had been sent to patrol its home district.(4) Following the successful British offensive at Helpmekaar and the Boer evacuation of the Biggarsberg line, Boer families in the Vryheid-Utrecht region were urged to retire deeper into the ZAR, while the Vryheid Commando helped to defend the Doornberg. This was in mid-May l900.(5) The Boers lacked sufficient strength to hold Vryheid and, although virtually deserted, the town was some distance from Buller's axis of advance, and its capture probably not a strategic priority or tactical necessity. A minor skirmish at Scheeper's Nek (on the Dundee road) on 18 May could also have deflected British interest in the town. A British column, in transit through the area, was lured towards Vryheid by talk of extensive stores. This column was ambushed by the Boers at the nek.(6) Between 13 and 16 May, Dundee and Glencoe had been occupied, and Newcastle on 18 May.(7)
In the British 'official' histories, there is no specific reference to Vryheid town (as distinct from the district's commando) in 1900 until the apparently routine occupation in September by Lieutenant General H J T Hildyard's 5th Division, along with Utrecht and Wakkerstroom. Strong garrisons were installed at all three locations, with Vryheid and Dundee connected by a series of subsidiary posts at Scheeper's Nek, Blood River and De Jager's Drift. This, in fact, comprised a so-called 'military district system', centred in this sector on Dundee. Operational by 19 October 1900, it comprised a major base at Dundee, with 29 companies of infantry, 11.5 companies of mounted infantry and 21 pieces of artillery. This 'reaction force' was intended to respond to crises, but betrayed the typical drawbacks of such a system - it was a passive defence and expensive in troops.(8) Both factors played an implicit role in the Lancaster Hill engagement, with the Vryheid garrison deficient in troops and the Boers long gone by the time reinforcements arrived. For the British, however, these were 'the halcyon days of British progress. Tamely submitting to the capture of their towns, the Boers had retired towards Piet Retief or to the mountains and forests east of Vryheid. Five hundred burghers surrendered of their own accord in September, but here, as elsewhere, their spirit began to revive in October.'(9)
The British garrison at Vryheid was soon to experience this revival at first hand. Before the war finally ended in May 1902, the Boers launched several incursions into Natal and the Cape Colony. One such incursion, in December 1900, originating in the Eastern Transvaal, was under the overall direction of the renowned Commandant-General Louis Botha. Rather dismissively entitled 'The Transvaal Outbreak' in a contemporary British history of the war,(10) this episode was nevertheless to prove embarrassing for Hildyard, whose garrisons at Utrecht, Wakkerstroom and Vryheid bore the brunt of the 'general offensive revival'. (11) Botha's experienced commanders included the veteran Lukas Meijer and Botha's brother-in-law, Cherrie Emmett. Following a 'half-hearted and easily repelled inquiry at the Vryheid outposts' on 1 December, (12) the Boers tested Hildyard's small garrisons at Utrecht and Wakkerstroom on 2 and 6 December respectively, possibly seeking bases from which to launch effective forays into Natal.(13) These vaguely documented episodes appear to have been little more than preliminaries to a serious attack on Vryheid. The Boers were aware, though, that the British had had three months in which to fortify the town.(14)
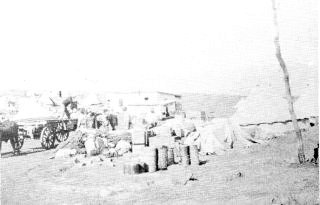
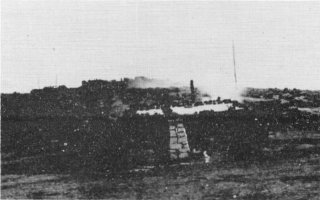
Unloading supplies at the main British camp on Lancaster Hill
(Photo: by courtesy of the Vryheid Museum, Lukas Meijer House)
Setting the scene
The British garrison of 900 men comprised one company ('A' Company)
5th Division Mounted Infantry (2nd Battalion Lancashire Fusiliers and Royal
Lancaster Regiment) under the command of Captain G Ormond, plus six companies,
2nd Battalion Royal Lancaster Regiment. (15) Artillery comprised two pieces,
variously reported as 12 or 15-pounders.(16) In overall command was Lieutenant-Colonel
J M Gawne, of the Royal Lancs. Gawne had also been appointed District Commissioner
at Vryheid in September 1900.(17)
Although Vryheid had been encircled with barbed wire and guards posted at entrances,(18) the town was never seriously threatened, with only 200 men left in its immediate defence. The primary defensive position was Lancaster Hill,(19) a dominating feature on the northern outskirts. Five hundred and fifty men of the Royal Lancs (Carleton) held an upper plateau with a perimeter of four miles (6,4 km). It was on this plateau that the main British headquarters and core defensive lines were located. The key positions were North Gun Point (with its ancillary post - Maxim Point) and South Gun Post, both so-named after their Royal Garrison Artillery (RGA) crews. A further post was located at Barrow Point on the north-eastern slopes of the hill. The Royal Lancs infantry contingent at North Gun Point was commanded by Captain R G Parker, and the RGA crew by Captain H G Marshall. A Lieutenant J C R Higgins commanded the nearby Maxim Point, its name, incidentally, betraying the fact that its primary armament was a Maxim machine-gun. At South Gun Post, the command comprised Captain W J Mangles, South Lancs, infantry, and Lieutenant G F A Drought, RGA.(20) Both North Gun Point and South Gun Post were carefully situated and solidly constructed, making the most of natural bastions provided by the rocky outcrops and precipitous slopes.(21) Further extensive breastworks were constructed during the British occupation of the hill, but it is unlikely that much of this network was completed by the time of the battle.
Situated below and to the west of these positions was a second plateau (Mounted Infantry Plateau) held by the company of 5th Division Mounted Infantry under the command of Captain G Ormond. The primary position on this plateau was known as Mounted Infantry Camp and, in evidence to the Commission of Inquiry that followed the battle of 11 December, Ormond detailed its defences as follows:(22)
Section alarm posts, comprising breast-high stone sangars fronted by wire entanglements and holding three men, were located to the north-west and south-west. These posts were under the control of a sergeant located in a tent in the centre of the camp. To the north-east was a tin guard-hut with an NCO and three men. This site is described as enjoying strong natural cover, suggesting that it was located close to the thickly-bushed escarpment overlooking the town. In an apparently similar position, on the Vryheid road to the south-east of the camp, was a mounted post, also comprising an NCO and three men. The horses were picketed some 70 metres to the west of the camp, where 20 boxes of reserve ammunition and the regimental stores were also located (in a pit, guarded by the quartermaster-sergeant). As it transpired, this was a dangerously exposed position. There were also two outposts at distances of several kilometres. To the north lay Mounted Infantry Post, with 20 soldiers, mostly mounted infantrymen, under Second Lieutenant G B Browne. The kopje position was reportedly a strong one, being almost completely surrounded by a stone wall and wire with a segment of a second wall along its western approaches. A second outpost, known as Farm Post, was tocated to the north-east. This had a garrison of 26 Royal Lancs under Lieutenant A H B Foster. Both outposts were separated from the main camp by pronounced valleys.
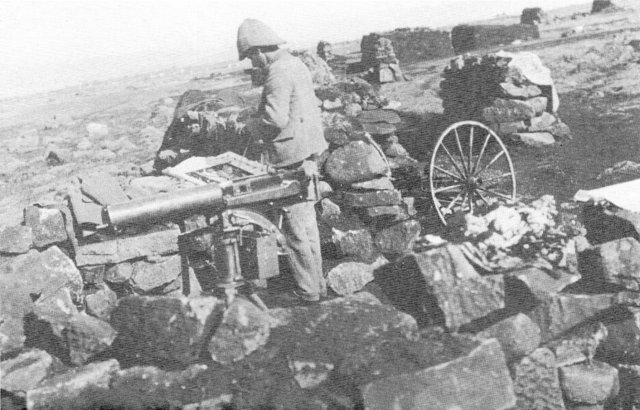
The Maxim gun emplacement on Lancaster Hill
(Photo: by courtesy of the Vryheid Museum, Lukas Meijer House)
The initial attack
Several months of inactivity had bred complacency in the Vryheid-Lancaster
Hill garrison by the time the 1 200 strong Boer force approached from the
north. The commandos (from Vryheid itself, Volksrust, Wakkerstroom, Piet
Retief and Paulpietersburg) had assembled at Wakkerstroom and only split
up immediately prior to the battle.(23) Sergeant J King (5th MI) inspected
the British outposts at approximately 01.00 on 11 December and found nothing
amiss.(24) Unbeknown to Sergeant King, the Boer attack was already underway
with the capture, at about this time, of the heavily entrenched Mounted
Infantry Post (wire entanglements and sentries notwithstanding), without
a shot being fired. Lieutenant Browne, one Royal Lanc soldier (Private
Sutton) and nineteen 5th MI troops were captured.(25) The signaller present,
even if he had the appropriate equipment, was obviously unable to communicate
with the main camp - therefore surprise must have been complete. Farm Post
was apparently bypassed altogether. According to the officer in charge,
Lieutenant Foster, heavy firing was directed at the outpost, but no determined
attack made. His tiny garrison remained in position throughout this eventful
day, joined at some point by four refugees from Mounted Infantry Camp.(26)
The initial weight of the main attack fell on Mounted Infantry Camp. The Boers, under the command of a Commandant Badenhorst, probably left their ponies at the foot of the steep lower slopes of Lancaster Hill and, displaying considerably skirmishing skills over the difficult terrain, stealthily approached the camp.(27) Although the British outposts 'were in the best available places for the available garrison and were well entrenched and entangled',(28) it proved a formality for the burghers to creep between the sangars. By 02.30,(29) soon after moonrise, the Boers had easily infiltrated the camp, opened fire from several positions, and 'rushed the line of sentries from end to end'.(30) Confusion reigned, compounded by the stampeding of the mounted infantry horses. According to one British officer, Lieutenant Markes, the Boers were assisted in this instance by Black auxiliaries/servants.(31) According to Captain Ormond, the horses had been equipped with their saddles and picketing gear - though the purpose is unclear.(32) Many were killed after plunging over the nearby escarpment overlooking Vryheid.(33) Surprise again, had been complete. Private J Thornhill was the only sentry to detect the approaching Boers before they opened fire, but it was too late to raise the alarm. According to Thornhill, the Boers emerged from behind Captain Ormond's tent (i.e. the western side of the camp), and infiltrated the horse-lines, using saddles as cover.(34) It was probably this group that was responsible for stampeding the horses. General chaos erupted along the entire perimeter and in the camp itself. The unsuspecting Sergeant King, emerging from his suddenly bullet-ridden tent, made a vain attempt, with his fellow sergeants, to rally the men, but the latter had already retired to unspecified alarm posts. King himself climbed the hill to the upper plateau, presumably heading for the main camp.(35) He was not the only one to exercise this option. Lieutenant Markes stated: 'I turned out at once and shouted to my section to turn out. The enemy were then in possession of my section lines, they were firing from my section saddles, the end of the ridge by the outpost sangars, and from the wagons and pigsty(!) on the south side of camp.'(36) Few of his men were to be found.
Private J Sherratt was a picket sentry in the west sangar. He recalled that 'a little after two o'clock I heard two shots fired from behind me. I immediately awoke the two men on picket with me. A heavy fire at once commenced from the direction of the camp.'(37) Sherratt's party remained briefly in the sangar, but after a confrontation with four Boers, retired to 'van Schalkwyk's farm'.(38) This farm could be the location of Farm Post, and it is possible that it was Sherratt's group who took refuge at the post. Lieutenant Markes (along with a Lieutenant Meredith) appears to have been one of the few members of this garrison, and almost certainly the only officer, to keep his head in this crisis and take constructive steps to redeem the situation, without the benefit of orders from his immediate superior, Captain Ormond.(39) He withdrew about 200 metres from the main camp and, at the Officer's Mess 'house', collected twenty men for a counter-attack. This group was ordered to fix bayonets, though only a few had them, the remainder being compelled to use their rifle-butts. Markes and his hastily assembled command twice attempted to retake the camp, but were driven out under heavy fire on both occasions. Markes claimed five Boers killed in these assaults, but this is almost certainly an exaggeration.(40) Unable to assume an emergency station in the immediate vicinity - a nearby ridge and kopje (the latter probably Fusilier Kopje) were both in Boer hands - Markes withdrew further, to a rocky outcrop east of the camp, at the head of the road pass to the town and 500 metres from the Boer positions. By this time the Boers had vacated the horse-lines after cutting the horses loose. From his party of twenty, Markes detached six men to any Boer advance along the southern edge of the plateau.(41)
As suggested above, Markes' initiative was not emulated by either the officers or men of this garrison. Lance-Corporal J Murray tried unsuccessfully to raise the officers and men of two sections before noticing a 'considerable number of mounted infantry running past me towards the hills'.(42) The movements of Captain Ormond, the Mounted Infantry Camp commander, deserves special scrutiny. Awakened, as were most of his garrison, by the predawn fusillade of Mauser fire, Ormond claimed, in evidence to the subsequent enquiry, that he found himself cut off from both the adjacent sangar and the camp itself. He found alarm posts and sangars abandoned and himself under heavy Boer fire. At this juncture he decided to proceed to North Gun Point in order 'to get [Captain Marshall, RGA] to bring his gun to bear on the end of the plateau on which the camp is situated.'(43) The artillery piece at North Gun Point did fire at least two shots in the direction of the plateau, temporarily clearing the camp of Boers,(44) but there is no corroborating evidence that this action was executed on Ormond's initiative. This artillery support is unlikely to have continued because, from daybreak onwards, the North Gun Point garrison faced immediate problems of its own. Regardless of the validity of his movements, Ormond received little sympathy from Colonel Charles Blomfield, officer commanding the Dundee sub-district, in a report of 20 January 1901: 'On the attack being made this officer, after an unsuccessful attempt to find his men, went up the hill to the North Gun. Meanwhile his company was in confusion, and while the action of two of his subalterns, Lieutenants Meredith and Markes, is deserving of the greatest praise, I am unable to extend that praise to Captain Ormond. His place was with his company on the Mounted Infantry Plateau, and his business was to rally his men on that plateau and endeavour to recover lost ground.'(45)
The adventures of the hapless Lieutenant Woodgate contrast markedly with Ormond's and, while scoring well on courage and devotion to duty, would probably fail on the level of common sense. When the Boers fell on the Mounted Infantry Camp, Woodgate emerged, unarmed, from his tent to be confronted by a burgher who demanded his surrender. Foolishly, and bravely, he defiantly retorted, 'Surrender be damned!' and was promptly shot in the abdomen and right thigh, at point-blank range. He died in Vryheid the next day.(46) Further casualties included a Lance-Corporal Walsh, Royal Lancs, and two other unidentified Royal Lancs troopers. In addition to the prisoners taken at Mounted Infantry Post, four 5th MI trooper's were captured in the major assault on Mounted Infantry Camp.
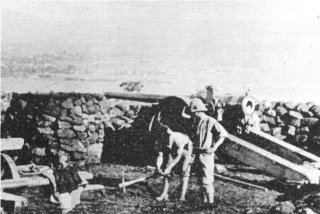
South Gun Post, with Vryheid in the background
(Photo: by courtesy of the Vryheid Museum, Lukas Meijer House)
The attack develops: North Gun Point, South Gun Post and Barrow Point
Elsewhere on Lancaster Hill, and in Vryheid itself, the remainder of
the garrison soon became aware of the assault. Between 02.30 and 03.30,
bedraggled refugees from Mounted Infantry Camp appeared at Major Carleton's
Royal Lancs positions on the upper plateau, many of them minus weapons,
ammunition or helmets.(48) At daybreak (around 04.00) Lieutenant-Colonel
Gawne, apparently unaware of the severity of the situation, arrived from
the town with reinforcements of a half-company ('D' Company) of Royal Lancs
(Captain J A Paton), having ascended the Vryheid - Piet Retief road.(49)
According to a Boer witness, Dominee Anderssen, the local preacher, Gawne
made his intentions clear: 'Come on, we will give them a hell for breakfast!'(50)
These reinforcements were placed close to Markes and Meredith's position.
According to Markes, Gawne ordered him to take up position to the left
(south) of a track that connected the Mounted Infantry Camp with the main
road to Vryheid. Paton's reinforcements were directed to positions on the
right (north) of this track.(51) There was one 'bold attempt' to re-occupy
the plateau in the face of intense Boer fire,(52) but the chief task of
these posts was the defence of the south-western approaches to the hill
for the remainder of the day. Markes and Meredith's mounted infantrymen
were kept especially busy. His small force was instrumental in keeping
Boers off Mounted Infantry Plateau from which they had been driven by the
North Gun Point artillery, thereby preventing looting of the abandoned
camp.(53) The action was heaviest on the British left flank, where Markes
reported one man killed and two wounded. According to Markes, he was only
withdrawn at approximately 20.00, with his ammunition exhausted.(54)
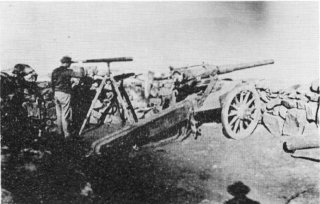
The British artillery position, North Gun Point.
(Photo: by courtesy of the Vryheid Museum, Lukas Meijer House)
The field kitchen at North Gun Point
The emplacement is visible in the background
(Photo: by courtesy of the Vryheid Museum, Lukas Meijer House)
At an unspecified time, probably soon after daybreak, Colonel Gawne decided to climb the slope separating the two plateaus, probably heading for Carleton's positions. In doing so, he exposed himself to heavy Boer fire and was mortally wounded in the abdomen, with a secondary wound in the right shoulder.(55) Carleton assumed overall command and directed the defence for the remainder of the day.
From approximately 03.30, following the rout of Mounted Infantry Camp, the Boers closed on the upper plateau, concentrating their efforts at North Gun Point, South Gun Post and Barrow Point. The North Gun Point attack, under the direction of Veldkornet Jan 'Mes' Potgieter,(56) was initially focused directly on adjacent Maxim Point. This was the key to the entire position, located on a small rocky knoll, separated from the main fortifications by a pronounced hollow. Its capture would have allowed the attackers to advance to close beneath the breastworks, paving the way for a Majuba-style assault of the position above. However, the initial and heaviest attack at about 04.00 was frustrated by heavy fire from the Maxim Point defenders, and a belt of barbed-wire at 50 metres .(57) According to Mr Fred Duke, a local battlefields guide, on Lancaster Hill the Boers were encountering barbed-wire for the first time.(58) The burghers retired, and the battle settled down to a day-long exchange of general long-range fire that spread to all sides of the hill. There appear to have been no further close-range assaults.(59) As was the case at the other points of attack, the Boer pressure was maintained until nightfall, although according to Anderssen, the commandos were ordered to retire at midday. The burghers were reputedly disappointed in this instruction and could very well have defied it and maintained their efforts.(60) However, according to Duke, the death of C G Gunter in the attack on Maxim Point, though one of only two confirmed Boer fatalities in the entire battle, severely shook the Boers and resulted in a marked reluctance to press home their attacks.(61)

Map of the Boer attack on Lancaster Hill, 11-12 December 1900.
(Source: L S Amery (ed), The Times History of the War in South Africa, Vol V, p 118)
At South Gun Post, 'one of the warmest corners' of the battle, the troops under Captain Mangles and Lieutenant Drought defended their excellent fortifications 'with marked bravery'.(62) The garrison was awakened by the musketry on Mounted Infantry Plateau and immediately manned the defences.(63) At about 02.45, Boer voices were heard below the 12-pounder gun emplacement. Battle was joined at some point between 02.45 and 03.30, with the gun's muzzle depressed to its utmost - and the trail raised - to sweep the steep hillside to the left front of the position, at a range of some 300 metres.(64) The Boers, led by Assistent-veldkornet Piet Henderson,(65) had crept to within 50 metres before being forced to retire. Following this flurry, the Boers settled down to a steady fire, gradually encircling the position from dawn onwards. The British response was aimed at halting the assaults at a safe range - 600 and l 500 metres. The Boer fire slackened toward midday, followed by a renewed onslaught, mainly on the right flank, between 17.00 and sunset. The Boer numbers are uncertain, as was the case with the other positions assaulted, but Captain Mangles reported counting 60-70 Boers when the attackers withdrew in the evening.(66) Only one casualty is specifically identified at South Gun Post. He was Gunner A E Harcourt, who served as a gunlayer on the position's artillery piece. He continued serving the weapon even after the Boer rifle fire encroached to within 300 metres, until he was mortally wounded in the face. His courage was rewarded with a commendation from Major Carleton.(67)
The third focus of Boer attention on the upper plateau was at Barrow Point, whose small post guarded the north-eastern slopes of the hill. The size of this garrison belied the actual strategic importance of the position. Described as simply a 'night post', it was only occupied after dark. Had the Boers captured it early in the battle, they could have infiltrated South Gun Post, and possibly the main British camp, from the rear.(68) As it was, the defenders held out long enough for the element of surprise to be lost and an effective defence organised. The defence of Barrow Point was the 'epic stand' of the day, and the post only surrendered when it was completely surrounded. Four Royal Lancs were taken prisoner and four were wounded. The post commander, Lieutenant Lippert, was himself mortally wounded in the heart, and the plucky performance of Private C Barry also earned the post a commendation for bravery. Barry, though severely wounded in both legs, maintained his station until the last moment, before retiring to the headquarters camp, a distance of at least 800 metres, without abandoning his rifle or ammunition.(69)
Aftermath and casualties
By 19.30, the battle had died down(70) and it was time to take stock
of casualties. The British toll, characterised by the high proportion of
officer fatalities, was 58, comprising eight killed, 20 wounded and 30
missing, and the loss of nearly all the mounted infantry horses.(71) On
the Boer side, mention has been made of Gunter, one of the two confirmed
Boer fatalities, but the circumstances surrounding the death of the second,
one Jan de Bruyn, is uncertain. An unconfirmed story had him shot while
stealing horses from near the headquarters camp, but it is possible that
he was the burgher reported shot later on 11 December when the Boers retired
from the hill.(72) De Bruyn (and possibly Gunter too) was buried on Lancaster
Hill, close to the British main camp, before being reinterred in Vryheid
Cemetery on 6 May 1947. The British, very optimistically, claimed 100 Boers
killed and wounded, a list subsequently amended to an 'official' Boer casualty
figure of seventeen.(73)
Alleged Boer interference with the evacuation of British casualties generated a minor storm of protest after the battle. The Imperial Bearer Corps party had twice come under fire, during the retrieval of Lieutenant Woodgate and Colonel Gawne. On the latter occasion, one of the bearers was dangerously wounded in the chest. Colonel Blomfield directed a complaint to Assistant Commandant-General Chris Botha in this regard, but the result is not known.(74)
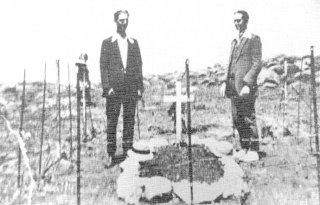
Pieter de Bruyn (left) visits the grave of his brother, Jan, on Lancaster Hill.
(Photo: by courtesy of the Vryheid Museum, Lukas Meijer House)
By the time Colonel Blomfield arrived with a column from Dundee, the Boers who had attacked Lancaster Hill had long since retired to the north, although he did encounter a small commando of some 400 near Scheeper's Nek. (On 25 December, a second Boer attempt was made on Utrecht, but this was easily repulsed by a reinforced and, this time, forewarned, garrison. The situation then quietened down until Louis Botha's incursion of September-October 1901.(75) Blomfield, however, did take the precaution of withdrawing the Vryheid garrison from Lancaster Hill by night, considering the position impossible to defend with the available garrison, in the light of the events of 11 December.(76)
The Inquiry
At no point during the battle had the Boers appeared likely to capture
Lancaster Hill in its entirety and immediately threaten Vryheid, and the
defenders of North Gun Point, South Gun Post, Barrow Point and the Markes-Meredith-Paton
positions, had conducted a solid and successful defence. However, the fact
that the Mounted Infantry Plateau garrison had been completely surprised
and its inadequate defences overcome with ease, was an embarrassment to
the British and called for an Inquiry. This was duly convened at Vryheid
on 16 December under the direction of Major J F Manifold, RFA. Evidence
was taken from a selection of all ranks from Captain Ormond down, and the
conclusions comprised a litany of lessons that should already have been
learnt by that point in the war: the Mounted Infantry Camp was located
too far from infantry support; pickets were isolated from each other, but
too close to the tents; and the horse-lines and ammunition store were exposed.
A common thread throughout was the inadequate manpower for a static defence
over such a large area. The commission failed to secure evidence on the
incredible silent capture of the entrenched Mounted Infantry Post, and
Blomfield confessed to being mystified on that score.(77) The actions of
the unfortunate Captain Ormond were roundly condemned, although there were
clearly extenuating circumstances. Ormond was the general scapegoat, but
no immediate action was taken against him. There was also no censure of
the late Colonel Gawne, although he had taken no apparent notice of the
several minor Boer forays against Vryheid and nearby centres during the
two weeks prior to the battle.(78) His actions on the day were probably
also ill-considered.
Epilogue
For the British military machine of 1900 and the historian or armchair
strategist of the 1990s, the Boer attack on Lancaster Hill had little impact
on the progress of the war and generated minimal casualties. In fact, the
first newspaper report of the battle in The Times of Natal, downgraded
the action to 'continual sniping'.(79) However, it did demonstrate the
continued skill and initiative of those commandos which chose to remain
in the field after the capture of their capitals. It also reminded the
British that the Boers could strike telling blows, at any time or place,
at unsuspecting and/or complacent garrisons, and that the war was, in fact,
far from over. For the people of Vryheid, who cannot boast a Colenso or
Spioenkop, this was the battle of the South African War, and both sides,
Boer and British, emerged with equal credit, or lack thereof.
The Lancaster Hill Battlefield Self-Guided Trail
The Lancaster Hill battlefield site has survived in excellent condition
and, with the exception of Barrow Point and the outlying posts, the features
described in this paper are largely extant. North Gun Point, in fact, has
been restored to close to its original condition. The Lukas Meijer House
Museum, Vryheid, in association with the KwaZulu-Natal Provincial Museum
Service, has recently completed a self-guided trail of the battlefield
in which the full scope of the battle is explored and important features
identified, during a walk of only a few kilometres. An illustrated brochure,
complete with map, includes much of the information covered in this paper.
Readers are invited to digress from the 'big battles' and explore this
forgotten corner of the South African War. For the less historically-minded,
Lancaster Hill also boasts spectacular views of Vryheid and the surrounding
country, and is also teeming with game, located as it is in a Natal Parks
Board reserve. The town itself is also a gateway to several other obscure
engagements of the South African War: Scheepers Nek (18 May 1900), Blood
River Poort (17 September 1901) and Holkrans (6 May 1902), as well as two
major Anglo-Zulu War battles, Hlobane and Kilambula (28 and 29 March 1879
respectively). All are located within a day's drive.
British casualties, Lancaster Hill, 11 December 1900
Officers, killed or died of wounds:
Lt Col J M Gawne (2nd Royal Lanc Regt)
Lt Lippert
Lt Woodgate (2nd Royal Lanc Regt MI)
Officers, taken prisoner:
2/Lt G B Browne (2nd Lancashire Fus MI), Mounted Infantry Post.
Missing, presumed prisoner-of-war:
Other ranks:
2nd Royal Lancaster Regiment:
5984 L/Cpl H Barker, taken prisoner at Barrow Point.
1162 Pte C Kennist*
3382 Pte R Kennedy
5485 Pte A Hogg
5603 Pte W Sutton, taken prisoner at Mounted Infantry Post
2nd Royal Lancaster Regiment, Mounted Infantry:
4177 L/Cpl H Johnstone, Mounted Infantry Camp
3244 Sgt Burton, Mounted Infantry Post
4570 L/Cpl J Martin
4578 Pte T Saunders
5684 Pte J Lyons
4510 Pte T Barett
3481 Pte F Burgess
954 Pte J Coombs
3846 Pte C Smithson
2333 Pte W Mansell
4459 Pte J Mooney
5732 Pte F Curley*
5907 Pte J Hopkins
4643 Pte J Ferris
5935 Pte W Moutton
4411 Pte C Eastwood
4706 Pte W Grimshaw
4646 Pte A Crons*
3815 Pte F Robinson
5927 Pte F Smallwood
2nd Lancashire Fusiliers, Mounted Infantry:
5098 L/Cpl W Rathbone, Mounted Infantry Camp
5389 Pte J Daley
4428 Pte E Harris
5271 Pte E Smithson
* - Spelling uncertain
Source: War Office Records, FK 1787 (WO 32/859), p 38.
Appendix II
ROYAL ARMY MEDICAL CORPS (RAMC)
The Imperial Bearer Corps party on Lancaster Hill on 11 December
1900:
Section leader H Fairbridge
Bearer P O'Keefe
Bearer W Pearson
Bearer N Delmar
Bearer J Dornings
Bearer C Pantaleki
Bearer J C Cowden (wounded)
Source: War Office Records, FK 1787 (WO 32/859), p 46.
The general chronology of this paper is drawn primarily from L S Amery (ed), The Times History of the War in South Africa, vols IV (1906) and V (1907), chapters 2 and 4; and Capt Maurice Harold Grant, The History of the War in South Africa, Vol IV, Chapter 2 (London, Hurst & Blacken, 1910). The title, 'The Transvaal Outbreak' is drawn from Amery (ed), The Times History, Volume V, p 117.
1 . E C Anderssen, Die Verlede Herleef (1942), p 34; Michael Barthorp, The Anglo-Boer Wars, 1815-1902 (1987), pp 112 and 128.
11. Amery, The Times History, VoI V, p116.
12. Grant, The History of the War in SA, Vol IV, p 29.
13. Grant, The History of the War in SA, Vol IV, p 29.
14. Anderssen, Die Verlede Herleef, p 35.
15. Amery, The Times History, Vol V, p 117. In the text, the 5th Division
Mounted Infantry will hereafter be referred to as '5th MI' and the 2nd
Battalion, Royal Lancaster Regement as the 'Royal Lancs'.
16. Twelve pounders according to Amery, The Times History, Vol V, p 117,
and 15-pounders according to Maj G A Garleton, Transvaal Archives, War
Office Records, FK 1787 (WO 32/859), p 36.
17. Grant, The History of the War in SA, Vol IV, p 31; Transvaal Archives,
PSY/SB, DC 9/01, pp 11,12.
18. Anderssen, Die Verlede Herleef p 34.
19. So-named after the Royal Lancaster Regiment. It has also been known
as Vryheid Hill.
20. Transvaal Archives, FK 1787, Carleton Report, p 36.
21. Grant, The History of the War in SA, Vol IV, p30.
22. Transvaal Archives, FK 1787, evidence of Captain Ormond, 'Court of
Inquiry...into the circumstances of the attack on Vryheid', pp 54-5.
23. Mr Fred Duke, 12 January 1995.
24. Transvaal Archives, FK 1787, Inquiry, p 56.
25. Transvaal Archives, FK 1787, pp 38-9.
26. Transvaal Archives, FK 1787, Inquiry, p 59.
27. Mr Fred Duke.
28. Transvaal Archives, FK 1787, p 52, report of ColoneI C J Blomfield,
Inquiry.
29. Considering the prevailing confusion at the time, it is not surprising
that sources do not agree on the precise time. Variously, it is reported
as 02.15 (Amery, The Times History, Vol V, p 117; Transvaal Archives, FK
1787, p 51) and 02.20 (Transvaal Archives, FK 1787, Carleton report, p
36).
30. Grant, The History of the War in SA, Vol IV, pp 30-1.
31. Transvaal Archives, FK 1787, p 56. This is an isolated reference to
Black participation in the battle and there is no indication of the capacity
in which they served. Markes only identifies them as 'kaffirs'.
32. Transvaal Archives, FK 1787, p 43.
33. Transvaal Archives, FK 1787, p 52, Blomfield report.
34. Transvaal Archives, FK 1787, p 58, evidence to Inquiry.
35. Transvaal Archives, FK 1787, pp 56-7, Sgt J King, evidence to Inquiry.
36. Transvaal Archives, FK 1787, p 42, Ormond report.
37. Transvaal Archives, FK 1787, p 57, Inquiry.
38. Transvaal Archives, FK 1787, p 57, Inquiry.
39. Transvaal Archives, FK 1787, p42, Markes in Ormond report, pp 55-6;
Inquiry,p 51.
40. Transvaal Archives, FK 1787, p 42. Anderssen, Die Verlede Herleef p
35, says there were only two Boer fatalities in the entire battle.
41. Transvaal Archives, FK 1787, p 43, Markes in Ormond report.
42. Transvaal Archives, FK 1787, p 58, Inquiry.
43. Transvaal Archives, FK 1787, pp 54-5, Inquiry.
44. Transvaal Archives, FK 1787, p 42, Markes.
45. Transvaal Archives, FK 1787, p 51, Blomfield to DAG, 20 January 1901.
46. Transvaal Archives, FK 1787, p 38, Ormond report.
47. Transvaal Archives, FK 1787, pp 38-9,43, Ormond report.
48. Transvaal Archives, FK 1787, Carleton report, p 36.
49. Transvaal Archives, FK 1787, Carleton report, p 36.
50. Anderssen, Die Verlede Herleef, p 35.
51. TransvaaI Archives, FK 1787, p 56.
52. Transvaal Archives, FK 1787, Carleton report, p 36.
53. Transvaal Archives, FK 1787, pp 40-1, Carleton to Blomfield; Markes,
p 42; Blomfield, p 51.
54. Transvaal Archives, FK 1787, p 56. These casualties (FK 1787, p 47)
could have been Pte H Lawson (died of wounds) and Ptes Vaughn and McGee
(wounded), but these men have not been precisely identified with this action.
55. Transvaal Archives, FK 1787, Carleton report, pp 36, 38.
56. Mr Fred Duke.
57. Transvaal Archives, FK 1787, p 60, Captain Parker.
58. Mr Fred Duke.
59. Transvaal Archives, FK 1787, p 60.
60. Anderssen, Die Verlede Herleef p 35.
61. Mr Fred Duke.
62. Amery, The Times History, Vol V, p 118.
63. Transvaal Archives, FK 1787, p 60. The details of the events at South
Gun Post were obtained largely from the report of Captain Mangles to the
Inquiry.
64. Grant, The History of the War in SA, Vol IV, p31.
65. Anderssen, Die Verlede Herleef p 35.
66. Transvaal Archives, FK 1787, p 60.
67. Transvaal Archives, FK 1787, p 47.
68. Mr Fred Duke.
69. Transvaal Archives, FK 1787. pp 38, 39, 50.
70. Grant, The History of the War in SA, Vol IV, p 31.
71. Grant, The History of the War in SA, Vol IV, p 31; Transvaal Archives,
FK 1787, p 38; Amery, The Times History, Vol V, p 118. The Times History
lists a ninth fatality who cannot be accounted for.
72. Transvaal Archives, FK 1787, pp 55-6; L/Cpl C Mitchell to Inquiry;
Anderssen, Die Verlede Herleef p 35.
73. The Natal Witness, 17 December 1900; The Times of Natal, 18 December
1900.
74. Transvaal Archives, FK 1787, pp 41, 45-56, report of Captain Lyacke,
RAMC.
75. Amery, The Times History, Vol V, p 118. For details of Botha's 1901
invasion, see Amery, The Times History, Vol V, Chapter 12.
76. Transvaal Archives, FK 1787, p 52, Blomfield report.
77. Transvaal Archives, FK 1787, pp 51-60, Inquiry. The other two members
of the Inquiry were Major Hubert Gough (Composite Regiment) and Captain
G Ashworth (South Lancs).
78. Grant, The History of the War in SA, Vol IV, p 30.
79. The Times of Natal, 14 December 1900.
A. Primary sources
Transvaal Archives, War Office Records, FK 1787 (WO 32/859):
B. Manuscripts and secondary sources
Amery, L S (ed), The Times History of the War in South Africa (London,
Sampson Low, Marston and Co), volumes IV (1906) and V (1907).
Anderssen, Ds E C, Die Verlede Herleef (Johannesburg, 1942).
Barthorp, Michael, The Anglo-Boer Wars 1815-1902 (Bok Books, 1987).
Grant, Captain Maurice Harold, History of the War in South Africa 1899-1902
(London, Hurst and Blacken Limited, 1910) Vol IV.
Torlage, C I, 'The British Advance and Boer Retreat through Northern Natal,
May-June 1900' (unpublished MA thesis, UNISA, 1992).
C. Newspapers
The Natal Witness, The Times of Natal and The Natal Mercury, December
1900.
D. Other sources
Mr Fred Duke, battlefield guide, Vryheid, 12 January 1995.
Return to Journal Index OR Society's Home page