
 The South African
by J A Van Schalkwyk & S M Moifatswane
Dept of Anthropology
National Cultural History Museum.
INTRODUCTION
As part of a recent anthropological study of the Hananwa(1) living at Blouberg, Lebowa, in the northern Transvaal, their history was researched. From this was deduced that one of the more important events in their history was the siege of Leboho in 1894 by General Piet Joubert of the South African Republic (ZAR). This was such a traumatic experience for the Hanawa that even today, almost a hundred years afterwards, this incident is to many of the tribal elders a major source of injustice.
While interviewing informants they were asked about the war in an effort to establish what the nature and extent of this incident was on the lives of the Hananwa of the time, and to contrast this with the formal view found in various official documents. Besides some oral tradition handed down about the hardship of the times, interesting anecdotes were also told. One such is that the Hananwa women had to make bullets from soapstone for the men to shoot at the burghers. Originally, this was thought to be a myth, but later a reference was found in the work of C Rae(2) that confirmed this. It becomes even more plausible if it is taken into consideration that many of the Hananwa at that stage were still using muzzle loaders.
Informants also identified certain stone structures as fortifications built by the burghers during this war. Investigation of these structures led to the question of how the battle and the eventual siege of Leboho progressed. About this informants were unable to give any real information. However, it was later established that some of the published sources do not correspond with the actual situation as found in the veld. As a result it was decided to investigate this subject further to gain more information in this regard.
It is not within the scope of this paper to describe the war against the Hananwa in detail. This has already been done in various contemporary publications, as well as in later studies.(3) The investigation was originally structured to obtain more information from the side of the Hananwa, but after repeated attempts, this was abandoned because of the lack of information.
The discussion that follows is inherently chronological, but is done in such a manner that the strategy followed by the burghers for ascending the mountain and the eventual siege of the tribal capital becomes clear. Therefore, attention is given firstly to the arrival of the commandos at Blouberg, their ascent of the mountain the siege and the final surrender of the Hananwa.
BASE CAMPS
Upon arrival of the various commandos at Blouberg, each set up its own base camp or laager. No physical remains of any of these camps could be found. In contrast to the first found on the mountain, these camps consisted only of wagons and tents surrounded by a fence of thorn branches (Figures 1 & 3) and any sign of them would have disappeared long ago. Accordingly it was not very easy to establish their original position. By using contemporary sources and information supplied by local informants, however, it has been possible to approximate the location of these camps. The published version of Sonntag's diary(4) includes a map showing the location of some of these camps, but is it believed to be inaccurate.
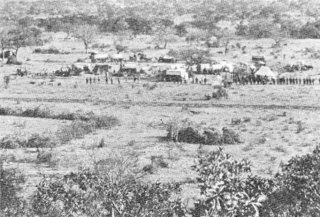
Figure 1: Zoutpansberg camp
on the northern side of Blouberg
(Photo: Transvaal Archives)
As far as could be ascertained, only one of these camps was situated on the northern side of Blouberg, namely, the Zoutpansberg camp established by members of the Zoutpansberg Commando (Figure 1). This camp was located in the vicinity of the village of a certain headman called Mapene(5) and from there the burghers and their black compatriots ascended Blouberg (Figure 2). A section of the State artillery under Captain Schiel was also located there. The Marico commando joined the Zoutpansberg commando there on June 25.(6)
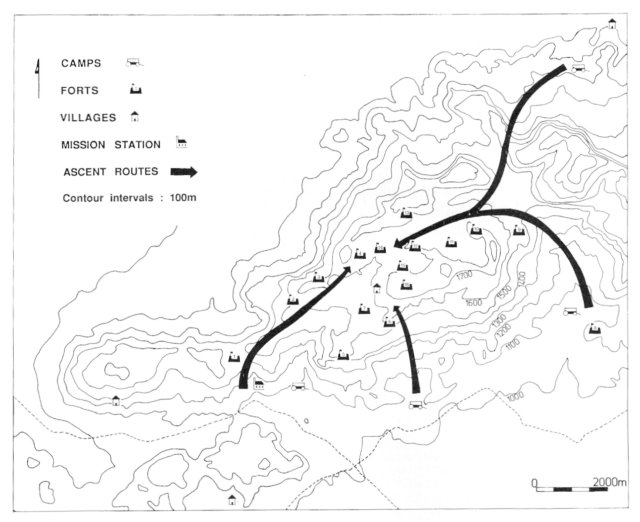
Figure 2: Map indicating the position
of the various camps and forts.
The positions of the Waterberg and Rustenburg camps are problematic. Weidemann, using reports in The Zoutpansberg Review and The Press, writes that the Waterberg Commando was stationed on the northern side of Blouberg.(7) A report in De Volksstem confirms Weidemann's location of this camp.(8) However, in his diary Sonntag contradicts this view. According to him the Waterberg camp was originally located in the south-western foothills of Blouberg and was later moved to a position approximately 15 minutes walk from the Berlin Mission Station.(9) Thus, it could have been east or west of the mission. Later the Rustenburg Commando established their camp close to the Waterberg camp.(10) Sonntag writes: 'A new commando from Rustenburg... set up camp quite close to our station opposite the Waterberg commando...'(11)
The General Staff War Office states that the Rustenburg Commando camped 'near the head of the valley in which the mission station lies.'(12)
According to the map in the published version of Sonntag's diary, both the Waterberg and the Rustenburg Commandos were located to the west of the mission station. In this position the camp would, with regard to what has been said above about the Rustenburg Commando, lie outside the valley in which the mission station is located. A further argument against the camp really being located to the west of the mission station, is that it was in this area that the village of headman Morotsi was located. Locating the camp practically on the doorstep of the enemy does not make sense. It was only on 14 June that Morotsi was attacked by the burghers and driven away. On the other hand, roughly one and a half kilometres (approximately 15 minutes walk) directly east of the mission station an area known as Lareng (place of the laager) is found. According to local informants it is here that the burghers camped - see Figure 2.
The Middleburg Commando set up camp approximately one and a half kilometres east of Harvey's shop(13) (Figure 2). The Pretoria Commando also originally camped here. Due to insufficient water, they moved to a point south-west of a hill called Setswa, in the entrance to the valley on the farm Beauley. The largest part of the artillery and the hospital was also located here. This became the main camp for the rest of the campaign(14) (Figure 3).

Figure 3: The Pretoria and Artillery
camps in the Beauley valley
(Photo: Transvaal Archives)
THE FORCES
The opposing forces are summarized below. The ZAR forces consisted of about 1 760 burghers, representing the following commandos:(15)
| Zoutpansberg Commando | 60 |
| Pretoria (District) Commando | 250 |
| Pretoria (Town) Commando | 150 |
| Middelburg Commando | 400 |
| Waterberg Commando | 150 |
| Rustenburg Commando | 400 |
| Marico Commando | 150 |
The balance was made up of detachments of the Staatsartillerie, the hospital corps and the heliograph section of the Staatsartillerie.
This force was supplemented by approximately 700 men of various tribes living in the vicinity (mostly those of Chiefs Kibi,(16) Masebe, Matlala and Mapene) who also fought on the side of the ZAR.(17) Most of these chiefs supported the ZAR due to long standing feuds between them and the Hananwa, notably in this case Chief Kibi.
Information on the forces that the Hananwa could muster is more difficult to obtain. According to Weidemann the tribe consisted of about 2 000 individuals during the war.(18) Other figures date to 1905, but can also be used as a possible indication: 1 000 male adults,(19) or 7 941 men, women and children.(20) Even if these figures are used as an estimate, it is obvious that the Hananwa were completely outnumbered. They did, however, have help from some of their allies. According to tradition the Lobedu of Madjadji sent some men(21) to assist the Hananwa and Weidemann(22) writes that the Venda of Makhado also gave the Hananwa assistance by sending some warriors.
STRATEGY
The burgher strategy was to ascend Blouberg from four different directions. These coincided to a large extent with the relative positions of the various camps (Figure 2), namely:
From these four directions the burghers tried to occupy strategic positions on top of the mountain. These were then strengthened by building forts manned by a contingent of burghers, sometimes assisted by the placement of cannon. From these forts advances were made to occupy other points of strategic importance closer to the tribal capital. The tribal capital was eventually surrounded by a series of forts, from where the capital was besieged. Lack of water and food forced the Hananwa to surrender.
This was by no means a new strategy. It was previously used by General Joubert in 1883 against the Ndzundza-Ndebele of Chief Mapoch,(24) and again against Chief Makgato of the Venda in 1898.(25)
At Blouberg this strategy made little provision for the protection of the various routes used by the burghers. Colin Rae writes that Fort Pretoria was situated seven miles (approximately 12 km) from the camp. Nowhere along the route were any measures taken to safeguard it against attacks by the Hananwa. This was apparently the case for most of the routes to the forts, as Rae mentions several incidents where burghers were killed or wounded while travelling between camps and the various forts.(26)
THE FORTS
From the available literature and the physical remains studied, at least twenty fortifications were erected by the burghers. Of these, fourteen are indicated on the map prepared by the General Staff War Office. Colin Rae refers to an additional three and Weidemann to one more fort that is not indicated on the map. An additional two forts were also shown to the authors by local informants, bringing the total to 20. This, however, does not mean there might not be others.
Of the 20 forts, twelve were visited personally. All of these answer to the description of the literature, are indicated on the map of the General Staff War Office, and were identified by local informants as forts. Also their strategic location and the occurrence of loopholes and cartridge cases in these structures further serve to confirm that they are forts rather than structures used for other purposes.
In general the first consisted of an oval or rectangular shaped structure of packed stone (Figure 4). An entrance, sometimes covered by the addition of a rectangular wall, is situated at the back of the fort. Others also have a wall in the shape of a half-moon added to one side. It is believed that these may have housed guns.
In many of these forts hard and soft type .45 calibre Martini-Henry cartridge cases were found. A piece of metal, possibly a piece of shrapnel (Figure 5), was also found in one of the forts. Pieces of glass and earthenware bottles were also found. Though it is possible that these might have been brought to the site at a later stage, the cartridge cases definitely seem to be associated with the siege.
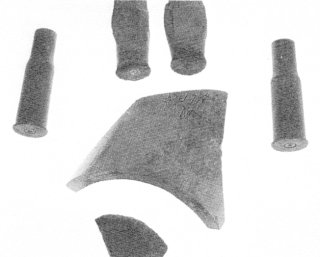
Figure 5: Cartridge cases and a piece
of shrapnel found in the forts.
(Photo: F Dreyer)
Fort Erasmus (No. 1):
Fort Erasmus is the first fort to be found on the western side of Blouberg (Figure 2). In all probability it was named after Cmdt D J Erasmus who was in charge of the Pretoria commando and responsible for its erection.
Although this fort is not indicated on the map of the General Staff War Office it is mentioned in this publication that it was erected. The burghers of the Pretoria Commando climbed the mountain on 15 June and, after meeting some resistance from the Hananwa, '... a work with a garrison of 40 men was established on the ridge.' (27)
Sonntag describes how, on June 14, the burghers first attacked the village of Chief Morotsi (Figure 2) on the south-western portion of the mountain and thereafter tried to establish a gun position on top of the hill named Lenare.(28) This was not possible and caused the burghers to move in a north-westerly direction, on top of Blouberg, towards the tribal capital. Due to fierce resistance from the Hananwa they were stopped and it was decided to erect a fort. This fort was manned by a hundred men, assisted by a section of the artillery with one gun.(29) This same incident is also described by V.N.(30) It is interesting to note the difference between the General Staff War Office and Sonntag, in the number of burghers that were supposed to man this fort.
Colin Rae confirms the existence of this fort and the name thereof when he writes of the Berlin Mission: '... Sonntag's mission station, which lay immediately below the kopje on which was Fort Erasmus ...'(31)
Local informants identified two structures that, according to oral tradition, were part of Fort Erasmus. They were found on the plateau below Lenare, approximately 200 metres from each other; in other words on both sides of the plateau. The stone of the southern structure was later used for fencing fields, but the northern structure is still complete. This structure is rectangular in form, roughly nine by four metres in dimension.
Fort Waterburg (No. 2):
On June 24 the Waterberg Commando, with one gun, moved out from Fort Erasmus in the direction of a hill known as Serowe. Again they were stopped by the Hananwa, who even succeeded in seizing the gun. It was only after heavy fighting that the burghers succeeded in retrieving the gun. It was decided to erect a new fort.(32) This fort, named Fort Waterberg because it was erected by the Waterberg Commando, is located on the hill known as Tshita Tshwene (Figure 2). It is approximately the same size as Fort Erasmus, but more oval in plan.
Unnamed Fort (No. 3):
According to the General Staff War Office the Rustenburg Commando moved on June 26 from Fort Waterberg to the hill known as Serowe and took possession of it. Here they proceeded to build a fort and deploy a 9-pounder gun. (33)
Fort Schiel (No. 4):
In the publication of the General Staff War Office it is stated that while the Rustenburg Commando were taking possession of Serowe hill on June 26, the Waterburg Commando erected a fort in the vicinity. On the accompanying map Fort Schiel is indicated directly east of Serowe and this might be the same structure.(34) The person after whom it is named is Captain Adolf Schiel of the Staatsartillerie.
Fort Van der Merwe (No. 5):
This fort, situated on the southern edge of Blouberg (figure 2), was manned from June 28 by members of the Middelburg Commando.(35) The reason for the erecting of this fort is uncertain as it was located too far from any of the routes up the mountain to lend them protection. It was also too far from the tribal capital to be of any help in the siege.

Figure 4: Fort Van der Merwe
(Photo:J A van Schalkwyk)
This fort is still in a good condition. It has various loopholes and a half moon addition that probably housed a cannon. The fort is rectangular in plan, but a bit smaller than Fort Erasmus. It is not known after whom it was named.
Fort Botha (No. 6) and Fort Willemse (No. 7):
After erecting Fort Van der Merwe, the Middelburg Commando erected Fort Botha.(36) It is oval shaped and nearly fourteen metres across the longest axis.
It is not known who was responsible for the erection and naming of Fort Willemse, but its relative position (Figure 2) suggests that it may have been the Middelburg Commando. This fort is circular in plan and approximately five metres in diameter. Forts Botha and Willemse effectively sealed off the tribal capital on the southern side.
Fort Holzer (No. 8):
There exists some confusion about the exact location of this fort in the literature. According to Weidemann, Fort Holzer was the second fort erected by the Pretoria Commando, approximately 2 600 feet (800 metres) above the Pretoria camp. As proof of this he quotes a description by Dr Tobias in the newspaper De Volksstem. However, no reference to this or any other fort at Fort Holzer is found in this specific newspaper.(37) In our opinion the fort which Weidemann refers to as Fort Holzer, is actually Fort Jonker (see below).
According to the General Staff War Office Fort Holzer is situated on top of a small hill, named Setswa in the opening of a big valley on the farm Beauley. The Pretoria and Artillery camps (Figure 6) were located in this valley and Fort Holzer, named for Lieutenant Holzer of the Pretoria Commando, was erected to give protection to these camps.(38) This fort was located on top of Setswa hill ( Figure 2). It consists simply of a number of big rocks stacked to give the minimum amount of defence on the northern side, the side facing Blouberg. This fort is very strategically located as it not only gives protection to the camps below, but also overlooks a large part of the route the burghers took up Beauley valley to the top of Blouberg.
Figure 6: 'Conradies Mess'
in the Pretoria camp
(Photo: Transvaal Archives)
Fort Jonker (No. 9):
This fort (Figure 2) is named after one of the burghers wounded when the Pretoria Commando proceeded to scale Blouberg from Beauley valley.(39) According to Colin Rae it was one of the few forts located in a position to give protection to one of the routes the burghers took up the mountain.(40) This fort was not visited and accordingly little detail can be given.
Unnamed Fort (No. 10), Sandford (No. 11) and Fort Pietersburg (No. 12):
On June 28 the Zoutpansberg commando, from the north east, and the Pretoria commando, from the south east, joined in the vicinity of Sandfort and Fort Pietersburg on top of Blouberg (Figure 2). From there they moved west in the direction of the tribal capital.(41) These forts were apparently erected to keep the Hananwa from escaping to the north. These forts were not visited.
Fort Henning (No. 13):
Fort Henning was erected on 28 June by the Zoutpansberg Commando at the top end of the valley in which the tribal capital is located. It is situated in such a position that gun and rifle fire could be directed into the capital.(42)
Fort Schmidt (No. 14) and Fort Ferreira (No. 15):
Fort Schmidt (Figure 2), was built by members of the Zoutpansberg Commando from Fort Henning and was named for a burgher killed during its erection.(43) Fort Ferreira, named after Colonel Ignatius Ferreira of the Pretoria Commando, is situated at the edge of a krantz not very far from Fort Schmidt. It is almost square in plan and about ten metres across.
One of the last sources of water the Hananwa had was a small stream that flowed from the north east past the capital. Just to the north of the capital it disappears underground and surfaces further downstream. The building of Forts Schmidt and Ferreira, on either side of this stream effectively cut the capital off from its source of water.(44)
Fort Pretoria (No. 16):
The biggest, most complex and important fort of the siege was Fort Pretoria. Situated due east of the tribal capital on top of the hill against which the capital was built, it was central to the siege. From here both the main onslaught and the later dynamite attacks(45) were launched. Figure 7 shows Chief Leboho, about thirty years after the war, in his capital in front of the rock fissures in which the Hananwa took shelter during the siege. For the purpose of the dynamite explosions a series of smaller forts was erected between Fort Pretoria and the tribal capital, in a line running north-south on a ledge above the capital.(46) These are all roughly circular in plan and five to ten metres in diameter.
Forts Schroeder, Rensburg, Vorster and Bokfort:
None of these forts could be traced. The first three are mentioned by Colin Rae and the last by Weidemann.(47) It is possible that these names refer to some of the smaller forts built between Fort Pretoria and the capital (see above).
CONCLUSION
On 31 July 1894 Chief Leboho of the Hananwa surrendered to General Joubert. He and his councillors were taken to Pretoria. Although found guilty by a military court, he was never convicted. He was set free in 1900 after the British takeover of Pretoria. Chief Leboho then returned to Blouberg to rule over his people until his death in 1939.
After the war the Hananwa women and children were divided up and indentured to burghers representative to six Transvaal districts. They had to work for these farmers for a period of five years without any compensation other than food and clothing.(48) From early on, however, they found their way back to Blouberg, there to continue with their life. Things were never the same for them thereafter as their way of life has undergone drastic change ever since.(49)
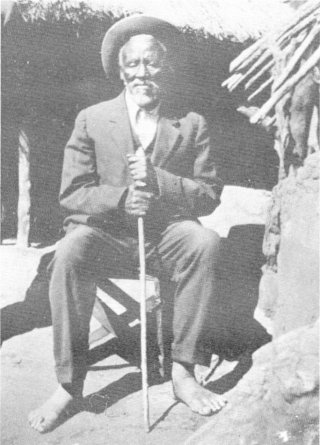
Figure 7: Chief Leboho in later years.
(Photo: Transvaal Archives)
One could possibly question the effectiveness of the strategy of laying siege followed in this case. It is possible that a more purposeful and concerted effort might have contributed to a quicker conclusion to the war, but with more casualties on both sides. On the other hand, the length of the siege could also have resulted in a higher casualty figure.
When reading contemporary sources, for instance the work of Colin Rae, it can be seen how ignorance and carelessness gave rise to many of the casualties, both on the side of the Hananwa and the burghers. That the burghers did not have many more casualties can be ascribed to the unwillingness of the Hananwa to fight. Colin Rae puts it as follows:
'... all through the campaign the poor Malabochians were seldom, if ever the aggressors, their attitude being nothing more or less than gentle protest against what they considered unjust encroachment on their ancestral rights.'(50)
The last few decades of the previous century were, for the government of the ZAR, a period of continual political unrest, in which it tried to establish its absolute power over the area. On the one hand there was British Imperial pressure and on the other the various Black tribal groupings rebelled against white domination. The number of times that the ZAR government had to resort to military action against these people in order to bring them to subjection is well known. The action against the Hananwa must be seen in this light. However with the passing of time all the original motivating factors for the declaration of the war have come to nothing and the Hananwa still live in their mountain stronghold.
References
1. Various spellings of the names Leboho and Hananwa exist. As
the g sound does not occur in the Hanawa dialect, the correct
way is to use an h in place of the g, therefore Hananwa and
Leboho and not Ganawa and Lebogo. This spelling is used
throughout, except in titles of sources or in direct quotations,
in which case the original spelling is kept. See A Kotze, 'Die
Fonologie van die Hanawa'. Unpublished MA thesis, Pretoria,
1987.
2. C Rae, Malaboch, or notes from my diary on the Boer campaign of
1894 against chief Malaboch (London, 1898), p. 143, 144.
3. See for example C Rae, Malaboch, or notes from my diary on the
Boer campaign of 1894 against chief Malaboch (London, 1894); C
Sonntag, My friend Maleboch, chief of the Blue Mountains
(Pretoria, n.d.). Secondary sources are for example the report of the
GENERAL STAFF, WAR OFFICE, Native strongholds and locations of the
Transvaal (London, 1907); N C Weidemann, 'Die Malaboch-oorlog (1894)',
Historiese Studies 7(1), 1946.
4. C Sonntag, My friend Maleboch, chief of the Blue Mountains
(Pretoria, n.d.). Sonntag was a missionary stationed at the Berlin
Mission Station on the farm Leipzig on the south western side of
the mountain.
5. According to informants this particular chief used to stay on
the northern side of the Blouberg. He was of Birwa (Nare) origin
and became one of the allies of the ZAR. After the war, due to
fears of reprisal by the Hananwa, he and some of his followers
fled to Zimbabwe (LOCATION COMMISSION, 'History,
Malaboch, Kibi and Mapin. File C27/19, 1905, Transvaal
Archives, Pretoria). According to N C Weidemann ('Die
Malaboch-oorlog (1894)', Historiese Studies, 7(1), 1046, p.2),
Mapen (Sic) used to stay on the southern side of Blouberg in the
direction of Pietersburg.
6. GENERAL STAFF, WAR OFFICE, Native strongholds and locations
of the Transvaal (London, 1907), p. 18, 21.
7. N C Weidemann, 'Die Malaboch-oorlog (1894)', Historiese
Studies, 7 (1), 1946, p. 16.
8. De Volksstem, 20 June 1894.
9. C Sonntag, My friend Maleboch, chief of the Blue Mountains
(Pretoria, n.d.), p. 66.
10. V N, 'Uit Onze geschiedenis: een gebeurtenis uit de Malaboch
oorlog'. Die Brandwag 2 (5), 1911, p. 153-154.
11. C Sonntag, My friend Maleboch, chief of the Blue Mountains
(Pretoria, n.d.), p. 78.
12. GENERAL STAFF, WAR OFFICE, Native strongholds and locations
of the Transvaal (London, 1907), p. 20.
13. As far as could be ascertained, this shop did not exist in
1894. It might be that the compilers of the Native strongholds and
locations of the Transvaal used it only as a reference point.
14. De Volksstem, 20 June 1894; GENERAL STAFF, WAR OFFICE,
Native strongholds and locations of the Transvaal (London, 1907), p. 18.
15. These are the figures given by the GENERAL STAFF, WAR OFFICE,
Native Strongholds and locations of the Transvaal (London,
1907), p. 17). However, they differ somewhat from source to
source, e.g., the number of men for the Rustenburg Commando
is given variously as 400 - 430 (N C Weidemann, 'Die Malaboch-oorlog
(1894)', Historiese Studies, 7(1), 1946, p. 14, 15), 460 (C
Rae, Malaboch, or notes from my diary on the Boer campaign of 1894
against the chief Malaboch (London, 1898), p. 86) and 600 (C
Sonntag, My friend Maleboch, chief of the Blue Mountains
(Pretoria, n.d.). p.78).
16. These people form a second faction of the Hananwa, who split
off some generations earlier.
17. GENERAL STAFF, WAR OFFICE, Native Strongholds and Locations
of the Transvaal (London, 1907), p. 18.
18. N C Weidemann, 'Die Malaboch-oorlog (1894)'. Historiese
Studies, 7(1), 1946, p. 2.
19. TRANSVAAL NATIVE AFFAIRS DEPARTMENT, Short history of
the Native Tribes of the Transvaal (Pretoria, 1905), p. 37.
20. LOCATION COMMISSION, 'Report on Malaboch's Location'.
File C27/16, 1905, Transvaal Archives, Pretoria.
21. Rumours had it that it was as many as two thousand men (C Rae,
Malaboch, or notes from my diary an the Boer campaign of 1894
against chief Malaboch (London, 1898), p. 86.
22. N C Weidemann, 'Die Malaboch-oorlog (1894)', Historiese Studies
7(1), 1946, p. 11,25.
23. GENERAL STAFF, WAR OFFICE, Native strongholds and locations
of the Transvaal (London, 1907), p. 26; De Volksstem 27June 1894.
24. H P van Caller, 'Mampoer en die stryd om die Bapeditroon'.
Historiese Studies, 3,1942, p. 97-152.
25. T Kroon, 'De Magato oorlog: 'a kleine bijdrage tot de geschiedenis'.
Die Brandwagl3 (4), 1921, pp. 115-123.
26. C Rae, Malaboch, or notes from my diary on the Boer campaign
of 1894 against chief Malaboch (London, 1898), p. 146.
27. GENERAL STAFF, WAR OFFICE, Native strongholds and locations of the
Transvaal (London, 1907), p. 19.
28. Seen from the west, Lenare is the second hill on top of Blouberg.
In the publication of the General Staff, War Office, it is incorrectly shown as Denar.
29. C Sonntag, My friend Maleboch, chief of the Blue Mountain (Pretoria, n.d.), p. 74.
30. V N 'Uit onze geskiedenis: een gebeurtenis uit de Malaboch oorlog'. Die Brandwag2(5), 1911,
pp. 153-154.
31. C Rae, Malaboch, or notes from my diary on the Boer campaign
of 1894 against chief Malaboch (London,1898), p. 91.
32. Do Volksstem, 27 June 1894; GENERAL STAFF, WAR OFFICE,
Native strongholds and Locations of the Transvaal (London, 1907),
20; C Rae, Malaboch, or notes from my diary on the Boer campaign of
1894 against chief Malaboch (London, 1898), p. 83.
33. GENERAL STAFF, WAR OFFICE, Native strongholds and locations
of the Transvaal (London, 1907), p. 21
34. GENERAl STAFF, WAR OFFICE, Native strongholds and locations
of the Transnaal (London, 1907), p. 21.
35. GENERAL STAFF, WAR OFFICE, Native strongholds and locations
of the Transvaal (London, 1907), p. 21.
36. De Volksstem, 27 June 1894; GENERAL STAFF, WAR OFFICE,
Native strongholds and locations of the Transvaal (London, 1907), p. 22.
37. N C Weidemann, 'Die Malaboch-oorlog (1894)'. Historiese
Studies 7(1), 1946, p. 29; De Volksstem, 4 July 1894.
38. GENERAL STAFF, WAR OFFICE, Native strongholds and locations
of the Transvaal (London, 1907), p. 18.
39. De Volksstem, 4 July 1894; GENERAL STAFF, WAR OFFICE, Native
strongholds and locations of the Transvaal (London, 1907), p. 20-21.
40. C Rae, Malaboch, or notes from my diary on the Boer campaign of 1894
against chief Malaboch (London, 1898), p. 146.
41. GENERAL STAFF, WAR OFFICE, Native strongholds and locations
of the Transvaal (London, 1907), pp. 21.
42. De Volksstem 4 July 1894; GENERAL STAFF, WAR OFFICE, Native
strongholds and locations of the Transvaal (London, 1907), p. 21, 22.
43. C Rae, Malaboch, or notes from my diary on the Boer campaign
of 1894 against chief Malaboch (London, 1898), p. 155-129; GENERAL
STAFF, WAR OFFICE, Native strongholds and locations of the
Transvaal (London, 1907), p. 24.
44. Letter from the Commandant General to the State Secretary,
1984/07/30, Transvaal Archives, KG, CR 2644/94; De Volksstem 25
July 1894.
45. In an effort to force the Hananwa out of the caves in which
they were hiding, a tunnel was dug from the forts towards the tribal
capital. This was then used to place dynamite as close to the
caves as possible, and by blowing down the cliffs in which the
caves were situated, it was hoped to force the Hananwa from hiding.
However, the whole effort proved to be unsuccessful.
46. De Volksstem, l8 July 1894.
47. C Rae, Malaboch, or notes from my diary on the Boer campaign of 1894
against chief Malaboch (London, 1898), p. 182; N C Weidemann,
'Die Malaboch-oorlog (1894).' Historiese Studies 7(1), 1946, p. 27.
48. Letter by the Commandant General, 1894/08/18, Transvaal Archives, SS, R8631/94
49. The missionary Sonntag writes very graphically on this matter.
See C Sonntag, My friend Maleboch, chief of the Blue Mountains
(Pretoria, n.d.), p. 127, 128, 147.
50. C Rae, Malabach, or notes from my diary on the Boer campaign of 1894
against chief Malaboch (London, 1898), p. 63.
Return to Journal Index OR Society's Home page
South African Military History Society / scribe@samilitaryhistory.org