
 The South African
by S.A.Watt
Before the battle of Vaalkrans, the attempts by the Natal Field Force to relieve the siege of Ladysmith had ended in failure; at Colenso (15 December 1899) and at Thabanyama (20-23 January 1900), culminating at Spioenkop (24 January 1900).
While on the upper Tugela, with the Ladysmith Garrison weakening daily under bombardment and disease, Sir Redvers Buller resolved once more to make an attempt to reach the beleaguered town. Viewing the heights across the Tugela, he perceived one single point which offered any likelihood of success, namely, Vaalkrans Hill. Here the barrier of hills was at its narrowest, with open country lying beyond it. Viewed from the right bank, the top of the Vaalkrans appeared practicable for artillery, which would from that position command the plain and wagon routes to Ladysmith.
Between 27 January and 2 February 1900 British reinforcements arrived in the form of a half company of Royal Garrison Artillery with two 5-in guns, 'A' Battery Royal Horse Garrison Artillery, two squadrons of 14th Hussars, and 1 200-1 500 reservists of infantry - a total of about 2 400 men and 8 guns - so that Sir Redvers Buller's force stood once more at its original strength of 26 000 to 27 000 men. The British force detailed for the Vaalkrans operation comprised:
Thus this force amounted to 21 402 men (of whom 683 were officers), 72 guns, and 19 machine guns.
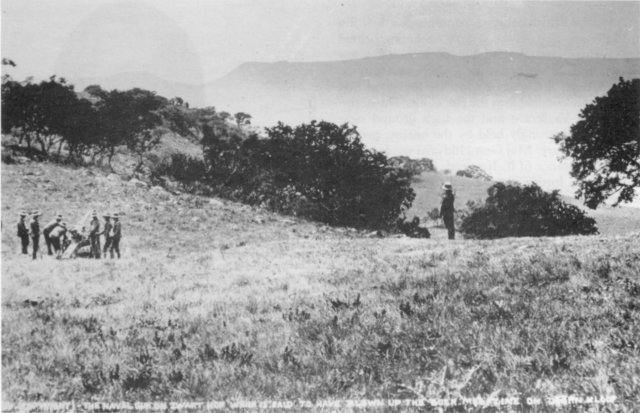
Preparations for the projected battle began on 27 January 1900. They involved heavy work on Swartkop, up whose slopes a slide was smoothed for the haulage of artillery, for the movement of which some 2,5 km of road had to be made through rough country. Stormy weather hampered these labours, the difficulty of which was further increased by the necessity of endeavouring to keep them invisible to the enemy. By 2 February 14 guns (six Naval 12-prs, two 15-pr field guns and six of a mountain battery) stood concealed amongst the trees on the top of Swartkop. Two 5-in guns which it had been found impossible to drag up the steep slopes were placed to the west, and above them stood a 4,7-in gun on Naval Hill, while another was on Mount Alice.
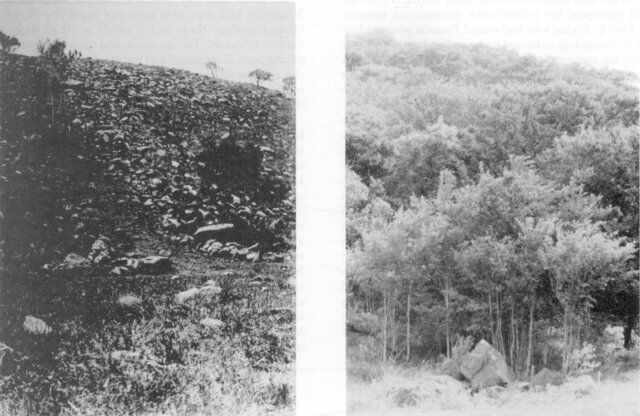
Before the battle of Vaalkrans the Royal Engineers
devoted their time and energies
to the construction of a road 2,5km long towards
the and up the slopes of Swartkop.
Their efforts were hampered by stormy weather,
and their difficulty was further increased
by the necessity of preventing these activities
being visible from the Boer positions.
The final ascent to the summit was along
an elevation of 40°. The six Naval
and two field guns were individually hauled
to the top by a wire hawser looped around
the gun's trail, the tractive force being supplied
by 50 men on each of two lengths of cable.
The Mountain Battery of 6 guns was transported
to the top by mules ascending the slope at easy angles.
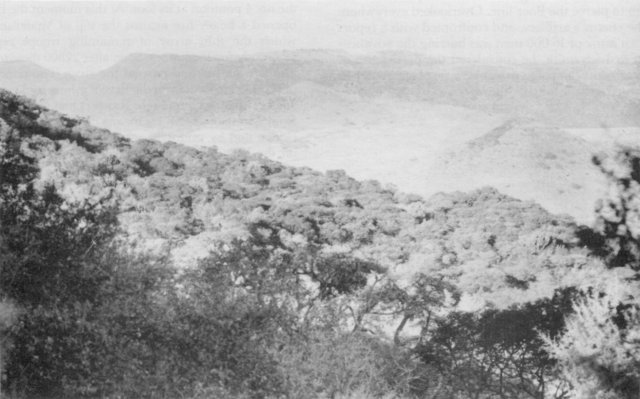
A visit to the site revealed that the slope
was covered by thick vegetation.
The sole point of reference was the rocks
in the foreground, while the disturbed surface
of the soil was evident when the author ascended
along the route of the former road.
In addition, two Naval 12-prs stood on a plateau north of Mount Alice. The remaining guns were, at this stage, with the infantry. Against these, the Boers were estimated to have seven artillery pieces.
On 3 February Sir Redvers Buller issued orders for the forthcoming attack. Vaalkrans, presumed to be the extreme left of the Boer position, was the object of the assault. For its capture Maj Gen Lyttelton's 4th Brigade was detailed, supported by Maj Gen Hildyard's 2nd and Maj Gen Hart's 5th. To lure the enemy away from the real point of the attack a feint was arranged to be delivered against Brakfontein by seven batteries of artillery and the 11th Infantry Brigade, now commanded by Col A.S. Wynne who had succeeded Maj Gen E.R.P. Woodgate. The fire of the Naval guns on and under Mount Alice and the remainder of the artillery, except the pieces on Swartkop, was to cover the movement. It was hoped that the massing of the infantry brigades for the true attack close to the eastward of no. 2 pontoon bridge would appear as if they were to cross the Tugela and join the assault on Brakfontein. When the enemy had hopefully been drawn to the apparently threatened position, a pontoon bridge no.3 would be thrown across the river, eastward of no.2 pontoon. Thereupon the batteries on Swartkop would shell Vaalkrans, to be joined by most of the batteries from in front of Brakfontein, after having crossed the river to the right bank of no.2 pontoon. Vaalkrans was then to be assaulted and occupied by the infantry in order that artillery be established upon the hill. This movement was then to be followed by an attack on Brakfontein, whilst the cavalry would pass Vaalkrans to the open ground beyond.
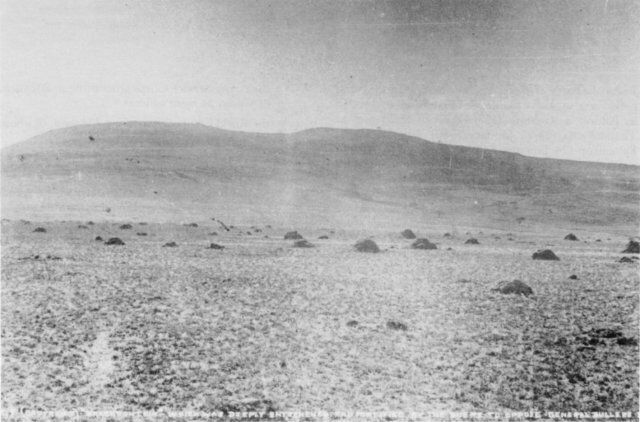
Brakfontein Hill as seen from
the British side in 1900.
The Boer position on top of the hill
was occupied by the Free State commandos
during the campaign on the Upper Tugela
in January-February 1900.
By the evening of 4 February a Boer force of some 3 600 men was entrenched along a front of 30 km, from Doringkloof in the east to Thabanyama in the west. The left flank was under the command of Combat General T. Smuts and consisted of the commandos from Soutpansberg with 50 men, and Standerton and Johannesburg together, with 800 men. With them were two 75 mm Creusot guns, 2 Krupps and a Pom-Pom. In the Boer centre, on the Brakfontein Heights, were stationed the Free Staters under Chief Commandant M. Prinsloo (who was in command of the Boer Army on the Upper Tugela at that moment), 250 men of the Senekal Commando, 650 from Vrede, and 40 from Winburg and Harrismith. Here, and along the eastern slope towards Spioenkop, the Boers placed two 75 mm Krupps, two 75 mm Cruesots, a Pom-Pom and a Free State Krupp gun. Gen S.W. Burger commanded the western flank from Drielingkoppe to Thabanyama and his command comprised 170 men from Rustenburg, 200 from Lydenburg and Carolina, 420 from Heidelberg, some 650 from Ermelo, and 40 Germans.
By the night of 4 February the British preliminary movements had been effected; the 11th Brigade had taken up positions on the Maconochie Koppies (also known collectively as One-Tree Hill) behind which seven batteries of artillery had gathered in readiness. The remaining infantry brigades, detailed for the real attack, moved into bivouacs near the foot of Mount Alice or Naval Gun Hill.
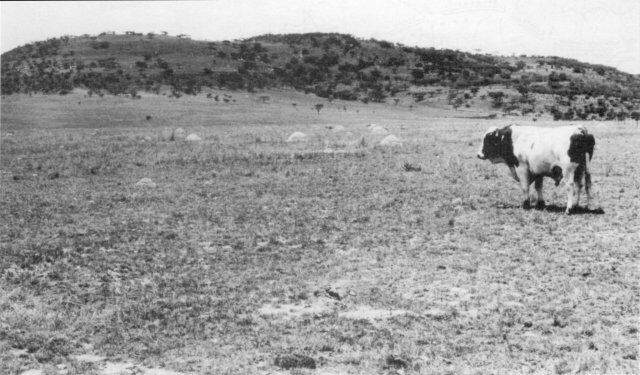
The view in 1984. Ant-hills
still dot the scene.
At 06h00 on 5 February 1900 the British 11th Brigade emerged from the Maconochie Koppies (called Rooikoppe by the Boers) with two battalions in front, a third in support, while the fourth held the bridgehead at the no. 1 pontoon to the rear. Under cover of bursting shells, the British infantry advanced toward Brakfontein behind which the Boers waited in silence. When the infantry was about 1 000m from the enemy four guns and a Pom-Pom opened up from amongst their ranks. (Various accounts give different times - from 09h00 to 11h45 - as to the commencement of the bombardment). Thereupon the infantry halted and lay down, though no rifle fire was discharged from Brakfontein. For the next hour and a half the British artillery shelled the enemy's position. Shortly after noon the British batteries departed singly for the no. 2 pontoon across the Tugela, north of Swartkop, and by 13h30 the infantry began to retire. As the men rose and turned about, the Boer musketry on Brakfontein burst into life with an immense discharge of rifles. Soon the British infantry regained the shelter of the Maconochie Koppies with a loss of 1 man killed and 27 wounded, while the artillery suffered 10 men wounded. (See map A)
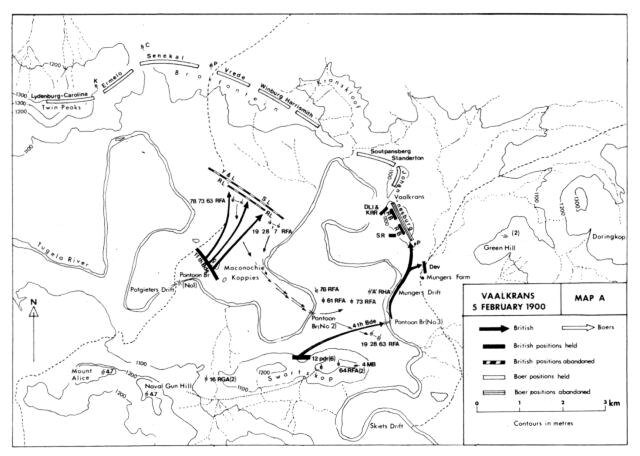
Map A
Meanwhile, preparations for the main offensive on the British right flank went ahead. Setting out at 07h00, the 2nd (Hildyard's), the 4th (Lyttelton's), and the 5th (Hart's) Brigades filed from their bivouacs under Mount Alice and Naval Gun Hill, and halted near the foot of Swartkop. At 10h25 the Royal Engineers began to build the no.3 pontoon bridge some 1 350 m south of Munger's Drift. A Maxim gun near Munger's Farm and sniping from elements of the Johannesburg Commando 600 m eastward, as well as the koppies above Skiets Drift, greatly disrupted the construction work, nor could the British artillery and rifle fire appreciably diminish the annoyance. However, the pontoon, 65m in length, was completed in fifty minutes, with minimal loss. The attacking columns were ready but it was another hour before the artillery of the feint attack came across the river. On their arrival on the plain between Swartkop and Vaalkrans, these guns and those on Swartkop itself, now 72 in all, converged their fire upon Vaalkrans, the hill scarcely visible through flames and the eruptions of the exploding shells. Its garrison of 95 men of the Johannesburg Commando, with a Pom-Pom, suffered severely. Its Commandant, Gen. B. Viljoen, was temporarily stunned under the bombardment.
At 14h00 two battalions of Lyttelton's 4th Brigade, namely the 1st Durham Light Infantry and the 1st Rifle Brigade, descended to the pontoon. The effect of the musketry and Pom-Pom on the troops crossing the pontoon in rushes of companies was slight, although a few casualties occurred. Under the left bank, some 6m high, the units reformed and advanced in single file. For about 800 m the bank provided shelter from rifle and shell fire. Thereafter, the protection ceased and the battalions clambered out into a mealie field to be greeted with fire from all directions. Here, several infantrymen were killed or wounded and had to be left behind, including Maj T.R. Johnson-Smyth.
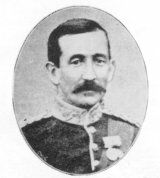
Major Thomas Roger Johnson-Smyth of the
1st Battalion, Durham Light Infantry
was killed in action during the advance
on Vaalkrans. He was born in June 1857
and joined the 106th Regiment of Foot in
September 1878. He was promoted eventually
to the rank of Major in August 1896. He embarked
for South Africa with his battalion in October 1899
and served with the Natal Field Force. On 5 February,
after emerging from the left bank of the Tugela River
into a mealie field, the Durham Light Infantry
came under severe rifle and artillery fire.
For a moment they withdrew to the cover of the
river bank, but not before Maj Johnson-Smyth was killed.
Today he lies buried in the military cemetery at
the foot of Vaalkrans, where a marble cross
has been placed in memory of him.
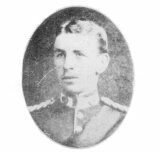
Lieutenant Charles Duncombe Shafto
of the 1st Battalion, Durham Light Infantry,
was killed in action in the attack on Vaalkrans
on 5 February 1900. He was born in July 1878,
entered his regiment in February 1898, and attained
the rank of Lieutenant in January 1900. He accompanied
his battalion to South Africa in October 1899 and served
with the Natal Field Force up to the time of his death.
He lies buried in the military cemetery at Vaalkrans.
Lt Shafto and Maj Johnson-Smyth were the only two
British officers to die in the battle of Vaalkrans.
By 16h00 the southern koppie of Vaalkrans had been seized. However, a brief occupation sufficed to arouse doubts in the minds of its captors. Immediately northward, separated by a deep saddle, the northern koppie of Vaalkrans was seen to be seamed with trenches occupied by the Johannesburg Commando; though it had been set ablaze by shells, it was strongly held. The musketry from there, and from the heights near Kranskloof occupied by the Soutpansberg and Standerton Commandos, searched the flank and reverse side of Vaalkrans. In addition, artillery from Drielingkoppe, Brakfontein, and Green Hill then shelled the hill. It was also observed that the narrow defile through which the road passed was unsafe during such fire. Moreover, a practicable position for artillery on Vaalkrans, the ultimate objective of the capture of the hill, could not be found. The infantrymen on the hill disposed themselves as best they could along the rocky crest. Pom-Pom fire and a series of bursts from Mausers onto the hill prompted the infantrymen to construct sangars.
Gen L. Botha, who had visited Pretoria after the battle of Spioenkop, returned to the upper Tugela and took over the command from Commandant Prinsloo. As a result of Botha's enthusiasm the numbers in the Boer ranks promptly increased and it was soon realised that a wedge had been driven into their line. The commandos and artillery were accordingly called towards the salient. From the right flank came 100 men of the Heidelberg Commando, to be followed by an additional 320, and 145 from Lydenberg and Ermelo, while 400 men under General L. Meyer arrived from Colenso and went to the assistance of Combat Gen Smuts on the Boer left flank. From Ladysmith there came 200 men from the Pretoria laager and 50 of the Utrecht Commando. Two field guns and Viljoen's Pom-Pom were moved to Green Hill, while a Krupp was moved to a position 2 700 m north of Vaalkrans. On Doringkop a 155 mm Long Tom, brought from Telegraph Hill at Ladysmith, was mounted in a shell-proof work. Thus by daybreak on the 6th the Boer left flank had received some additional 1 200 men and at least three more guns. (See map B)
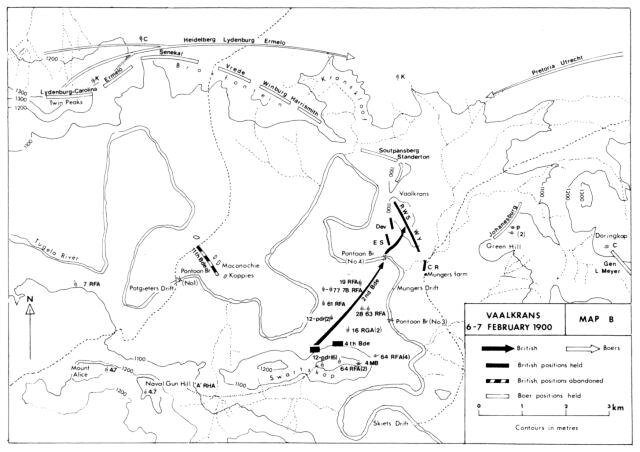
Map B
Sir Redvers Buller believed that the value of the Vaalkrans Hill depended upon the possibility of established artillery there which would serve to cover a further advance. The strength and proximity of the enemy near Kranskloof and northern Vaalkrans made the success of the previous day incomplete. It was intended that these features were to be shelled before the infantry could occupy them.
At 05h00 on 6 February the battle was renewed with heavy exchanges of artillery; the Boer artillery concentrating on Vaalkrans and the British guns firing onto suspected Boer gun positions and Kranskloof. The Long Tom directed its fire at the British artillery pieces on Naval Gun Hill and Swartkop. The heavy British ordnance engaged the fire of the Long Tom but did not succeed in silencing it. By 06h40, in spite of the assistance of the artillery, the British found it was still impossible to attempt the seizure of northern Vaalkrans. Meanwhile no.2 pontoon had been removed to a spot close under Vaalkrans in order to make a retreat easier should it be necessary to abandon the hill. Little chance was seen of capturing the remainder of Vaalkrans, and Maj Gen Lyttelton was ordered to hold onto his position until sunset. Lyttelton said he could do so provided no more Boer guns fired into the rear of the British position. Furthermore, he saw it was impossible to mount any guns on Vaalkrans.
There was scarcely any change on either side as the day wore on. The shellfire neither ceased nor decreased. Vaalkrans continued to be the focus of the Boer bombardment, although occasional shells from the Long Tom fell among the British troops there and the batteries on the plain beneath or on Swartkop. Shortly after l5hOO the Boers made a determined attempt to recapture the hill by approaching close to the defences and opening up a hot fire from behind burning grass. The attack, lasting less than 30 minutes, was beaten back by the Durham Light Infantry, supported by the King's Royal Rifles, after which the Boers maintained a constant discharge from their rifles at a distance, supported by artillery. Towards evening the no. 2 pontoon bridge had been assembled under Vaalkrans (shown as no.4 on the map) on while Maj Gen Hildyard's (2nd) Brigade crossed the river and relieved the 4th Brigade after their 26 hours of occupancy.

British infantrymen advance towards the
crossing of the Tugela River (shown as
pontoon no 4 on the map) for the attack on
Vaalkrans on the afternoon of 6 February 1900.
The 2nd Battalion Royal West Surrey, the
2nd Battalion East Surrey and the 2nd Battalion
West Yorkshire Regiments, suffered relatively few
casualties as compared to those of the
1st Battalion Durham Light Infantry and
1st Battalion Rifle Brigade which occupied
Vaalkrans the previous day. Smoke caused by
exploding British shells, can be seen near
the northern slopes of Vaalkrans.
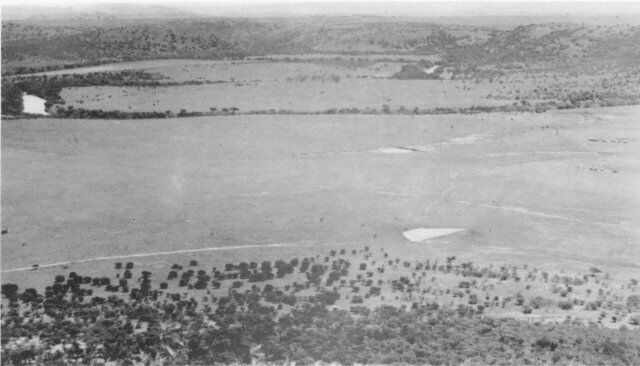
The author visited the spot
where the photographer once stood
on Swartkop to capture this historical
scene some 80 years ago.
Up on the crest, the 2nd Royal West Surrey (the Queen's) Regiment replaced the Durham Light Infantry to the north-west, the 2nd East Surrey prolonging the line, whilst the 2nd West Yorkshires manned the sangars of the Rifle Brigade on the southern shoulder of the hill. The Devonshires, having been relieved by the 1st Connaught Rangers of Maj Gen Hart's (5th) Brigade, took post behind the southern koppie of the Vaalkrans. A spasmodic shellfire did not cease with the fall of darkness and harassed the relief. Thereupon the fresh troops set themselves to improve the defences. They too were disturbed by demonstrations of musketry at close quarters.
The next day (7 February) was once more ushered in by an artillery combat. The Boer guns, paying less attention to the British batteries, concentrated their fire upon Vaalkrans. The new occupants, sheltering behind strong sangars, were afforded fair cover, though a few losses occurred. Nevertheless the soldiers were pinned to their shelters; the heat was intense and food and water were only obtainable at the risk of life. The northern koppie of Vaalkrans and the high ground near Kranskloof, still strongly held by the enemy, proved an annoying feature. Maj Gen Hildyard made a personal reconnaissance of it. If seized, its tenure would be doubtful, its fortification difficult and both flanks could be easily enfiladed with enemy fire. The bombardment continued without intermission. A shell from a 4,7-in gun on Naval Gun Hill fell in the work of Long Tom at a range of 10 500 m, exploded some of its ammunition, and produced a large column of smoke. Yet the weapon was undamaged and, after an interval, resumed firing.
A British Naval 12-pr gun on the southern slopes of Swartkop
engaged in shelling the Boer Long Tom on Doornkloof.
It was there that an ammunition magazine received
a direct hit and, for a while, the Boer gunners suspended
the shelling of the British targets.
The author visited the site in 1980.
The thick bush prevented him from locating
the exact site where the British gun once stood
and he had to be content with a similar view.
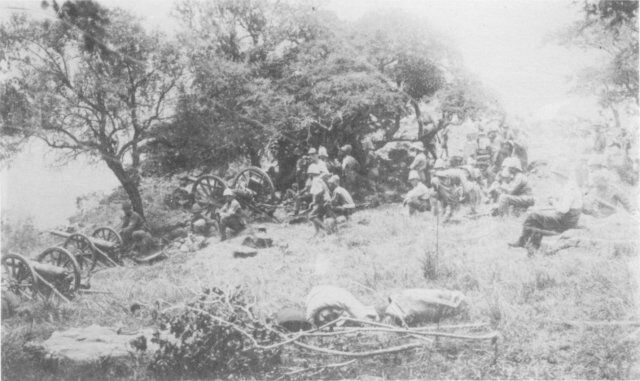
A view of some of the British artillery
on Swartkop. On the left are two 2,5-inch screw guns
of the no 4 Mountain Battery while the
artillery piece in the centre is a 15-pdr field gun.
An expenditure of 9 599 shells, fired from 72 guns,
was one of the highest during the entire Anglo-Boer War.
The guns on Swartkop, 14 in all, concentrated
their fire mainly on Vaalkrans.
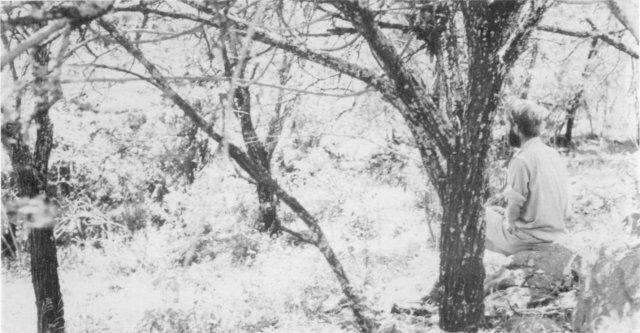
A visit to the spot in 1980
proved difficult to identify owing to
the increased natural vegetation.
Gilbert Torlage sits on the same rock where
one of the British soldiers rested almost 80 years ago.
At 16h00 Sir Redvers Buller called together his generals, and after hearing various suggestions, announced his intention of abandoning his present attempt and of seeking a more viable position from which to pierce the Boer line. Overlooked everywhere by the enemy's artillery, and confronted with a report that an army of 16 000 men was barring the advancement to Ladysmith, he considered the persistence of the Vaalkrans campaign a useless waste of life. At 17h45 he issued orders for a withdrawal.
Meanwhile the artillery fire on both sides never slackened, the bombardment of Vaalkrans increasing in severity during the late afternoon. At nightfall it ceased and the British troops, issuing from their shelters for the first time, prepared for a retreat.
The evacuation, made quietly, did not arouse the enemy riflemen nearby. By 21h00, leaving a token force on Vaalkrans, the remainder of the infantrymen descended the rocky hillside and crossed the Tugela by the no.4 pontoon at its foot. At this moment the Boers opened a heavy fire against the top of Vaalkrans, to which the thin array of remaining troops replied vigorously for 15 minutes. Soon after 22h00 these troops also left the hill and crossed the river. The pontoons of no.4 bridge were rapidly drawn ashore and packed. Meanwhile the Connaught Rangers had retired safely from Munger's Farm by means of the no.3 pontoon bridge and by midnight no British soldier remained on the left flank of the Tugela.
Early on 8 February the Natal Field Force was in motion. The Boers, discovering Vaalkrans abandoned, found the corpses of 22 Boers and 5 British soldiers. In addition, several British graves were found, indicating that the British had buried some of their dead. (A year later two skeletons were found on Vaalkrans and were buried there). Meanwhile the Boer gunners on Doornkop were engaging in an artillery duel with the British Naval 4,7. By 08h00 the rearguard had withdrawn out of range, following the main body to Springfield. There still remained to be effected the evacuation of the Maconochie Koppies, the removal of the no.1 pontoon from Potgieter's Drift, the withdrawal of the artillery on Swartkop, and the clearance of the camp at Spearman's Farm of stores and ammunition, all of which were forwarded to Springfield and Chieveley. These tasks, which required the use of 559 wagon loads, were completed in 17 hours on 9 February. By 11 February most of the army arrived at Chievely and found itself opposite the heights at Colenso after a month's absence.
According to The History of the War in South Africa the British losses amounted to 333 (27 killed (of whom 2 were officers), 300 wounded (of whom 18 were officers) and 6 missing).
According to the Times History of the War in South Africa the British losses amounted to 369 (34 killed or died of wounds (of whom 3 were officers), and 335 wounded (of whom 17 were officers). Dr Blake Knox, a surgeon who accompanied the army to the Upper Tugela, estimated the total loss as 374 (25 killed (of whom 2 were officers), 344 wounded (of whom 18 were officers) and 5 missing.)
These statistics are also borne out by The German Account of the War in South Africa.
The Boer losses were 88 i.e. 39 killed, 45 wounded and 4 missing.
The Johannesburg Commando of 96 men fared the worst by losing no less than 57, of whom 30 were killed, 23 wounded, and 4 were missing.

The main British monument in
the Vaalkrans Garden of Remembrance.
Those soldiers who died of wounds received
at Vaalkrans lie buried in the military
cemeteries at Mount Alice farm and at Mooi River.
The remains from the scattered graves of the British soldiers on Vaalkrans have been re-interred in the Vaalkrans Garden of Remembrance situated on the south-east slope of the hill. Maj T.R. Johnson-Smyth, whose grave was located near the Tugela, has also been re-buried here. The Garden contains the main British monument, on which is inscribed the names of 34 soldiers (one name is repeated) who were killed at Vaalkrans or who died of wounds and lie buried at Mount Alice farm or at Mooi River. On the obelisk to the memory of the 1st Durham Light Infantry there appear 21 names. There is also a marble cross to the memory of Maj. Johnson-Smyth.
Of the Boers buried on the battlefield, only eight were positively located, and the remains of seven of these have been re-interred in the Burger Monument at Ladysmith and one is buried elsewhere. The graves of 28 Boers, all belonging to the Johannesburg, Krugersdorp, and Standerton commandos, have, to date, not been found.
Up the slope of Swartkop where the British hauled fourteen guns, there is some evidence of the slide constructed for the purpose. After much searching, a single large rock helped to identify the spot. On top of Swartkop, nothing remains except a stone wall near the eastern end. There the Mountain and Naval guns were concentrated, offering obvious targets for the Boer gunners, and were afforded some shelter behind the wall.
Near Potgieter's Drift there is a grave which could have been that of the solitary soldier killed in action during the advance of the 11th Brigade towards Brakfontein or could also be that of an infantryman killed on 20 January or 24 January 1900 during the Thabanyama or Spioenkop campaign.
Bibliography
Amery, L. The Times History of the War in South Africa. (London. Sampson
Low, Marston & Co. 1905)111, VIII.
Amery, L. Anglo-Boer War 1899-1900. An Album of Upwards of Three Hundred
Photographic Engravings (Cape Town. c1901).
Atkins, J.B. The Relief of Ladysmith. (London. Methuen. 1900).
Barnard, C.J. Gen Louis Botha op die Natalse Front 1899/1902 (Cape Town.
A A Balkema, 1970).
Breytenbach, J.H. Geskiedenis van die Tweede Vryheidsoorlog 1899-1902.
(Pretoria. Die Staatsdrukker 1969)1-V.
Burleigh, B. The Natal Campaign. (London. Chapman & Hall, 1900).
Chisolm, R. Ladysmith. (Johannesburg. Jonathan Ball. c1979).
Churchill, W.S. Frontiers and Wars. (London. Eyre & Spottiswoode. 1962).
Crowe, G. The Commission of HMS Terrible. (London. George Nunes. 1903).
Dooner, M.G. The Last Post (London. Simpkin, Marshall, Hamilton. 1903).
Du Cane, H. The German Official Account of the War in South Africa. (London
1906).
Du Cane, H. Graphic, The. 1900
Hillegas, R.C. With the Boer Forces. (London. Methuen. 1900)
Illustrated London News, The. 1901.
Knox, E.B. Buller Campaign with the Natal Field Force. (London. R. Brimley
Johnson. 1902).
Kruger, R. Goodbye Dolly Gray (London. Cassell. 1959).
Maurice, F. and Grant, M.H. History of the War in South Africa. (London.
Hurst & Blackett, 1906)ll (text) II (maps).
Pakenham, T. The Boer War. (Johannesburg. Jonathan Ball. 1979).
Pemberton, W.S. The Battles of the Boer War (London. Batsford. c1964).
Register of Graves in Natal (War Office Library. 1904).
Selby, J. The Boer War. A Study of Cowardice and Courage. (London. Arthur
Barker, 1969).
Small, J.L. Those Restless Years. (Cape Town. Howard Timmins. 1971)
South African Field Force Casualty List from 11th October 1899 to 31st
May 1902. (London. 1980).
Symons, J. Buller's campaign. (London. Cresset Press. 1963).
Todd, P and Fordham, D. Private Tucker's Boer War Diary. (London. Elm Tree
Books. 1980).
Verner, W. The Rifle Brigade Chronicle for 1900. (London. 1901).
Viljoen, B. My Reminiscences of the Anglo-Boer War. (Cape Town, 1973) (Reprint).
Wilson, H. With the Flag to Pretoria. (London. Harmsworth, 1900-1901)l,ll.
Return to Journal Index OR Society's Home page
South African Military History Society / scribe@samilitaryhistory.org