
 The South African
by Ken Gillings
Battles such as Colenso, Ladysmith, Nicholson's Nek, Spioenkop and others of the Anglo-Boer War of 1899-1902 have consistendy captured the imagination of military historians and students of military history. Much has, of course, been written regarding the Siege of Ladysmith; from the battles preceding it to Sir Redvers Buller's final breakthrough via the Tugela Heights and the final relief of the town. However, the events following the Relief of Ladysmith appear to have escaped the attention of most writers, owing, perhaps, to the fact that material dealing with the British breakthrough via the Biggarsberg in May 1900 is extremely difficult to locate. One of these events was the action at Helpmekaar which was pivotal to the battle for the positions along the Biggarsberg following the Relief of Ladysmith. A study of this engagement proves it to have been one of no less interest than that of the other more renowned battles.
At this point a brief background to Helpmekaar is apposite. The Voortrekkers gave Helpmekaar its name. The precipitous nature of the terrain necessitated the families assisting one another with the laborious ascent to the summit of the plateau. They settled along its summit and in the valleys below. There remain many descendants of the Voortrekkers in the area to this day, such as the Cronje, Vermaak, Landman, de Jager and Fourie families. The year 1879 witnessed the Anglo-Zulu War during which Helpmekaar became an important military base. Owing to its natural prominence it provided an ideal heliograph station. The remains of this period, especially an old fort constructed during the war and some stone hewn buildings, are rapidly disappearing and it may only be a short while before the graves of the British soldiers killed in the war and buried behind the present police station will be the only tangible evidence of this phase of Helpmekaar's history. In 1899, shortly after the outbreak of the Anglo-Boer War, there was once again a great deal of military activity at Helpmekaar which continued throughout the war. The Bambata rebellion of 1906 witnessed a resurgence of this military activity, when the valleys below the Biggarsberg were the scene of vicious, almost hand-to-hand combat. However, it is the period 1899-1902 which will form the subject matter of this article. The history of Helpmekaar clearly bears witness to its strategic importance as a defensive position.
Prior to the discussion of the 'duel', it is necessary to detail the character and strengths of the two opposing forces, as well as the personalities of their commanders.
THE BRITISH FORCES: BULLER'S INDECISION AFTER THE RELIEF OF LADYSMITH
The British force, after its success in relieving Ladysmith, remained
under command of Gen Sir Redvers Buller, VC, GCB, KCMG, who had at his
disposal three divisions: the 2nd Division, under Lt Gen Sir C F Clery,
KCB; the 4th Division, under Lt Gen the Hon N G Lyttelton, CB; and the
5th Division, under Lt Gen H J T Hildyard, CB. For the actual assault on
the Boer positions along the Biggarsberg Buller drew from all three divisions.
It is important to bear in mind that the force which Buller had at his
disposal, numbering in excess of 25000 men, was an extremely large one
which, if utilized efficiently, possessed all the capabilities required
for a successful follow-up to the Relief of Ladysmith by ejecting the Boers
from the Biggarsberg. Following upon the reverses sustained by the British
at Colenso (15 December 1899), Spioenkop (23 January 1900) and Vaalkrans
(15 February 1900), General Buller had finally broken through the Boer
line along the Tugela Heights and relieved Ladysmith, on 28 February 1900,
one day after Lord Roberts had secured the surrender of Gen Piet Cronje
at Paardeberg on 'Majuba Day' (27 February).
However, for some two months following the Relief of Ladysmith, Buller's force remained in a state of virtual inactivity. Even before the Relief, the future of Buller's force had become the subject of a spate of telegrams between he and Lord Roberts, the latter no doubt anxious to obtain assistance for his intended march on Bloemfontein. In point of fact, on 24 February, while Gen Hart's Irish Brigade was being decimated by the defending Boers at 'Hart's Hollow', on the Tugela Heights, Lord Roberts requested Sir Redvers to send him Gen Sir George White's force and Gen Warren's Division via East London as soon as the Relief had been achieved. Lord Roberts' request was motivated by the lack of efficient reinforcements available to him at the time. It is reasonable to believe that, had Buller complied with Roberts' request, the detachment of these forces would not have seriously hampered Buller's post-Ladysmith operations, since he would still have had a considerable force at his disposal even after despatching the reinforcements to Roberts. (It would also, incidentally, have saved Sir George White's career; as it would have provided him with a viable command, instead of which his presence became superfluous and he was invalided back to Britain). Characteristically, Buller vacillated and one is justified in speculating as to whether the serious problems subsequently encountered by the British at Wepener, Reddersburg and Sannaspos would have occurred had Buller agreed to Lord Roberts' request. Arguing that the Boers would not make a stand south of Laing's Nek, he suggested alternative strategies in a veritable flurry of telegrams (some 40-50 in number), reflecting an indecision that persisted until he finally began his advance in May 1900. For example, Buller suggested that one division should be sent to occupy Northern Natal whilst the remaining two divisions be used to launch an attack against the Boer positions in the Drakensberg; thereafter to proceed through the Orange Free State to link up with Roberts.
As Lord Roberts continued his advance he became convinced that his march to Bloemfontein would be far more difficult than he originally thought, and so he telegraphed Buller, ordering him to send the 5th Division to East London without further delay and to take up a defensive position. In this climate of indecision, however; Buller continued to obstruct Roberts' requests for assistance.
Compounding the folly of such indecision, Buller committed a profound tactical blunder. Instead of pursuing the Boers following the Relief of Ladysmith, he marched his army into camp around the town. The Boers, meanwhile, having been persuaded by their Commandants to return to the Biggarsberg, assumed a defensive position.
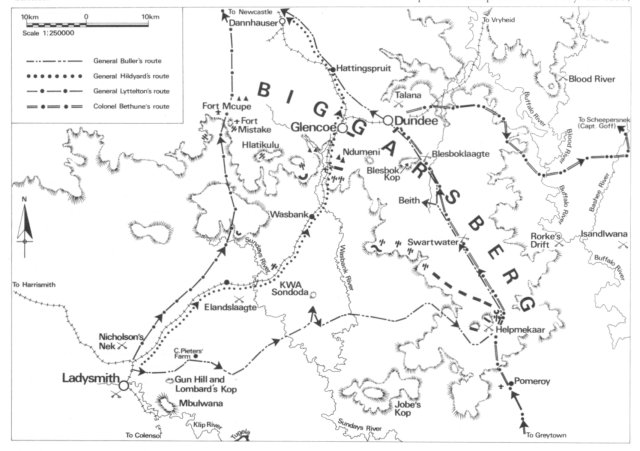
The Biggarsberg range extends from the vicinity of Colling's Pass in the Drakensberg, along the Natal/Zululand border, to a point north of the village of Pomeroy. The Boer line of defence was located along this range extending from Mcupe (opposite Fort Mistake) to the high point overlooking Helpmekaar village.
The choice for Buller now clearly lay between the following alternatives: either he could effect a western advance across the Drakensberg into the Eastern Orange Free State; or he could effect a northern advance into Natal; or he could pursue both movements. His indecision is clearly evident when he suggested, on 2 March, implementing the two simultaneously, whilst on the 5th he proposed the northern movement and on 7 March the western movement. A plainly frustrated Lord Roberts acted with typical coolness and offered both advice and military assistance with any future plan which Sir Redvers might eventually decide upon albeit that his own force was somewhat deficient for the task which lay ahead of it; a situation due in no small measure to Buller's chronic indecisiveness.
Buller estimated that the total strength of the opposing Boers was in the region of 18 000 and that they possessed 16 guns. Lord Roberts, still in no position to co-operate, sanctioned the northern advance. Buller then telegraphed to the effect that he could not advance without Gen Warren's Division (already en route to East London). On 10 March Lord Roberts fought a successful major action against Gen de la Rey's forces at Driefontein (between Poplar Grove and Bloemfontein) which resulted in the Boers falling back on the OFS capital, where they occupied pre-planned positions. Following this action, which provided clear access to Bloemfontein, Roberts felt that he could dispense with Gen Warren's division and telegraphed Buller accordingly, suggesting that he retain Warren. Buller, however, now forwarded a variety of reasons to justify delaying his advance; in pursuance of which, by 19 March, his estimate of the Boer forces opposing him had increased to a staggering 25 000. He then requested Lord Roberts, who was at that stage some 340 km distant, to clear the Drakensberg passes in order to enable him to move northwards. Lord Roberts, no doubt in sheer desperation, agreed immediately. Incredibly, Buller now obstructed this plan, which was accordingly aborted. Finally, on 8 April, Roberts ordered Buller to remain on the defensive (no doubt having abandoned all hope of co-operation with Buller) but to send him (Lord Roberts) Gen Hunter's Division and the Imperial Light Horse.
Buller's obstructionist and delaying tactics with regard to Lord Roberts was thus symptomatic of a fundamental indecision which manifested itself in the failure to pursue the Boer forces after the Relief of Ladysmith.
THE REPUBLICAN FORCES: BOER INACTIVITY IN A DEFENSIVE ROLE
Despite the severe reverse suffered by the Boer forces on the Tugela
Heights, the Commandos deployed along the Biggarsberg had consolidated
their positions and appear to have been reasonably well motivated. The
composition of the Boer forces at this time was as follows:
The Krugersdorp Commando, under Commandant Jan Kemp (approximately 1 317); the Johannesburg Commando, under Commandant Ben Viljoen (approximately 2 013); the Middelburg Commando, under Commandant Fourie (approximately 1 550); the Carolina Commando, under Commandant D Joubert (approximately 1 427); the Lydenburg Commando, originally commanded by Commandant Schalk Burger but at this stage probably under Commandant D J Schoeman (approximately 1 125); a Commando from Pretoria, under Commandant D Erasmus (approximately 2 832); the Swaziland (Bremersdorp) Commando, under Commandant Chris Botha (no numbers available); the Piet Retief Commando (approximately 301); and finally a group of Irish volunteers under Col Lynch. Furthermore, the Boers had positioned some guns at intervals along the summit.
After they had been routed from the Tugela Heights, some semblance of order had been established and a Krygsraad (Council-of-War) was held at Glencoe, attended by the Commandant General, Gen Piet Joubert, who made an impassioned plea to the some 50 officers present to maintain a united front. It was to be Gen Joubert's last Krygsraad. His plea proved successful and, as a result, those Commandos which could be re-mustered were sent to assume defensive positions along the Biggarsberg. These totalled some 8 000 men - a number far short of Buller's estimate of 25 000. The Johannesburg Commando, under Ben Viljoen, occupied a position between Helpmekaar and Van Tonder's Pass, under the overall command of the uninspiring Gen Lucas Meyer, the ageing former President of the 'Nieuwe Republiek'. The following weeks were occupied in entrenching, fortifying and strengthening their positions. It was during this period that Gen Piet Joubert died. Joubert had proved to be a genial and popular leader, who had been defeated in the struggle for the State Presidency by Paul Kruger. Deeply religious, it was he who had restrained his men after the British defeat at Farquhar's Farm outside Ladysmith, saying, 'When God holds out a finger, do not take the whole hand'. Upon his death Lord Roberts, characteristically, sent President Kruger a message of condolence. Joubert was succeeded by Gen Louis Botha and almost immediately there appeared to be a revival of spirit among the Boers, morale having been at a very low ebb at that time, owing principally to the unaccustomed inactivity associated with a purely defensive role. However; this boost to Boer morale was soon diluted when Gen Louis Botha took a large number of Transvaalers into the Orange Free State with him in an attempt to check Roberts's advance, and transferred overall command of the Commandos along the Biggarsberg to Gen Lucas Meyer. As a result, after an initial flurry of Boer activity, as well as an occasional skirmish between the two forces, the Boers proved as inactive as the British. During this period there was only one engagement of note and this took place on 10 April 1900, when the Boers brought seven or eight Creusot guns into action on the left bank of the Sundays River and shelled the Elandslaagte camp (see below). This was countered by long range musketry fire, the action continuing throughout the entire day. Gen Clery's force suffered some 17 casualties, and his camp was subsequently moved eastwards to the site of the battle of Elandslaagte, which had occurred some five months previously.
BRITISH FORCES RE-DEPLOYED: THE BRITISH ADVANCE BEGINS
At the beginning of March, Lyttelton's 2nd Division and the 1st Cavalry
Brigade, under Brig Gen Burn-Murdoch, moved to Elandslaagte, where they
established a camp immediately south of the Sundays River. They were relieved
by Lord Dundonald one month later. This was the camp which the British
were forced to evacuate after the artillery duel of 10 April discussed
above. The period was marked by a great deal of sickness among the British,
and dysentery, enteric fever (typhoid) and other sicknesses took their
toll, keeping military and civilian hospitals throughout Natal both full
and busy.
On 13 March 1900 Lord Roberts had entered Bloemfontein. By the end of April he had made final preparations to leave the town and continue his advance to Pretoria. On 2 May he telegraphed Gen Buller, ordering him to occupy the attention of the Boers in the Biggarsberg whilst he (Roberts) continued his advance through the Orange Free State. At this time, the Northern Natal route had been decided upon (the reader will recall the indecision commented upon earlier in this article). Buller, aware of the large concentration of Burghers along the points where the roads and railway passed through the Biggarsberg in the direction of Newcastle, decided to attack Helpmekaar and, he hoped, gradually overwhelm the position. (Why Buller did not persist in his characteristic procrastinating tactics after Roberts' request, following upon the capture of Bloemfontein, is unclear). Buller informed Gen Clery that the task would be allocated to his (the 2nd) Division. In addition, the 3rd Mounted Brigade from Gen Hildyard's 5th Division commanded by Lord Dundonald, would accompany Clery's force; the 3rd Mounted Brigade had been reinforced by Maj Dartnell's command, consisting of the Natal Carbineers, the Border Mounted Rifles, the Natal Mounted Rifles and the Left Section (comprising two guns) of the Natal Field Artillery. The men were ordered to take 10 days rations and supplies. Buller intended that the reinforced 2nd Division should, after clearing the Biggarsberg, be the head of a large sweeping movement that was to pivot on Elandslaagte. Gen Hildyard's force (the 5th Division) was to function as the pivot and was to keep in touch with, and support, Gen Clery's force in its flanking march. Gen Lyttelton would, meanwhile, cover Ladysmith.
On 10 May 1900 Gen Clery's force concentrated at the Sundays River drift, the entire movement being apparently unobserved by the Boers. That evening Gen Buller rode out to take command of the flanking column, comprised as follows:
2nd Division:
2nd Brigade; 4th Brigade; 3rd Mounted Brigade; 7th, 63rd and 64th Batteries,
Royal Field Artillery; 17th Company, Royal Engineers; A Battery, Royal
Horse Artillery (known as the 'Chestnut troop', due to the colour of their
horses); 61st Howitzer Battery.
Artillery: four 4,7 inch naval guns; two (some reports say three) 'pom-poms';
four 12-pr naval guns.
With some exceptions, the components of the 2nd Division had been involved in the fateful battle of Spioenkop some four months earlier. The Boers entrenched along the Helpmekaar range soon became aware of the activity occurring between themselves and Ladysmith, and assumed correctly that some major forward movement was being undertaken by the British. The start of Gen Buller's eastern movement was then noted. On 10 May the Dorsetshire Regiment occupied kwaSondoda mountain (situated on the road between Ladysmith and the road-junction at Vermaakskraal) and, on the 11th, Gen Buller camped on the banks of the Waschbank ('Wasbank') River. Lord Dundonald's Brigade, which covered the left flank and the front of the main force, maintained contact with Talbot Coke's men at kwaSondoda and actually encountered some of the Boers to the east of the mountain. The Boers now realized that a full-scale offensive was being launched on their positions and, assuming that the attack would be launched at Van Tondersnek, south of the hamlet of Beith (one of the passes which descends the Biggarsberg) they began to concentrate their forces at that point. In addition to van Tonder's Pass, there were two further routes to the summit of the Helpmekaar plateau in 1900; viz., the track which ascended the hill directly into Helpmekaar village and a well constructed road which extended from the base of Uithoek hill and linked up with the Dundee-Tugela Ferry road at the edge of the escarpment, a route still in regular use today. It is apparent that the Boers anticipated an attack on van Tondersnek Pass, since these other routes were relatively ignored in their defensive planning.
The British, on the other hand, realized that Uithoek hill commanded both the village of, and the track to, Helpmekaar. While an attack on van Tondersnek and Beith would have required a frontal assault on the Biggarsberg, an attack on Uithoek could be more easily concealed. Furthermore, Gen Buller was in telegraphic communication with the force commanded by Col E C Bethune, which had been guarding Buller's right flank in the vicinity of Greytown since February 1900. Col Bethune now received orders to assist from the south; a point from which he could, if necessary, participate in a second flanking movement in support of Buller. Col Bethune's column comprised Bethune's Mounted Infantry, the Umvoti Mounted Rifles, the Imperial Light Horse and the remaining Left Section of the Natal Field Artillery; the artillery consisting of some 12-pr naval guns.
The crossing of the Waschbank River took some time, with the result that Gen Buller was able to move only a short distance on 12 May. He left his supply and transport columns at the drift, under the protection of the Scottish Rifles. He did so in order to save these sections from making an unnecessary detour via Uithoek once the Boer position had, he hoped, been overcome. Having crossed the river; the column proceeded to Vermaakskraal, the Natal Carbineers providing flank protection. There were some small skirmishes but there were no casualties, although on the previous day (11 May), the advance squadrons of the Natal Carbineers made contact with some Burghers and Tpr R A Lindsay was wounded.
Vermaakskraal was a poor campsite, with insufficient water and within easy range of the Boer guns, but Gen Buller insisted that this manoeuvre formed an important part of his feint.
THE STRUGGLE FOR UITHOEK NEK: THE BOERS WITHDRAW FROM HELPMEKAAR
It was at this point that some of the Boers felt uneasy regarding the
British movements; these were largely the Commandos under Ben Viljoen and
Chris Botha (brother of the new Commandant General), who were positioned
along the summit between Van Tondersnek and Helpmekaar village. The two
commanders voiced their misgivings to Gen Lucas Meyer, who foolishly disregarded
them. Gen Meyer informed them that he felt confident that Buller would
choose the route via van Tondersnek Pass.
At dawn, on 13 May 1909, as the British were leaving Vermaakskraal, the Boers directed artillery fire onto the site. One (possibly two) of the 4,7 inch guns were brought into action, checking the Boer shell fire.
Gen Buller immediately realized that, if this plan to deceive the Boers was to be successfully implemented, speed was of the essence. Accordingly, he ordered Lord Dundonald to cover the proposed advance to Helpmekaar with Col Hamilton's Brigade in support and the Light Brigade in the rear. The route chosen was via Uithoek Pass. Lord Dundonald sent Maj Dartnell with the Natal volunteer forces to clear the hills west of the road, and the South African Light Horse, together with Thorneycroft's Mounted Infantry, to clear the east.
Commandants Ben Viljoen and Chris Botha realized at this juncture the implications of the British plan and, mounting their ponies, led their Commandos (consisting of some 500 men from the Johannesburg and Swaziland Commandos) in a frantic race across the summit. The Natal volunteers ascended the hills along the west side of the Uithoek valley without opposition, whilst Col Thorneycroft led his men directly up the Uithoek hills. (Uithoek consists of two hills - Ncgonwana and Sikhanyisweni. These were either captured individually or subjected to a simultaneous assault).
To his surprise Col Thorneycroft found the high ground unoccupied save for an advance party commanded by Maj Walters, who had climbed the hills without opposition that morning. (Commandant Ben Viljoen claims that a force under his command had captured some members of the South African Light Horse earlier.)(1) Leaving a squadron to hold Uithoek, Col Thorneycroft swept on up the valley with the rest of the Brigade and, as they approached the nek, they observed shells bursting over it; Col Bethune was bringing his guns into action on the southern slope.(2) Gen Meyer then arrived with some reinforcements at a point close to Helpmekaar.
The position on the summit of the hill above the village had not been strengthened to any great degree, and the sole defenders at this stage were the Piet Retief Burghers, known derisively by their countrymen as the 'Piet Retreaters', as well as some German volunteers. Meyer's tactical blunder in not stationing his reinforcements directly at Helpmekaar was especially noted by Col Blake, commanding the Irish Brigade, who wrote:
The British ruse had proved successful. The main Boer force, consisting of the Krugersdorp, Middelburg, Carolina, Lydenburg and Pretoria Commandos, had concentrated in the vicinity of Glencoe, in reaction to reports that Gen Hildyard's Division was moving up the railway, in the direction of the towns of Glencoe and Dundee.
Commandant Viljoen's force was clearly observed by Lord Dundonald, who, in turn, was clearly discerned by Commandant Viljoen himself from his position west of Helpmekaar village. The result was a deperate race between Viljoen and Dundonald for the possession of Uithoek Nek. Lord Dundonald, however enjoyed a head start and, together with Bethune's Mounted Infantry which, by this stage, he had joined, moved across the eastern extremity of the plateau in extended order and easily overran the entrenchments constructed by the Boers. By so doing, Lord Dundonald had reached the summit a matter of minutes before Commandant Viljoen had managed to position his men on a few koppies at the eastern extremity. Viljoen was able to check any further advance for a short time by opening fire with a Creusot field gun and a 'pom-pom'. Lord Dundonald then deployed A Battery, RHA, into action alongside the deserted Boer trenches, and a sharp artillery duel took place, resulting in the withdrawal of A Battery.
Despite Commandant Viljoen's success in maintaining his position, the Boer leaders decided, at a Krygsraad held on the night of 18 May, that, with the limited numbers at their disposal, they faced overwhelming odds and would be unable to maintain their position much longer. During the night, therefore, the defenders of Helpmekaar slipped away and, by dawn, were in full retreat across the Helpmekaar plateau, moving in the direction of Dundee.
THE BOER RETREAT : THE BIGGARSBERG POSITIONS ABANDONED
On 14 May Maj Lord Dundonald was ordered to move from his position
at Uithoek and to scout in the direction of Helpmekaar village. His advance
commenced shortly after first light and, finding the village to be evacuated,
the mounted troops began their northward advance along the road to Dundee.
The Boers had set fire to the very dry grass whilst retreating and the
thick, billowing smoke and huge flames effectively obstructed the advancing
mounted troops. (It is of interest to note that this pursuit represented
the very first time during the Natal campaign that Gen Buller had actually
followed up a Boer retreat. Thorneycroft's Mounted Infantry, the South
African Light Horse and the Composite Regiment of Mounted Infantry were
extended across the entire summit, under orders from Lord Dundonald to
press on as fast as possible).
After advancing some 10km the pursuers suddenly came under fire from the low ridge known as 'Spioenkop', in the vicinity of Swartwater farm. The men responsible for checking the British advance were part of Col Lynch's section of the Irish Brigade that had joined forces with the Boers. They were covering the Boer retreat and managed to delay Dundonald's advance. After some time Col Lynch's men fired the veld, retired under cover of the smoke, and the pursuit was resumed. Some 12 or 13 km further on, Col Lynch delayed their advance once again at Blesboklaagte, further impeding Dundonald, whilst enabling the baggage-laden Burghers to make good their escape. On this occasion, the Boers used two or three guns, which they fired from the ridge alongside the Blesbok Kop. Once again A Battery was brought into action, while the long line of mounted troops was extended still further, seeking to locate and penetrate the Boer flanks. At this time, after 17h00, with the light failing fast, the Boers withdrew their guns and joined the Commandos in the retreat past Dundee. Lord Dundonald, aggrieved that he had been unable to exploit fully the Boer retreat, withdrew his grimy men back to camp, which had been established near Beith.
The supply and transport which, it will be recalled, had been left behind at the Wasbank River with the Scottish Rifles, then ascended the Biggarsberg via van Tondersnek Pass and joined Lord Dundonald's camp.
On the night of 13 May 1900, the entire Boer line of defence along the Biggarsberg received orders to retire and, during Lord Dundonald's pursuit of 14 May, every laager was disbanded. The withdrawal of the Boers was unchecked and undisciplined, eventually becoming a rout; they used whatever means of transport they could seize, and their retreat was signalled by a huge pall of dust in the direction of Newcastle.
BULLER'S SUCCESS: SKIRMISHES IN THE WAKE OF THE BRITISH ADVANCE
At 08h00 on 15 May Buller resumed his advance and entered Dundee without
opposition. On 16 May the infantry arrived there and the cavalry proceeded
as far as Clencoe. Meanwhile, Gen Hildyard advanced simultaneously with
Gen Wynne's 11th Brigade via Wesselsnek to Wasbank, which was reached on
16 May. Buller's success was undeniable. However, the Times History (4)
conjectures that this success would have eluded his grasp had he hesitated
on 13 May at Vermaakskraal and repeated the procrastinating tactics which
had characterized Buller's approach at Colenso, Spioenkop and Vaalkrans.
On 17 May Gen Buller resumed his advance via Dannhauser. The graves of three mounted men on the outskirts of the town bear witness to the fact that resistance continued to be offered by some Boer rearguard. He was still further hampered by the fact that virtually every bridge and culvert had been destroyed and on the farm 'Ardrossan' a locomotive had been derailed. Advance parties informed Buller that Newcastle was unoccupied and that the remainder of the Boers were retreating across the Drakensberg.
Gen Hildyard concentrated those elements of his division which had not spearheaded the advance at Wasbank and then continued his advance, reaching Glencoe on 18 May, continuing as far as Hattinghspruit, a settlement approximately midway between Dundee and Dannhauser. On 18 May Buller arrived in Newcastle and on the 19th advanced still further, together with Dundonald, pushing on as far as Laing's Nek. There he discovered that the Boers had crossed the Nek between 16 and 17 May. Whilst some reports state that they had left it unoccupied, Pte F G Tucker mentions in his diary that on 28 May his Regiment (1st Rifle Brigade) was shelled from the vicinity of Majuba whilst it was stationed on Inkwelo Mountain.
It would appear that, after they had crossed Laing's Nek, the Burghers had divided their forces, some rejoining Gen Louis Botha's force which, to reiterate, had set off prior to the action at Helpmekaar to oppose Lord Roberts' advance. Of the remainder, many dispersed with some returning to their home districts to participate in local operations; whilst others actually returned to the elaborate system of trenches at Laing's Nek (possibly confirming Pte Tucker's diary entry), forcing Lord Dundonald to withdraw from the vicinity due to the strategically dangerous and possibly even numerically superior concentration of the Boers. Gen Meyer left Natal to take up his position as Commandant of Pretoria and was succeeded by Gen Erasmus as commander of the Natal forces.
Gen Lyttelton remained at the Sundays River until 23 May, when he was ordered to advance with his Division to Newcastle.
On 16 May Col Bethune was ordered to pursue some Boers who were reported making their way towards Nqutu. Finding none there, Col Bethune's column commenced in the direction of Blood River and thence towards Vryheid. On 20 May a squadron under Capt W E D Goff, in the act of reconnoitering in advance of the main party of Mounted Infantry, was ambushed at Scheepersnek, some 10km distant from Vryheid on the Dundee Road. Despite orders to the contrary, Capt Goff galloped far ahead of his supports and, upon entering the nek, was fired on from the vicinity of two farmhouses to the west and from the high ground to the east, both at very close range. A short, sharp engagement followed resulting in the deaths of Capt Goff (3rd Dragoon Guards), Lt Lanham (Bethune's Mounted Infantry) and Lt McLachlan (Bethune's Mounted Infantry). Capt the Earl de la Warr and Lt de la Salle were wounded. There is some discrepancy in the various accounts of the other British casualties. According to Col Bethune, 18 NCOs and men were killed, 23 wounded, 9 taken prisoner and 9 prisoners wounded. The Times History states that, in addi tion to three officers killed, 30 men were killed, 30 wounded and six taken prisoner.(6) In addition to these specific casualties others were reported missing, including Lt (later Capt) A E Capell. On the monument at Scheepersnek, 31 names appear.(7)
The Boers involved in the Battle of Scheepersnek were members of the Swaziland Police, commanded by Commandant Koot Opperman. According to the Rev E C Andersen, in his memoirs, Die Verlede Herleef (The Past Re-lived), he had ridden out to Scheepersnek and was holding a church service for the Boers there when a sentry shouted from a ridge that the English were almost upon them. The Boers took up positions from whatever protection they could find and stood their ground, the British taking cover behind antheaps. The Rev Andersen comments upon the incredible fact that only one Burgher was killed, he being the popular Cornelis Ferreira from Vryheid.(8)
CONCLUSION
Notes
1. B. Viljoen, My Reminiscences of the Anglo-Boer War, (London, Hood, Douglas and Howard, 1902), p. 130.
Other Sources consulted:
L. Creswicke, South Africa and the Transvaal War, (Edinburgh, T C and E Jack, n.d.), V
A.C. Doyle, The Great Boer War, (London, Smith Elder, 1902), (Struik reprint, 1976).
D. Johnson, The Anglo-Boer War, (London, Jonathan Cape, 1972).
South African War Honours and Awards 1899-1902, (London, Arms and Armour Press, Hayward and Hall, 1971).
J. Symons, Buller's Campaign, (London, Cresset Press, 1963)
J. Stalker, The Natal Carbineers: From 1855 to 1911, (Pietermaritzburg, P Davis and Sons, 1912).
I.A. St C. Whiteford, The History of the Natal Field Artillery, 1862-1942, (Unpublished Hons BA Essay)
The Biggarsberg at the Crossroads of Natal History, (Dundee and Ladysmith Historical Societies). The Button Collection.
The following individuals have greatly assisted me in my research:
Mrs Sheila Henderson, Balbrogie, Wasbank
Mr George Bunting, Dundee
Mr Frans Wessels, Swartwater, Helpmekaar
Return to Journal Index OR Society's Home page