
 The South African
by Major D.D. Hall
Editors’ note: No artillery was used at the Bronkhorstspruit battle on 20 December 1880 but the artillery of both adversaries did play a role in most of the actions that are described hereafter so that it seems advisable at this stage to introduce the subject covered so ably by Major Hall in the following article.
In 1880, there was little up-to-date British artillery available, compared with the recent Zulu War. Artillery reinforcements, which were ordered from England arrived too late for the war. Those guns which were available had to be divided between the main battle front in Natal and the garrisons of the besieged towns in the Transvaal. The British were therefore fored to make use of anything they could lay their hands on.
The Boers had some guns, but none of these were modern. The few modern guns which they had possessed, had been taken over by the British on the annexation of the Transvaal in 1877. So they had to rely on a few old ships guns, and some guns - the Ras guns - which were made for the occasion.
This account outlines the use of artillery in the war in four parts:
Part 1 The British Artillery.
Part 2 The Boer Artillery.
Part 3 The Sieges.
Part 4 The Battles.
N Battery 5th Brigade, Royal Artillery
Known as N/5 Battery, this was a field battery equipped with six 9 pr 8 cwt RML. (Rifled Muzzle
Loading guns. These guns had been brought to South Africa by N/6 Battery for the Zulu War, and
had been used in several battles, including Ulundi. On the departure of N/6 from the country at the
end of the war, the guns were taken over by N/5. This battery had also been engaged in the war, but
equipped with 7 prs.
10th Battery 7th Brigade, Royal Artillery
10/7 was a garrison battery, stationed in the Cape Town area. Garrison batteries normally manned
coast defence guns, but, in South Africa at least, they often found themselves in the field, as did an
element of this one. Stationed in Mauritius in 1879, a half-battery had been sent to South Africa for
the Zulu War. It brought 7 prs to Natal, but was then re-equipped with Gatlings, with which it had
taken part in the Battle of Ulundi.
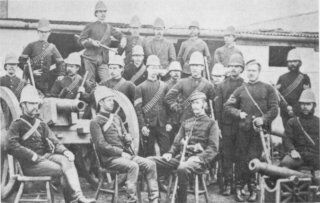
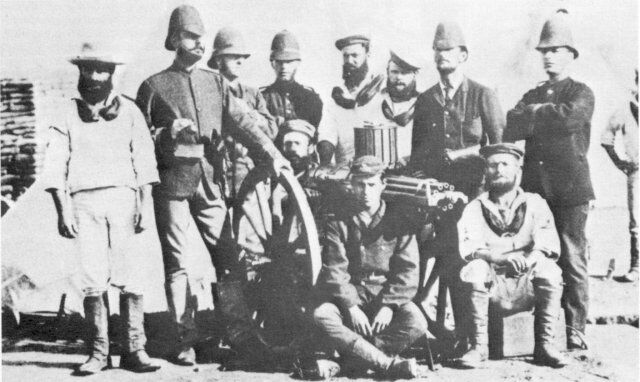
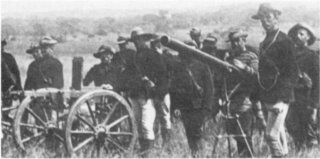
Typical of the men and uniforms
of the time, and some obsolete guns.
This photograph was taken at the
Ordnance Depot, Pretoria. The
small gun on the right, on its very
distinctive carriage, is similar to one
in the S.A. National Cultural History
and Open-Air Museum, Pretoria
and may well be the same one.
By courtesy of Africana Museum, Johannesburg
This meant that two 9prs were in Pretoria, two in Potchefstroom and two in Natal. Maj C. Thornhill, N/5 Battery Commander, was in Potchefstroom throughout hostilities.
Captain Greer, the senior artillery officer in Natal, then drew two more 9 prs from stores. Horses were bought locally, and NCOs and men from 10/7 Battery were sent up from Cape Town to man the guns. A wagon team was transferred to the new section from N/5, with its men, so that they could train the garrison gunners.
Two 7 prs on small mountain carriages were also discovered in stores, but there were no artillerymen to man them. Infantry volunteers were therefore drawn from the 60th Regiment of Foot for this new section. With the guns each drawn by two mules in tandem, and after some training, another section of guns was soon ready for action.
In emergencies such as this, the Royal Navy was always prepared to help and they provided three 24 pr rocket tubes for use with the Army in Natal, and some Gatling guns.
Other guns were acquired wherever possible. The most notable of these were the four 4 pr Krupps, once of Battery Dingaan, and an old Mitrailleuse, which had been acquired in 1877, as mentioned in the Introduction. Old and obsolete muzzle loaders were pressed into service as well.
Most of these last-named guns were in Pretoria. Just as in Natal, ‘temporary’ gunners had to be found to man them. Bandsmen of the 2nd/21st Regiment took over some of them, and the Transvaal Artillery the remainder. This latter consisted of about twenty men under the command of Lt F. Stiemens, who was First Clerk to the Colonial Secretary.
In spite of this unusual mixture of guns and gunners, Major General Sir George Colley, commanding in Natal, was reasonably satisfied with his artillery force. He believed that it would strike fear into the hearts of the enemy. ‘Artillery have a great moral effect on the Dutch’, he said. The Boers themselves were apprehensive.
The deployment of British artillery during the war, was as follows:
| Natal | |
|---|---|
| One section N/5 Battery | Two 9 pr 8 cwt RML |
| One section 10/7 Battery | Two 9 pr 8 cwt RML |
| One section 60th Regiment | Two 7 pr 200 lb RML |
| Naval Brigade | Three 24 pr rocket tubes |
| Two Gatlings | |
| Transvaal | |
|---|---|
| Pretoria | |
| One section N/5 Battery | Two 9 pr 8 cwt RML |
| Band 2nd 21st Regiment | Two 7 pr 200 lb RML |
| Rocket apparatus | |
| Transvaal Artillery | Four 4 pr Krupp RBL |
| One 3 pr Whitworth | |
| One Mitrailleuse | |
| Potchefstroom | |
| One section N/5 Battery | Two 9 pr 8 cwt RML |
| Standerton | Dummy gun |
| Lydenburg | Makeshift gun |
| Wakkerstroom | Ship’s gun |
| Rustenburg | Nil |
| Marabastad | Nil |
Reinforcements were ordered to join the troops in South Africa, and these included two field batteries of The Royal Artillery - C/1 from England, and F/3 from India. The Battle of Majuba took place before they could be used. They got no further than Newcastle.
Some details of the guns used in the war, follow.
9 pr 8cwt RML
In 1871, the 9 pr 8 cwt RML was introduced as the British Army’s field gun. The designation means that
this was a rifled muzzle loading gun weighing 8 cwt (406 kg) and firing a 9 lb (4 kg) shell. The weight of the
gun refers to the gun itself, from muzzle to breech, and does not include the weight of the carriage (trail
and wheels, etc.).
A lighter 9 pr 6 cwt was adopted for use by horse artillery. Later, this lighter gun was accepted for use by field artillery as well. It was the original 8 cwt model which was used in South Africa.
Although it was a muzzle loader, the 9 pr fired an elongated shell, unlike the round shot of earlier muzzle loaders. The 9 pr’s rifling improved accuracy and increased range.
The problem of muzzle loading a shell into a rifled barrel was overcome by a simple but effective means. There were only three rifling grooves. The shell had projecting lugs which engaged in these grooves, causing it to rotate in the barrel on being loaded, and imparting spin on firing. Maximum range was 3 500 yds (3 231 m).
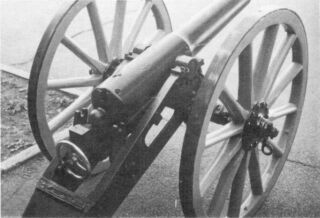
N/5 Battery, Royal Artillery,
was equipped with 9-pr 8 cwt RML
guns, such as this. This particular
gun, restored to its former glory,
is now at the S.A. National Museum
of Military History, Johannesburg
7 pr 200 lb RML
This was a mountain gun, which was introduced into the British service in 1873. As in the case of the 9 pr, it
had three rifling grooves, into which slotted the projecting lugs on the shells. The low mountain carriage
had not been used much in South Africa. The gun was intended to be transported, stripped down, on mules
- but in South Africa there was little mountain warfare, and the gun seldom had to be dismantled.
For South African use, therefore, a Colonial (or Kaffraria) carriage was introduced. This was similar in appearance to that of the 9 pr, but it was lighter. It allowed the gun to be drawn by a team of horses, making it more mobile. It also made it easier to operate in areas where long grass was prevalent. 7 prs on these Colonial carriages were widely used in the Zulu War. Although many must still have been in the country, in this war the small mountain carriage appears to have been used.
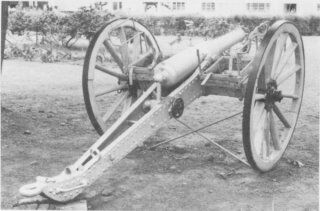
A 7-pr 200lb RML
on its mountain carriage.
On display at S.A. National
Museum of Military History.
4 pr Krupp RBL
In appearance, this gun was similar to the 7 pr mountain gun just described. Shell weight was less, as was the
calibre - approximately 2,2 in (5,7 cm) for the 4 pr Krupp, compared with 3 in (7,62 cm) for the 7 pr.
A major difference was that the Krupp was a rifled breech loader (RBL), and not a rifled muzzle loader (RML), as was the 7 pr. It had a typical Krupp sliding breech block. There were four of these guns. They had been purchased in 1874, and were the guns of Battery Dingaan the Transvaal’s first formed artillery unit. They were used in various campaigns against black tribes, but they were taken over by the British on the annexation of the Transvaal in 1877. Details of performance are not known.
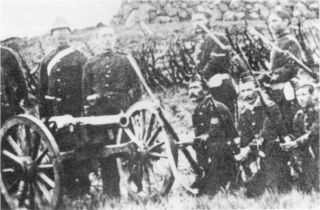
Men of 2/21st Regiment
(Royal Scots Fusiliers) with
a 4-pr Krupp RBL at
Fort Tullichewan, Pretoria.
By courtesy of Africana Museum, Johannesburg
The 7 and 9 prs already described, were Armstrong guns. Sir William Armstrong and Sir Joseph Whitworth were prominent British gun designers, who competed against each other to provide breech loading guns for the British Army in the 1860s.
The 3 pr Whitworth was probably a 200 lb breech loading mountain gun. Guns of this type were used in the American Civil War, and some had been bought by the Orange Free State.
Gatling
The Gatling was an American invention, and could be said to be a multi-barrelled machine gun on an artillery
carriage. At this stage, European armies considered these weapons to be artillery in nature, and they normally
came under Gunner control. This was the case in the British Army as well, and the Zulu War provides an
example of this.
However, the Royal Navy also had its Gatlings. They fired a ,65 in (1,65 cm) bullet compared with the Army’s ,45 in (1,14cm), and the guns themselves were heavier. When Gatlings were issued to the Services, starting in 1874, the Navy also received some ,45 in models. The probability is that these guns, on carriages lighter than those of the Army, were used by the Navy in Natal.
Although Gatlings were susceptible to jamming, they performed well on many occasions. They were used in Peru in 1877, and in battles such as Inyezane, Gingindlovu and Ulundi in the Zulu War. There they had an ideal target Zulus charging in mass at short range. Their greatest success was at Tel-el-Kebir in the Anglo-Egyptian War of 1882, where six Gatlings caused heavy Egyptian casualties. They were not to have the same success against the Boers.
Officers and men of HMS Boadicea
with a Gatling gun in the Zulu War.
The Naval Brigade would have had
Gatling guns similar to this in the
War of 1880-1881.
It was loaded by inserting into the breech, a steel plate with ammunition in each of 25 holes. It was fired by rotating a crank the rounds being fired as fast as the crank was turned, in a single rotation. ‘Mitraille’ means ‘grapeshot’. Rate of fire was 130 rounds per minute, and range was 1 200 yds (1 108 m). The gun on its carriage weighed 1 760 lb (800 kg), and it was towed by a six horse team.
The French did not appreciate that this was really an infantry weapon. They used their Mitrailleuses as an extension of their artillery. This artillery was, in turn, weakened by having batteries of guns replaced by batteries of machine guns, with the limited range and fire-power of such weapons. They suffered severely in the Franco-Prussian War.
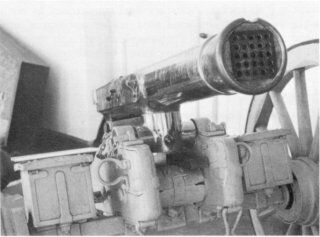
This is the Mitrailleuse
presented to President Burgers in 1874,
and which was in the hands of
Pretoria garrison during the siege.
The 25 barrels can clearly be seen.
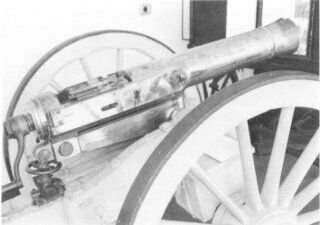
Another view of the Mitrailleuse,
which today stands in the
S.A. National Cultural History
and Open-Air Museum, Pretoria.
Note the heavy, artillery-type carriage,
and the crank handle, which,
on being rotated, fired the gun.
Rockets were erratic in performance, although lucky rounds could cause heavy casualties. They could be fired from either tubes or troughs. Tubes were safer to use on board ship. Sparks and flames from open troughs (like V-shaped drain pipes) could cause damage in the confined space of a ship. There was less chance of this when tubes were used.
This rocket trough has part
of its mounting missing. Troughs
were normally used by the Army,
and tubes by the Navy. This trough
is in the Natal Museum,
Pietermaritzburg. A rocket is
in place in the trough, and a
larger example beneath the trough.
An example of the latter, fired at
Laingsnek on 28 January 1881 and
which failed to explode, is on display
at the S.A. National Museum of
Military History, Johannesburg.
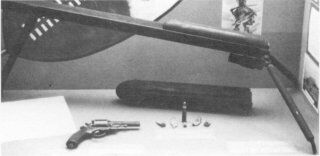
This photograph was taken
before the departure of a column
for Rhodesia many years after
the war of 1880-1881.
On the right is a rocket tube,
similar to those used by the
Naval Brigade in Natal.
On the left is a Nordenfelt machine gun.
By courtesy of Mafeking Museum
There was no standing artillery force until 1874, when President Burgers visited Europe and purchased four 4pr Krupp guns, and formed Battery Dingaan. Their guns were used in such campaigns as the Sekukuni War in 1876. It is reported that in the attack on Johannes’ stronghold on the Spekboom River, two of these Krupps and a rocket tube were used.
On that occasion, the first rocket projectile exploded as it left the tube. The second went 50 m, then turned round like a boomerang. Not surprisingly, the Boers made no use of rockets in the war of 1880-1881.
When in Europe, President Burgers was presented with a Mitrailleuse which had been captured from the French in 1871. As already described in Part 1, the British took over this Mitrailleuse and the Krupps when they annexed the Transvaal.
For their artillery in 1880, the Boers therefore had to make use of the old muzzle loaders which they had collected over the years, none of which could be described as modern in any way. Boer artillery during the war was consequently not very effective, but it did its bit to damage the morale of the besieged garrisons. No guns were used against the British in Natal where the main battles of the war were fought.
An enterprising blacksmith, Marthinus Ras, made his contribution when he constructed his own guns. One blew up when being tested, but two survive to this day.
A summary of the guns used by the Boers, including ‘nil returns’, is as follows:
| Natal | Nil |
|---|---|
| Transvaal | |
| Pretoria | Nil |
| Potchefstroom | ‘Ou Griet’ |
| Standerton | Nil |
| Lydenburg | Two ships’ muzzle loaders |
| Wakkerstroom | Nil |
| Rustenburg | Ras gun |
| Marabastad | Two carronades |
Some details of these guns follow, but not much information is available.
‘Ou Griet’
This is the most famous of the old Boer guns, and consequently has an honoured position in the Voortrekker Museum near Pretoria.
There are conflicting reports about the guns used at Blood River in 1838, but according to Preller, Ou Griet was there. He also says the gun saw service against the British in Durban, or Port Natal, in 1842.
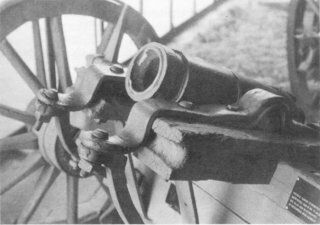
A close-up of 'Ou Griet'
The Ras guns
Marthinus Ras was a blacksmith who lived near Rustenburg. Realising the Boers’ shortage of artillery, he
decided to construct some muzzle loaders himself. He did this, making use of material which was freely
available to him in his work namely, the iron coils which were an integral part of wagon wheels. The guns were
then mounted on gun carriages, which were simply the wheels and axles of wagons.

The two Ras guns which survived the war.
The gun on the left was used against
Rustenburg, and is today in the Museum
at Paul Kruger's House in Pretoria. The other
gun is in the S.A. National Cultural History
and Open-Air Museum, Pretoria.
The guns fired projectiles weighing about 6 1/2 lb (3 kg), and had an effective range of about 600 m.
Ras was murdered by blacks near Derdepoort in 1900. The two surviving guns are now in Pretoria one in the SA National Cultural History and Open Air Museum, and the other at Paul Kruger’s house.
Miscellaneous
Two old ship’s guns were used at Lydenburg, and two more at Marabastad. The latter are reported to have
been carronades. These were short barrelled weapons, which had short range and a powerful destructive
effect. They were intended for use against ships when close alongside. The makers, the Carron Company of
Falkirk, Scotland, also made conventional guns. Whatever the Marabastad guns were, they were handled
effectively, and achieved some success.
Guns
| Weight of | Weight of | MV | |||||
|---|---|---|---|---|---|---|---|
| Gun | gun | Type | Calibre | shell | Ammunition | (ft/sec) | Range |
| 9 pr | 8 cwt (406 kg) | RML | 3 in (7,62 cm) | 9 lb 13 oz (4,5 kg) | Shrapnel | 1 330 (409 m/s) | 3 500 yds (3 231 m) |
| 9 lb 1 oz (4,1 kg) | Common | ||||||
| 9 lb 10 oz (4,4 kg) | Case | ||||||
| 7 pr | 200 lb (91 kg) | RML | 3 in (7,62 cm) | 7 lb 11 oz (3,5 kg) | Shrapnel | 914 (281 m/s) | 3 100 yds (2 862 m) |
| 7 lb 5 oz (3,3 kg) | Common | ||||||
| 12 lb 3 oz (5,5 kg) | Double | ||||||
| 6lb 4oz (2,8 kg) | Case | ||||||
| 4 pr Krupp | — | RBL | 2,2 in (?) (5,7 cm) | 4 lb approx. (1,85 kg) | — | — | — |
| 3 pr Whitworth | 200 lb | RBL | 1,5 in (3,7 cm) | 3 lb approx. (1,4 kg) | — | — | — |
Boer guns: These are not included in this Table because of lack of information. All were obsolete muzzle loaders. Refer to the text for a general description of the guns.
Machine Guns
| Weight of | Number of | Maximum | Effective | Rate of fire | ||
|---|---|---|---|---|---|---|
| Gun | gun and carriage | barrels | Calibre | range | range | (rds/min) |
| Gatling Army | 8 cwt 6 qtr 6 lb (485kg) | 10 | 0,45 in (1,14cm) | 2 400yds (2 215m) | Up to 1 200 yds (1 108m) | 300 to 400 |
| Gatling Naval | 14 cwt 4 qtr 27 lb (775 kg) | 10 | 0,65 in (1,65cm) | — | — | — |
| Mitrailleuse (de Raffye) | 15 cwt 2 qtr 24 lb (800 kg) | 25 | 0,50 in (0,13 cm) |
— |
Up to 1 200 yds (1 108m) | 130 |
Note: Both Naval and Army Gatlings are detailed for comparative purposes. The probability is that the Naval Brigade had the ,45 in Gatling on a small and light carriage.
Rockets
| Troughs | |||
|---|---|---|---|
| Type | Maximum elevation | Range at 15° | Weight of trough |
| 9 pr | 15° | 1371 to 2228 yds (1265 to 2057 m) | 27 lb (12,3 kg) |
| 24 pr | 25° | 1546 to 2226 yds (1427 to 2055 m) | 64 lb 12 oz (29,4 kg) |
Note the large zone in which rockets fired at 15° elevation could fall. Army rockets were normally 9 prs.
Tubes
Tube details are not known, but will have been about the same as for troughs. The Naval Brigade in Natal had
24 pr rocket tubes.
Pretoria
The Pretoria garrison had the strongest artillery element of all the besieged forces. With two 9 prs, two 7
prs, the four Krupp 4 prs, the Mitrailleuse, a 3 pr Whitworth, and rocket equipment, its artillery was quite
impressive.
Just before the siege started, Maj Thornhill, Battery Commander of N/5, left at the head of a column which included a two gun section of his battery, for Potchefstroom. The remaining section was commanded by Lt E.C. Hare, who became the senior artillery officer in Pretoria.
The Krupp and Whitworth guns were manned by the Transvaal Artillery under Lt F. Stiemens. The Krupps were deployed in each of four forts sited to defend the British camp. These were Fort Tullichewan, Fort Commeline, Fort Royal and the Jail Laager (or Convent Redoubt).
Bandsmen of the 2/21st Regiment (Royal Scots Fusiliers) manned the two 7 prs. These guns, and other artillery equipment, were deployed in the various forts and camps constituting the defences of Pretoria. Not all of this artillery was used during the siege. There is no record, for instance, of the use of the Mitrailleuse. The Boers had no artillery outside Pretoria.
The garrison maintained an active defence, An early example was the reconnaissance and skirmish on 29th December, 1880. A British force of 330 mounted men and infantry was accompanied by two 7 prs. The guns were fired, but at extreme range, and without much success. However, some shells landed near a cattle laager, and these forced the Boers to remove their oxen. The intention of the British commander was to keep the Boers at a distance, so preventing them from interfering with grazing livestock, and causing alarm or annoyance to the civil inhabitants of Pretoria.
Foraging expeditions were carried out, and these were normally supported by a 7 pr. This would be carried on a cart or wagon, and would then be mounted on a koppie, on which the working parties could retire if under pressure.
On 6th January, 1881, a force left Pretoria to attack a Boer wagon laager at Zwartkoppie, 20 km (12 miles) to the east. A 9 pr accompanied the force. It engaged the laager with shrapnel in support of a successful attack.
Two 9 prs, a 7 pr and the rocket equipment, were in action ten days later on 16th January, in a reconnaissance in force at Elandsfontein Farm. In a spirited engagement, the guns did not have a good day. According to Bellairs ‘...the artillery practice throughout the day had been bad; and Lt-Col Gildea afterwards reported that “had it been what it ought to have been, he would have had possession of the ridge before the enemy’s reinforcements arrived.”’
As the column withdrew, the two 9 prs, working closely with Nourse’s Horse, ‘leapfrogged’ back, one gun always in action to support the other, so keeping the Boers at bay. This part of the action was handled very well. As the withdrawal was being completed, it was thought that the garrison was about to be attacked from another flank. To prevent this, the Krupp 4 prs opened fire for the first time, and a shell from the gun at Fort Royal landed among a party of Boers, causing their retirement.
The 9 prs, a Krupp 4 pr and a rocket trough were in action again on 12th February, when an attack was made on the Red House Laager, 14 km (9 miles) to the south.
At the end of the siege, Col W. Bellairs, commanding the Pretoria garrison, had this to say about the artillery in his despatch dated 3 1st March, 1881: ‘The division of guns N/S RA, under Lt E.C. Hare, has rendered effective service; as also have the two 7 prs worked by the Band of the 2/21st Foot, and the Krupp and Whitworth guns under the Transvaal Artillery.’
Potchefstroom
Unlike Pretoria, where the Boers had no artillery, they were able to use a gun against the defenders of the fort
at Potchefstroom. This gun was ‘Ou Griet’. As the British had two 9 prs, the stage was set for an interesting
artillery confrontation.
In the Boer attack on New Year’s Day, ‘Ou Griet’ fired 20 rounds. Its 5 lb (2,3 kg) shot penetrated the fort’s parapet. It was eventually silenced by return fire from the 9 prs.
This 9 pr section was commanded by Lt H.M.L. Rundle RA. He had been mentioned in despatches for his work with the Gatlings at Ulundi. Later, as Lieutenant-General, he was to command the 8th Division during the Second Anglo-Boer War.
On 3rd January, 1881, ‘Ou Griet’ was in action again at 500 m, firing at the building which was being used as the magazine. The 9 prs eventually silenced it. Actions of this sort continued throughout the siege, but ‘Ou Griet’ was not silenced permanently.
At about 500 m range, ‘Ou Griet’ fired at the fort almost daily through the later stages of the siege. It was kept behind a house which was filled with sacks of earth, which gave complete protection from British artillery fire. After being loaded, ‘Ou Griet’ would be run from behind cover, fired, and then returned to safety. Thick bushes on both sides of the house made it difficult to follow the gun’s moves. Little damage was caused to the British, although on one occasion, one man was killed and one wounded.
On another occasion, in March, a trench was constructed with an emplacement for the gun, in rear of the fort. 83 rounds were fired on one day. On another 52, but with little effect. The British 9 prs returned this fire to the best of their ability. In addition, they supported skirmishes by the garrison outside the perimeter.
The Gunners played a full part in all aspects of siege life. When the water supply ran out on 19th December. a reward was offered to the first party to locate a fresh supply. There was much joy and relief when the RA party struck water at 9 ft (3 m).
When two men were wounded in a gallant charge on a Boer position on 22nd January, Drivers Gibson and Martin carried in one man under heavy fire; and then Gibson, with another Driver Pede, carried in the second man.
The garrison surrendered on 21st March, 1881, at the end of a siege which had lasted 3 months and 5 days.
Standerton
There was no artillery available to either side at Standerton. To discourage the Boers from coming too close,
the British commander, Maj WE. Montagu,. ordered the construction of a dummy gun. This was made from
wood and was mounted on wagon wheels. To ‘fire’ it, four rifles were fired simultaneously from just beneath
the barrel. This had the desired effect of driving away the Boers.
Lydenburg
The leadership of the garrison commander, and the morale of the defenders of Lydenburg, left much to be
desired. This situation was not improved when the Boers produced two ships’ guns, with which they
proceeded to engage the fort.
The guns were used regularly, but as time passed, the spirit of the defenders improved. Raids were made on the enemy, and a gun was made to counter those of the Boers. This was the gun described by Lehmann as being made out of ‘the monkey of an Abyssinian pump.’ Supported by the fire of sharpshooters, it forced the withdrawal of the Boer guns.
Wakkerstroom
The British had the only gun at Wakkerstroom. It was an old ship’s gun, mounted on the body of a water cart.
It was placed in front of the door of the church, in which the garrison was holding out. The purpose of
the gun was to frighten the Boers by its mere presence.
The Boers did not press this siege closely, but care should be taken not to give too much credit for this to the gun.
Rustenburg
Rustenburg’s claim to fame in the artillery story of the war, was the use there of the Ras guns. One of these
was used at 2 000 yds (1 846 m) at 06h00 on 8th January 1881. It was then moved forward to 800 yds (738 m).
45 rounds were fired from these positions. At 11h00, it came to 600 yds (554 m), but was then silenced.
It is not clear if this was because of British action, as they claim to have silenced the gun; or because of an accident at the gun. It was more probably the latter, as the breech of the first gun was blown out, and this may have been the occasion. Whatever happened, a Ras gun reappeared on 3rd March. It fired 6 rounds at the fort. On the 9th, 30 rounds were fired, and then 13 more on the 12th.
There are no reports of the use of artillery by the British.
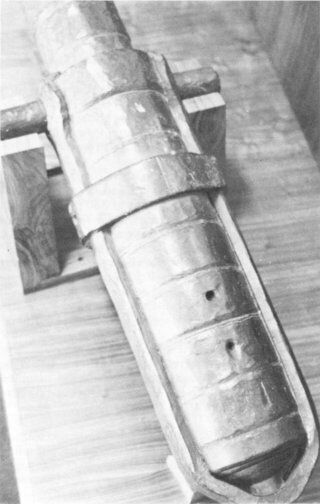
Ras gun - breech
Round shot ammunition was made from beaten iron from the Eersteling Gold Mining Company. The guns were obsolete, and the ammunition ‘home made’, but the guns performed well. They were reasonably accurate, and they were handled skilfully. Concealment was good, and it was not possible to silence them.
A Sergeant Major was mortally wounded by a round shot on the first day the guns were used. Thereafter, a look-out gave a warning blast on a railway whistle when smoke showed that a gun had fired, and everyone immediately took cover. This procedure effectively prevented any more serious casualties.
There was no British artillery in Marabastad.
Laingsnek
The two 9 prs of N/S Battery opened proceedings half an hour before the infantry attack, by firing on the
Boer positions on the Nek. Using the Watkin rangefinder, the range was calculated at 2 350 yds (2 169 m),
and fire was opened at this range. This rangefinder had only just come into service, and the men were not
expert in its use. The range was incorrect, and all the shells disappeared over the ridge. Range had to be
reduced to 1 900 yds (1 754 m) before rounds landed on the Boer position.
The rocket tubes of the Naval Brigade then moved forward to 1 200 yds (1 108 m) with a company of the 60th Rifles. They engaged the enemy, and the Boer reserves and horses behind the main position.
The attack of the 58th Regiment was supported by the four 9 prs of the N/ 5 and 10/7 detachments, and the 7 prs of the 60th. Their fire compelled the Boers to withdraw to the rear edge of the plateau. There they were secure from the shrapnel, even though their field of fire was limited. In addition, the Boers had constructed defensive works, and in these they were relatively safe from the British artillery fire. The result was that when the attack of the 58th came, the Boer riflemen were well able to deal with it. During this action, the rockets covered the left flank of the force.
The artillery covered the withdrawal, firing at ranges from 1 200 yds (1 108 m) to 2 200 yds (2 031 m).
In his despatch, Gen Colley wrote: ‘The artillery was well served, though from the nature of the ground, and the cover it afforded the Boers, the fire was not very effective. Much credit is due to Captain Greer and Lieutenant Parsons for the efficiency of my artillery forces, seeing that there were originally only two guns properly manned and equipped in this country, the other four having been equipped and horsed locally, and manned partly from a garrison brigade, and partly by volunteers from the 60th Rifles. The Naval Brigade threw their rockets well, and covered the left flank of the force in action.
Schuinshoogte
The 7 pr section of the 60th, and the 9 pr section of N/5, accompanied the force, which, under Gen Colley,
marched off to Newcastle. At the Ingogo River, the 7 prs were left on the Mount Prospect side, in action on
high ground overlooking the river.
When the main force came under fire, the two 9 prs were galloped into action, and opened fire with shrapnel at 1 200 yds (1 108 m). Capt Greer, commanding the artillery in Natal, was killed as he supervised the boring of fuzes at the trail of one of the guns. As the Boers came closer, the guns fired case shot, and when that was exhausted, reversed shrapnel, which had very nearly the same effect.
By this time, most of the gunners had been hit, but the Boers were unable to rush the guns, thanks to the assistance of the infantry. From their position across the river, the 7 prs engaged the enemy in support of the main force which was now in some difficulty.
When orders were given for the withdrawal of the 9 prs, there were not sufficient men to limber up. Gunners and infantrymen manned the wheels, and the guns were moved back to a position from which they could engage the Boers approaching from the Laingsnek direction.
The section commander, Lt C.S.B. Parsons, was then hit, and Sergeant-Major Toole took command. Using riding horses to make up the gun teams, the guns were then brought out of action, although wagons and ammunition had to be left behind. The ammunition was rendered useless by burning the cartridges and burying the fuzes.
Casualties were 16 out of 27 men, and 14 horses. In his despatch, Gen Colley said: ‘The conduct of the men of the Royal Artillery well sustained the reputation of that corps.’
Majuba
There was no artillery participation in this, the most decisive battle of the war. It is not the pttrpose of this
article to discuss the battle. It is necessary, though, to comment on some of the suggestions regarding the
possible use of artillery in the battle. Most common of these are that artillery should have been taken to the
summit, or that the fire of artillery below the feature should have been controlled by those on the summit.
Colley had with his force 9 prs, 7 prs, rocket tubes and Gatlings. Could any of these have been taken to the summit?
The 9 prs and Gatlings could not have been taken up, because of their size and weight. Even if it had been possible, the value of the 9 prs’ fire from the top would have been questionable. Fire could not have been brought to bear on all the Boer laagers as most were out of range. With only four 9 prs available to the whole force, there would have been little potnt in isolating one or more on the summit. It was possible that the Mount Prospect camp would come under attack, and guns would have been needed for its defence.
The Gatlings also, on their relatively heavy carriages, could not have been taken to the top. Certainly, the route the British took was quite impossible for heavy equipment such as the 9 pr and the Gatling.
It is also important to remember that, had guns been taken up Majuba, much ammunition would have had to be carried up as well. In many ways, this would have been as much of a problem as the guns. Many porters would have been required for this job, and it is doubtful that sufficient men could have been spared for this.
Perhaps the easiest equipment to have carried up would have been the rocket tubes - but rockets were not highly regarded, and they were probably not given a moment’s thought in this connection.
The 7 prs were the most likely candidates for this move. They were mountain guns after all, and intended for this very situation. But these particular guns were manned by infantrymen, and no one in the force was versed in their use in this role. The mules were not trained, and probably in insufficient number as well, as more were required for pack use, than were required to tow the guns. It is unlikely that the necessary saddles and pack equipment were available.
So, if the taking of artillery up Majuba was not possible, could artillery fire have been controlled from the summit? Observers so placed would have had an excellent view of the countryside, and of Boer movements in the vicinity.
Most who make this suggestion are thinking in terms of the present day. Nowadays, there certainly would have been an artillery observer with the infantry on Majuba, prepared to control the fire of his guns below. But, in 1881, this capability did not exist. In those days, there were no methods of communication, or drills, practised and in readiness for this situation. The sending of messages over a distance was obviously a common occurrence, but not the sending of fire orders, and the control of guns, from a distance - and this was still the case in 1899. It was only in this later war that procedures were evolved to cover the situation where the guns fired from behind cover, and only the observer could see the target.
Even if there had been a drill to control fire from Majuba, the guns would have had to move forward from Mount Prospect, as they were well out of range of the Boer positions at Laingsnek. In other words a general move forward of the main force would have been necessary. As stated earlier, this article will not speculate on what Gen Colley’s plan (if any) was, or should have been.
In the event, the guns of N/5 accompanied the force to the foot of the hill. When it was seen that it was quite impossible to get them to the top, they were sent back to camp. On the morning of the 27th, they checked Boer attempts to cut off the retreat of the companies left on Inkwelo and the lower slopes of Majuba, and the survivors of the battle itself.
Conclusion
Although neither British nor Boer artillery can claim to have played a decisive part in the war, the artillery
story is nevertheless interesting. Gunners on both sides performed well, and using their ingenuity to the full,
made the best use of the equipment and opportunities offered them.
Bibliography:
Return to Journal Index OR Society's Home page
South African Military History Society / scribe@samilitaryhistory.org