
 The South African
By Major D.D. Hall
The object of this article is to describe the squares of ‘the small wars’ - the colonial wars of the second half of the 19th century. These were not purely static, defensive squares. They could be used on the march, but naturally, they were static under attack.
Their use involved a combination of the strategic offensive and the tactical defensive. There were rules for their use, and these are of interest when studying the Zulu War, and in particular the Battle of Ulundi.
In Napoleonic days, the square was an infantry formation. Guns were placed between squares, and cavalry was deployed to the flanks, or rear, to move through or around a line of squares as the situation required. Supplies and wagons were to the rear.
The square was used against cavalry, which could rapidly swirl right around a square. Against an infantry attack, infantry were deployed in line so that the maximum firepower could be brought to bear.
In the small wars of the late 19th century, squares were used when the enemy was in superior numbers and exercised great mobility. The Dervishes of the Sudan, and the Zulus in South Africa, had both these characteristics. Supplies and wagons were inside the squares, and guns were placed along the sides or at the corners. Even the cavalry was sometimes inside.
Enemies such as the Zulus were regarded as cavalry. Their mobility and numbers were such that supply trains could not be considered as safe, even if well in rear. So the small wars’ square had to be big enough to enclose defenceless and vulnerable wagons, ambulances and the like, within the square. But there were dangers in having too much of this to protect as will be explained later.
If the ground permitted, one square was better than two. With the same number of troops, one square enclosed twice the area enclosed in two squares. However, with two (or more) squares, one square could give some support to its mate(s). If one square was broken, a second might survive. Two squares were more manoeuvrable than one.
Nevertheless, there were some other disadvantages with two squares. As an enemy would seldom attack two squares at once, more firepower was achieved if only one square was in use. Also, with two squares, one could mask the fire of the other. If too far apart, each square could be dealt with in detail. A square was vulnerable if the enemy had modern weapons, as troops stood out in the open. This problem was not often encountered in small wars.

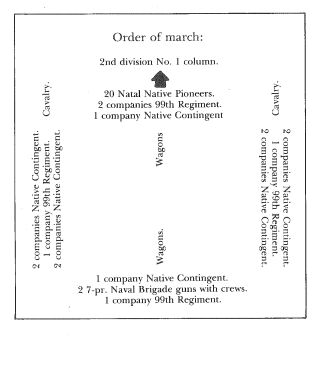
In rigid square formation, combatant troops were formed up practically shoulder to shoulder, four deep, along the outer faces. As already stated, wagons, ambulances and non-combatants were inside the square.
A square could be moved into enemy-held territory if the ground was suitable, as it was also a defensive formation, that invited attack. An attack being imminent, the square would be halted and all would turn outwards to resist the enemy. Alternatively, troops would move in normal march formation, ready to form line along the square faces as required.
The movement of the square was not easy, as gaps were quick to appear. The leading face was often required to stop to allow the remainder to close up. Slow-moving wagons in the centre were inclined to lag behind, causing the rear face to bulge outwards. Dervishes in the Sudan were quick to exploit this weakness, and squares were broken by attacks in this quarter.
Skirmishers were sometimes posted outside the square, but this was dangerous. When an enemy attacked, the skirmishers screened the fire of the square until they were safely back inside it; and sometimes the enemy reached the square before they did.
Cavalry were normally kept outside the square. This enabled them to reconnoitre effectively, and their mobility made them a better screen than skirmishers. When one of the two squares was broken at Tamai in the Sudan, the dismounted fire of cavalry was useful in that it took the enemy in flank, and took the pressure off the remaining square. Cavalry inside a square were an encumbrance.
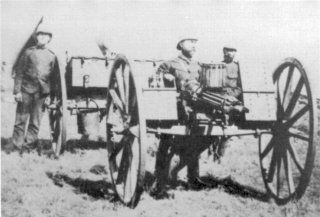
Guns, when limbered up and on the move, were defenceless, so there was no point in their travelling outside the square. Guns were vulnerable when coming into action, and, if outside, they screened the fire of the infantry, so they normally moved inside the square. Once unlimbered, they were manhandled into the firing line.
Guns and machine guns (or Gatlings) were normally posted in pairs at the corners of the square. Corners were vulnerable and often came under attack. Guns placed at the corners could fire down either of two faces of the square. They were in pairs so that if one gun were put out of action, the other could continue to bring fire to bear upon the enemy. This particularly applied to the Gatlings, as they were liable to jam.
Artillery was sometimes kept in battery within the square, and only run out when required. Wherever the guns were, they could always be moved to a threatened part of the square. At Ulundi, two guns of N/6 Battery were moved from the left rear to the left forward corner of the square during the battle.
To ensure that corners were safeguarded, boundaries between infantry units were not normally at the corners. A unit’s responsibility would extend either side of a corner. Even an unsophisticated enemy realised that a corner was weak as little fire could be brought to bear at that point. In spite of all this, at Ulundi only the left rear corner complied with this rule.
If a square were breached, a good defensive position suddenly became a very poor one. Intact faces could not fire into enemy within the square, as they would hit each other. A safeguard was to have a reserve within the square, or several reserves, one at each corner, However, at Shekan in the Sudan in 1883, an enemy force was expelled by the front face turning about and driving the enemy out.
This was the force commanded by Hicks Pasha, which was annihilated the following day with the loss of about ten thousand men killed. One reason for this disaster was that the three squares were filled with an enormous mass of transport carrying fifty days’ supplies.
Hicks Pasha had moved into inhospitable desert with little water. Wells had been destroyed behind him, and he had no means of retreat or possibility of escape - and morale was low. When attacked by an overwhelming force, the squares were broken and there was chaos, largely caused by the large mass of non-combatants in the supply columns within the squares.
The correct action was to establish a laager to hold and protect as much of the non-combatant supply element as possible. The fighting forces would then move forward in square formation with the minimum number of wagons to protect. This procedure was followed in the Ulundi campaign. It must be stated that Hicks Pasha had moved too far into the desert to follow this course.
With a square on the move, when night came, it was necessary to bivouac. The square was converted into a laager, or zeriba for those in the Sudan. This was similar to a laager, except that mimosa bushes and scrub were used to fortify the sides. Laagers were typical of South Africa and North America, where wagons provided the main protection for parties moving across wide open spaces. Additional protection was provided by the digging of trenches outside the circle of wagons.
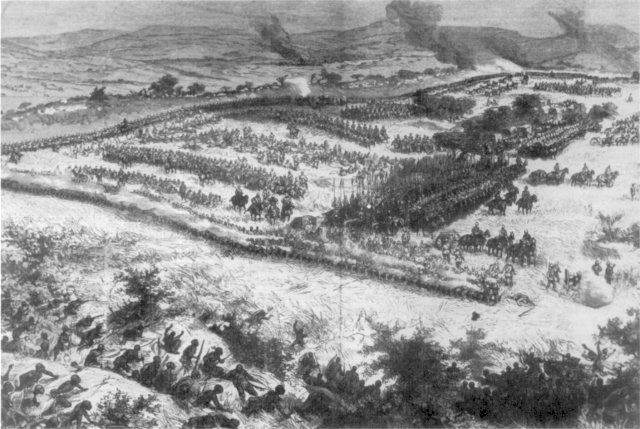
At Isandlwana, none of these rules was followed. The move to Ulundi followed ‘the book’ in every respect. A laager was left on the White Umfolosi, and the square that moved forward across the Ulundi plain contained the minimum number of non-combatants.
The same can be said of the advance to the relief of Eshowe. Laagers were formed at each overnight stop. When the Zulus attacked in the Battle of Gingindlovu, the troops were still in their laager and fought the battle from there.

There is no doubt that Gingindlovu and Ulundi provided the best examples of the correct tactics to follow in small wars such as the Zulu War. Strict adherence to the rules, with well-disciplined troops to carry them out, made victory inevitable.
Return to Journal Index OR Society's Home page
South African Military History Society / scribe@samilitaryhistory.org