
 The South African
This is the plain unvarnished story of the wanderings of the 5th SAMR over 700†miles of desolate country, practically devoid of natural water and grazing. It is something to have had such an experience, but it was hard; hard for man and beast. We can afford to feel proud of it now, but there was little to feel proud of in the daily fights against blinding sand and dust, suffering the tortures of thirst, knowing that somewhere near us was an elusive enemy who might make a dramatic appearance at any moment and give us a taste of lead.1
Contents
Introduction
Assembly of the Eastern Force
The 5th South African Mounted Rifles (SAMR)
The 9th Bechuanaland Mounted Rifles (BMR)
From Kimberley to Kuruman
The Kalahari Horse
Cullinanís Horse
Appraisal
Preparations at Kuruman
Logistical Arrangements
Animal Transport
Water
Mechanical Transport
Communication
Medical
Crossing the Thirst Belt
An Enemy Raid into Union Territory
From Witdraai to the Border
In Enemy Territory: From the Border to Gross Aub
The Raid on KoŽs
A Strike at the Railway Line
The Taking of Kiriis West
The Joining of Forces
From Kiriis West to Daweb
The Battle of Kabus
The Final March to Gaberas
Cullinanís Horse
Dissolution of the Eastern Force
Reflection
About Colonel Berrangť
Acknowledgements
References
Appendix - Coordinates of Locations Mentioned in Text
It is well known that South Africa declared war on Germany in September 1914; that it agreed to a request from England to wrest two powerful radio transmitters in South-West Africa from enemy control; that it mobilised the Northern, Central, Southern and Eastern Forces to do so; and that South-West Africa came under South African control at the surrender of the German forces on 9 July 1915. Whilst numerous authors had covered the activities of the first three forces in great detail, the activities of the small Eastern Force, nicknamed ďBerrangťís TrekĒ, are much more difficult to trace. As early as 1919, a member of the Eastern Force wrote in frustration:2
Contemporary accounts acknowledged the achievements of Berrangťís Trek with glowing reports:
A more recent historian regards Berrangťís Trek as an achievement comparable with the famous ride of General JCG Kemp and his rebel commando across the southern Kalahari a few months earlier:7
The Eastern Force was one of four forces of the South African Expeditionary Force to participate in the South-West African campaign. The Northern Force, eventually under the command of General Louis Botha, landed at Walvis Bay and worked their way towards Windhoek; the Central Force under Brigadier-General Duncan Mackenzie landed at LŁderitz and proceeded along the railway line towards Keetmanshoop; the Southern Force under Colonel Jaapvan Deventer had Upington as base and pushed towards Keetmanshoop via Karasburg (earlier Kalkfontein); and the Eastern Force under Colonel Berrangť was despatched from Kimberley via Kuruman over the Kalahari desert to approach Keetmanshoop from the east. Figure 1 indicates the general route followed by the Eastern Force.
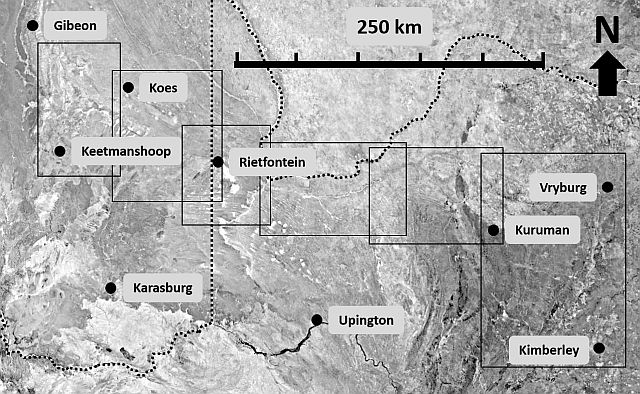
Figure 1. General route of the Eastern Force,
showing the areas to be covered in detail maps following.
The Eastern Force was considerably smaller than the other, with different estimates of its size. Modern authors such as LíAnge and Strachan provide numbers from ďmore than 2000Ē9 and 300010, while a transport officer in 1915 reported ďabout 3000 of all ranksĒ11 These estimates bracket the official troop count on 15 March 1915 shown in Table 1.
| Force | Artillery | Mounted | Infantry | Administrative | Total |
|---|---|---|---|---|---|
| Northern | 741 | 12 773 | 5 864 | 1 491 | 20 869 |
| Central | 575 | 3 858 | 5 583 | 855 | 10 871 |
| Southern | 117 | 8 438 | - | 631 | 9 186 |
| Eastern | 40 | 2 016 | - | 420 | 2 476 |
| Total | 1 473 | 27 085 | 11 447 | 3 397 | 43 402 |
The order to mobilise the Eastern Force came on 4 January 1915, after the Northern, Central and Southern Forces had already been placed in the field.13 This made it ďextremely difficultĒ to obtain enough suitable troops and equipment.14 The Eastern Force, mainly composed of mounted riflemen, was made up of the 5th South African Mounted Rifles, the 9th Bechuanaland Mounted Rifles; the Kalahari Horse and Cullinanís Horse.
The 5th South African Mounted Rifles (SAMR)
The SAMR was one of two permanent police forces formed on 1 April 1913 after amalgamation of the Cape Mounted Police, Cape Mounted Rifles, Natal Police and the Transvaal Police. It existed alongside the regular South African Police with a peacetime mandate to mainly undertake policing duties in traditional rural areas. It had five regiments throughout South Africa, with the 5th SAMR based in Kimberley.15 It was commanded by Colonel CLA Berrangť, but when the Eastern Force was formed, Berrangť was promoted to be the force commander and Lieutenant-Colonel WW Rush took his place as commander of the 5th SAMR. The 5th SAMR contributed four squadrons to the Eastern Force.
The Kimberley base for the campaign was established on the Kimberley showground, close to the railway station and conveniently serviced by a short branch line, shown in Figure 2. Kimberley was the logical supply point for the campaign as it offered the closest major railway station to the advance base at Kuruman. At the time, there were no other railway lines in the vicinity of the planned line of march of the Eastern Force Ė the present railway line to Kuruman was built later. For this reason, a strong Transport and Remounts section was stationed in Kimberley, commanded by Major CES King with Captain Eastwood second in command Ė see Figure 2. The eventual success of the campaign was in no small measure attributable ďto weeks and months of incessant toil, pushing, fitting out, leasing and despatching convoy after convoy Ė work which can only be appreciated by one who has been and thoroughly understands the heavy working of a large base depotĒ.16
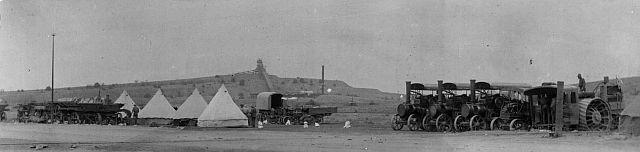
Figure 2. Part of the supply base in Kimberley.
(THL P4374_01)
The 9th Bechuanaland Mounted Rifles (BMR)
The 9th BMR started its recruitment on 5 January 1915 from its base on the Mafeking showground with the objective to raise four squadrons with a total of 650 men all ranks. Its commander was Major BM Cowan. Having done so in about three weeks, B Squadron left on 29 January by train for Kimberley, with Cowanís HQ and A, C and D Squadrons leaving the following day in two different trains. The three trains arrived in Kimberley on 30 January and were shunted into the showground siding. The regiment was assigned a camping spot in the inside of the racecourse.17
For the next three weeks, the regiment was trained and fitted out for the campaign. On 10 February nine cases of measles were reported. This was taken seriously by the authorities Ė by the next day 67 men were interned in an isolation camp. The measles was found to be confined to A and C Squadrons and these men underwent two rounds of inoculation. Other units were ordered to avoid contact with the regiment. The last five fresh cases of measles were reported on 20 February.18
By the middle of February 1915, the 5th SAMR and the 9th BMR were ready to leave Kimberley for Kuruman. BMRD Squadron was despatched first on 12 February to escort 300 remounts required in Kuruman. All squadrons of the SAMR left Kimberley on 19 February and the remaining BMR squadrons on 22 February.19
The route, shown in Figure 3 and 205km in length, was described as one that ďlay over a desolate track, badly watered and with but poor grazingĒ.20 It went northwest from Kimberley up to a spot called ďThe BendĒ on the Vaal River, where there was a hotel. From here the route went downriver to reach the Barkly Bridge at Barkly West, completed in 1885 and the only bridge over the Vaal Riverat the time Ė see Figures 4 and 5. The route continued northwest to the present Delportshoop at the confluence of the Harts and Vaal Rivers. After crossing the Harts River, the route headed directly to Kuruman over the farms Rietfontein, Koopmansfontein, Vierling and Blikfontein.21
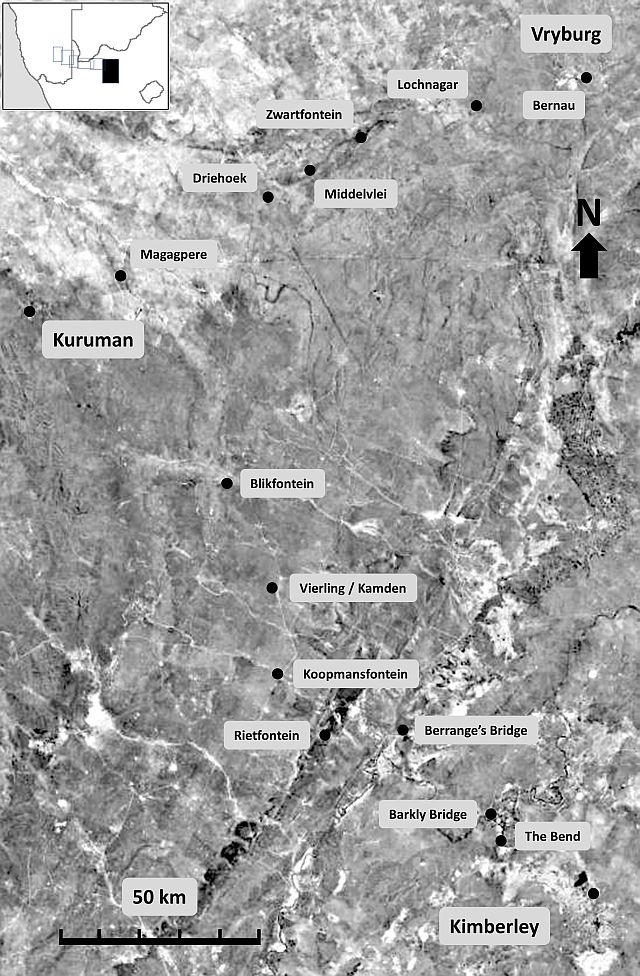
Figure 3. Route map from Vryburg
and Kimberley to Kuruman.
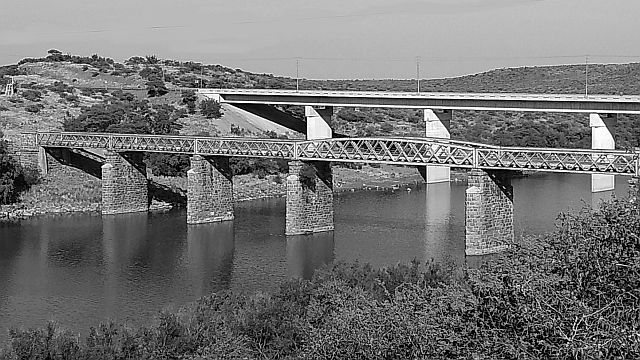
Figure 4. The Barkly Bridge over the Vaal River
at Barkly West in 2019. (Johannes Haarhoff)
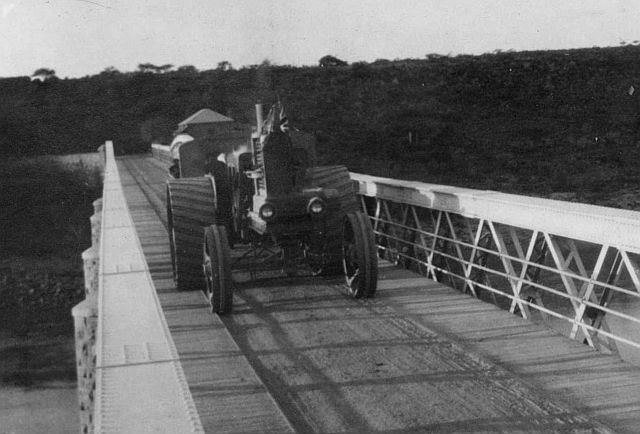
Figure 5. A Marshall tractor crossing the Barkly Bridge.
(THL P4381)
The inland parts of South Africa had unusually good rains from December 1914 to February 1915, causing widespread flooding. At Upington further downstream, for example, the floods stopped the railway engineers building the Prieska-Kalkfontein line from crossing the Orange River for more than three months.22 The SAMR and BMR, on the move at the time, therefore also found the Vaal River in flood at The Bend, which presented a magnificent spectacle; water overflowing almost to the steps of the hotel. The Barkly Bridge further downstream, allowed the troops to cross the Vaal River without a problem. But a further 26km out of Barkly West, they were stopped in their tracks by the Harts River. The high flows in the Vaal and Harts Rivers raised the river levels so much that the men were effectively trapped between the two rivers, as shown in Figure 6. 23
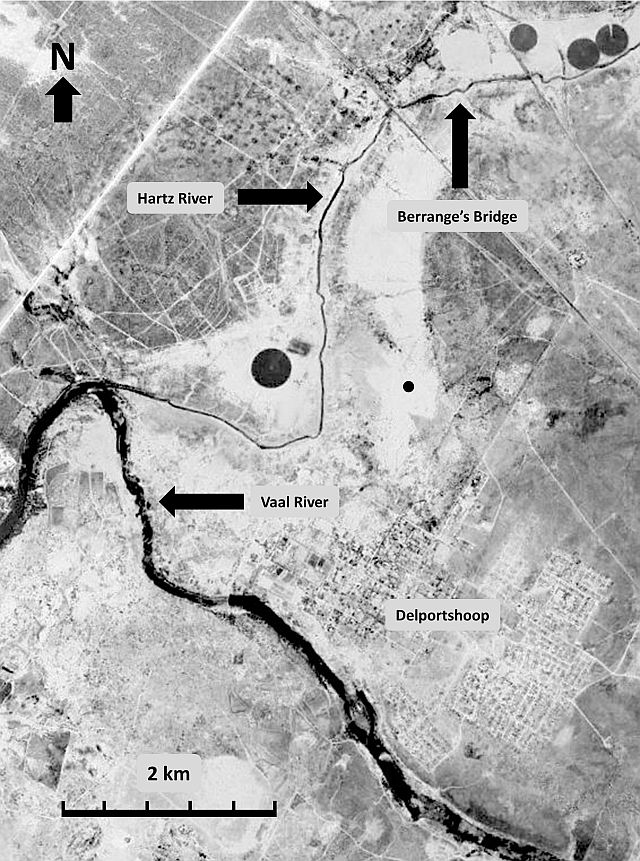
Figure 6. Berrangeís Bridge at the confluence
between the Vaal and Harts Rivers.
The column was held up for two days while looking for a fordable drift, eventually finding one about 5km upstream of the confluence.24 This allowed the column to proceed, but it was obvious that the crossing place would not be able to deal with the continuous heavy traffic of troops and supplies for long. The approaches to the bridge were heavy black turf and drift sand which did not provide a good footing for the animals and trucks entering and leaving the river. When the BMR troops (the last of the troops to leave Kimberley) arrived at the Harts River on 24 February, all their men were employed in fatigue parties to spend a day carting and packing stones to firm up the approaches. The route was extremely busy at the time Ė a total of 57 supply wagons crossed the river on this day alone.25 The improvised crossing quickly acquired the name of ďBerrangťís BridgeĒ, shown in Figures 7 and 8.
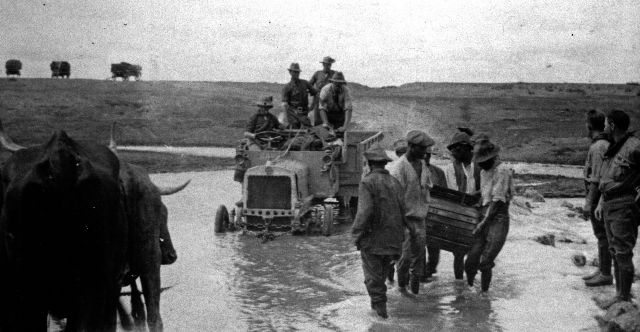
Figure 7. A Halley truck and men crossing Berrangťís Bridge.
(THL P4339)
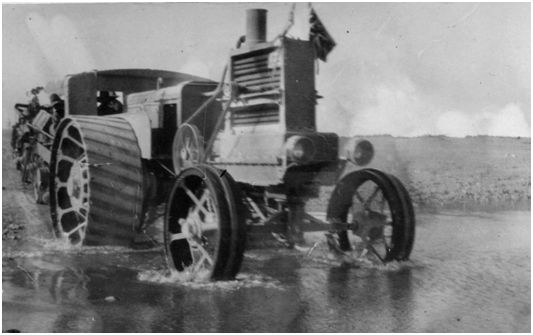
Figure 8. A Marshall tractor crossing Berrangťís Bridge.
(THL P4359_01)
It took the different units seven to nine days to complete the journey from Kimberley to Kuruman. BMR D Squadron arrived in Kuruman around 20 February, the SAMR all squadrons on 25 February and the rest of the BMR on 2 March.26
The Kuruman Commando started as a rebel commando during the Anglo-Boer War, commanded by General Jacobus Albertus van Zyl who operated with distinction in the Western Transvaal during the latter phase of the war. With the new Defence Act of 1912 after Unification, the Kuruman Commando was formally recognised and Van Zyl was put in charge on 1 July 1913. The Kuruman Commando was located in Military District No 12 in the northwest of the Cape Province, under the overall command of Major SG (Manie) Maritz.27 In terms of the new Defence Act, Van Zylís new rank was Lieutenant-Colonel.28 Captain Frylinck was appointed as deputy commander of the Kuruman Commando.
In September 1914, as the Rebellion broke out, the Kuruman Commando was ordered to mobilise a commando of 300 men. Its first action was to engage with General Kempís rebel commando as they travelled through Kuruman on their way to South-West Africa. Kemp narrowly escaped and, once over the border, executed raids into Union territory. As a result, Van Zyl and the Kuruman commando moved into the Lower Orange River region and operated there from December 1914 to February 1915, 600km from their base. The Kuruman commando was driven back at Nous on 23 December but managed to occupy Ramans Drift and Goudou Drift on the Orange River early in 1915, thereby driving the enemy back to Sandfontein where the Union troops suffered a setback in September 1914.29
While the Kuruman commando was operating in the Lower Orange River region, the Eastern Force was formed in January 1915. The Kuruman Commando was simultaneously reorganised and would now be known as the Kalahari Horse, maintaining the leadership of Van Zyl and Frylinck. The Kalahari Horse was asked to contribute six squadrons to the Eastern Force.30
Cullinanís Horse, a unit dating back to the Anglo-Boer War and based in Mafeking, was incorporated with the Eastern Force on 4 January 1915. The regimental commander, Major Arthur William Cullinan, established a base at The Willows in Mafeking and started recruitment and procurement of the necessary supplies. Three squadrons were to be formed. On 19 January the base camp was moved from The Willows to the farm Bernau, about 3km east of town. On 22 February, after seven weeks in Vryburg, the regiment was finally instructed to march to Kuruman, with a warning to avoid contact with the Bechuanaland Mounted Rifles due to the outbreak of measles in that regiment, discussed earlier. 31
Their line of march passed the farms Lochnagar, Middelvlei, Zwartfontein, Driehoek and Magagapere, shown in Figure 3. Halfway through the march, they received orders to divert to Mophephe (earlier Mímupeppe, northwest of Kuruman) due to fresh cases of measles at Kuruman. The following day, the order was rescinded and their destination was set for Kuruman once more. After a march of eight days and 147km, Cullinanís Horse arrived at Kuruman on 2 March.32
The mounted troops of the Eastern Force, discussed above, represented all the different military organisations which had been combined under the Union Defence Force. The Permanent Force was represented by the 5th SAMR; the Active Citizen Force by the 9th Bechuanaland Rifles; the Volunteers by Cullinanís Horse; and the Commandos by the Kalahari Horse.33 There were a multitude of smaller support units Ė medical, veterinary, artillery, machine gun sections, communications, a water section and numerous supply and transport units, which will be mentioned as this narrative develops. It was a largely inexperienced force, with only the 5th SAMR seeing brief and unsuccessful action at the Orange River in September 1914 and the Kalahari Horse operating for three months in the same area with mixed results. There was a great need for specialised training and small groups of the 9th BMR and Cullinanís Horse had to be despatched to Johannesburg during January and February 1915 for machine gun training.
Despite its shortcomings, the Eastern Force was described by a contemporary:34
Berrangťís own impression of his force after the campaign was:35
Kuruman, then and now, is best known for its ďEyeĒ, a perennial 200†litre/second stream of water issuing from cool caverns of dolomite Ė clear as crystal and at even temperature. This stream of water is the origin of the Kuruman River. In 1915 the stream persisted for tens of kilometres before it disappeared into the sand of the riverbed. About 5km from the Eye, on the bank of the Kuruman River at a place called Seodin, Dr Moffat established a mission station in 1824, well known in South African history as the place where the explorer David Livingstone lived and married Mary Moffat, the missionaryís daughter. In Moffatís honour, the London Missionary Society founded the Moffat Institution in 1879, a teaching seminary. It was not successful and was closed in 1897, whereafter the buildings were vacated.36,37 By 1915, three of its buildings were still left, fast deteriorating into ruin through neglect. The empty buildings, spacious grounds and nearby water met all the requirements for a military base. In late 1914, the rebel leader General JCR Kemp passed through Kuruman on his epic trek from the Transvaal to South-West Africa with the Union troops in hot pursuit. After a brief skirmish at Kuruman, a truce was agreed for 48 hours. During this time, Kempís commando camped at the mission station from 8 to 10 November and he was even entertained at the missionaryís home.38
Immediately after the declaration of war in September 1914, preparations were started to move the Bechuanaland Mounted Rifles from their base in Mafeking to Kuruman, presumably to be closer to German South-West Africa, to be more rapidly deployed later in the campaign. Orders were consequently issued on 22 October 1914 to establish a supply base at Kuruman. It fell upon Lieutenant-Colonel JA van Zyl, commander of the Kuruman Commando, to make the practical arrangements for hosting the BMR. The grounds and unused buildings of the Moffat Institution were an obvious choice for a military camp and Van Zyl negotiated successfully with the church authorities to place them at the disposal of the troops.39 The buildings were quickly fixed and the area converted into a military camp, complete with depots for transport and supplies, ordnance stores and a hospital.40 See Figure 9. Later, when it became evident that more units would have to be hosted in Kuruman, a second camp was established. This camp included a supply depot and mechanical workshop with two animal supply depots on the municipal commons.41 The magistrate of Kuruman was instructed to procure some of the supplies required by the military. Starting on 31 October, he purchased used wagons, oxen, donkeys and horses from the local community, leading to an economic boom for the previously impoverished Kuruman.42
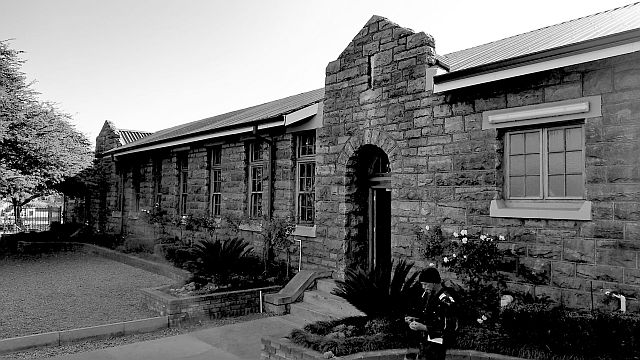
Figure 9. This building, photographed in 2019,
was part of the original Moffat Institution,
now part of the Kalahari High School.
(Johannes Haarhoff)
Compared to the later hardships to be encountered by the troops, Kuruman was an oasis. Favourable comments were made on the generous supply of clear water and troops had the highest praise for the orchards of apple, pear, fig, almond and other fruit trees found along the Kuruman River, all which ďcome as a complete surprise to most people who trek in from the thirsty landĒ. The abundance and quality of the fruit was described in flowery language:
It is no surprise that Cullinanís Horse had to issue strict orders to its troops against trespassing in gardens and enclosed lands on 15 March!44
The mounted troops, numbering more than 2000 and coming from different directions, converged on Kuruman between 20 February and 2 March. All the units had to establish their camps and training of the different units commenced immediately. Kuruman had probably never seen such activity before and since. But before the troops could start their advance towards South-West Africa, a number of logistical difficulties had to be overcome first.
At the time, there were no roads and no reliable water sources between Kuruman and Witdraai, a police post more than 300km away and close to the border of South-West Africa. Moving more than 2 000 men on horseback over this distance would be a challenge in itself, but nothing compared to the difficulty of maintaining a constant stream of heavy supply wagons to the front and back for the duration of the campaign. Moreover, World War One came on the cusp of the transition from animal-powered to mechanised warfare Ė could mechanical tractors provide a solution?
To successfully move the Eastern Force over the Kalahari Desert would eventually require multiple modes of transport Ė horses, donkeys, oxen and motor vehicles. Each of these had their own needs and limitations which had to be taken into account.
After some unsuccessful experimentation with mechanised transport, there was no other option but to use animal transport for crossing the desert. Initially, mules were organised for transport along the entire route, but the varying nature of the terrain forced a change in plan. The first part of the route from Kimberley to Kuruman was an existing ďhard and stonyĒ road better suited to donkeys.Numbers of donkeys were thus purchased to keep the convoys of wagons going along this section. For the second part of the route from Kuruman onwards, once the reality of the ďtremendous length of our trek across the desertĒ was fully grasped, the ďsuperiority of the ox over the mule in long waterless stretches of heavy sand in the sweltering heat of summerĒ soon became apparent.All the contemporary reportspointedly mentioned the ďheavyĒ sand of the Kalahari Ė see Figure 9. The oxen were therefore driven to Kuruman without burden to arrive with ďsound feet and in good conditionĒ.45 As was the custom in South Africa, trekking was done during the first half of the day and again in the late afternoon and early evening, thus permitting the animals to graze and rest during the intense heat of the day.46
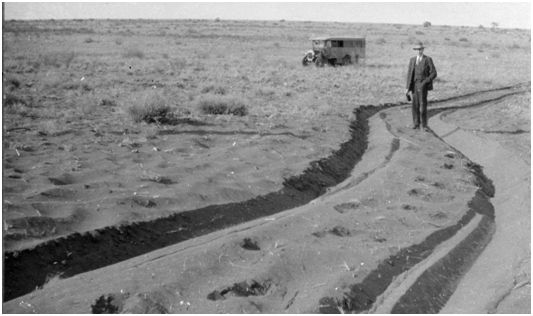
Figure 10. The heavy sand of the Kalahari desert.
(THL N90074_87)
Initially, oxen were obtained from Fourteen Streams and Queenstown but, being unacclimatised, they proved to be too soft and unable to stand the thirst and strain put upon them. As the campaign progressed, the need for more oxen was met by purchasing oxen better adapted to the terrain. The many hundreds of hardy Kalahari Cattle obtained ďproved to be the best and most suitable class of animal for the undertaking and it was marvellous how they kept condition and withstood thirst although it was the hottest time of the yearĒ.47 But even the best cattle, with adequate grazing, could not deal with the exceptionally heavy stretches of sand, day after day. A transport officer described the conditions as ďknee deep in loose and burning sand. As the heat at this time was fierce and blinding, the distress and suffering of the animals attempting to cross it can be more easily imagined than describedĒ. It was found expedient to reduce wagon loads by a third to 1†800kg while simultaneously increasing the number of oxen from 16 to 18 or even 20 per team Ė all adding to the strain of managing the convoys through the Kalahari.48
The good summer rains however had the beneficial effect of producing one of the finest crops of grass seen for years, not only in the Kimberley and Kuruman districts, but right through the Kalahari. This was a key factor in the successful carrying out of operations as it supplied fodder to the transport animals, the horses of the force and the batches of remounts sent up at regular intervals to replace weakened and diseased animals.49 The two main sources of fodder were bushmanís grass and the tsamma. Bushmanís grass, when young and green, provided excellent grazing for horses and cattle, but when old it became hard and brittle and lacerated the mouths of animals attempting to masticate it. The tsamma or ďwild watermelonsĒ are filled with a ďthickish clear liquid like waterĒ on which both man and beast can subsist for months. They were not suitable as a complete substitute for water for animals doing heavy trekking as they are liable to fall off in condition, unless they got accustomed to it over a long time. The tsamma also provided some relief to the men, expressed by a trooperís remark: ďStrained through muslin, excellent coffee can be made with this liquid.Ē 50
Having determined that the brunt of the transport would fall upon oxen, the military planners hoped to establish water points approximately 30km apart along the route Ė about one day of heavy trekking for an ox-drawn transport wagon. Every fourth water point would be a depot under the command of an officer to allow the transport convoys to get food, water and rested animals to replace those that became leg-weary or debilitated.51
The only feasible route option was to head down the Kuruman River, where the chances of finding enough water in wells and boreholes would be most likely, but certainly not guaranteed. The Kuruman River, fortuitously, ran in the same general direction as the planned march for most of the way to the border. Not only would the grazing be likely to be the best at or near the river, but the river also provided large camelthorn trees over its full length to provide fuel for fire and pumping engines. But most importantly, the riverbed offered the best chance of finding water by wells or boreholes.
The advance of the Eastern Force over the Kalahari desert depended entirely on whether water would be found in the Kuruman River in an area mostly uncharted, undeveloped and sparsely populated. It was therefore a fortunate turn of events when Sir Thomas Cullinan (not to be confused with the unrelated Major Cullinan, commander of Cullinanís Horse) offered his services when the Eastern Force was formed.52 Sir Thomas, a personal friend of General Smuts and well known for his connection with the Premier diamond mine at Cullinan near Pretoria, gained a good knowledge of the Kalahari during earlier periods of prospecting for diamonds. He was consequently put in charge of a special section to control and coordinate the necessary water supplies.53,54 A number of water boring teams, commanded by Major Ireland, were part of this section.
The water demand of the Eastern Force was significant. The water boring teams themselves required much water, the various garrisons at the depots along the route required water, along with more than 2000 troops, their horses and remounts, many spans of oxen and the various support units passing through all the time. Not only must water be found, but in adequate quantity.
From the Eye in Kuruman, the Kuruman River ran for almost 60km up to Tsineng (earlier Tsenin) before the water was seen to disappear from the surface of the river bed. It was a logical choice for the first advance depot. According to plan, the first drilling attempt was 30km further at Mophephe (earlier Mímupeppe), where a fair supply of water was struck at a depth of 45m. By the end of January 1915, Mophephe was fully equipped with pumping plant, storage tanks and troughs for watering the cattle and stock.55 The water boring teams progressed well and by early February, two further depots with reserve rations and water storage tanks were being established at Lower Dikgatlhong (earlier Lower Dekatalong) and Boesmansput (earlier Bushmanís Pit) Ė see Figure 10. By providing water storage tanks at the water points and running the pumps continuously, it was anticipated that there was just enough water to get from Kuruman to Boesmansput. As soon as each depot along the way was established, convoys of transport wagons started to push supplies and equipment forward.56
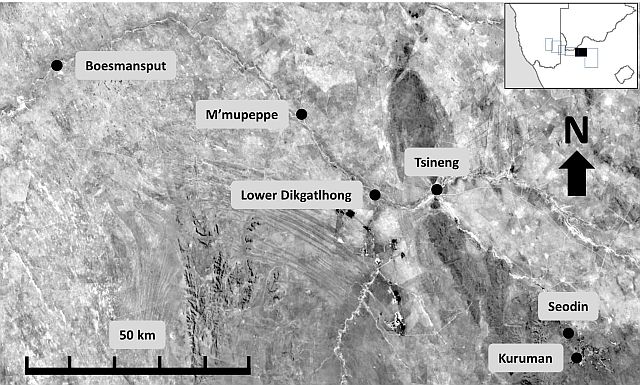
Figure 11. Route map from Kuruman to Boesmansput.
West of Boesmansput, the water boring teams ran out of luck. The next advance depot after Boesmansput was planned at Matlapaning, but by the beginning of March no more than 1000†litre/day was found there, which was barely sufficient for its small garrison. Unsuccessful drilling attempts were made further west at Eensaam, Kameelrus, Murray, Springputs, The Heights and Visgat.57 The next water source existed much further west, at an existing police post at Witdraai. Moreover, their work was cut short due to enemy activity which forced them to drop back to Boesmansput.58 This left the ďThirst BeltĒ of 150km between Boesmansput and Witdraai which could not be crossed by the transport wagons. The locations are shown in Figure 11. The original plan of an uninterrupted chain of evenly spaced water points and depots in the bed of the Kuruman River proved to be too optimistic and had to be revised. (Towards the end of the campaign, more generous water supplies were found which brought some relief, but too late to assist at the critical start of the campaign.)59
There was no option but to place storage tanks at two intermediate points and to fill them with water from afar. The first point was located at Newton, 42km west of Boesmansput; the second at Eersterust, 26km east of Witdraai. This left a considerable distance of 83km between Newton and Eersterust, on the limit for oxen-drawn convoys. (Later in the campaign, water was found at Witkrantz to bring some relief.) Motor transport was organised to supply water from Boesmansput to Newton; ox transport brought water from Witdraai to Eersterust.

Figure 12. Route map from Boesmansput to Witdraai.
This complicated arrangement called for careful planning. For the South-West African campaign, the military planners worked on a daily allowance of 6.8 litre (1.5 gallon) per person; 32 litre (7 gallon) per horse; and 45 litre (10 gallon) per head of cattle.60,61. We also know that each car could carry 270 litre of water in empty petrol drums. Estimates can be made of the daily water demand at Newton:
About 40 motor cars were allotted to the transport of water from Boesmansput to Newton. The cars worked together in pairs and the drivers had to fill and empty the drums themselves.63 If there were 30 motor cars in operation at a time, each car had to make two trips per day in the early phase of the campaign when troops and transport wagons were moving at the same time. See Figure 12.
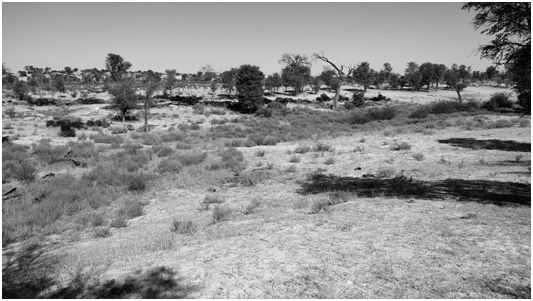
Figure 13. The Kuruman River at Newton in 2019.
(Johannes Haarhoff)
Major Frank Dutton, a colourful SAR&H engineer who is best known for pioneering the SAR&Hís Road Motor Service between Botrivier and Hermanus two years earlier, was in Kimberley at the start of the campaign to conduct some experiments with heavy tractors and trucks, shown in Figure 13. By and large, these experiments were not successful for reasons not explicitly recorded. Possible reasons might have been that they could not negotiate the heavy sand, that they were not reliable enough or that there were not enough available, as imports from Europe stopped during the war. It is probable that some of these tractors continued to be used between Kimberley and Kuruman, but not beyond. The idea of heavy mechanical transport by trucks and tractors beyond Kuruman was dropped and the attention turned to light motor transport by sedan motors.64 A Motor Section under Major Rose with about 40 sedan cars was attached to the Eastern Force.
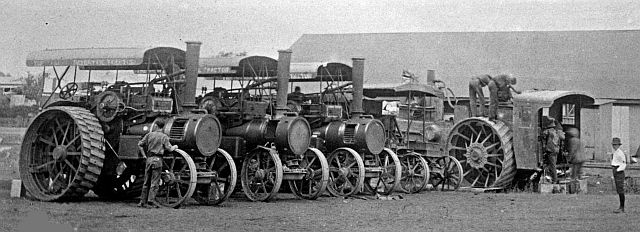
Figure 14. Line of tractors at Kimberley transport Camp.
(THL P4373)
The maintenance of a large fleet of cars, spread over a long route in rough terrain, required special preparation by a dedicated engineering unit.65 A fully equipped automobile repair shop was established at Seodin just outside Kuruman and arrangements were made for similar shops at other posts along the line.66 One example of such motor depot was 15km west of Vanzylsrus, between the later farms Lushof and La Gratitude, where a bunker was excavated in the limestone bank of the river. During the campaign, many empty four-gallon petrol cans were stacked and left there after the campaign came to an end. An enterprising farmer filled them with sand and used them as bricks to construct his first farmhouse. A subsequent owner later reused them by cutting them open to make rudimentary roof tiles for another house.67 Motor repair tasks were complicated by not being able to import any spare parts from Europe in wartime, where the motor cars originated.68 A Reuters correspondent noted that the repairs were rapidly made at ďshops established in the great and silent wildernessĒ which ďmended and ended most troubles on the spot.ď69 There were a few exceptional occasions where the motor car was beaten by the combination of sand and steep gradients, when animals had to be brought to their rescue.70
The motor car assisted the Eastern Force in two ways. For the crossing of the Thirst Belt, it played a crucial role to supply water to Newton described earlier. It should be noted that the decision to use motor cars for the section between Boesmansput and Newton was seemingly not unanimous. Writing four years after the event, one of the transport officers argued that the water transport should have been done by ox wagon, not only as the motor car was ďa most expensive method of transportĒ, but also that it would have freed up the motor cars for more useful tasks in South-West Africa to bring the entire South-West African campaign to a speedier end.71
The second role of the motor car became more important during the second phase of the campaign once the Eastern Force entered enemy territory and outran its supply convoys. The motor cars, now being able to travel at higher speeds on better roads, were used to carry supplies from head of the transport convoys to the different units further inland. As the different forces closed in on Keetmanshoop, their operational areas started to overlap needing better communication and coordination. The motor cars were indispensable to keep the different commanders in touch with their own troops and amongst each other.
Communication was a vital need for the Eastern Force to keep their supply line coordinated. The Thirst Belt forced Berrangť to despatch his troops in squadron-sized groups, turning the Eastern Force into a convoy of small units, at times strung out over hundreds of kilometres. He therefore used all the technologies available at the time. He firstly had a signalling section under Captain JE Dennison who communicated by heliograph, but this method was ďgreatly handicappedĒ not having a sufficient number of properly trained signallers. Secondly, he had a telegraph and telephone section under Captain Watson who built and maintained a line from Kuruman to Boesmansput. The third method was provided by two Marconi radio sections Z-A and Z-B under Lieutenant Lever who were able to provide communication over the Thirst Belt and could keep up with the column, also communicating with the other Union forces towards the end of the campaign. In the final stages of the campaign when the Force moved very rapidly, the lines of communication could not keep up and despatch riders had to be used over the breaks which caused some delays in transmitting messages to the base.72 At times, pigeons were used, evidenced by the fact that a pigeon wagon was attached to the Eastern Force right up to the end of the campaign.73
Captain Watson and 19 men of the telegraph and telephone section, left Bloemfontein on 8 January 1915, were offloaded at Taungs (the closest point on the railway line to Kuruman at the time) the following day and trekked from there to Kuruman. They arrived on 13 January, their materials on 16 January and they started construction on 19 January. By 25 January telephonic communication was established amongst most of the different units camped in Kuruman and Seodin and they could start on the line towards South-West Africa. They progressed and soon allowed telephonic communication to Mophephe (17 February during heavy rain) and Lower Dikgatlhong (20 February). The section moved camp every few days as they proceeded until they reached Boesmansput on 6 March.
After Tsineng was reached, the section was in short supply of materials and makeshift solutions had to be improvised. In some cases, single wires were run on farmersí fence posts; in other cases the wire was strung from the tops of thorn bushes and trees approximately 3m from the ground. For about 70km, the cables were simply left on the ground, until they found that the cable was chewed to pieces by wild animals. These sections had to be lifted and buried in ploughed furrows. The section, with a motor car and driver dedicated to them, confined their activities to the Kuruman to Boesmansput section, where it attended to line repairs and maintenance after the material for new construction dried up. At the beginning of May the main body of the section was ordered to proceed to Keetmanshoop where they arrived on 20 May 915.
The preparation for the medical care of the troops was considered ďcomplete and thoroughĒ. Lieutenant-Colonel J Mackenzie, Assistant Director of Medical Services, as the senior officer, established four military hospitals at Kimberley, Kuruman, Matlapaning and on the border at Rietfontein, each supplied with a medical officer and field ambulances. Later, when the troops were in enemy territory, special units were provided at Keetmanshoop and Gibeon with medical officers, nurses and orderlies.74 Two clergymen, the Reverend Archdeacon Lawson (Church of England) and Reverend W Medhurst (Congregational) accompanied the force throughout the campaign, while Reverend Brown officiated at Kuruman.75
The fighting troops had to cross the Thirst Belt only once, but the transport officers had to keep convoys continuously running for months while troops were despatched to the front and supplies sent forward to the troops and garrisons along the way. From Kimberley to Kuruman, the management of the donkey-drawn supply lines was apparently relatively easy. After Kuruman, the oxen proved more difficult to manage. It was already demonstrated how carefully the transport wagons had to be coordinated to ensure that Newton and Eersterus, the manually supplied water points, did not run dry. The communication network was necessary to maintain the orderly progression of the convoys across the desert. Each depot would notify the base at Kuruman as soon as its storage tanks were filled. When all stations were ready, the order was given from the base that all convoys should move. The full convoys moved on to the next station and the empty convoys moved one station back, with the ďregularity of clockworkĒ.76 This system worked well most of the time and it became somewhat easier as time went on with more water drilling successes along the route.
The scourge of anthrax was ever present and an immediate danger to the transport oxen. As early as 17 January 1915, three cases of anthrax were found amongst the cattle at the Seodin cattle depot. This problem taxed the veterinary staff, commanded by Major E Runciman, Assistant Director of Veterinary Services for the duration of the campaign. ďWe were pestered by this scourge during the whole length of the campaign, some of our personnel even being affectedĒ.77 The loss of horses during the hardships of the Thirst Belt was unavoidable. It was found that smaller horses were hardy and withstood the strain remarkably well - better than ďlarger and more showy animalsĒ. A regular supply of these small, hardy remounts was sent up from base to arrive at the mounted riflemen at column head in fair condition, owing to the excellence grazing condition of the veld.78
Not only the animals suffered. The heavy sand between Kuruman to Witdraaialso impeded on the progress of the motor cars. A number of road parties, placed under the command of Sir Thomas Cullinan, had to be formed to make and maintain the necessary motor tracks through the heavier and most difficult stretches.79 Roads were ďbushed and corduroyedĒ to enable the passage of motors through the sand; bad drifts and hills repaired and levelled.80 The fleet of motor cars did valuable work. Other than keeping the tanks at Newton filled with water, they also supported the ambulances, postal system and despatch work Ė thus saving time and animals.81 Initially, the fleet of 40 cars was mostly engaged in assisting the troops to cross the Thirst Belt. By the end of March, when almost all the mounted riflemen were at Witdraai or beyond, a convoy of 22 motor cars arrived at Witdraai to take on a new role as the Eastern Force crossed the border into South-West Africa.
Despite these problems, the convoys were generally managed well and it was claimed afterwards that there was no ďdislocation of the general schemeĒ.82,83 During early March, however, when the mass movement of troops were superimposed on the regular transport wagon traffic, the Thirst Belt became seriously congested and the supply of water was wanting for short periods.84 Men and animals, as evidenced from numerous diary entries, had to get along with only a fraction of the normal water ration. All in all, the combination of ox wagons and motor cars ensured the mobility of the column, ďeven though the natural conditions of the country were inimical to mobilityĒ.85
The Kalahari Horse was the first to be sent out from Kuruman as an advance guard to secure the route for the troops to follow. By the end of February, lines of communication from Kuruman to Witdraai were firmly established and all the posts and depots were guarded by strong detachments of the Kalahari Horse.86 By early March 1915, Berrangť started to despatch the rest of the Eastern Force from Kuruman, squadron by squadron. SAMR A and C Squadrons were despatched on 3 March, B and D Squadrons on 5 March, BMR Squadrons C and D on 8 March, etc. Cullinanís Horse stayed in Kuruman to escort an artillery battery and ammunition convoy that were only despatched by the end of March. The troops moved at a slower pace over Tsineng, Lower Dikgatlhong and Mophephe until they reached Boesmansput, presumably to save their horses for the Thirst Belt. At each depot, they first had to obtain telephonic permission to advance, suggesting that the necessary preparations were still being made for the water points and supplies further on.
It took an average of three days, for mounted riflemen as well as the transport wagons, to cross the Thirst Belt between Boesmansput and Witdraai. The first troops left Boesmansput around 16 March. Hereafter the rest of the squadrons followed quickly. Squadrons to arrive at Witdraai were recorded on 19, 23, 28, 30, 31 March, 3 April, 10 and 12 April. The conditions for troops were terrible, with heat, cold, dust, disappointment when insufficient water was found at water points, and their horsesí suffering as their constant companions. The troops were not issued with greatcoats some nights were very cold. On one occasion, rum was distributed to the troops; on another, a convoy had to make multiple stops at night to allow them to make large fires to warm themselves.87
One of the troopers only known as ďELĒ recorded his experience:
We continued along its course as far as Dekatalong and the Bushmenís Pit, both Government water stations, at distances of 30 miles apart. Along this section of the journey game was plentiful and the fact that we were on half rations did not worry us during the few days we rested at Dekatalong. Men were constantly sneaking from the column for an hour or two, to return later in the day with something eatable slung over the backs of their saddles. Unfortunately we could not get forage for our horses in the same unconventional way and the poor beasts many a time had to go on very short commons, for we could not carry much and the bites of grass were few and far between.88
The abundance of game was echoed by others:
Back to ELís experience:
Berrangť highlighted the harsh desert environment:91
Witdraai, at the start of the 20th century, was a hub where the main roads and routes of the times crossed. It therefore lured illicit dealers in arms, ammunition, stolen cattle and alcohol, along with other unsavoury characters such as the legendary Scotty Smith. The Cape Mounted Police at Rietfontein charged with law enforcements in the region, wrote in 1907:92
As a result, a police post with ďthree camel men and one native detectiveĒ was established at Witdraai in the same year. It had a strong well with good water, dug earlier. By 1909, the police moved from tents to huts. It is a police station to this day. See Figure 15.
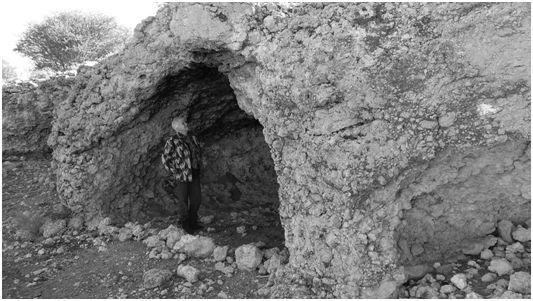
Figure 15. Witdraai is also known for its ďcavesĒ on the riverbank,
where camels probably rested during the heat of the day,
shown here in 2019.
(Johannes Haarhoff)
An Enemy Raid into Union Territory
Rietfontein was permanently settled by Chief Dirk Philander in 1865. The settlement steadily grew to the point where Rhenish missionary Heinrich Pabst established a mission station and built a church twenty years later, shown in Figure 16. Shortly thereafter in 1888, Dirk Philander died and was succeeded by his son David. After Germany established the present Namibia as its colony in 1884, it was uncertain whether Rietfontein was under British or German sovereignty. David made official enquiries and conflicting answers were received. Surveyor-General Adriaan Moorrees of British Bechuanaland could not give a definite answer, as proper triangulation had not extended to that region yet; a private German citizen Kiepert published a map which showed Rietfontein to be in German territory; while a German survey erroneously reported Rietfonteinís longitude to be 19į45í east.93 The border was decreed to be at 20į east, and Rietfontein is in reality at 20į02í east, as shown in Figure 15. The confusion was clarified, presumably after more precise surveying, with all in agreement that Rietfontein was in Union territory. By the time of the Herero revolt of 1904 in South-West Africa, the positions of the border and Rietfonteinwere precisely known and accepted. Its close proximity to the border made it a logical spot for a police post. By 1907 Rietfontein had a magistrateís court, a deputy inspector of police with about fourteen men, a prison with a warder, about three shops, two tennis courts and a lending library with about 1000 books.94
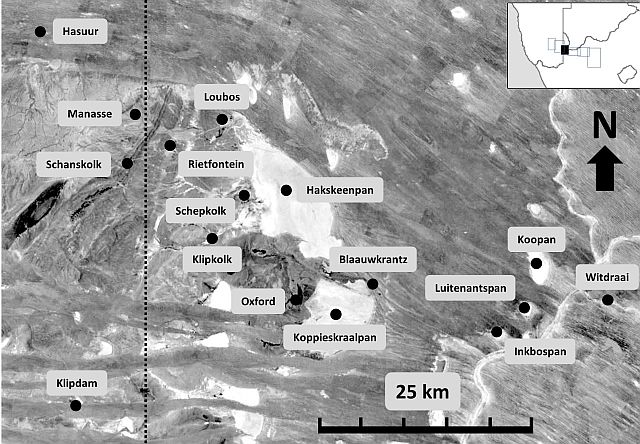
Figure 16. The area between Witdraai and the border.
When the First World War broke out, there were police posts on opposite sides of the border. On the Union side, there was Rietfontein about 5km away, in pre-war days reckoned as ďthe loneliest and most isolatedĒ post in the police service. On the German side, close to Rietfontein, was a post called Schanskolk.95 A short distance to the north was a stronger enemy garrison at Hasuur. At the start of the campaign, Berrangť posted a patrol of the 5th SAMR at Rietfontein to keep the enemy movements at the border under close observation. The unit, commanded by Intelligence Officer Captain Munro, consisted of twelve camels, a few troopers and native scouts.96 The enemy, obviously, also kept an eye on the movements of the Eastern Force.
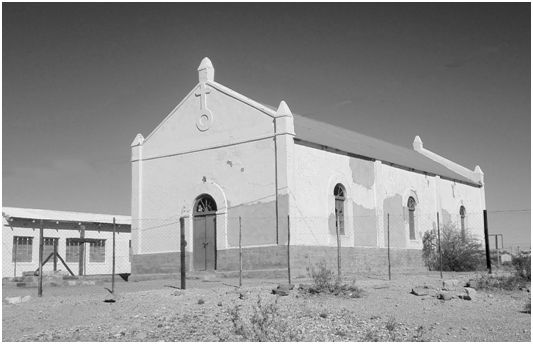
Figure 17. The old missionary church at Rietfontein in 2019.
(Johannes Haarhoff)
Around 8 February, while the main force was being assembled at Kuruman and the depots in the Kuruman River were being established, the commander at Hasuur, Oberleutnant Goedecke, swung into action by crossing the border to occupy Rietfontein. After a skirmish which left casualties on both sides, the enemy captured the resident magistrate (Mr Stewart) and some others.97,98 Munroís patrol escaped and retreated via Oxford to reach Witdraai on 10 February with the enemy in hot pursuit. A further skirmish followed where Rifleman A OíBrien, Scout Harry Bok of the Camel Section and some camels were captured by the enemy.99 Munro and the remainder of his patrol escaped and retreated once more, this time all the way back across the Thirst Belt to reach Witkrantz on 16 February. They were exhausted after their strenuous escape with long periods of sleepless vigils, mostly without much water or food. It was difficult to imagine that the enemy would pursue them so far across the Thirst Belt and they therefore felt perfectly safe as they were resting beside two water tanks. But they were suddenly surrounded by an enemy patrol which indeed had followed them across the desert.100 During the short, fierce fight that ensued, Captain Munro and Riflemen Clarke and Foreman were captured near the spot shown in Figure 18. A further scout was wounded, one native scout was killed and three camels shot. The water boring section was forced to retreat to Boesmansput.101
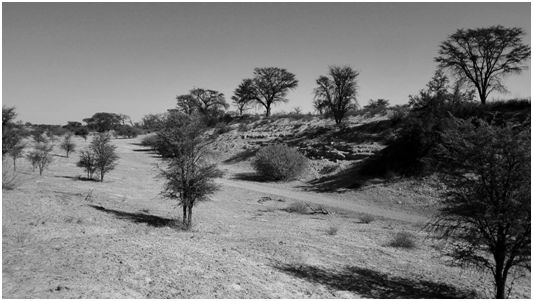
Figure 18. The Kuruman River at Witkrantz in 2019,
at or near the spot where Captain Munro was captured.
(Johannes Haarhoff)
On their return to Rietfontein, the enemy destroyed some of the water boring equipment along the way, burnt the Witdraai and Rietfontein police stations and blocked the well at Witdraai. This daring enemy raid resulted in all the numerous smaller parties of the Eastern Force being driven back to as far as Matlapaning, upsetting the elaborate plans for water boring and the setting up of advance depots. This was a blow to the Eastern Force and an untenable situation.
Berrangť called upon the Kalahari Horse to reclaim the Union territory now under enemy control. About two weeks after Munroís capture at Witkrantz, a patrol of the Kalahari Horse under Captain Dickason pushed across the Thirst Belt to reach Witdraai. They found the police post deserted, the building burnt down and the well filled in by the enemy, which they quickly cleaned out. With the help of an empty petrol can and their hands, the soldiers scooped out shallow depressions in the sand and lined them with waterproof sheets to form improvised water troughs for their horses and themselves. They were soon reinforced by a squadron of the Kalahari Horse under Major Frylinck, followed by the balance of the Kalahari Horse with Lieutenant-Colonel van Zyl. These movements across the Thirst Belt, before the planned preparations were completed, were made possible by the heavy rains that fell at this time. The Kalahari Horse, now reunited at Witdraai, were able to obtain rations of fresh meat, milk and some butter from the farms surrounding Witdraai. The farmers at these distant outposts of South Africa were ďmost ready and willing to render us every assistance in their power, and the information continually brought in by their natives and our spies kept us well advised of the movements of the enemyĒ.102,103
With their position consolidated at Witdraai, the Kalahari Horse could proceed to clear the enemy from the remaining area towards the border. Van Zyl sent two squadrons to establish camp at Klipkolk on 14 March and Schepkolkon 15 March respectively. On 16 March, one of their patrols under Lieutenant McGeer left Schepkolk in the direction of Hasuur.104 The next day, they captured an enemy patrol of three men of the Hasuur garrison at Manasse nearby.105 The same day, enemy troops under Captain Schoepfer arrived from Keetmanshoop to reinforce the Hasuur garrison.106 The enemy realised that they should strike at the Eastern Force before the camps at Schepkolk and Klipkolk could be further reinforced. On 18 March an enemy company left Hasuur for Rietfontein.107 Schoepfer, while improving the defences in and around Rietfontein, sent a strong patrol of 250 men to attack the squadron encamped at Schepkolk later on the same day. At nightfall, the enemy was repulsed by the squadron of 90 strong under Captain van Vuuren and fell back to their base at Rietfontein, suffering some casualties.
Early the next morning, on 19 March, Captain Van Vuuren and his squadron counterattacked the 200 enemy soldiers at Rietfontein. Schoepfer entrenched part of his force in the hills at Sannaspoort near the border to command the road between Rietfontein and Hasuur, while other troops defended Rietfontein. At first, the enemy could not be dislodged from Rietfontein. Van Vuuren then encircled the enemy at Sannaspoort, attacking them in the rear at 13h00. The enemy in town withdrew to Sannaspoort and the combined force retreated after a while to their base at Hasuur. By 14h00, the Kalahari Horse had complete control of Rietfontein and the area up to the border.108 In the Official History of the Great War, the action at Rietfontein was one of four by the Eastern Force singled out: ďIn view of the importance of the water at Rietfontein and the enemy superiority in numbers, Captain van Vuuren may be considered as having operated in a highly creditable manner.Ē109 The casualties of the Eastern Force were one killed (Trooper Badenhorst who died the following day at Rietfontein) and two wounded (Troopers Slabbert and Viljoen).110 The enemy retired with the loss of their transport and a number of horses, four killed, 20 wounded and two captured on the field.111
The battle of Rietfontein ended the enemy occupation of Rietfontein and a large part of the Kalahari, which lasted from 8 February to 19 March. The entire route from Kuruman to the border was now secured. The enemy had retreated to Hasuur, reorganised their forces and had a machine gun sent out urgently from Aus to await the Union Troops. Their Captain Schoepfer had orders to detain the Eastern Force as long as possible at Hasuur to allow the main enemy force to witdraw in an orderly way from Keetmanshoop. While the Eastern Force was entrenchingits position by pushing the rest of its troops forward to Rietfontein, there was one minor skirmish on 23 March when an enemy patrol attacked a group of Kalahari Horsemen near Loubos which drew heavy fire before the attack was called off.112
At Witdraai, the Kuruman River turns in a southwestern direction, while the Rietfontein border post lies in a northwestern direction. The Eastern Force would therefore have to leave the Kuruman River and head to Rietfontein through open country. The area between Witdraai and Rietfontein is dotted with pans, which fortunately held water after the exceptionally good summer rains. The most common route from Witdraai continued with the Kuruman River for some distance up to Luitenants Pan or Inkbospan, Blauwkrantz, Koppieskraalpan, Oxford, Klipkolk and Schepkolk to Rietfontein, shown in Figure 15. An alternative route to the north followed Koopan, Hakskeenpan and Loubos. Upon reaching the edge of Koppieskraalpan, the troops found themselves at Blauwkrantz ďon the edge of a high plateau, the open country stretching away to the west as far as the eye could seeĒ. Towards the northwest they could see Hakskeenpan, its eastern borders fringed with tremendous sand dunes. Its water was shallow, so salt as to be undrinkable, but its surface along the edge was of hard sun-baked mud as smooth as a billiard table.113 From Blauwkrantz, all the way to Keetmanshoop, the roads were much harder with few exceptions. An officer, who was riding in a motor car, described the moment:
The joy of finding open water and better roads were equally appreciated by the mounted riflemen:
In Enemy Territory: From the Border to Gross Aub
Units of the 5th SAMR and 9th BMR started to arrive in the Rietfontein area during the last week of March 1915. On 1 April, the Eastern Force marched into enemy territory, an area shown in Figure 19.
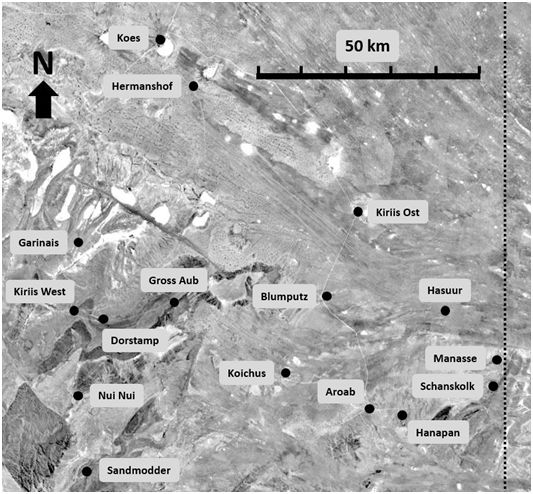
Figure 19. Area between the border and Kiriis West.
They arrived at Schanskolk, the closest enemy post just on the other side of the border, brought up their guns, shot down the walls of the enemy blockhouse and captured the surviving defenders.118 Schanskolk, described as ďa very progressive German farmĒ rested on a ridge which formed a natural fort with heavy boulders and featured a strong well, filled with sheep carcasses, and a dam of which the wall was partially blown away.119,120 Figure 20 shows a remaining prison building constructed during German colonial rule.
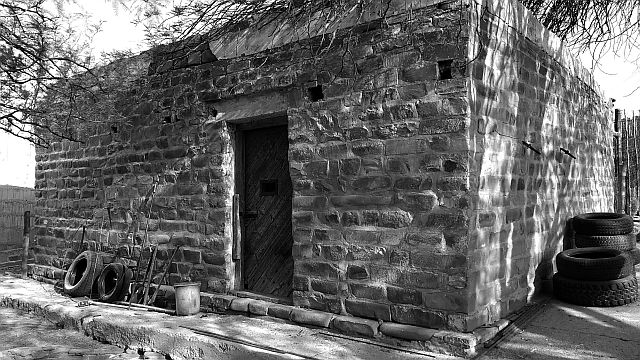
Figure 20. Prison at the Schanskolk police post
dating from the German colonial period, photographed in 2019.
(Johannes Haarhoff)
From Schanskolk,on the same day, the force struck northwestward to Hasuur, a stronger, better fortified police post. It was described as a ďcold, bleak placeĒ consisting of a couple of very substantial police buildings and a well with a good supply of water. There was another well close to the buildings, but the presence of a dead dog and certain pungent oils rendered the water useless for human consumption.121 Before the Eastern Force arrived, the enemy evacuated Hasuur without offering any opposition, which surprised a trooper as he considered that ďnothing short of big guns could have shifted themĒ.122
Two patrols were sent out from Hasuur. The first encountered an enemy patrol near Hasuur and pursued them to Blumputz, where an enemy trooper was captured.123,124 A second group of the Kalahari Horse under Captain Gers was sent forward to Aroab, which was defended by ten of the enemy, ensconced in a house. The enemy engaged in fierce fire but retreated when Gers circled around to block their line of retreat.125
The troops were issued with two days full rations for the march that lay ahead, considered insufficient by some of the troops. The limited nature of the supplies was due to the fact that Berrangť had partly outrun his supply lines. From this point onwards, motor transport was used for the distribution of supplies from the head of the supply convoys to the various units. A transport officer, after the campaign, summarised the role of motor cars:126
The different units of the Eastern Force continued through Hanapan and Aroab to reach Arinab on 3 April. It was a stud farm owned by an enemy officer, only recently vacated, with ďsubstantial red brick buildings in Teuton style Ė two residences, one office and laboratory and a building suitable for barracks to accommodate about 25. Good and substantial sheds. Three wells and windmill Ö also a dam sufficient to our needsĒ.127
From here they moved camp to Koichus, an unoccupied farm still with cattle and other property ďproving that the occupier had left in a considerable hurryĒ.128 At Koichus, the Force came to a halt while all the units caught up and supplies could be brought forward. On 13 April, for the very first time, the 5th SAMR, the 9th BMR and the Kalahari Horse were together at the same place and time.
On 14 April, the main force moved from Koichus. The next obstacle was an enemy position at Gross Aub, a fortified police post in a mountain pass, situated on a hill which commands miles of surrounding country, with a substantial building, stables and storeroom, all enclosed by a wall three metres high, well loopholed.Ē129 It was stormed and the 300 defenders put to flight.130 A loaded wagon standing near the quarters revealed, on examination, a considerable quantity of dynamite and detonators under each wheel. If the wagon had been moved before the explosives were detected, there would have been a terrific explosion.131 All troops were warned to be wary of similar traps. The heliograph station at Gross Aub was an important link in the enemyís communication network. The present remains are shown in Figure 20.
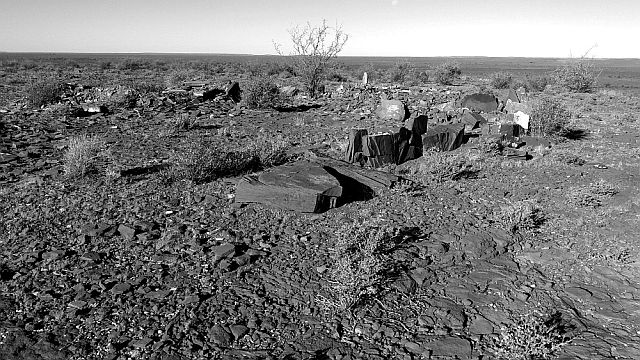
Figure 21. Remains of enemy heliograph station
at Gross Aub in 2019. (Johannes Haarhoff)
On 5 April, four days after crossing the border, two squadrons of the Kalahari Horse were despatched to KoŽs, known to be an enemy post. On arrival, they engaged the enemy, captured 500 head of cattle and 2000 head of small stock and took one prisoner. Their own losses were one wounded (Trooper TJ Steyn) and one captured (Trooper M Louw). Van Zyl and the Kalahari Horse returned to join the main force, but left Lieutenant Hobson with five troopers behind to return with the animals at their own pace. On their way back, Hobson and his group encountered some 40 of the enemy who made a determined attempt to recapture the animals. After an engagement of two and a half hours, Hobson and his men succeeded in driving them off enabling the stock to be successfully returned.132 After the campaign, Trooper D Jacobs of the Kalahari Horse was recommended for displaying considerable bravery during this encounter:133
On 13 April, as the Eastern Force was about to move from Koichus, Berrangť despatched a patrol of 14 men of the Kalahari Horse under Lieutenant Wessels to cut the railway line near Itsawisis Ė ďan ambitious plan which came very near successĒ.135,136 Due to a lack of water, the patrol had to fall back without achieving their objective. On their way back, on 14 April, they ran into a part of the enemy Third Reserve Company under Lieutenant Egersdorff at Kiriis West.137 Fierce fighting went on from 09h00 to 14h00 before the Kalahari Horse retired with the loss of six casualties Ė two wounded (Sergeant J Etzebeth, who died a few days later138 and Sergeant L le Grange) and four captured (Corporal PWS Terblanche and Troopers JA Prinsloo, JJF Markram and HH Sonnekus). The enemy lost one lieutenant killed, one man wounded, two taken prisoner and nine horses.139,140 The enemy evacuated Kiriis West that same night.141
On 14 April at noon, exactly at the same time that the return patrol of the Kalahari Horse was engaged with the enemy at Kiriis West, Berrangťís force was dislodging the enemy from Gross Aub. When word got to Gross Aub about the engagement at Kiriis West, a squadron was despatched to Kiriis West, but the enemy had meanwhile vacated the position. The squadron of the Eastern Force camped at Kiriis West for the night.142 Early the next morning, Captain Frylinck of the Kalahari Horse arrived to consolidate the position, with Berrangť and the rest of the troops arriving later the same morning.143
Both Berrangť and the enemy commander were handicapped by poor intelligence reports. The enemy commander at Daweb received a report that Colonel Berrangť with a force of 2500 men had crossed the desert and on their way to Kiriis West. He dismissed the intelligence as a mistake, believing that the number must have been 250 men, as he considered it utterly impossible for so large a force to cross the Kalahari desert. He therefore sent a small enemy force of 300 riflemen and two machine guns to keep Berrangť away from Kiriis West. On 15 April Berrangť, in turn, received news that a large enemy force of 800 men and two cannons had been advanced from Spitzkop through Stampriet to Kiriis West and he hastily took up a strong defensive positionon 15 April in anticipation of a night attack.144 When the small enemy force arrived at Kiriis West on 16 April, the advance patrols of the Kalahari Horse repelled their attack and drove them back with losses of two troopers killed, one officer and two non-commissioned officers wounded, and four troopers captured; the Union loss was one killed and one wounded.145 The enemy retired towards Keetmanshoop past DŲrstamp and Guruchab.146 The advance patrols of the Eastern Force pursued them to DŲrstamp, where they retired for the night.147 The decisive action at Kiriis West had the effect of startling a second enemy force of about 100 men that was advancing from the southwest, retiring in time.148
The next day, 17 April, Berrangť received another false alarm that the enemy was advancing in large numbers. A defensive position was taken up again, but nothing happened. By 15h30 the column left Kiriis West and marched in a northeastern direction towards Daweb.
It is now necessary to break the narrative to consider the broader military position in southern South-West Africa, with reference to Figure 21. By the beginning of April 1915, there were three forces closing in on the enemy Ė from the west (Mackenzie), the southeast (Van Deventer) and the east (Berrangť). The enemy held a strong position at Aus, but they had to be careful not to be isolated from their forces further north. The railway network was the key to their rapid movement. When Van Deventer and Berrangť came closer to the railway line, the enemy feared that their only means of withdrawal to the north may be cut off. Rather than holding out at Aus while being encircled by Union forces, they withdrew from Aus and started to move northwards. It now became a race against time Ė could the Union troops block the railway line further north before the enemy in the south could complete their withdrawal? The Eastern Force in particular could move much further north before striking at the railway line Ė therefore a major worry for the enemy. The optimal deployment of the Union Forces, all converging on roughly the same point, would require effective coordination. General Jan Smuts, at military headquarters in Pretoria, ďwho had done a giant's work in the preparation and equipment of all the southern columnsĒ, arrived on 11 April in enemy territory to take personal command of the combined operations.149
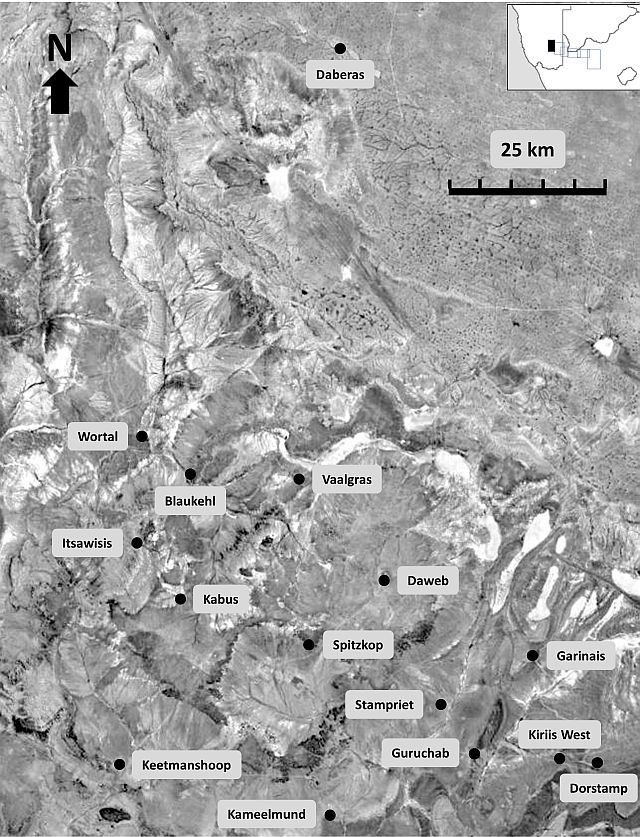
Figure 22. The terrain between Kiriis West and Daberas,
where the final phase of the Eastern Force campaign played out.
An important part of the coordination was focused on the Southern and Eastern Forces sweeping in from the southeast and the east, moving closer to each other as they advanced. The Southern Force was commanded by Colonel Jacob Louis van Deventer (1874-1922), veteran from the Boer War and later knighted to be generally known as ďSir JaapĒ.150 He sent one of his columns to his right with the objective to clear the enemy from the intervening space between the Southern and Eastern Forces and to make contact with Berrangť. This column was commanded by Colonel-Commandant Dirk Jacob Carel Bekker van Deventer (1876-1945), the younger brother of Jaap.151
As early as 15 March, Berrangť tried to establish communication with the Southern Force by patrols and heliograph as far south as Klipdam, but without success as Dirk van Deventer had no signallers with him.152 A day or two later the first contact was made when a patrol of the Southern Force turned up at Klipkolk to inform Berrangť that Dirk van Deventer was moving forward from Platbeen. Berrangť then lent two signallers to Dirk van Deventerís column to maintain communication.153 By early April, the Southern and Eastern Forces came within heliograph range and communication and coordination improved.154
General Smuts issued an order to the Eastern Force that they should be at Kiriis West on 15 April.155 This was probably part of coordinating the forces, as a patrol from Colonel Dirk van Deventerís column of the Southern Force also turned up at Kiriis Weston the same day - the first physical contact between the two forces in enemy territory. Colonel Dirk van Deventer with the main part of his column had then reached Sandmodder some 50km to the south.156 From this time onwards, the movements and deployment of the Eastern Force would have to be coordinated with the others.
From Kiriis West, Berrangť and Dirk van Deventer worked closely together. Their joint objective was to cut the railway line at Itsawisis about 40km north of Keetmanshoop. Itsawisis was only about 11km from Kabus, where some enemy activity was reported by Berrangťís military intelligence.157 Kabus would have to be cleared first. Kabus, 31km north of Keetmanshoop and about 9km east of the Keetmanshoop Ė Windhoek railway line, had been a large military training school with accommodation for at least 1500 men. All the quarters were lofty and substantial and were built with faced bluestone. There were officersí quarters, barrack rooms for both single and married troops, mess rooms, kitchens, canteens, storerooms, workshop with numerous other buildings and outhouses.158
Berrangť and the Eastern Force left Kiriis West in the late afternoon of Saturday 17 April. That evening they camped on the farm DwŲrer, where two wounded prisoners, several wagons and more small stock fell into their hands. With the enemy on the run, they left early the next morning and continued the chase as fast as their bone-weary horses allowed.159 Late the next evening (18 April) they made it to Spitzkop where the condition of horses and men compelled them to rest. Spitzkop was an outpost situated in a very bare and bleak spot. The buildings were solidly erected, comprising officersí quarters, barrack room, stables, etc.160 All these amenities, however, did nothing to ease the plight of the troops:161
Spitzkop was left very early on Sunday 19 April and the force moved on to the nearest farm, where they bivouacked for breakfast. While they were cooking their eagerly awaited breakfast, they were suddenly put on alert:162
The Eastern Force was kept on alert until noon, when Berrangť sent a message to Dirk van Deventer that he [was] going to move towards Kabus.163 The Eastern Force left in the late afternoon to reach its overnight camp at Daweb at 22h30 on 19 April.164
At the same time, Dirk van Deventerís column had been on the march from Sandmodder via Nui Nui to Kameelmund. Berrangť and Van Deventer met at Stampriet (probably on 18 April) where the two commanders agreed that both forces would move to Kabus, with the Eastern Force operating on the right.165 The two leaders met again late in the evening on 19 April at Daweb where Berrangť was encamped. Van Deventerís force was camped further west, close to Kabus. After Berrangť received intelligence that the enemy was preparing with 600 men, 10 machine guns and two machine guns at Kabus, it was decided to reinforce Van Deventerís force with 350 men and two machine guns.166 Major Frylinck would command 250 men of the Kalahari Horse, and Captain Wimble 100 men of the 5th SAMR A and C Squadrons and a machine gun section. Van Deventer would command the 150 men of the Southern Force. The reinforcements left Daweb at 03h00 the next morning to join the Southern Force at their camp closer to Kabus.167
Very early during the morning of 20 April, troops from both sides started to take up their positions at and near Kabus. Refer to Figure 22 for the rest of ??? under this heading.
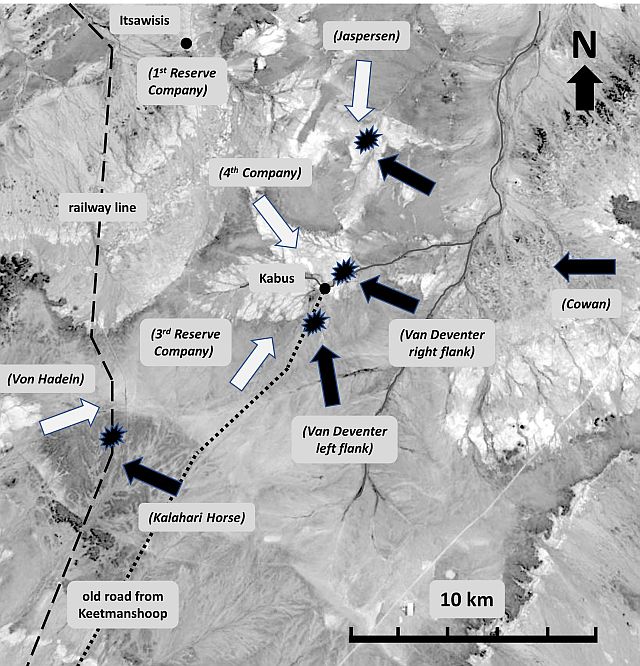
Figure 23.The battle of Kabus on 20 April 1915.
The enemy had five units in the field which would have a bearing on the battle of Kabus:
The Southern Force (including the reinforcements from the Eastern Force) and the remainder of the Eastern Force moved independent of each other:
Van Deventer attacked Kabus from two directions. He utilised the riverbed to advance his right flank towards Kabus from the east, forcing the enemy to take up defensive positions south and north of the river. His left flank approached Kabus from the south. Around 08h00, his right flank drew the first enemy fire of the 4th Company, while the 3rd Reserve Company was still underway to Kabus. At the same time, the enemy group of Von Hadeln reached the railway line less than a kilometre north of the Kalahari Horse position, immediately coming under heavy fire. Both sides held their positions until about 10h00, until Von Hadeln attacked to drive the Kalahari Horse from their position with the help of a machine gun but suffered five wounded. The Kalahari Horse was unsuccessful to damage the railway line. Von Hadeln then left north to join Von Kleist at Itsawisis and did not participate in the battle any further.
The gunfire at Kabus, once started, remained heavy without letting up for more than three hours. The two enemy companies, once united at Kabus, kept up a fierce defence and they kept Van Deventerís left flank at bay. On Van Deventerís right flank, as his men were manoeuvring into a better position near the riverbed, the enemy mounted a daring counterattack at 08h20 to eventually dislodge them with machine gun fire from that position by 09h00. During this operation, two Union officers and 27 troopers were taken prisoner.169 Fierce fighting continued until about 11h00.
About 09h00, the enemy platoon of Leutnant Jaspersen approached Kabus from the northwest, running into a Union patrol that skirted around their own right flank to attack the enemy from the rear and to disrupt their line of withdrawal to Itsawisis. Jaspersen was quickly ordered to block their advance and was sent some reinforcements from Kabus. A drawn-out battle of more than two hours followed, the Union troops eventually withdrawing.
During the morning, more Union troops continued to arrive at Kabus from Keetmanshoop, halting just outside the range of the enemy fire. By about 11h00, it was clear that Van Deventer was not making progress. The patrol of the Kalahari Horse was driven away from the railway line by Von Hadeln; the northern patrol pushed back by Jaspersen; his right flank in the riverbed dislodged with heavy loss; and his animals in need of water. He ordered a withdrawal. Major Frylinck of the Kalahari Horse sent a note to Berrangť, still some 8km to the southeast, to inform him that he was ordered to withdraw; that he had been heavily engaged with the enemy; and that he was in need of an ambulance. Berrangť immediately left for Kabus with Major Cowan and the 9th BMR in support of Frylinck. On their way, they met retiring troops from the disintegrating left flank. Berrangť sent for Van Deventer by motor car (heliograph communication failed), who personally confirmed to Berrangť that he was retiring.
On the enemy side, a message was reportedly sent on horseback from the enemy command to Von Kleist to withdraw all their forces to Itsawisis. This message was issued at 10h00 (presumably from Keetmanshoop), but for some reason, it was delivered on horseback to Von Kleist only three hours later, at 13h00. The order was carried out immediately and the two enemy companies joined their comrades at Itsawisis by 15h00. After an hour of rest, the combined enemy force marched further north to Wortal as part of their strategic withdrawal towards Windhoek.
When Major Cowan and his two squadrons of the BMR, 100 men in total, stormed into Kabus, he therefore found a battle site where both the enemy and the left flank of the Union troops had withdrawn. The enemyís main body had left together with their guns and a group of prisoners captured earlier that morning. Only the enemy ambulances and their wounded remained on the battle site. The enemy wounded were later collected under protection of the Red Cross, also returning one of the captured troops that was heavily wounded.
By the evening, the entire Eastern Force had moved to Kabus to camp for the night. The enemy got away with a loss of two killed and 16 wounded; the Union casualties being 10 wounded and about 30 prisoners taken prisoner, including two officers. A vast quantity of military stores was left behind. Figure 23 shows an old photograph taken of a memorial erected at the Kabus battle site.
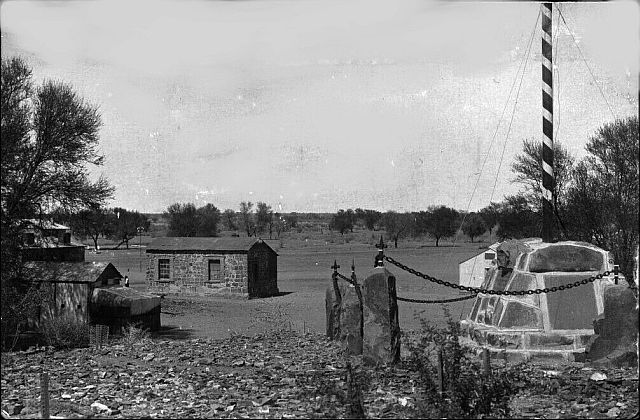
Figure 24. Memorial and old buildings at Kabus.
(credit source)
On the evening of the battle of Kabus, orders were received for the amalgamation of the Southern and Eastern Forces. Lieutenant-Colonel van Zyl proceeded on 21 April to Keetmanshoop to have discussions with Colonel Dirk van Deventer, with Colonel Berrangť and Brigadier-General Jaap van Deventer joining them the next day. An agreement was reached that the Eastern Force should continue its forward movement.170
Berrangť despatched a patrol of the 5th SAMR under Lieutenant Brinton northwards with a view to turn back large treks of Boer farmers who had been ordered north by the enemy. Some 40 families were thus released, together with large flocks and herds. The farmers returned to their farms and two enemy troopers were captured in the process. Two enemy soldiers were captured.171
At the same time, Berrangť ordered the entire Eastern Force to march northwards via Blau Oost and Vaalgras to reach its final camp at Daberas on 28 April, some 90km northeast of Kabus.172 Camping at Daberas beside a large pan of water, the main body of Berrangť's force rested for the first time since leaving Kuruman, now in possession of all the posts between Keetmanshoop and Daberas. They had captured a considerable number of prisoners, including the enemy commander of the southeastern portion of the country, together with thousands of head of cattle and small stock.173 The Kalahari Horse continued their patrols over the country to the north, rounding up much cattle and sheep.174 Owing to the scattered positions of the various units, it took some time to consolidate the force as it was before.175
The three squadrons of Cullinanís Horse did not leave Kuruman with the rest of the Eastern Force, as they were given the task to escort a convoy with 107 cases of ammunition and an artillery battery to South-West Africa. A and B Squadrons left Kuruman on 28 March. On the road, they were caught by rain and bitterly cold temperatures, without overcoats. On the evening of 5 April, rations of rum had to be issued to comfort the men. Boesmansput was reached on 6 April. Having a heavy load, Major Cullinan sought the advice of Sir Thomas Cullinan on how best to get through the Thirst Belt. It was decided to place 50 men on the wagons; to lead their horses;to limit the use of water to the absolute minimum; and to increase the number of oxen to 20 per span Ė this arrangement had to be approved by their superiors. The following day, Captain Wilson with half of A and B Squadrons left Boesmansput.176 The cold weather continued and on the night of April 8, the column had to be stopped several times to allow the thinly clad men to make fires to warm themselves. They arrived at Witdraai on 10 April, 62 hours after leaving Boesmansput. The rest of A and B Squadrons arrived at Witdraai on 12 April. On 13 April, A and B Squadrons of Cullinanís Horse with a machine gun section and signallers left Witdraai Ė a group of 6 officers, 153 other ranks with 169 horses, 3 wagons and 74 oxen. On 21 April they crossed the border at Rietfontein and from here rapidly advanced through enemy territory Ė Arinab (22 April), Stampriet (27 April), Daweb (28 April), Vaalgras (1 May) and Daberas (3 May).
Cullinanís Horse C Squadron under Captain Swanepoel had the task of escorting the K Battery Heavy Artillery, commanded by Captain C Lucien, with two 12 pond naval guns and 16 wagons with ammunition and provisions. By 8 April, they started the trek from Kuruman. When at Lower Dikgatlhong on 13 April, Swanepoel received instructions from Boesmansput to split the convoy. Half would leave first, with guns following. The first half arrived at Boesmansput on 15 April, the others a day later.
Swanepoel received new marching orders at Boesmansput. He had to cross the Thirst Belt in two groups. The first group included all the horses and half of the squadron; the second included the artillery pieces. All the men had to walk. The first group left Boesmansput on 16 April and arrived at Witdraai on 19 April. The second group, with the artillery pieces, did not do so well. The men, suffering from sore feet, some unable to walk and grumbling, sent a request forward to have fresh oxen sent back. They only arrived at Witdraai on 23 April. From here, they made haste to cross the border around 28 April, Arinab (30 April), Vaalgras (5 May) to arrive at Daberas on 7 May.
Although not part of any military action, Cullinanís Horse did remarkably well to bring the artillery and ammunition from their supply base in Kimberley to Daberas, stretching over 1†160km, in little more than a month, using oxen only.177 Their arrival completed the full establishment of the Eastern Force in every detail, and with all units ready to move forward with supplies etc.178
Dissolution of the Eastern Force
After Berrangť left for Daberas, the pursuit of the main enemy force was entirely in the hands of Mackenzieís Central Force, who moved in rapidly from the southwest towards the railway line, while the Eastern Force had to cover the right flank the Central Force on the eastern side of the railway line.179 Mackenzie scored a victory at the battle of Gibeon on 27 April, the day before Berrangť reached Daberas, but the enemy succeeded in getting most of its troops away. The Union forces were in no condition for a long chase as their dash across country had left men and horses severely exhausted. The battle of Gibeon, though the most considerable of the whole southern campaign, failed to be the complete victory hoped for. Nevertheless, it was decisive - the southern campaign was over.180 On the same day, General Smuts issued a proclamation announcing the conquest of the whole southern territory.181
It was already known that the Eastern, Central and Southern Forces would be amalgamated into a single force. The news of the Battle of Gibeon and General Mackenzieís occupation of Gibeon on 28 April reached Daberas only on 2 May. Berrangť immediately went to report to Mackenzie at Gibeon to receive orders about the amalgamation of the forces.182
On 11 May, orders were received for the dissolution of the Eastern Force. Only the 5th SAMR and small parts of the Kalahari Horse and Cullinanís Horse would remain in the campaign Ė all the other units were to be sent home.183 Berrangť recorded it tersely:184
The 9th BMR left for Keetmanshoop on 13 May. The K Battery Heavy Artillery, who arrived at Daberas only a week earlier after their arduous trek from Kuruman, left for Cape Town on the same day.185 The Kalahari Horse and Cullinanís Horse were reduced and amalgamated. The 5th SAMR, under the command of Berrangť, was to remain in the south to take over the policing of the entire area with garrisons in Keetmanshoop, Gibeon, Rehoboth, Mariental, Berseba and MaltahŲhe until civilian rule could be established.186
Colonel JA van Zyl, commander of the Kalahari Horse, was awarded a Distinguished Service Order (DSO) for his clever use of scouting patrols in desert warfare in the South-West African campaignĖ one of the roughly 9000 DSOís awarded during the First World War. From this narrative of the Eastern Force, it is obvious that Van Zyl and the Kalahari Horse were always in the forefront of action, often operating independently and far ahead of the main force.187
The relationship between Berrangť and Van Zyl might have been uneasy. They fought on opposite sides during the Boer War, Van Zyl as a rebel. Moreover, they both took part in the battle of De Klipdrift / Tweebosch towards the end of the Anglo-Boer War Ė Berrangť part of Lord Methuenís force and Van Zyl part of De la Reyís commando. The British suffered a humiliating defeat after General van Zyl led the opening charge on the British. It is well known that there was a simmering tension in the newly formed Union Defence Force going back to the Anglo-Boer War which had to be managed with great wisdom and tact by General Louis Botha. During the South-West African campaign, the Kalahari Horse adopted an informal regimental song with words written by SJPK Riekert. The first verse started with:
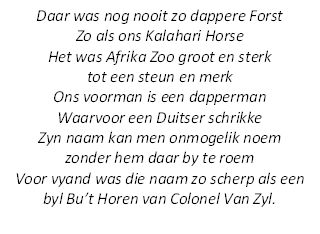
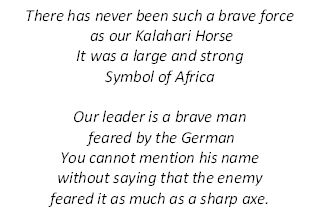
The sixth verse reveals a glimpse of disrespect to Berrangťís leadership:
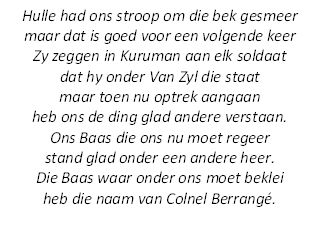
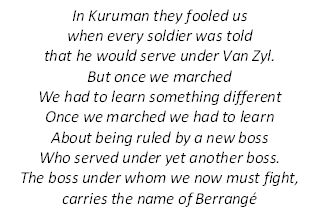
The Eastern Force was neither a numerically strong force, nor did it engage in the larger battles of the southern campaign. Except for minor skirmishes and its participation in the fight for Kabus, itsvalue was mainly due to its strategic position, always a hovering threat from the east. This did not diminish its role in the overall playing out of the southern campaign. The Times History of the War put it succinctly:188
The Eastern Force played a role in the important evacuation of Aus, although it was far away to the east. A captured enemy officer, when asked why the formidable fortifications at Aus had been abandoned, pointed despairingly to the place on the map occupied by Hasuur and replied:189,190
The Eastern Force had left a second, perhaps larger legacy, namely that of pluck and innovation. Its troops marched with great speed and determination. After the campaign, enemy commanders acknowledged that ďthey never conceived it possible that a force so large could be transported with ammunition, supplies and equipment, through so many hundred miles of waterless, uninhabited sandy desertĒ.192 In addition, it was supported by a logistical tour de force which involved donkeys, oxen, horses, camels, motor cars, water exploration and communications over a supply line which was never equalled before in South African history Ė neither in distance, nor in hardship.
ďBerrangťís TrekĒ is a chapter from our past that bears retelling to the present generation. The paper is closed with the final paragraph of Colonel Berrangťís report to General Jan Smuts:193
Christiaan Laurence Anthony Berrangť (Figure 24) was born in 1864 and educated at Graaff-Reinet, son of Johan Christian Brasler Berrangť and Emily Locke Lamont and grandson of Anthony Berrangť and Anna Christina Wilhelmina Brasler.194 His grandfather was Civil Commissioner of Graaff-Reinet and his father was Secretary of the Graaff-Reinet Branch of the SA Mortgage and Investment Company.
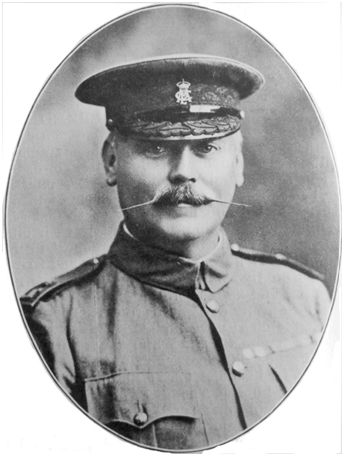
Figure 24. Colonel CLA Berrangť.
(Old Colonists of the Cape Colony and Orange River Colony, p20)
On leaving school he joined the Stockenstroom Volunteer Rifles to serve through the Gaika-Galeka War of 1877-1878, and subsequently through the Basutoland War of 1881. In 1883 he joined the Cape Police, in which his promotion was rapid, securing a commission in 1892 and a captaincy five years after the Bechuanaland Rebellion (1896-97).195 He took the rank of Major in October 1899.196 During the Anglo Boer War, he was successful with twenty men in breaking through the enemyís forces at Kimberley and entering unscathed. During the siege he was placed in command of C Squadron of the Kimberley Mounted Corps and when the siege was raised, he joined Lord Methuenís column, being mentioned in dispatches for saving a convoy near Boshof. Afterwards he became attached to Colonel Mahanís column, in charge of A Squadron of the Kimberley Mounted Corps during the march to the relief of Mafeking. He holds the distinction of having been the first to enter Mafeking with his squadron. He then served with General Hunter in various parts of the Transvaal, and subsequently with General Settle and General Scobellís column, and led the right wing traversing the Transvaal, Orange River Colony and the Cape Colony. He was more than once mentioned in dispatches for his service rendered during the war, consequently decorated by the Duke of Connaught on the Horse Guard Parade, London, with the distinguished Order of CMG.197
During World War One, he was involved during the early phase of the South-West African campaign as commander of the 5th SAMR when he took up a position on the southern border of South-West Africa to control Ramanís drift on the Orange River. At the time of the Battle of Sandfontein on 26 September 1914 where the Union troops surrendered after being outgunned by the enemy, he was at Houmís Drift about 24km east of Ramanís Drift.198 After Sandfontein, the campaign was temporarily halted while the Afrikaner Rebellion was put down. Upon its resumption, Berrangť and the 5th SAMR were deployed at Kimberley as narrated at the start of this paper. The paper ended with Berrangť being put in charge of the garrisons in southern South-West Africa during May 1915. Less than a year later, in February 1916, he was commanding the 3rd South African Infantry Brigade in East Africa with the rank of Brigadier-General.199 By 1919, he was referred to as General Berrangť.
Information was provided by Carole Beneke, Harald Koch, Hennie Heymans, Evert Kleynhans, Kobus van Zyl and Kevin Watermeyer. Farm owners and hosts along the campaign route, too many to mention, were helpful and kind during field work in Jun 2019. Elsa Riekert shared an unpublished manuscript of her late father. The Department of Defence Documentation Centre in Centurion arranged access to the war diaries. The Transnet Heritage Library (THL) provided most of the photographs. Locations of farms were mostly found from www.fallingrain.com. To all, my deepest appreciation and gratitude.
Abbott, Henry, and Van Zyl, Kobus (2018) Camels to Cruisers: 100 Years of Police Adventure in the Kalahari. Witdraai Centenary Album 1907 Ė 2007, Just Done Productions, Durban.
Akweenda, S (1997) International Law and the Protection of Namibiaís Territorial Integrity. Martinus Nijhoff Publishers, The Hague.
Anonymous (1906) Old Colonists of the Cape Colony and Orange River Colony. Eyre and Spottiswood
Anonymous (2019) The Soldierís Burden. http://www.trenchfighter.com/40117/40776.html
Anonymous (2019) Tiger Kloof Educational Institute.
https://en.wikipedia.org/wiki/Tiger_Kloof_Educational_Institute
Dane, Edmund (1919) Chapter 3: British Campaigns in Africa and the Pacific 1914-1918. Hodder and Stoughton, London.
https://archive.org/stream/britishcampaigns00dane/britishcampaigns00dane_djvu.txt
CLA Berrangť (1915) Report on the Formation and Operations of the Eastern Force in German South-West Africa up to 15 May 1915. Copy in Department of Defence Documentation Centre, WW1 GSWA Box 20, Pretoria.
Collyer,†The Campaign in German South West Africa, 1914-1915,†p 161.
Department of Defence Documentation Centre (2019) World War 1 GSWA Diaries: 9th Bechuanaland Mounted Rifles.
Department of Defence Documentation Centre (2019) World War 1 GSWA Diaries: Cullinanís Horse.
Department of Defence Documentation Centre (2019) World War 1 GSWA Diaries: 5th South African Mounted Riflemen.
ďELĒ (1915) Kimberley to Keetmanshoop: A Record March Across the Kalahari with the 5th SAMR. The Nonquai Volume 4 Number 1.
Government Printer (1923) Union of South Africa and the Great War 1914-18: Official History. Pretoria.
Johannes Haarhoff (2015). Construction of the Prieska Ė Kalkfontein Railway Line 1914-15, Part 2. Civil Engineering, May 2015.
King CES (1915) Unpublished report from the Transport and Remount Office of the Eastern Force to Colonel Berrangť dated 29 July 1915. Copy in Transnet Heritage Library, Johannesburg.
King CES (1919) General Berrangťís March Across the Kalahari. Royal Colonial Institute Journal, Volume10.
https://archive.org/stream/unitedempire10royauoft/unitedempire10royauoft_djvu.txt.
LíAnge, Gerald (1991) Urgent Imperial Service: South African Forces in German South West Africa 1914-1915. Ashanti Publishing, Rivonia.
Kleynhans, Evert (2016) A Critical Analysis of the Impact of Water on the South African Campaign in German South West Africa, 1914-1915. Historia, Volume 61 Number 2.
http://www.scielo.org.za/scielo.php?script=sci_arttext&pid=S0018-229X2016000200002
Pelteret, Robin (2008) Berrangť Family in South Africa.
http://www.pelteret.co.za/content/000003/Berrangť-Family-in-South-Africa.pdf
Rayner, WS and OíShaughnessy (1916) How Botha and Smuts Conquered German South West. Simpkin Marshal Hamilton Kent and Company, London.
Reuters Special Correspondent (1915) With Col. Berrangťís Column: Transport Triumphs. The Northern News, Vryburg, 2 June 1915. Copy in Transnet Heritage Library, Johannesburg.
Riekert, Donald W (2009) Verby die Groot Stormloop. Unpublished biography of General JA van Zyl, made available privately by Erika Riekert in 2019.
Strachan, Hew (2004) The First World War in Africa. Oxford University Press.
https://books.google.co.za/books?id=L5ZJCAAAQBAJ&pg=PA212&lpg=PA212&dq=cal+berrangť&source=bl&ots=E5n
pNoTdz4&sig=j_0Dg06f7miQngzD6l4d-C4PY4Q&hl=en&sa=X&ved=2ahUKEwjB5qXnvYreAhXrKsAKHeAAAvwQ6AEwB3oECAAQAQ#v=onepage&q=cal%20berrangť&f=false
The Times (1916) History of the War, Volume 8, Chapter 130. The Times, London.
https://archive.org/details/timeshistoryofwa08lond/page/n5
Thompson ES (1987) A Machine Gunnerís Odyssey Through German East Africa: The Diary of ES Thompson January 1916 Ė February 1917. Military History Journal, vol 7 no 3 June 1987.
Van der Merwe, PJ (1941) Pioniers van die Dorsland, (Translated by Margaretha Schšfer). Rapid Access Publishers.
Van Schoor, MCE (2006) Generaal JCG Kemp en die Epiese Woestyntog, Protea Boekhuis, Pretoria.
Volz, Stephen (2014) The Rise and Fall of the Moffat Institution: Mission Education in a Colonial Borderland. South African Historical Journal, Volume 66 No 3.
https://doi.org/10.1080/02582473.2014.881910.
Von Oelhafen, Hans (1923) Der Feldzug in SŁdwest 1914-1915. Safari-Verlag, Berlin.
Appendix - Coordinates of Locations Mentioned in Text
| Bernau | 26į 58í S | 24į 47í E |
| Lochnagar | 27į 02í S | 24į 31í E |
| Middelvlei | 27į 07í S | 24į 13í E |
| Zwartfontein | 27į 10í S | 24į 06í E |
| Driehoek | 27į 15í S | 24į 02í E |
| Magagapere | 27į 24í S | 23į 40í E |
| Kuruman | 27į 28í S | 23į 26í E |
| Kimberley | 28į 43í S | 24į 47í E |
| The Bend | 28į 36í S | 24į 34í E |
| Barkly Bridge | 28į 33í S | 24į 32í E |
| Berrangťís Bridge | 28į 23í S | 24į 19í E |
| Rietfontein | 28į 22í S | 24į 08í E |
| Koopmansfontein | 28į 14í S | 24į 02í E |
| Vierling / Kamden | 28į 04í S | 24į 01í E |
| Blikfontein | 27į 49í S | 23į 55í E |
| Kuruman | 27į 28í S | 23į 26í E |
| Kuruman | 27į 28í S | 23į 26í E |
| Seodin | 27į 25í S | 23į 26í E |
| Tsineng | 27į 05í S | 23į 04í E |
| Lower Dikgatlhong | 27į 06í S | 22į 56í E |
| Mophepe | 26į 57í S | 22į 46í E |
| Bushmanís Pit | 26į 47í S | 22į 09í E |
| Newton | 27į 01í S | 21į 44í E |
| Matlapaning | 27į 01í S | 21į 47í E |
| Witkrantz | 27į 00í S | 21į 30í E |
| Eersterust | 27į 04í S | 20į 57 E |
| Witdraai | 26į 57í S | 20į 42í E |
| Blauwkrantz | 26į 55í S | 20į 21í E |
| Hakskeenpan | 26į 48í S | 20į 11í E |
| Inkbospan | 27į 00í S | 20į 32í E |
| Klipkolk | 26į 52í S | 20į 06í E |
| Koopan | 26į 54í S | 20į 36í E |
| Koppieskraalpan | 26į 57í S | 20į 13í E |
| Loubos | 26į 42í S | 20į 07í E |
| Luitenantspan | 26į 58í S | 20į 35í E |
| Oxford | 26į 58í S | 20į 13í E |
| Rietfontein | 26į 45í S | 20į 02í E |
| Sannaspoort | 26į 45í S | 20į 00í E |
| Schepkolk | 26į 49í S | 20į 09í E |
| Arinab1 | ? | ? |
| Aroab | 26į 48í S | 19į 39í E |
| Aus | 26į 40í S | 16į 16í E |
| Blumputz | 26į 32í S | 19į 33í E |
| Blaukehl | 26į 08í S | 18į 16í E |
| Blau Ost | 26į 11í S | 18į 21í E |
| Daberas | 25į 29í S | 18į 32í E |
| Daweb | 26į 18í S | 18į 36í E |
| DŲrstamp | 26į 34í S | 18į 53í E |
| DwŲrer | 00į 00í S | 00į 00í E |
| Eisnstein | 00į 00í S | 00į 00í E |
| Garinais | 26į 25í S | 18į 51í E |
| Geitsanes | 27į 05í S | 19į 00í E |
| Gibeon | 25į 10í S | 17į 50í E |
| Gross Aub | 26į 33í S | 19į 08í E |
| Guruchab | 26į 34í S | 18į 45í E |
| Hanapan | 26į 48í S | 19į 44í E |
| Hasuur | 26į 35í S | 19į 50í E |
| Itsawisis | 26į 14í S | 18į 10í E |
| Kabus | 26į 19í S | 18į 15í E |
| Kameelmund | 26į 40í S | 18į 30í E |
| Keetmanshoop | 26į 35í S | 18į 08í E |
| Kiriis West | 26į 35í S | 18į 57í E |
| Klipdam | 27į 06í S | 19į 53í E |
| KoŽs | 25į 57í S | 19į 07í E |
| Koichus | 26į 43í S | 19į 26í E |
| Manasse | 26į 42í S | 19į 59í E |
| Nui Nui | 26į 46í S | 18į 54í E |
| Platbeen | 27į 17í S | 19į 26í E |
| Sandmodder | 26į 57í S | 18į 55í E |
| Schanskolk | 26į 46í S | 19į 58í E |
| Sorenstein2 | ? | ? |
| Spitzkop | 26į 24í S | 18į 28í E |
| Stampriet | 26į 30í S | 18į 41í E |
| Ukamas | 28į 02í S | 19į 44í E |
| Vaalgras | 26į 09í S | 18į 27í E |
| Wortal | 26į 06í S | 18į 10í E |
1 between Aroab and Koichus
2 between Daweb and Kabus
---oooOOOooo---
1 ďELĒ (1915) Kimberley to Keetmanshoop: A Record March Across the Kalahari with the 5th SAMR, p24. Opening lines of a letter written on 20 April from Kabus.
2 CES King (1919) General Berrangeís March Across the Kalahari, p147.
3 WS Rayner et al (1916) How Botha and Smuts Conquered German South West, p119.
4 CES King (1915) Unpublished report from the Transport and Remount Department, p10.
5 Edmund Dane (1919) British Campaigns in Africa and the Pacific 1914-1918, p50.
6 Reuters (1915) With Col. Berrangťís Column.
7 A detailed account is provided by MCE van Schoor (2006) Generaal JCG Kemp en die Epiese Woestyntog.
8 Gerald LíAnge (1991) Urgent Imperial Service, p151.
9 Gerald LíAnge (1991) Urgent Imperial Service, p142.
10 Hew Strachan. The First World War in Africa, p85.
11CES King (1919) General Berrangeís March Across the Kalahari, p147.
12 Government Printer (1923) Union of South Africa and the Great War: Official History, p60.
13 CLA Berrangť (1915). Report to General Smuts.
14 CES King (1915) Unpublished report from the Transport and Remount Department, p1.
15 Anonymous (1919). SA Mounted Rifles 1911-1922.
16 CES King (1915) Unpublished report from the Transport and Remount Department, p1.
17 Department of Defence Documentation Centre. World War 1: BMR diary.
18 Department of Defence Documentation Centre. World War 1: BMR diary.
19 Department of Defence Documentation Centre. World War 1: BMR diary.
20 CES King (1919) General Berrangeís March Across the Kalahari, p147.
21 Department of Defence Documentation Centre. World War 1: BMR diary.
22 Johannes Haarhoff (2015). Construction of the Prieska Ė Kalkfontein Railway Line 1914-15, pp31-40.
23 ďELĒ (1915) Kimberley to Keetmanshoop: A Record March Across the Kalahari with the 5th SAMR, p24.
24 ďELĒ (1915) Kimberley to Keetmanshoop: A Record March Across the Kalahari with the 5th SAMR, p24.
25 Department of Defence Documentation Centre. World War 1: BMR diary.
26 Department of Defence Documentation Centre. World War 1: BMR and SAMR diaries.
27 Donald W Riekert (2009) Verby die Groot Stormloop, Chapter 44, unpublished biography of General JA van Zyl, made available by the authorís daughter Erika Riekert in 2019.
28 For the same reason, General Kemp became a Major and General Beyers a Brigadier-General. Van Zyl preferred to be addressed as ďColonelĒ, but his men continued with ďGeneralĒ or informally as ďOom KoosĒ. Others, like Generals Botha and Smuts, retained the rank of General.
29 Donald W Riekert (2009) Verby die Groot Stormloop, Chapter 44, unpublished biography of General JA van Zyl, made available by the authorís daughter Erika Riekert in 2019.
30 http://www.trenchfighter.com/40117/40726.html
31 Department of Defence Documentation Centre. World War 1 GSWA Diaries: Cullinanís Horse.
32 Department of Defence Documentation Centre. World War 1 GSWA Diaries: Cullinanís Horse.
33 CLA Berrangť (1915). Report to General Smuts.
34 CES King (1919) General Berrangeís March Across the Kalahari, p147.
35 CLA Berrangť (1915). Report to General Smuts. The overlap in phrases between this and the previous quote is more than coincidental.
36 Stephen Volz (2014) The Rise and Fall of the Moffat Institution.
37 Anonymous (2019) Tiger Kloof Educational Institute. It was founded in 1905 as the successor of the Moffat Institution.
38 Donald W Riekert (2009) Verby die Groot Stormloop, Chapter 44.
39 One of the three buildings survives to this day as the Home Economics wing of the Kalahari High School.
40 CES King (1919) General Berrangeís March Across the Kalahari, p147.
41 Donald W Riekert (2009) Verby die Groot Stormloop, Chapter 46. The second camp was on the site of the current police station in the centre of Kuruman.
42 Donald W Riekert (2009) Verby die Groot Stormloop, Chapter 46.
43 ďELĒ (1915) Kimberley to Keetmanshoop: A Record March Across the Kalahari with the 5th SAMR, p24.
44 Department of Defence Documentation Centre. World War 1 GSWA Diaries: Cullinanís Horse.
45 CES King (1915) Unpublished report from the Transport and Remount Department, p2.
46 CES King (1919) General Berrangeís March Across the Kalahari, p148.
47 CES King (1915) Unpublished report from the Transport and Remount Department, p2.
4 8CES King (1919) General Berrangeís March Across the Kalahari, p151.
49 CES King (1919) General Berrangeís March Across the Kalahari, p148.
50 CES King (1919) General Berrangeís March Across the Kalahari, p149.
51 CES King (1919) General Berrangeís March Across the Kalahari, p149.
52 Donald W Riekert (2009) Verby die Groot Stormloop, Chapter 47.
53 Kleynhans, Evert (2016) A Critical Analysis of the Impact of Water on the South African Campaign.
54 WS Rayner et al (1916) How Botha and Smuts Conquered German South West, p129.
55 CES King (1919) General Berrangeís March Across the Kalahari, p148.
56 CES King (1919) General Berrangeís March Across the Kalahari, p149.
57 Donald W Riekert (2009) Verby die Groot Stormloop, Chapter 47.
58 CLA Berrangť (1915). Report to General Smuts.
59 CES King (1919) General Berrangeís March Across the Kalahari, p149.
60 Kleynhans, Evert (2016) A Critical Analysis of the Impact of Water on the South African Campaign.
61 CES King (1915) Unpublished report from the Transport and Remount Department, p10.
62 CES King (1919) General Berrangeís March Across the Kalahari, p150.
63 Government Printer (1923) Union of South Africa and the Great War: Official History, p57.
64 CES King (1919) General Berrangeís March Across the Kalahari, p148.
65 Gerald LíAnge (1991) Urgent Imperial Service, p152.
66 CES King (1919) General Berrangeís March Across the Kalahari, p150.
67 Donald W Riekert (2009) Verby die Groot Stormloop, Chapter 46.
68 Colonel Berrangť was mentioned as being driven in a German Adler car during the campaign.
69 Reuters (1915) With Col. Berrangťís Column.
70WS Rayner et al (1916) How Botha and Smuts Conquered German South West, p130.
71 CES King (1919) General Berrangeís March Across the Kalahari, p151.
72 CLA Berrangť (1915). Report to General Smuts.
73 Department of Defence Documentation Centre. World War 1: Cullinanís Horse diary.
74 CLA Berrangť (1915). Report to General Smuts.
75 CLA Berrangť (1915). Report to General Smuts.
76CES King (1919) General Berrangeís March Across the Kalahari, p150.
77CES King (1919) General Berrangeís March Across the Kalahari, p150.
78 CES King (1915) Unpublished report from the Transport and Remount Department, p10.
79 CES King (1915) Unpublished report from the Transport and Remount Department, p9.
80CLA Berrangť (1915). Report to General Smuts. ďBushedĒ meant that bushes and branches were laid on the loose sand; ďcorduroyedĒ meant that a layer of corduroy material was placed on top for stability of this rudimentary road formation.
81 CLA Berrangť (1915). Report to General Smuts.
82 CES King (1919) General Berrangeís March Across the Kalahari, p151.
83 Reuters (1915) With Col. Berrangťís Column.
84 Donald W Riekert (2009) Verby die Groot Stormloop, Chapter 48.
85 WS Rayner et al (1916) How Botha and Smuts Conquered German South West, p129.
86 CES King (1919) General Berrangeís March Across the Kalahari, p150.
87 Department of Defence Documentation Centre. World War 1: Cullinanís Horse diary.
88 ďELĒ (1915) Kimberley to Keetmanshoop: A Record March Across the Kalahari with the 5th SAMR, p25.
89 CES King (1919) General Berrangeís March Across the Kalahari, p148.
90 ďELĒ (1915) Kimberley to Keetmanshoop: A Record March Across the Kalahari with the 5th SAMR, p25.
91CLA Berrangť (1915). Report to General Smuts.
92 Henry Abbott et al (2018) Camels to Cruisers, p33.
93 S Akweenda (1997) International Law and the Protection of Namibiaís Territorial Integrity, p118 11.
94 PJ van der Merwe (1941) Pioniers van die Dorsland, p85.
95 Edmund Dane (1919) British Campaigns in Africa and the Pacific 1914-1918, p50.
96 Donald W Riekert (2009) Verby die Groot Stormloop, Chapter 47.
97 CES King (1915) Unpublished report from the Transport and Remount Department, p7.
98 WS Rayner et al (1916) How Botha and Smuts Conquered German South West, p130.
99 Department of Defence Documentation Centre. World War 1: SAMR diary.
100 Witkrantz was not one of the initial water points on the Thirst Belt. It is likely that this was the site where one of the boring parties tried unsuccessfully to drill for water, therefore the presence of the water tanks.
101 CLA Berrangť (1915). Report to General Smuts.
102 CLA Berrangť (1915). Report to General Smuts.
103 CES King (1919) General Berrangeís March Across the Kalahari, p151.
104 CLA Berrangť (1915). Report to General Smuts.
105 Department of Defence Documentation Centre. World War 1: SAMR diary.
106 Donald W Riekert (2009) Verby die Groot Stormloop, Chapter 48.
107 Donald W Riekert (2009) Verby die Groot Stormloop, Chapter 48.
108 Donald W Riekert (2009) Verby die Groot Stormloop, Chapter 48.
109 Government Printer (1923) Union of South Africa and the Great War: Official History, p54.
110CLA Berrangť (1915). Report to General Smuts. Petrus Johannes Badenhorst is buried in the Rietfontein Village Cemetery.
https://www.southafricawargraves.org/lists/southafrica_n_cape.htm
111 Government Printer (1923) Union of South Africa and the Great War: Official History, p54.
112 Donald W Riekert (2009) Verby die Groot Stormloop, Chapter 48.
113 CES King (1919) General Berrangeís March Across the Kalahari, p151.
114 CES King (1919) General Berrangeís March Across the Kalahari, p152.
115 ďELĒ (1915) Kimberley to Keetmanshoop: A Record March Across the Kalahari with the 5th SAMR, p25.
116 ďELĒ (1915) Kimberley to Keetmanshoop: A Record March Across the Kalahari with the 5th SAMR, p25.
117 CLA Berrangť (1915). Report to General Smuts.
118 Gerald LíAnge (1991) Urgent Imperial Service, p152.
119 WS Rayner et al (1916) How Botha and Smuts Conquered German South West, p130.
120 Department of Defence Documentation Centre. World War 1: BMR diary.
121 ďELĒ (1915) Kimberley to Keetmanshoop: A Record March Across the Kalahari with the 5th SAMR, p25.
122 ďELĒ (1915) Kimberley to Keetmanshoop: A Record March Across the Kalahari with the 5th SAMR, p25.
123 Donald W Riekert (2009) Verby die Groot Stormloop, Chapter 48.
124 Department of Defence Documentation Centre. World War 1: SAMR diary.
125 Donald W Riekert (2009) Verby die Groot Stormloop, Chapter 48.
126 CES King (1919) General Berrangeís March Across the Kalahari, p152.
127 Department of Defence Documentation Centre. World War 1 GSWA Diaries: Cullinanís Horse.
128 ďELĒ (1915) Kimberley to Keetmanshoop: A Record March Across the Kalahari with the 5th SAMR, p25.
129 WS Rayner et al (1916) How Botha and Smuts Conquered German South West, p130.
130 Gerald LíAnge (1991) Urgent Imperial Service, p152.
131 ďELĒ (1915) Kimberley to Keetmanshoop: A Record March Across the Kalahari with the 5th SAMR, p25.
132 CLA Berrangť (1915). Report to General Smuts.
133CLA Berrangť (1915). Report to General Smuts.
134CLA Berrangť (1915). Report to General Smuts. Berrangť may have made a mistake in his report, by reporting that Lieutenant Hobson was in command of the return patrol in one place, while mentioning Lieutenant Smit as the commander in another.
135 WS Rayner et al (1916) How Botha and Smuts Conquered German South West, p130.
136 WS Rayner et al (1916) How Botha and Smuts Conquered German South West, p146.
137 CES King (1915) Unpublished report from the Transport and Remount Department, p8.
138 Anonymous (2019) The Soldierís Burden.
139 WS Rayner et al (1916) How Botha and Smuts Conquered German South West, p130.
140 Donald W Riekert (2009) Verby die Groot Stormloop, Chapter 48.
141 CLA Berrangť (1915). Report to General Smuts.
142 CLA Berrangť (1915). Report to General Smuts.
143 Department of Defence Documentation Centre. World War 1: BMR diary.
144 Department of Defence Documentation Centre. World War 1: SAMR diary.
145 Government Printer (1923) Union of South Africa and the Great War: Official History, p54. Berrangeís report to General Smuts indicated that the Union casualties were nil.
146 CES King (1919) General Berrangeís March Across the Kalahari, p153.
147 Department of Defence Documentation Centre. World War 1: SAMR diary.
148 WS Rayner et al (1916) How Botha and Smuts Conquered German South West, p130.
149 The Times History of the War (1916), pp260-266. The Times, London.
150https://www.geni.com/people/Genl-Sir-Jacob-Louis-van-Deventer/6000000078625364041
151https://www.geni.com/people/Brigadier-Dirk-Jacob-Carel-Bekker-van-Deventer/6000000078625643017
152 CLA Berrangť (1915). Report to General Smuts.
153 CLA Berrangť (1915). Report to General Smuts.
154 CES King (1919) General Berrangeís March Across the Kalahari, p153. Heliograph range is generally considered to be 50km to 80km under favourable conditions.
155 CES King (1919) General Berrangeís March Across the Kalahari, p153.
156 CLA Berrangť (1915). Report to General Smuts.
157 WS Rayner et al (1916) How Botha and Smuts Conquered German South West, p139.
158 ďELĒ (1915) Kimberley to Keetmanshoop: A Record March Across the Kalahari with the 5th SAMR, p26.
159 ďELĒ (1915) Kimberley to Keetmanshoop: A Record March Across the Kalahari with the 5th SAMR, p26.
160 ďELĒ (1915) Kimberley to Keetmanshoop: A Record March Across the Kalahari with the 5th SAMR, p26.
161 ďELĒ (1915) Kimberley to Keetmanshoop: A Record March Across the Kalahari with the 5th SAMR, p26.
162 ďELĒ (1915) Kimberley to Keetmanshoop: A Record March Across the Kalahari with the 5th SAMR, p26.
163 CLA Berrangť (1915). Report to General Smuts.
164 ďELĒ (1915) Kimberley to Keetmanshoop: A Record March Across the Kalahari with the 5th SAMR, p26.
165 CLA Berrangť (1915). Report to General Smuts.
166 Donald W Riekert (2009) Verby die Groot Stormloop, Chapter 48.
167 Department of Defence Documentation Centre. World War 1: SAMR diary.
168 This account of the battle of Kabus was compiled from all the available sources; footnotes are therefore omitted from this section. For closer study and verification, the reader should consult the list of references Ė most include some material on the battle of Kabus.
169 It was presumably at this point where Lieutenant EB Watermeyer was captured.
170 CLA Berrangť (1915). Report to General Smuts.
171 CLA Berrangť (1915). Report to General Smuts.
172 CLA Berrangť (1915). Report to General Smuts.
173 CES King (1919) General Berrangeís March Across the Kalahari, p153.
174 CLA Berrangť (1915). Report to General Smuts.
175 CLA Berrangť (1915). Report to General Smuts.
176 Major Cullinan injured his foot by falling off a horse and was recuperating in hospital. He resumed command on 13 April.
177 CES King (1915) Unpublished report from the Transport and Remount Department, p8.
178 CLA Berrangť (1915). Report to General Smuts.
179 WS Rayner et al (1916) How Botha and Smuts Conquered German South West, p139.
180 Times History of the War, chapter 80, pp260-266.
181 Times History of the War, chapter 80, pp260-266.
182 CLA Berrangť (1915). Report to General Smuts.
183 CLA Berrangť (1915). Report to General Smuts.
184 CLA Berrangť (1915). Report to General Smuts.
185 CLA Berrangť (1915). Report to General Smuts.
186 CLA Berrangť (1915). Report to General Smuts.
187 Donald W Riekert (2009) Verby die Groot Stormloop, Chapter 48.
188 Times History of the War, chapter 80, pp260-266.
189 Reuters (1915) With Col. Berrangťís Column.
190 Gerald LíAnge (1991) Urgent Imperial Service, p152.
191 Gerald LíAnge (1991) Urgent Imperial Service, p155.
192 CES King (1919) General Berrangeís March Across the Kalahari, p153.
193 CLA Berrangť (1915). Report to General Smuts.
194 Most sources mistakenly name him as CAL instead of CLA Berrangť.
195 Anonymous (1906) Old Colonists of the Cape Colony and Orange River Colony, Eyre and Spottiswood, p20.
196 Robin Pelteret (2008) Berrangť Family in South Africa.
197 Anonymous (1906) Old Colonists of the Cape Colony and Orange River Colony, Eyre and Spottiswood, p20.
198 WS Rayner et al (1916) How Botha and Smuts Conquered German South West, p40.
199 ES Thompson (1987) A Machine Gunnerís Odyssey Through German East Africa, parts 1 and 2 in
Military History Journal