
 The South African
Introduction
The Eastern Force, commanded by Colonel Berrangķ,was the smallest of the four forces participating in the South-West African campaign during World War One. Military historians mostly glossed over its campaign, merely noting that the Eastern Force had to overcome severe hardship to cross the inhospitable Kalahari desert from their advance base at Kuruman. A more detailed narrative of its campaign is provided in a series of three papers, of which this is the third.
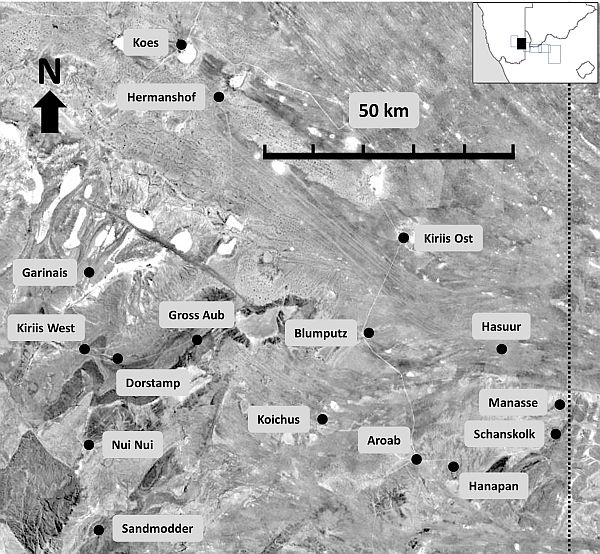
Figure 1. Area between the Namibian border and Kiriis West.
The first paper covered the formation of the Eastern Force and its logistical planning for crossing the Kalahari (Haarhoff, 2021); the second the problems and hardships of crossing the Kalahari (Haarhoff, 2022). This third paper picks up at Rietfontein in March 1915, as Colonel Berrangķ had his force assembled after its arduous crossing of the ōThirst Beltö, ready to enter enemy territory.
From the Border to Gross Aub
After the battle of Rietfontein on 18 March, the enemy retreated to their bases in German South-West Africa. The Eastern Force, now largely reassembled, marched into enemy territory on 1 April 2015 (see Figure 1). The closest enemy post was at Schanskolk, a ōvery progressive German farmö on a ridge which formed a natural fort with heavy boulders and featured a strong well, filled with sheep carcasses, and a dam of which the wall was partially blown away (Rayner & OÆShaughnessy, 1916, p 130); Department of Defence, BMR SAMR Diaries). Figure 2 shows a remaining prison building constructed during German col-onial rule. The Eastern Force brought up their guns, shot down the walls of the enemy blockhouse and captured the surviving defenders (LÆAnge, 1991, p 152).
On the same day, the force continued to Hasuur, a stronger, better fortified police post. It was described as a ōcold, bleak placeö consisting of a couple of very substantial police buildings and a well with a good supply of water. The enemy evacuated Hasuur without offering any opposition before the Eastern Force arrived. From here, two patrols of the Eastern Force were sent ahead. The first encountered an enemy patrol near Hasuur and pursued them to Blumputz, where an enemy trooper was captured (Riekert, 2009, Chapter 48; Department of Defence, SAMR Diaries). A second group of the Kalahari Horse under Captain Gers was sent forward to Aroab, where ten of the enemy retreated after fierce fire (Riekert, 2009, Chapter 48). The Eastern Force reached Arinab, a stud farm owned by an enemy officer, on 3 April. From here, they moved camp to Koichus, an unoccupied farm still with cattle and other property ōproving that the occupier had left in a considerable hurryö (EL, 1915, p 25). At Koichus, the force paused for a few days for all the units to catch up and to bring sufficient supplies forward.

Figure 2. Prison at the Schanskolk police post
dating from the German colonial period, in 2019.
(Johannes Haarhoff)
On 14 April, the main force left Koichus. The next obstacle was an enemy position at Gross Aub, a fortified police post in a mountain pass, situated on a hill which commanded miles of surrounding country, with a ōsubstantial building, stables and storeroom, all enclosed by a wall three metres high, well loopholedö (Rayner & OÆShaughnessy, 1916, p 130). It was stormed and the 300 defenders put to flight (LÆAnge, 1991, p 152). The heliograph station at Gross Aub was an important link in the enemyÆs communication network. The present remains are shown in Figure 3.
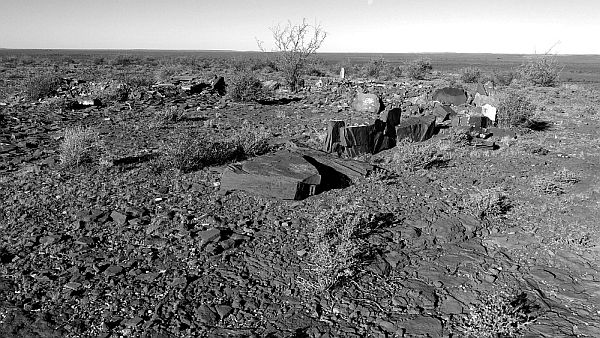
Figure 3. Remains of enemy heliograph station
at Gross Aub in 2019 (Johannes Haarhoff)
The Raid on Koļs
Earlier, on 5 April, four days after crossing the border, two squadrons of the Kalahari Horse were despatched to Koļs, known to be an enemy post. On arrival, they captured 500 head of cattle and 2000 head of small stock and took one prisoner. Their own losses were one wounded (Trooper TJ Steyn) and one captured (Trooper M Louw). Van Zyl and the Kalahari Horse returned to join the main force, but left Lieutenant Hobson with five troopers behind to return with the animals at their own pace. On their way back, Hobson and his group encountered some 40 of the enemy who made a determined attempt to recapture the animals. After an engagement of two and a half hours, Hobson and his men succeeded in driving them off, enabling the stock to be successfully returned. After the campaign, Trooper D Jacobs of the Kalahari Horse was recommended for displaying considerable bravery during this encounter (Berrangķ, 1915):
(Berrangķ made an error by naming both Lieutenants Smit and Hobson as the commander in different places in the same report. It is unclear which is correct.) After the raid on Koļs, the troops returned via Koichus to join Berrangķ and the main force at Kiriis West on 15 April.
The Taking of Kiriis West
On 13 April, as the Eastern Force was about to move from Koichus, Berrangķ despatched a patrol of 14 men of the Kalahari Horse under Lieutenant Wessels to cut the railway line near Itsawisis ¢ ōan ambitious plan which came very near successö (Rayner & OÆShaughnessy, 1916, pp 130, 146). Due to a lack of water, the patrol had to fall back without achieving their objective. On their way back, on 14 April, they ran into the Third Reserve Company under Lieutenant Egersdorff at Kiriis West (King 1915, p 8). Fierce fighting went on from 09h00 to 14h00 before the Kalahari Horse retired with the loss of six casualties ¢ two wounded (Sergeant J Etzebeth, who died a few days later (Anonymous, 2020) and Sergeant L le Grange) and four captured (Corporal PWS Terblanche and Troopers JA Prinsloo, JJF Markram and HH Sonnekus). The enemy lost one lieutenant killed, one man wounded, two taken prisoner and nine horses (Rayner & OÆShaughnessy, 1916, p 130; Riekert, 2009, Chapter 48). The enemy withdrew from Kiriis West that same night (Berrangķ, 1915).
On 14 April at noon, exactly when the return patrol of the Kalahari Horse was engaged with the enemy at Kiriis West, BerrangķÆs force was dislodging the enemy from Gross Aub. When word got to Gross Aub about the engagement at Kiriis West, a squadron of the Eastern Force was rushed to Kiriis West, but when it arrived there, the enemy had already left. The squadron camped at Kiriis West for the night (Berrangķ, 1915). Early the next morning, Captain Frylinck of the Kalahari Horse arrived to reinforce their position, with Berrangķ and the rest of the troops arriving later the same morning (Department of Defence, BMR Diaries).
Both Berrangķ and the enemy commanders were handicapped by poor intelligence. When the enemy commander at Daweb received a report that Colonel Berrangķ with a force of 2 500 men had crossed the desert and were on their way to Kiriis West, he dismissed the intelligence as a mistake. He considered it utterly impossible for so large a force to cross the Kalahari desert and believed that the number must have been 250 men. He therefore sent a small enemy force of 300 riflemen and two machine guns to keep Berrangķ away from Kiriis West. On 15 April Berrangķ, in turn, received news that a large enemy force of 800 men and two cannons had been advanced from Spitzkop through Stampriet to Kiriis West and he hastily took up a strong defensive position on 15 April in anticipation of a night attack (Department of Defence, SAMR Diaries). When the small enemy force arrived at Kiriis West on 16 April, the advance patrols of the Kalahari Horse repelled their attack and drove them back with losses of two troopers killed, one officer and two non-commissioned officers wounded, and four troopers captured; the Union loss was one killed and one wounded (Government Printer, 1923, p 54). The next day, 17 April, Berrangķ received another false alarm that the enemy was advancing in large numbers. A defensive position was taken up again, but nothing happened. By 15h30 the column left Kiriis West and marched in a northwestern direction towards Daweb.
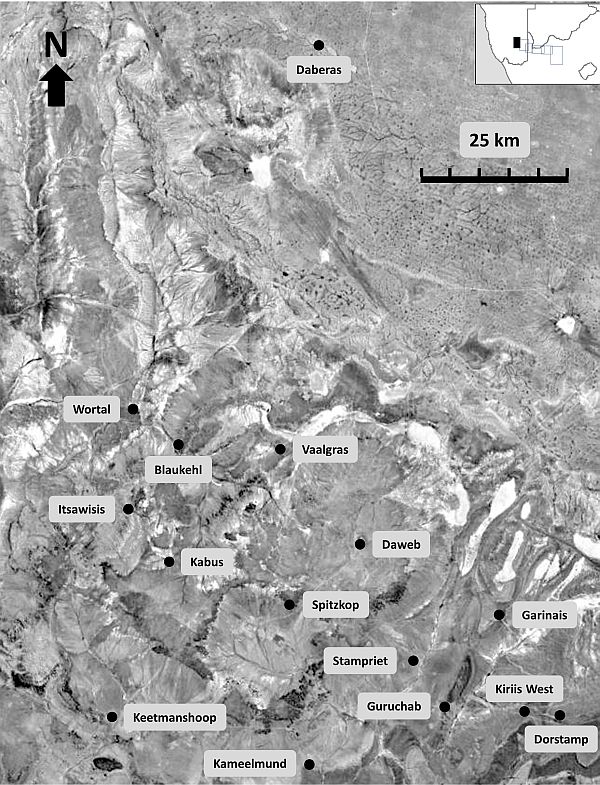
Figure 4. The terrain where the final
phase of the Eastern Force campaign played out.
The Joining of Forces
By the beginning of April 1915, the three Union columns in southern South-West Africa were closing in on the enemy ¢ from L³deritz, Karasburg and Rietfontein. The enemy held a strong position at Aus, but they had to be careful not to be isolated from their forces further north. The railway line was key to their rapid movement. As the Eastern Force came closer to the railway line, the enemy feared that the line might be cut off and therefore started their tactical withdrawal towards the north. It became a race against time ¢ could the Union troops block the railway line further north before the enemy in the south could complete their withdrawal? The rapid, optimal deployment of the Union columns, all converging on roughly the same point, would require effective coordination. General Jan Smuts, at military headquarters in Pretoria, ōwho had done a giant's work in the preparation and equipment of all the southern columnsö, arrived on 11 April in enemy territory to take personal command of the combined operations (Times History, 1916, pp 260-266).
An important part of the coordination was focused on the Southern and Eastern Forces sweeping in from the southeast and the east, moving closer to each other as they advanced. The Southern Force was commanded by Colonel Jacob Louis van Deventer (1874-1922), veteran from the Boer War and later knighted to be generally known as ōSir Jaapö. He sent one of his columns to his right with the objective of clearing the enemy from the intervening space between the Southern and Eastern Forces and making contact with Berrangķ. This column was commanded by Colonel-Commandant Dirk Jacob Carel Bekker van Deventer (1876-1945), the younger brother of Jaap.
As early as 15 March, Berrangķ tried to establish communication with the Southern Force by patrols and heliograph, but without success as Dirk van Deventer had no signallers with him. A day or two later the first contact was made when a patrol of the Southern Force turned up at Klipkolk to inform Berrangķ that Dirk van Deventer was moving forward from Platbeen. Berrangķ then lent two signallers to Dirk van DeventerÆs column to maintain communication (Berrangķ, 1915). By early April, the Southern and Eastern Forces came within heliograph range and communication improved. On 15 April, by order from Smuts, Van DeventerÆs column turned up at Kiriis West, the first physical contact between the two forces in enemy territory (King, 1919, p 153).
Towards Kabus
From Kiriis West, Berrangķ and Dirk van Deventer worked closely in the area shown in Figure 4. Their joint objective was to cut the railway line at Itsawisis about 40km north of Keetmanshoop, only 11km from a large military training school at Kabus. The school made provision for at least 1500 men with officersÆ quarters, barrack rooms for both single and married troops, mess rooms, kitchens, canteens, storerooms, workshop with numerous other buildings and outhouses, partly visible in Figure 5 (EL, 1915, p 26). Kabus would have to be cleared first.
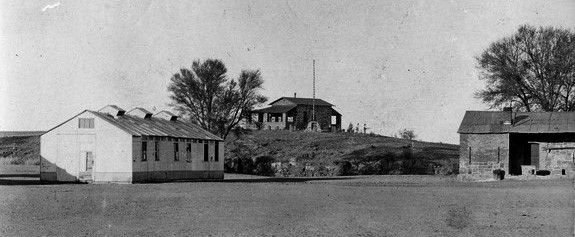
Figure 5. Part of the Kabus training school,
with officersÆ quarters and memorial
in the distance and hospital near left.
(Harald Koch)
As mentioned before, the Eastern Force left Kiriis West in pursuit of the enemy late in the afternoon of Saturday 17 April. They had their overnight camps at Dw÷rer (17 April), Spitzkop (18 April) and Daweb (19 April), reaching the latter only at 22h20 (EL, 1915, p 26). It was a difficult three days with bone-weary horses, lack of water due to destroyed wells, cold nights and a false alarm about an enemy attack. Simultaneously, Dirk van DeventerÆs column had been marching northwards via Kameelmund. Berrangķ and Van Deventer met at Stampriet (probably on 18 April) where the two commanders agreed that both forces would move towards Kabus, with the Eastern Force operating on the right (Berrangķ, 1915). The two leaders met again near midnight on 19 April at Daweb where Berrangķ was encamped. Van DeventerÆs force was camped further west, closer to Kabus. Intelligence indicated that the enemy was preparing with 600 men, 10 machine guns and two field guns at Kabus. It was agreed to form a combined force to attack Kabus, under the overall command of Van Deventer. The Eastern Force contributed 350 men (Major Frylinck commanding 250 men of the Kalahari Horse and Captain Wimble 100 men of the 5th SAMR A and C Squadrons) and two machine guns (Riekert, 2009, Chapter 48). Van Deventer would command his 150 men of the Southern Force. The reinforcements from the Eastern Force left their camp at Daweb at 03h00 to join Van DeventerÆs men at their camp at daybreak (Department of Defence, SAMR Diaries).
The Battle of Kabus
(This account of the battle of Kabus was compiled from all the available sources; references are therefore omitted from this section. For closer study and verification, the reader should consult the list of references ¢ most include some material on the battle of Kabus.)
Very early during the morning of 20 April, troops from both sides started to take up their positions at and near Kabus. Refer to Figure 6 to follow the remainder of this section.
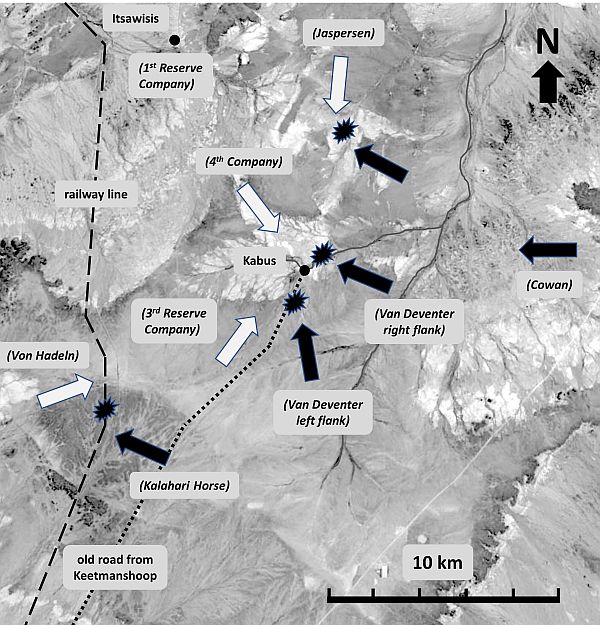
Figure 6. The battle of Kabus on 20 April 1915.
The enemy had five units in the field which would have a bearing on the battle of Kabus:
Van Deventer attacked Kabus from two directions. He utilised the riverbed to advance his right flank towards Kabus from the east, forcing the enemy to take up defensive positions south and north of the river. His left flank approached Kabus from the south. Around 08h00, his right flank drew the first enemy fire from the 4th Company, while their 3rd Reserve Company was still underway to Kabus. At the same time, the enemy group of Von Hadeln reached the railway line less than a kilometre north of the Kalahari Horse position, immediately coming under heavy fire. Both sides held their positions until about 10h00, until Von Hadeln attacked to drive the Kalahari Horse from their position with the help of a machine gun but suffered five wounded. The Kalahari Horse did not manage to damage the railway line. Von Hadeln then left north to join Von Kleist at Itsawisis and did not participate in the battle any further.
The gunfire at Kabus, once started, remained heavy without letting up for more than three hours. The two enemy companies, once united at Kabus, kept up a fierce defence and they kept Van DeventerÆs left flank at bay. On Van DeventerÆs right flank, as his men were manoeuvring into a better position near the riverbed, the enemy mounted a daring counterattack with machine gun fire at 08h20 which eventually dislodged them from that position by 09h00. During this operation, two Union officers and 27 troopers were taken prisoner. Fierce fighting continued until about 11h00.
At about 09h00, the enemy platoon of Leutnant Jaspersen, approaching Kabus from the north, ran into a Union patrol that skirted around their right flank to attack them from the rear and disrupt their line of withdrawal between Kabus and Itsawisis. Jaspersen was quickly ordered to block their advance and was sent some reinforcements from Kabus. A drawn-out battle of more than two hours followed, the Union troops eventually withdrawing.
During the morning, more Union troops continued to arrive at Kabus from Keetmanshoop, halting just outside the range of the enemy fire. By about 11h00, it was clear that Van Deventer was not making progress; the patrol of the Kalahari Horse had been driven away from the railway line by Von Hadeln; the northern patrol had been pushed back by Jaspersen; his right flank in the riverbed had been dislodged with heavy loss; and his animals were in desperate need of water. For these reasons, Van Deventer ordered a withdrawal. Major Frylinck of the Kalahari Horse sent a note to Berrangķ, still some 8km to the southeast, to inform him that he was ordered to withdraw; that he had been heavily engaged with the enemy; and that he was in need of an ambulance. Berrangķ immediately left for Kabus with Major Cowan and the 9th BMR in support of Frylinck. On their way, they met retiring troops from the disintegrating left flank. Berrangķ sent for Van Deventer by motor car (heliograph communication failed), who personally confirmed to Berrangķ that he was retiring.
On the enemy side, a message was reportedly sent on horseback from the enemy command to Von Kleist to withdraw all their forces to Itsawisis. This message was issued at 10h00 (presumably from Keetmanshoop), but for some reason, it was delivered on horseback to Von Kleist only three hours later, at 13h00. The order was carried out immediately and the two enemy companies joined their comrades at Itsawisis by 15h00. After an hour of rest, the combined enemy force marched further north to Wortal as part of their strategic withdrawal towards Windhoek.
When Major Cowan and his two squadrons of the BMR, 100 men in total, stormed into Kabus, he therefore found a battle site where both the enemy and the left flank of the Union troops had withdrawn. The enemyÆs main body had left together with their guns and a group of prisoners captured earlier that morning. Only the enemy ambulances and their wounded remained on the battle site. The enemy wounded were later collected under protection of the Red Cross, also returning one of the captured troops that was heavily wounded.
By evening, the entire Eastern Force had moved to Kabus to camp for the night. The enemy got away with a loss of two killed and 16 wounded; the Union casualties being 10 wounded and about 30 prisoners including two officers. Another report stated the enemy losses as none killed and 12 wounded, of which four died later (Von Oelhafen, 1923). A vast quantity of military stores was left behind. Figure 7 shows the battle memorial erected at Kabus.
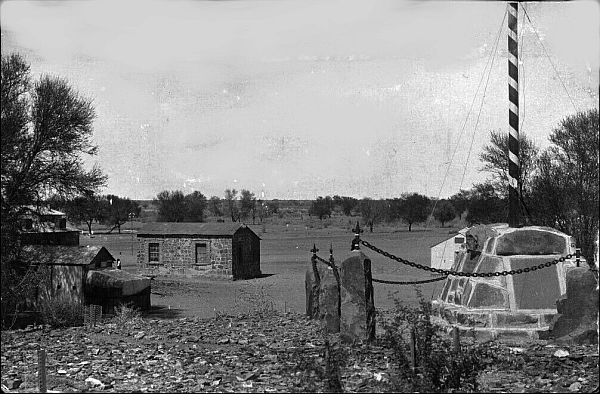
Figure 7. Memorial and old buildings at Kabus. (Harald Koch)
The Final March to Daberas
On the evening of the battle of Kabus, orders were received for the amalgamation of the Southern and Eastern Forces. Lieutenant-Colonel van Zyl proceeded on 21 April to Keetmanshoop to have discussions with Colonel Dirk van Deventer, with Colonel Berrangķ and Brigadier- General Jaap van Deventer joining them the next day. The Eastern Force was ordered to march northwards via Blau Ost and Vaalgras. It reached its final camp at Daberas on 28 April, some 90km northeast of Kabus. Camping beside a large pan of water, the main body of Berrangķ's force rested for the first time since leaving Kuruman, now in possession of all the posts between Keetmanshoop and Daberas. Owing to the scattered positions of the various units, it took some time to consolidate the force as it was before Berrangķ, 1915).
Notably, the last part of the Eastern Force to arrive were the three squadrons of CullinanÆs Horse. As recalled from the previous paper, these troops did not leave Kuruman with the rest of the Eastern Force, as they were held back to escort two later convoys. On 28 March, Captain Wilson left with A and B Squadrons escorting 107 cases of ammunition and a machine gun section. On 8 April, Captain Swanepoel and C Squadron left to escort K Battery Heavy Artillery, commanded by Captain C Lucien, with two 12 pound naval guns and 16 wagons with ammunition and provisions. The two convoys were both carrying exceptionally heavy loads which made the crossing of the Thirst Belt of the Kalahari especially arduous. Special plans were made, such as splitting the convoys into smaller groups, letting the men march on foot and putting others on the wagons, and increasing the number of oxen to 20 per wagon, with limited success. Moreover, the men were caught, without overcoats, by rain and bitterly cold temperatures. The first convoy reached and crossed the border on 21 April; the second on 29 April. Once in enemy territory, conditions eased considerably and both convoys advanced rapidly via Arinab and Vaalgras, joining the Eastern Force at Daberas on 3 and 7 May respectively. Although not seeing any military action, CullinanÆs Horse did remarkably well to bring the artillery and ammunition from their supply base in Kimberley to Daberas, stretching over 1 160km, in little more than a month, using oxen only. Their arrival completed the full establishment of the Eastern Force in every detail, and with all units ready to move forward, fully supplied (King, 1915, p 8).
Dissolution of the Eastern Force
After Berrangķ left for Daberas, the pursuit of the main enemy force was entirely in the hands of MackenzieÆs Central Force, who moved in rapidly from the southwest towards the railway line, while the Eastern Force had to cover the right flank of the Central Force on the eastern side of the railway line (Rayner & OÆShaughnessy, 1916, p 139). Mackenzie scored a victory at the battle of Gibeon on 27 April, the day before Berrangķ reached Daberas, but the enemy succeeded in getting most of its troops away. The Union forces were in no condition for a long chase as their dash across open country had left men and horses severely exhausted. The battle of Gibeon, the most considerable of the whole southern campaign, failed to be the complete victory hoped for. Nevertheless, it was decisive -the southern campaign was over. On the same day, General Smuts issued a proclamation announcing the conquest of the whole southern territory.It was already known that the Eastern, Central and Southern Forces would be amalgamated into a single force. The news of the Battle of Gibeon and General MackenzieÆs occupation of Gibeon on 28 April reached Daberas only on 2 May. Berrangķ immediately reported to Mackenzie at Gibeon to receive orders about the amalgamation of the forces (Berrangķ, 1915). On 11 May, orders were received for the dissolution of the Eastern Force. Only the 5th SAMR and small parts of the Kalahari Horse and CullinanÆs Horse would remain in the campaign ¢ all the other units were to be sent home. Its commander recorded tersely (Berrangķ, 1915):
The 9th BMR left for Keetmanshoop on 13 May. Spare a thought for the K Battery Heavy Artillery escorted by CullinanÆs Horse C Squadron, who arrived at Daberas only a week earlier after their arduous trek from Kuruman, who were turned back to Cape Town without seeing the enemy or even hearing a shot.The Kalahari Horse and CullinanÆs Horse were reduced and amalgamated. The 5th SAMR, under the command of Berrangķ, was to remain in the south to take over the policing of the entire area with garrisons in Keetmanshoop, Gibeon, Rehoboth, Mariental, Berseba and Maltah÷he until civilian rule could be established (Berrangķ, 1915).
Reflection
Colonel JA van Zyl, commander of the Kalahari Horse, was awarded a Distinguished Service Order (DSO) for his clever use of scouting patrols in desert warfare in the South-West African campaign ¢ one of the roughly 9000 DSOÆs awarded during the First World War. From this narrative of the Eastern Force campaign, it is obvious that Van Zyl and the Kalahari Horse were always in the forefront of action, often operating independently and far ahead of the main force (Riekert, 2009, Chapter 48).
The relationship between Berrangķ and Van Zyl might have been uneasy. They fought on opposite sides during the Anglo-Boer War, Van Zyl as a rebel. Moreover, they both took part in the battle of De Klipdrift / Tweebosch towards the end of that war ¢ Berrangķ in Lord MethuenÆs force and Van Zyl a part of De la ReyÆs commando. The British suffered a humiliating defeat after General van Zyl led the opening charge on the British. It is well known that there was a simmering tension in the newly formed Union Defence Force going back to the Anglo-Boer War which had to be managed with great wisdom and tact by General Louis Botha. During the South- West African campaign, the Kalahari Horse adopted an informal regimental song with words written by SJPK Riekert.
The first verse started with:
[There has never been such a brave force
as our Kalahari Horse
it was a large and strong
Symbol of Africa
Our leader is a brave man
Feared by the German
You cannot mention his name
without adding that the enemy
feared it as much as a sharp axe.]
The sixth verse reveals a glimpse of disdain to BerrangķÆs leadership:
Hulle had ons stroop om die bek gesmeer
maar dat is goed voor een volgende keer
Zy zeggen in Kuruman aan elk soldaat
dat hy onder Van Zyl die staat
maar toen nu optrek aangaan
heb ons de ding glad andere verstaan
Ons Baas die ons nu moet regeer
stand glad oner een andere heer,
Die Baas waar onder ons moet beklei
heb die naam van Colnel Berrangķ
[In Kuruman they fooled us
When every soldier was told
That he would serve under van Zyl.
But once we marched
We had to learn something different
Once we marched we had to learn
About being ruled by a new boss
Who served under yet another boss.
The boss under whom we must now fight,
Carries the name of Berrangķ]
The Eastern Force was neither a numerically strong force, nor did it engage in the larger battles of the southern campaign. Except for minor skirmishes and its participation in the battle of Kabus, its value was mainly due to its strategic position, always a hovering threat from the east. This did not diminish its role in the overall playing out of the southern campaign. It was put succinctly (Times History, 1916):
A captured enemy officer, when asked why they abandoned the formidable fortifications at Aus, pointed to the place on the map occupied by Hasuur and replied (Reuters Correspondent, 1915; LÆAnge, 1991, p 152):
ōBerrangķÆs Trekö is a chapter from our military past that bears retelling to the present generation. The final paragraph of Colonel BerrangķÆs report to General Jan Smuts read (Berrange, 1915):
Acknowledgements
Information was provided by Carole Beneke, Harald Koch, Hennie Heymans, Evert Kleynhans, Kobus van Zyl and Kevin Watermeyer. Farm owners and hosts along the campaign route, too many to mention, were helpful and kind during field work in June 2019. Elsa Riekert shared an unpublished manuscript of her late father. The Department of Defence Documentation Centre in Centurion arranged access to the war diaries. The Transnet Heritage Library (THL) provided most of the photographs. Locations of farms were mostly found from www.fallingrain.com To all, my appreciation and gratitude.
Bibliography
Anonymous. The SoldierÆs Burden. http://www.trenchfighter.com/40117/40776.html, visited 2020
Berrangķ, CLA. Report on the Formation and Operations of the Eastern Force in German South-West Africa up to 15 May 1915 (Copy in Department of Defence Documentation Centre, WW1 GSWA Box 20, Pretoria)
Department of Defence Documentation Centre. 5th South African Mounted Riflemen (GSWA Diaries, Box 20, 1915)
Department of Defence Documentation Centre. 9th Bechuanaland Mounted Rifles (GSWA Diaries, Box 20, 1915)
EL. Kimberley to Keetmanshoop: A Record March Across the Kalahari with the 5th SAMR (The Nonquai Volume 4 Number 1, 1915)
Government Printer. Union of South Africa and the Great War 1914-18: Official History. (Pretoria, 1923)
Haarhoff, J. BerrangķÆs Trek, Part 1: Assembly and Preparation of the Eastern Force for the South-West African Campaign 1915 (Military History Journal Vol 19 No3 December 2021)
Haarhoff, J. BerrangķÆs Trek, Part 2: From Kuruman to the German South-West African Border 1915 (Military History Journal, Vol 19 No 4 June 2022)
King, CES. Unpublished report from the Transport and Remount Office of the Eastern Force to Colonel Berrangķ dated 29 July 1915 (Copy in Transnet Heritage Library, Johannesburg)
LÆAnge, G. Urgent Imperial Service: South African Forces in German South West Africa 1914-1915. (Rivonia, Ashanti Publishing, 1991)
Rayner, WS and OÆShaughnessy. How Botha and Smuts Conquered German South West (London, Simpkin Marshal Hamilton Kent and Company, 1916)
Reuters Special Correspondent. With Col. BerrangķÆs Column: Transport Triumphs (The Northern News, Vryburg, 2 June 1915, copy in Transnet Heritage Library, Johannesburg)
Riekert, DW. Verby die Groot Stormloop (Unpublished biography of General JA van Zyl, 2009, made available privately by Erika Riekert in 2019)
The Times. History of the War (London, Volume 8, Chapter 130, 1916) https:// archive.org/details/timeshistoryofwa08lond/ page/n5
Von Oelhafen, H. Der Feldzug in S³dwest 1914-1915 (Berlin, Safari-Verlag, About the Author Johannes Haarhoff is a retired civil engineer with a lifelong interest in the history of technology, particularly how
Return to Journal Index OR Society's Home page
South African Military History Society / scribe@samilitaryhistory.org