
 The South African
Introduction
Heidelberg (Gauteng), like other towns, was fortified with blockhouses during the Second Anglo-Boer War. To the north north-east stood Dublin Hill with three blockhouses (cf. Green, 2022, p 112), to the north-north-west stood Somerset Hill with Fort Whatman on its crest. To the north-west - inside today’s Suikerbosrand Nature Reserve - stood Fort Copley and to the west, also now within the reserve, were erected three blockhouses at Fort Colville. Here they are called the East, South and West Blockhouses: collectively, the “Trio”. They stand alongside the later trigonometric beacon 147.
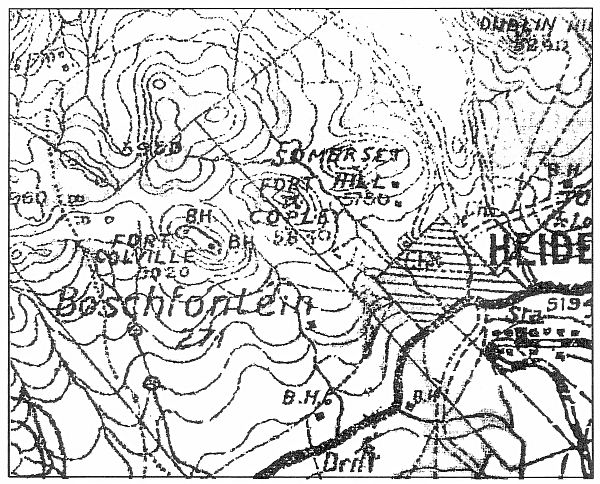
Figure 1. Major Jackson map [1902] showing Fort Colville,
Fort Copley, Somerset Hill and Dublin Hill.
Image Courtesy of Ditsong National Museum of Military History
A well-defined rock wall three km west-by-north of Heidelburg Town Hall, surrounds the site of the East blockhouse with the West and South Block houses in close proximity, forming a triangle.

Fig. 2 Map showing ten blockhouses from north to west of Heidelberg.
The “Trio”, plus another “blockhouse”, appear near the bottom left.
Map (Africa, 1:125 000, 1917) Robin W. Smith
Ten blockhouses appear on the map above: Figure 2.
Although numerous fortifications protected the pre-1959 Durban to Johannesburg railway line that passed through Heidelberg, the Trio, having been located over 4km away and having good visibility over Heidelberg and its approaches, probably were intended to defend the town.
Fort Colville
Grant (1910) mentions “Colville and his blockhouses”. Presumably, the Trio was named after the contemporary Lt-Col A.E.W. Colville, who was active in the area. His column consisted of 500 mounted troops, 300 infantry, four guns and one machine gun (see Grant, 1910, pp 514, 522; Uys, 1981, pp 92, 100; Uys, 2002, p 101). The nearby Fort Whatman also took its name from another officer, Captain Whatman, who fortified the nearby Somerset Hill.
Excerpt from Somerset Archive DD.SLI.1.4 (10):
G Coy under Capt Whatman sent out
on permanent picquet to fortify hill 2 miles
[3km] west of Heidelburg [sic] which hill
was afterwards Officially named Somerset
Hill,the Fort on its crest being named
Fort Whatman.
Fort Colville stands “2 miles (3,6km)
west of Heidelburg”; Somerset Hill lies
one mile (1,6km) north-north-west of
Heidelberg.
The archival excerpt is dated 28 June
1900; E Company took over the Trio on 8
August 1901. Captain Whatman, however,
commanded G Company, not E
Company, which wording appears on the
South Blockhouse. An early 1900's
Braune & Levy No. 1652 postcard titled
"Somerset Hill's Block House" shows a
circular Rice pattern blockhouse, not a
square stone structure like those of the
Trio. And with Grant’s mentioning “Colville
and his blockhouses”, these three
observations further confirm Fort
Colville’s location on the June 1902
Jackson map, Figure 1. Five circular-wall
stone ruins, visible on GE, (Google Earth)
plus another close by, all one mile
(1.6km) north-north-west of Heidelberg,
were discovered during a field visit on
20/3/2022, where Somerset Hill appears
on the Jackson map.
General description of the
blockhouses
Each blockhouse measures 6,5m
square. None has a roof. They “probably
had corrugated iron [CGI] roofs” (AvV to
AD, 3/3/2022). A rusted 100mm x 6mm
diameter nail was found here. Each floor
is littered with stones from the upper
walls. The remaining walls, in good
condition, average 2,5m in height. All
walls are built of partially dressed stone
using the dry-stone-walling technique
with some galleting (stone chips) (Green,
2022, pp 108, 346). The stones are
blocks of koppie rock 30cm-80cm long
and 15cm-30cm high. No zigzag pathways
are evident leading uphill towards
the blockhouses. Blockhouses were not
generally attacked by the Boers, hence
the absence of bullet marks on walls. As
attacks are not mentioned in the archives
or in the two Uys books, Mike Hardisty’s
view of no hostilities having taken place,
therefore, is supported.
Smaller stoneworks stand alongside
each blockhouse, which may have been
magazines, sangars, lookout posts,
latrines (likely further away), etc. Therefore,
“some of these [blockhouses] could
indeed actually be forts” (AvV to AD,
3/3/2022). Certainly, the East Blockhouse
was such one.
The East and South Blockhouses are
360m away from the West Blockhouse;
310m separate the East and South
Blockhouses (GE).
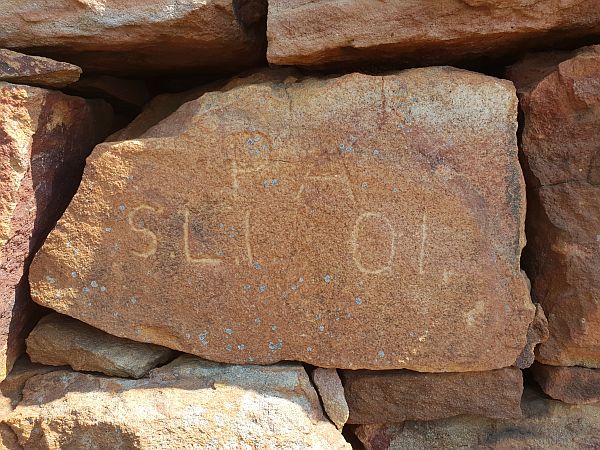
Significantly, however, the words XIII
SOMERSET E COY appear on the South
Blockhouse! The colour photograph on the
inside back cover is shown below with the text
from the South Blockhouse graffito.
Layout differences of the Trio
Five variations from other blockhouses
are apparent:
East Blockhouse
Location: The blockhouse lies 10m to the
west of trigonometric beacon 147.
Condition: Poor.
Entrance: Faces west, is 120cm wide and
only 75cm above ground, unlike the
elevated entrances at the South and West
Blockhouses. This might indicate that the
South and West Blockhouses were built
later to different specifications, with
entrances higher up.
Loopholes: None evident.
Graffiti: On the inside of the south wall,
74cm above ground, are ligatures 24cm
wide x 9cm high, possibly soldiers’ initials,
which are common at block-house sites
around Pretoria but not elsewhere.
Perimeter wall: The inside of the 130 cm
high wall is 210cm away from the north
blockhouse wall. The east surrounding
wall is 90cm wide; the north wall 70cm.
Relics: A rusted piece of CGI 57cm x
40cm and a smaller, earlier version of the
beacon signal lie near the east perimeter
wall.
Restoration: None visible.
Other features: The blockhouse plus
ancillary stoneworks are surrounded by a
long irregular stone wall, suggesting that
the East Blockhouse was a fort. The 1,0m
to 1,2m high wall spans an area 180m
wide and 220m long, i.e., under 4ha.
Numerous loopholes, typically 25cm (10
in) wide x 15cm (6in) high, appear along
the wall.
A fourth blockhouse?
Eleven adjacent thick-walled rings of
stones 2m-3m in diameter lie 50m southwest
of the East Blockhouse. The walls
are about 1m high: perhaps sleeping
quarters when covered with a tarpaulin?
One, in particular, still in good condition in
the form of a 1,5m square, may have
been a well (Green information,
14/5/2022).
Adjoining towards the south-east lies
a 20m diameter ring of stones suggesting
a mule enclosure with a muleteer’s room,
clearly visible on GE (Green information,
4/10/2021).
South Blockhouse
Location: Not visible from the East
Blockhouse. The West Blockhouse is
located at a compass bearing of 6°.
Elevation: 1 734m (GE).
Condition: Reasonable.
Dimensions: The north wall measures
650cm; the east wall 644cm.
Entrance: The north wall has a 76cm
wide opening 196cm above ground.
Loopholes: The bottom of two 8cm
wide x 32cm in high loopholes are
located 196cm above ground level,
115cm on either side of the entrance.
Ancillary stoneworks: A 30cm-high x
40cm-wide stone wall, 55m long and
37m away from the north of the
blockhouse, coincidentally pointing to
magnetic north, is built on relatively
level ground. The wall, when extended
south-wards, lines up with a fence and
road and is, in fact, a farm portion
boundary “and nothing to do with the
military occupation”. This is confirmed
by the dot-dash line, also aligned along
magnetic north, on the topo-cadastral
2628CB map (Green to AD, 26/3/2022).
Abutting the south wall, another
80cm wide x 1m high wall extends
southwards for about 10m, forms a right
angle and extends 50cm towards the
west.
Graffiti: Notably, the following
words appear:
SOMERSET E COY The inscription stands for E
Company, 2nd Battalion, Prince Albert’s
(Somersetshire Light Infantry) 13th of Foot.
"The Companies were numbered ‘A’ to ‘H’:
eight companies of 120 men each"
(Smith to AD, 21/10/2021).
The 88cm-wide lettering, in serif, is
chiselled deeply into the north-facing
wall, right-hand side, 90cm above
ground level. The E before COY is the
tallest letter being 11cm (4in) high and
probably bigger than the other letters to
signify that it does not stand for
(Somerset) East but for E Company.
The letter Y of COY is 9cm away from
the right-hand edge of the north wall.
The XIII sits 100cm above ground
and above the letters ME of Somerset.
Perimeter wall: A 70cm-wide entrance
faces north midway along the 123cm-high
surrounding wall, which is 213cm away
from the blockhouse.
Relics: Strands of thick barbed wire, about
1m inches) long, tightly wound together lie
in front of the block-house. “To prevent
wire-cutting, twisted strands of barbed wire
were made up to form a thick rope of wires”
(Green, 2020, p 158
Restoration: The north wall was restored to
a height of 310cm with roughly mortared
stones.
Other features: The east wall has two
openings 177cm above ground level; the
left measures 50cm wide x 40cm high; the
right 50cm x 30cm.
Intermediate sangar
Located about midway between the
South and West Blockhouses, the sangar is
bullet-shaped in plan. Aligned in a north-south
direction, it is 4m long; the inside of
its north wall is 196cm wide; the western
and eastern walls meet at a point at its
southern end. The sangar walls are 1m
high, the western wall is 50cm wide and
the entrance is in the north-western corner
of the west wall.
West Blockhouse
Location: On crest of hill.
Dimensions: The north wall is 650cm
long. Walls are about 70cm wide.
Loopholes: One facing east.
Ancillary stoneworks: Two large circular
stoneworks lie about 10m to the west.
They are the stone remains of a Rice
pattern corrugated iron blockhouse (Green
information, 4/10/2021).
Graffito:
Perimeter wall: An 80cm-wide entrance
faces east midway along the surrounding
wall, which is 210cm away from the blockhouse.
Relics: Flagon shards lie about 5m to
the east and south-east of the
blockhouse. Rusted flat pieces of sheet
iron lie near the east wall. One sheet
measures 36cm square; the second,
46cm x 60cm, has three holes about
8mm in diameter near one of the corners:
two (bullet?) holes have penetrated
from the one side and the third
(a nail?) from the other side.
Restoration: Roughly mortared stones
form a loophole, still in good condition,
about 12cm wide x 35cm high, 1m to the
right of the blockhouse entrance.
Other features: The interior floor is
littered with rocks lying over 1m high that
have fallen from the surrounding walls.
E Company movements
As the subject is an extensive one,
only the events of E Company follow.
Formed in 1685, the regiment went
through numerous name changes. The
2nd Battalion was raised in 1858
(Everett, 1934, pp 4, 254). From 1881-1912
the regimental title was Prince Albert’s
(Somersetshire Light Infantry). The appendage
“13th of Foot” had clung as it
had been part of its former name since
1751. Hence “PA SLI” and “XIII” noted
above. In 1921 the name was changed
a final time, becoming “The Somerset
Light Infantry (Prince Albert's)” until
1959, when a series of amalgamations
began with other units. (Wikipedia,
accessed 20/11/2021)
The 2nd Battalion disembarked at
East London on 12 April 1900 and entrained
to Aliwal North. Here they joined Maj.-Gen. Hart’s
column to relieve the town of Wepener,
near today’s Lesotho border,
which had been invested by General
Christiaan de Wet. On the 21st
E Company under Capt. Swayne, who was
adjutant of the 2nd Battalion, skirmished
with the Boers. By 6 May the battalion
had marched 258km. E Company entrained
to Vryburg on 29 May where Lt-Col Gallwey
took command (Everett, 1934, pp 339-340).
On 3 August 1900 E Company,
under Capt. Elger, left for Schweizer-
Reneke, which they garrisoned. On 27
September and again on 28 October
Commandant Van Zyl summoned the
garrison to surrender. On 24 November
it was relieved by Col. Milne. Three
days later the garrison left the town and
headed to Vryburg when, on the 29th, the
convoy was attacked. E Company, being in
the rear-guard, “acquitted themselves
right well” (Everett, 1934, pp 341, 347-348).
On 29 November 1900, “E Coy
under Capt Elger were in action near
Hanneys farm on their way from
Schweitzer [sic] Reneke to Vryburg ...
to go to Kimberley, Capt Elger being
wounded” (DD.SLI.1.4 (14)).
After one year’s absence, E
Company joined the battalion from
Kimberley and, on 2 July 1901, the
battalion was ordered to Heidelberg to
relieve the 3rd K.R.R. (King’s Royal
Rifles). E Company arrived
at Heidelberg on 3 July and on the 23rd, under
Capt. Elger, relieved the K.R.R.
Company at Nigel [mine]. On 8 August
the 2nd Battalion took over the
blockhouse line that had been held by
the 1st Rifle Brigade. E Company was
then relieved from the Nigel mine and
occupied the blockhouses (DD.SLI.1.4
(6, 7)), hence the “01” on the West
Blockhouse graffito.
On 13 February 1902 E Company
moved from Waterval Bridge, south of
Greylingstad, and doubled the blockhouse
garrison line from Zuikerbos Post,
near Fortuna, to Heidelberg. At
00h30 on 16 February, when they were
stationed at Steynskraal between
Heidelberg and Balfour, 150 Boers
“charged the wire defences with a mob
of cattle”. “Some 50 men got across,
leaving 150 cattle, some horses and a
rifle” behind. Here one private from E
Company was “dangerously wounded”
(DD. SLI.1.4 (22); Uys, 1981, p 194).
On 4 April 1902 E Company was
moved back to Waterval Bridge and
Greylingstad, having handed over to the 1st
Rifle Brigade their posts from Val to
Grootpan Hill. Peace was proclaimed on 1
June (DD.SLI.1.4 (24)).
The 2nd Battalion remained in
Heidelberg until 11 September 1902, when
they marched to Elandsfontein and on 25
October started their march to
Potchefstroom. On 22 December the
battalion moved into cantonments after
over three years in tents and bivouacs
(Everett, 1934, p 367).
Acknowledgements
Tony Burisch for his rediscovery of, and
tours to, the Trio; Mrs Ann Meisel for
editing article; Simon Green; Professor
Anton van Vollenhoven; respondents Mike
Hardisty, Robin W. Smith, Professor Ian
Copley, Richard Tomlinson, Vincent
Carruthers; Johannesburg Public Library
for Tomlinson’s Pretoriana paper.
Bibliography and sources
Africa 1:125 000 (map), Transvaal,
Johannesburg, Sheet South G-25 Q-1,
War Office 1917.
Ditsong: National Museum of Military History,
Johannesburg: Tomlinson, R. Bequest (not
catalogued): “Fortifications of the Second
Anglo-Boer War (1899-1902)”, vol. 2 (E-J).
Everett, H. The History of the Somerset Light
Infantry (Prince Albert’s) 1685-1914
Google Earth (kmz) (GE).
Grant, M.H. History of the War in South Africa
1899-1902, vol. IV (London, Hurst &
Blackett, 1910).
Green, S.C. Anglo-Boer War Blockhouses: a
Field Guide (Johannesburg, Porcupine Press, 2022).
Green, S.C. Anglo-Boer War Blockhouses: a
Military Engineer’s Perspective
(Johannesburg, Porcupine Press, 2020).
Green, Simon, information at Fort Colville,
4/10/2021; 14/5/2022; interview en route
to Heidelberg, 20/3/2022.
Jackson, Major H.M., no. 13 (map),
Johannesburg-Heidelberg, (third revised
edition, June 1902), Mapping Section, Field
Intelligence Dept - Army Headquarters.
Somerset Heritage Centre, Taunton, Somerset,
England: DD/SLI/1/4, Record of Service of
the 2nd Battalion [Somerset Light Infantry],
1/5/1900-23/10/1902, pp(1)-(25).
South Africa, 1:50 000 (map) sheet 2628CB,
1995, Heidelberg.
Union SA, 1:50 000 (map) sheet 2628AD,
1944 [south Springs, Nigel, north Heidelberg].
Uys, I. Heidelbergers of the Boer War
(Heidelberg, Uys, 1981).
Uys, I. Fight to the Bitter End
(Knysna, Fortress, 2002).
Wikipedia -Somerset_Light_Infantry
About the Author
Alkis Doucakis, a mechanical engineer, is
absorbed in local and regional historical
research. He has published in books, and in
peer-reviewed and other journals. Presently,
with Mrs Ann Meisel, the two are editing a
book titled, “The story of Johannesburg’s
Doornfontein”. In the interim, he has authored
a book on Gandhi in north-eastern Johannesburg
(1909-1938); another on the first Hellenic
school in SA (1931-1944); and on Linear B Europe’s
first written language (1450-1200
BC).
Return to Journal Index OR Society's
Home page
Elevation: 1 751m above sea level (GE).
Dimensions: The north wall measures
650cm; the east wall 663cm. The north
wall is 80cm wide; the west wall, 77cm.
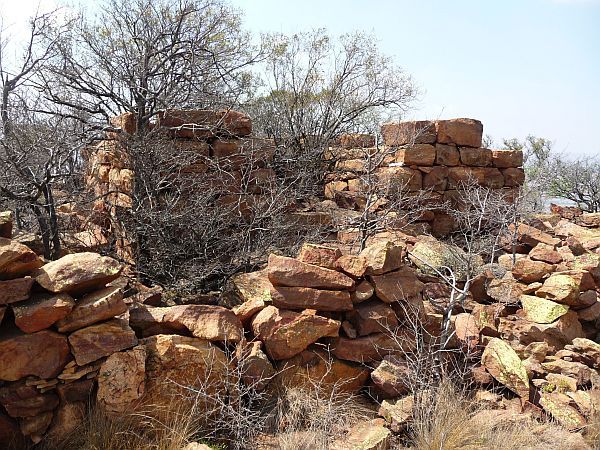
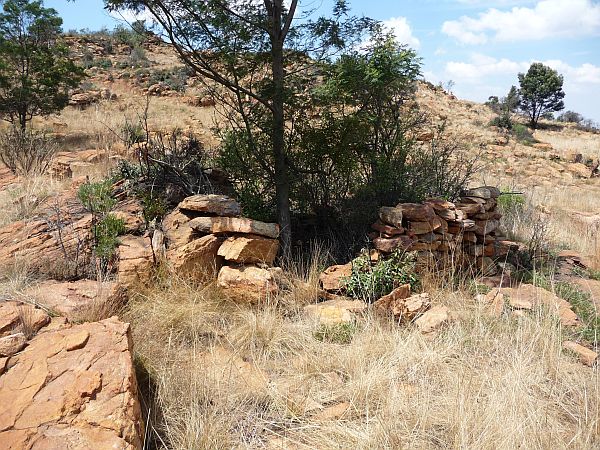
Fig.3 The East Blockhouse,
looking towards the south-west
Photo: AD, 4/10/2021
Ancillary stoneworks: See, “A fourth
blockhouse?” below. There is a stone
lookout post at the extreme north of the
wall surrounding the fort and a sangar on
the south-east of the blockhouse perimeter
wall (Green information, 14/5/2022).
Entry was probably from a retractable
stepladder: a common practice (AvV to
AD, 3/3/2022).
Figure 4 South Blockhouse looking
towards the south-south-west.
Also as a colour photo on back of issue.
Photo AD, 4/10/2021 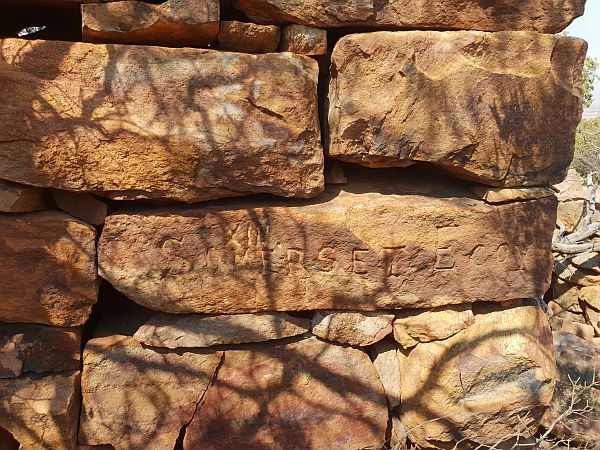
Photograph on inside front cover:
XIII SOMERSET E COY
chiselled on to the north west wall
of the South Blockhouse
Photo: AD, 4/10/21
(Green information, 4/10/2021)
The intermediate sangar looking
towards the north-east.
Photo AD, 4/10/2021 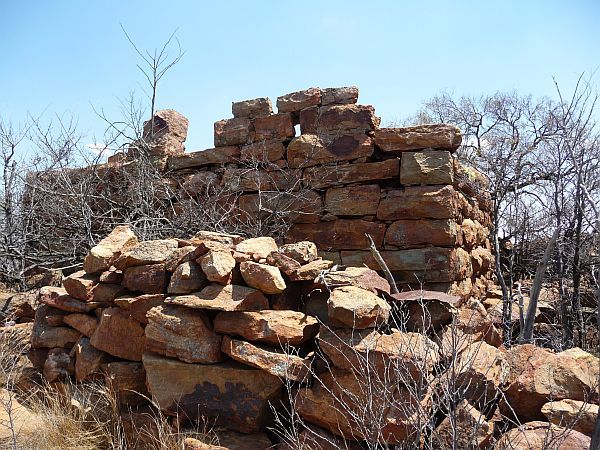
West Blockhouse looking towards the west.
Photo AD, 4/10/2021
Elevation: 1 758m (GE).
Condition: Of the Trio, this is the neatest in
construction (better stone-mason(s)?).
Entrance: The east-facing entrance
has been restored from stone roughly
mortared together, 76cm wide and 214cm
above ground
The following colour photo which was on the front inside cover
is shown here:
The letters PA above SLI 01
(Prince Albert’s Own Somersetshire Light Infantry, 1901)
(Green information 4 October 21) are scratched deeply on the
outside of the east wall.
(London, Methuen, 1927).