
 The South African
This is part 1 of a three part article. The full article, plus references, can be found in the Miscellaneous section of the Society’s website at www.samilitaryhistory.org
This is the plain unvarnished story of the wanderings of the 5th SAMR over 700 miles of desolate country, practically devoid of natural water and grazing. It is something to have had such an experience, but it was hard; hard for man and beast. We can afford to feel proud of it now, but there was little to feel proud of in the daily fights against blinding sand and dust, suffering the tortures of thirst, knowing that somewhere near us was an elusive enemy who might make a dramatic appearance at any moment and give us a taste of lead.
The South-West African campaign of the Union Defence Force in the early phase of World War One has been described and analysed by many historians. In a nutshell, South Africa declared war on Germany in September 1914 and agreed to a request from England to wrest two powerful radio transmitters in South-West Africa from enemy control. The fledgling Union Defence Force, established shortly before, decided on a four-pronged invasion of the German colony. The Northern and Central Forces, supplied from Cape Town by sea, launched their attacks directly from enemy territory at Walvis Bay and Lüderitz respectively. The Southern Force attacked from Upington, 125 km from enemy territory, towards Karasburg, supplied in part by a new railway line being hastily built during the campaign. The Eastern Force proceeded from Kimberley, 525 km away from the point where they planned to enter enemy territory, via Kuruman towards Keetmanshoop. The line of march of the Eastern Force, moreover, cut through the heart of the harsh Kalahari desert with practically no infrastructural support.
The activities of the Northern and Central Forces, and those of the Southern Force to a somewhat lesser extent, have been covered in great detail, but the campaign of the smaller Eastern Force, nicknamed “Berrangé’s Trek” after its commander Colonel Berrangé, has received nothing more than cursory mention. The Official History of the Great War, in the 33 pages devoted to the South-West African campaign, has less than a page in total on the Eastern Force. Robinson did not mention it at all. Ritchie referred to the Eastern Force in a single sentence. Rayner, in a book of about 300 pages, devoted four pages to the Eastern Force. Dane addressed it in only two pages. L’Ange, a more recent author, devoted less than two pages in his excellent book of 350 pages on the South-West African campaign, coming closest to a brief but coherent account of the Eastern Force campaign. These authors, understandably, wrote from a perspective where matters relating to strategy and military action were prioritised, rather than the more mundane problems of supply and transport logistics. However brief, they were unanimous in their praise of the Eastern Force in overcoming severe logistical and physical hardships mentioning “a fine example of the difficulties that may be overcome in a strategic advance across a desert”; “as clever a bit of work as will be encountered in the whole campaign”; “a march which ranks as one of the most brilliant achievements in the history of South Africa”; and more. What exactly were the difficulties encountered by the Eastern Force, and how were they overcome? This question was posed as early as 1919 when a member of the Eastern Force wrote in frustration:
A more comprehensive account of Berrangé’s Trek, from beginning to end and covering both its logistical challenges and its military actions, is overdue. This paper, the first of a series of three, addresses the assembly of the Eastern Force and the preparations for its trek over the waterless Kalahari desert.
Assembly of the Eastern Force
The Eastern Force was by far the smallest of the four parts of the South African Expeditionary Force to take part in the South-West African campaign, as shown in the official troop count on 15 March 1915 in Table 1.
| FORCE | ARTILLERY | MOUNTED | INFANTRY | ADMIN | TOTAL |
|---|---|---|---|---|---|
| Northern | 741 | 12773 | 5864 | 1491 | 10869 |
| Central | 575 | 3858 | 5583 | 855 | 10871 |
| Southern | 117 | 8438 | - | 631 | 9186 |
| Eastern | 40 | 2016 | - | 420 | 2476 |
| Total | 1473 | 27085 | 11447 | 3397 | 43402 |
Table 1. Summary of Union Troops in the Field on 15 March 1915
The order to mobilise the Eastern Force came on 4 January 1915, after the Northern, Central and Southern Forces had already been placed in the field. This made it “extremely difficult” to obtain enough suitable troops and equipment.
The Eastern Force, mainly composed of mounted riflemen, was up of roughly equal parts from the 5th South African Mounted Rifles (SAMR), the 9th Bechuanaland Mounted Rifles (BMR); the Kalahari Horse and Cullinan’s Horse. These units had their homes in Kimberley, Mafeking, Kuruman and Vryburg respectively. The Eastern Force was instructed to follow a line of march approximately indicated in Figure 1, which also provides the key map of the detailed maps following in this and subsequent papers. Kimberley was chosen as the main supply base as it was the only location with railway access on the route, and Kuruman the advance base from where the convoys would be despatched through the Kalahari desert.
The SAMR had five regiments throughout South Africa, with the 5th SAMR based in Kimberley. The Kimberley Regiment was commanded by Colonel CLA Berrangé, but when the Eastern Force was formed, Berrangé was promoted to be the force commander and Lieutenant-Colonel WW Rush took his place as commander of the 5th SAMR. The SAMR contributed four squadrons to the Eastern Force. Its Kimberley base for the campaign was established on the show grounds, close to the railway station and serviced by a short branch line with siding.
A strong Transport and Remounts section was stationed in Kimberley, commanded by Major C E S King, with Captain Eastwood second in command – see Figure 2. The eventual success of the campaign was in no small measure attributable to this section with “weeks and months of incessant toil, pushing, fitting out, leasing and despatching convoy after convoy – work which can only be appreciated by one who has been and thoroughly understands the heavy working of a large base depot”.
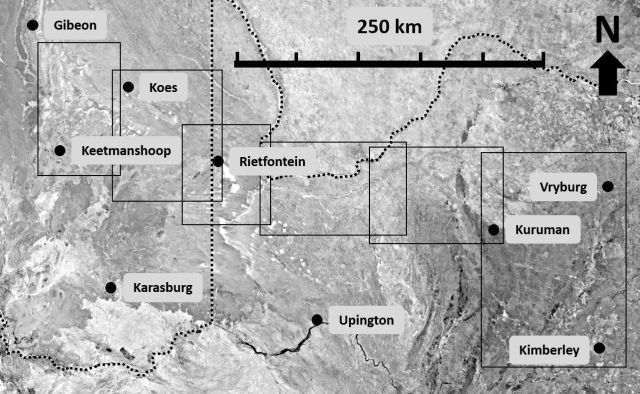
Figure 1. General route of the Eastern Force,
showing the areas to be covered in detailed maps following.
The 9th BMR, commanded by Major BM Cowan, started its recruitment on 5 January 1915 from its base on the Mafeking showground with the objective of raising four squadrons with a total of 650 men all ranks. The four squadrons, in three trains, arrived at Kimberley on 30 January and were shunted into the showground siding from where they set up camp in the centre of the racecourse. For the next three weeks, the regiment was trained and fitted out for the campaign. During this time, the BMR suffered an outbreak of measles, which was suppressed by all men getting two rounds of inoculation and isolation of the afflicted. The last cases of measles were reported on 20 February.
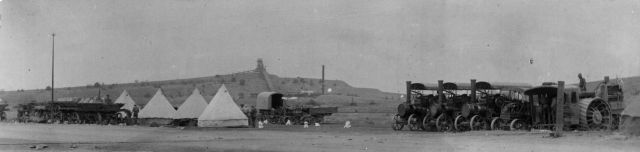
Figure 2. Supply base in Kimberley. (THL P4374_01)
By the middle of February 1915, the 5th SAMR and the 9th BMR were ready to leave Kimberley for Kuruman. The first troops were despatched on 12 February; on 22 February the last troops were on their way. The route from Kimberley to Kuruman, shown in Figure 3, was 205km in length.
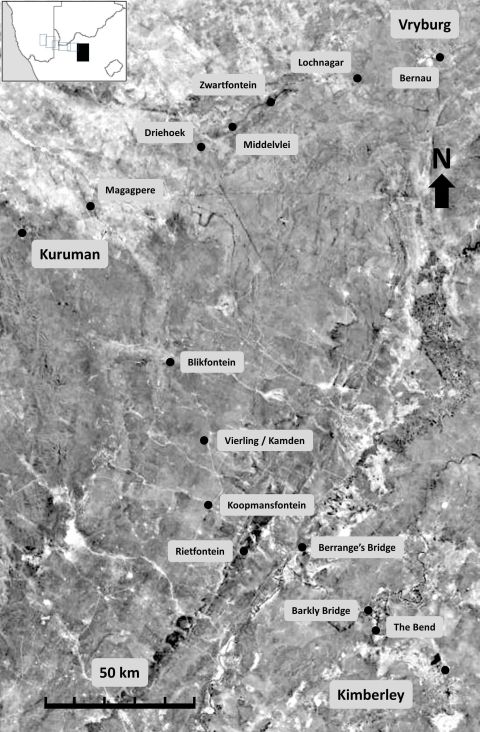
Figure 3. Route map from Vryburg and Kimberley to Kuruman.
It headed northwest from Kimberley to a spot called “The Bend” on the Vaal River, where there was a hotel. From here the route followed the river to cross the Barkly Bridge at Barkly West, the only bridge over the Vaal River at the time – see Figure 4. The route continued downriver to the present Delportshoop at the confluence of the Harts and Vaal Rivers. After crossing the Harts River, the route headed directly to Kuruman over the farms Rietfontein, Koopmansfontein, Vierling and Blikfontein.
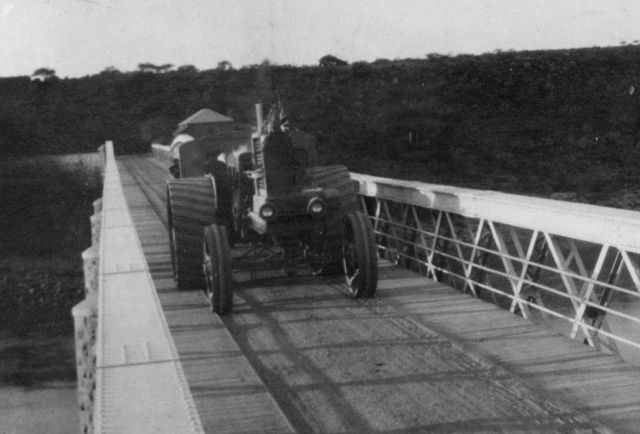
Figure 4. A Marshall tractor crossing the
Barkly Bridge during the campaign. (THL P4381)
On their way, the column faced only one obstacle due to the unusually good rains over the inland parts of South Africa between December 1914 and February 1915. The Barkly Bridge allowed them to cross the Vaal River without a problem, but a further 26km out of Barkly West, they were stopped in their tracks by the Harts River.
The high flows in the Vaal and Harts Rivers raised the river levels so much that the men were effectively trapped between the two rivers, as shown in Figure 5. The troops spent two days looking for a fordable drift, eventually finding one about 5km upstream of the confluence.
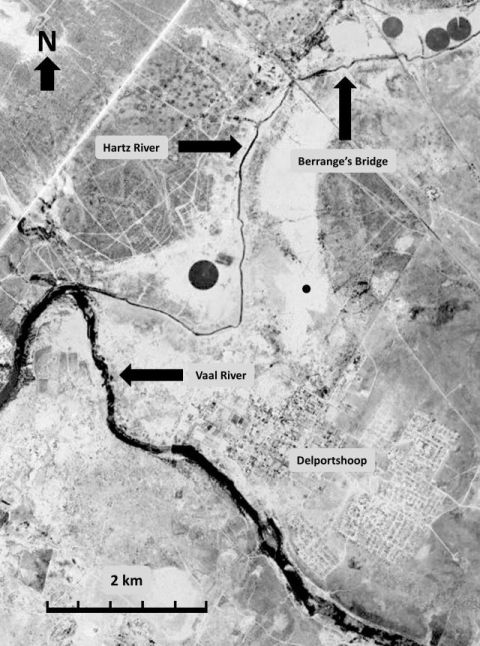
Figure 5. “Berrange’s Bridge”, a ford above the
confluence of the Vaal and Harts Rivers.
This allowed the column to proceed, but it was obvious that the crossing place would not be able to deal with the continuous heavy traffic of troops and supplies for long. The approaches to the bridge were heavy black turf and drift sand which did not provide a good footing for the animals and trucks entering and leaving the river. When the last BMR troops arrived at the Harts River on 24 February, all their men were employed in fatigue parties, spending a day carting and packing stones to firm up the drift and its approaches. The route was extremely busy at the time – a total of 57 supply wagons crossed the river on this day alone. The improvised crossing quickly acquired the name of “Berrangé’s Bridge”, shown in Figures 6 and 7. It took the different units seven to nine days to complete the journey from Kimberley to Kuruman. The troops from Kimberley arrived in Kuruman from 20 February to 2 March.
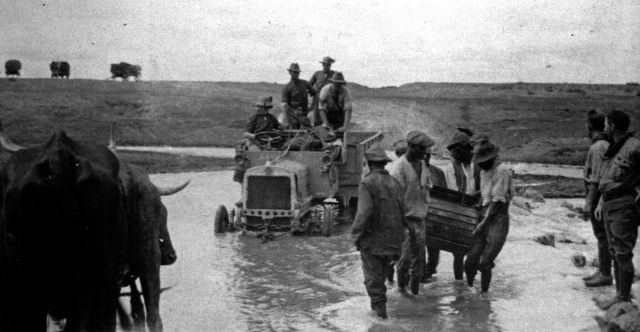
Figure 6. A Halley truck, men and oxen
at Berrangé’s Bridge. (THL P4339)
The Kalahari Horse started out during the Anglo-Boer War as the Kuruman Commando, a rebel commando commanded by General Jacobus Albertus van Zyl who operated with distinction in the Western Transvaal during the latter phase of the war. With the Defence Act of 1912, the Kuruman Commando was formally recognised and Van Zyl put in charge on 1 July 1913, now with the rank of Lieutenant-Colonel in terms of the new Defence Act. Captain Frylinck was appointed as deputy commander of the Kuruman Commando.
From September 1914, the Kuruman Commando was actively engaged first in suppressing the rebellion and later with the enemy in the Lower Orange River region. When the Eastern Force was formed in January 1915, the Kuruman Commando was reorganised as the Kalahari Horse, maintaining the leadership of Van Zyl and Frylinck. The Kalahari Horse returned in February 1915 to Kuruman. They contributed six squadrons to the Eastern Force.
Cullinan’s Horse, a unit also dating back to the Anglo-Boer War and based in Vryburg, started recruiting for three squadrons at The Willows. The regimental commander, Major Arthur William Cullinan, moved his base camp on 19 February to the farm Bernau, about 3km east of town. On 22 February, after seven weeks in Vryburg, the regiment was finally instructed to march to Kuruman. Its line of march passed the farms Lochnagar, Middelvlei, Zwartfontein, Driehoek and Magagapere, shown in Figure 3. Halfway through the march, they received orders to divert to Mophephe (earlier M’mupeppe, northwest of Kuruman) due to fresh cases of measles at Kuruman, but the following day the order was rescinded and their destination was set for Kuruman once more. After a march of eight days and 147km, Cullinan’s Horse arrived at Kuruman on 2 March.
The constituent parts of Eastern
Force were now assembled at
Kuruman, all the different military
organisations which had been
combined under the Union Defence
Force being represented. The Permanent
Force was represented by the 5th
SAMR; the Active Citizen Force by the
9th BMR; the Volunteers
by Cullinan’s Horse; and the
Commandos by the Kalahari Horse.
There were a multitude of smaller
support units – medical, veterinary,
artillery, communications, a water
section, machine gun sections and
numerous supply and transport
units, which will be mentioned as this
narrative develops. It was a largely
inexperienced force, thus requiring specialised
training. Small groups, for example, of
the 9th BMR and Cullinan’s Horse had to be
despatched to Johannesburg during January
and February 1915 for machine gun
training. When Berrangé reflected on his
troops at the end of the campaign, he
wrote:
They were M very good horse-masters;
there being very few sore backs in spite
of the heavy work performed without
grain. The shooting M was good.
Their physique was good and they
stood the hardships of thirst, hard
work and short rations well M all of
whom made up for the various
deficiencies in discipline and military
experience by keenness and
experience of the difficulties of the
country and nature of the work
required.
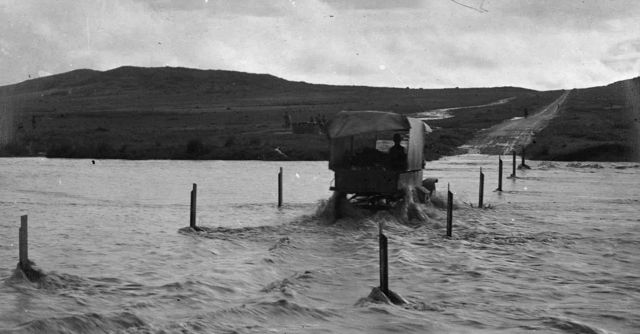
Figure 7. A truck crossing Berrangé’s Bridge
during the campaign. (THL P4359_01)
The Camp at Kuruman
All the mounted troops and most of the support staff, probably numbering about 3000, converged on Kuruman between 20 February and 2 March 1915. Camps had to be set up while training commenced immediately. The ideal position for a camp site was offered by the terrain of the Moffat mission station, for three good reasons. First, it was spacious. Second, it was on the banks of the Kuruman River with a consistent stream of cool, clear water issuing from the well known “Eye” of Kuruman 5 km upstream. In 1915 the stream persisted for tens of kilometres before it disappeared into the sand of the riverbed. Third, there were three empty buildings from the Moffat Institution, a teaching seminary that was closed in 1897. A few months earlier, just after South Africa declared war and at the time of the Rebellion, the Kuruman Commando was ordered on 22 October 1914 to establish a supply base at Kuruman. It was the intention to move the BMR from Mafeking to be closer to German South- West Africa. Lieutenant-Colonel JA van Zyl, negotiated successfully with the church authorities to place the grounds and unused buildings of the Moffat Institution at the disposal of the troops. The buildings were quickly fixed up and the area converted into a military camp, complete with depots for transport and supplies, ordnance stores and a hospital. See Figure 8. Later, when it became evident that more units would have to be hosted in Kuruman, a second camp was established. This camp included a supply depot and mechanical workshop with two animal supply depots on the municipal commons. The magistrate of Kuruman was instructed to procure some of the supplies required by the military, leading to an economic boom for the previously impoverished Kuruman.
Compared to the later hardships to be encountered by the troops, Kuruman was an oasis. Favourable comments were made on the generous supply of clear water and troops had the highest praise for the orchards of apple, pear, fig, almond and other fruit trees found along the Kuruman River, all which “come as a complete surprise to most people who trek in from the thirsty land”. It is no surprise that Cullinan’s Horse had to issue strict orders to its troops on 15 March against trespassing in gardens and enclosed lands!
Figure 8. This building, photographed in 2019, was part
of the original Moffat Institution, now part of
the Kalahari High School. (Johannes Haarhoff)
Preparations for Crossing the Kalahari
While the troops trained at Kuruman, military planners had to make complicated logistical arrangements for getting the troops and their supplies to enemy territory. From Kuruman, there were no roads and no significant water sources for more than 300km along the planned line of march. The first reliable water source was at Witdraai, a police post near the border of South-West Africa. Moving more than 2,000 mounted horsemen to Witdraai was a challenge in itself, but nothing compared to the difficulty of maintaining a constant stream of heavy supplies to be brought up to the front for the duration of the campaign. The key decision was to decide on the mode of transport – could motorised transport supplement or even replace the more conventional animal transport of that time? Both modes of transport required substantial, but different types of support. Animal transport required mainly adequate fodder and water; motorised transport required fuel, sophisticated maintenance and some road preparation.
Motorised Transport
The military planners had little or no practical experience of motorised transport. Many of the military commanders were volunteers (from both sides) of the Anglo-Boer War, a time almost before the advent of motorised transport. The South African Railways and Harbours, at that point, was probably the most knowledgeable on the topic as they had established the first motorised road service in South Africa in 1911 between the villages of Bot River and Hermanus over very rough roads with multiple river crossings. The Union Defence Force’s experience of motorised transport in the Kalahari was limited to the capture of General de Wet with a small fleet of sedan motors during the Rebellion. Could it meet the needs of the Eastern Force? Major Frank Dutton turned up in Kimberley at the start of the campaign to experiment with different types of tractors and trucks, illustrated in Figures 9 and 10.
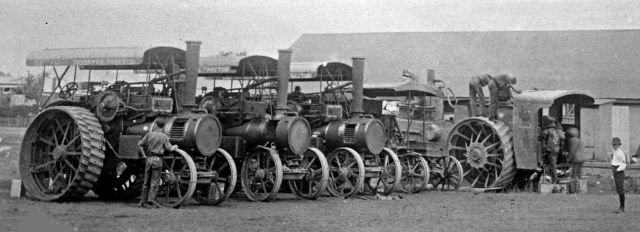
Figure 9. Line of tractors at the
Kimberley transport camp. (THL P4373)
Dutton was a colourful SAR&H engineer who was in charge of establishing the Bot River – Hermanus road motor service, which in later years grew into the formal SAR&H Road Motor Service, a vast national network to provide farmers with access to the national railway network. Dutton’s experiments in the Kalahari were unsuccessful for reasons not explicitly recorded. Possible reasons might have been that the vehicles could not negotiate the heavy sand, that they were not reliable enough or that there were not enough vehicles and spare parts available, as imports from Europe were stopped during the war. Eventually, the use of heavy lorries and tractors was limited to the rudimentary road between Kimberley and Kuruman in combination with animal transport.
Sedan cars apparently fared better and provided crucial support to the Eastern Force during their trek over the Kalahari beyond Kuruman. For the operation of sedan cars beyond Kuruman, a Motor Section of about 40 sedan cars under Major Rose was attached to the Eastern Force. The maintenance of a large fleet of cars, spread over a long route in rough terrain, required a dedicated engineering unit. A fully equipped automobile repair shop was established at the Kuruman camp and arrangements were made for similar workshops at other posts along the line. One example of such motor depots was 15km west of Vanzylsrus, between the later farms Lushof and La Gratitude, where a bunker was excavated in the limestone bank of the river. A Reuters correspondent noted that the repairs were rapidly made at “shops established in the great and silent wilderness” which “mended and ended most troubles on the spot.“ A number of road parties, placed under the command of Sir Thomas Cullinan, had to be formed to make and maintain the necessary motor tracks through the heavier and most difficult stretches. Roads were “bushed and corduroyed” to enable the passage of motors through the sand; bad drifts and hills repaired and levelled. There were a few exceptional occasions where the motor car was beaten by the combination of sand and steep gradients, where donkeys had to be stationed to pull the vehicles along. A case was recorded where it took three hours to haul a group of 17 cars through a short patch of 150 yards.
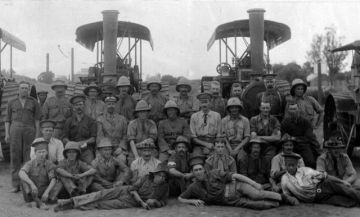
Figure 10. Major Dutton (fourth left in the
seated row)
with staff at Kimberley.
(THL P4373)
Animal Transport
Initially, transport mules along the entire route were foreseen, but the varying nature of the terrain forced a change in plan. The first part of the route from Kimberley to Kuruman followed an existing “hard and stony” road better suited to donkeys. For the second part of the route from Kuruman onwards, once the reality of the “tremendous length of our trek across the desert” was fully grasped, the “superiority of the ox over the mule in long waterless stretches of heavy sand in the sweltering heat of summer” soon became apparent. Bringing the oxen to Kuruman without burden left them with “sound feet and in good condition” for the trek further on. As was the custom in South Africa, trekking was done during the first half of the day and again in the late afternoon and early evening, thus permitting the animals to graze and rest during the intense heat of the day. The many hundreds of hardy Kalahari cattle obtained “proved to be the best and most suitable class of animal for the undertaking and it was marvellous how they kept condition and withstood thirst although it was the hottest time of the year”. But even the best cattle, with adequate grazing, could not deal with the exceptionally heavy stretches of sand, day after day. A transport officer described the conditions as “knee deep in loose and burning sand. As the heat at this time was fierce and blinding, the distress and suffering of the animals attempting to cross it can be more easily imagined than described”. It was found expedient to reduce wagon loads by a third to 1800kg while simultaneously increasing the number of oxen from 16 to 18 or even 20 per team – further complicating the management of the convoys through the Kalahari.
Water
The key to survival in the Kalahari, then and now, is water. Having established that the brunt of the transport work through the Kalahari would fall upon oxen, the vital problem of water supply had to be considered.
The first problem was that the Eastern Force had to cut through an area mostly uncharted, undeveloped and sparsely populated. It was therefore a fortunate turn of events that Sir Thomas Cullinan (not to be confused with the unrelated Major Cullinan, commander of Cullinan’s Horse) offered his services when the Eastern Force was formed. Sir Thomas, a personal friend of General Smuts and well known for his connection with the Premier diamond mine at Cullinan near Pretoria, gained a good knowledge of the Kalahari during his earlier career as diamond prospector. He was consequently put in charge of a special section to control and coordinate the necessary water supplies., A number of water boring teams, commanded by Major Ireland, were part of this section.
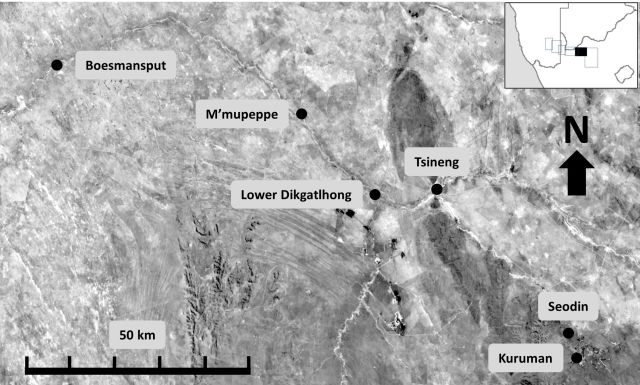
Figure 11 Route map from Kuruman to Boesmansput (not to scale).
An ox-drawn transport wagon can cover up to 30km during a day of heavy trekking. It was therefore planned to establish water points approximately 30km apart along the route. Furthermore, every fourth water point would be a depot under the command of an officer to allow the transport convoys to get food, water and rested animals to replace those that became leg- weary or debilitated. The only feasible route option was to head down the Kuruman River, which fortuitously ran in the same general direction as the planned march for most of the way. The river bed provided large camel thorn trees for shade and fuel, and offered the best chance of finding water with wells or boreholes, although not guaranteed.
The Kuruman River ran for 55km up to Tsineng (earlier Tsenin, depicted in Figure 11) before the water was seen to disappear below the surface of the riverbed. It was a logical choice for the first advance depot. According to plan, the first drilling attempt was 30km further at Mophephe (earlier M’mupeppe), where a fair supply of water was struck at a depth of 45m. By the end of January 1915, Mophephe was fully equipped with pumping plant, storage tanks and troughs for watering the cattle and stock. The water boring teams progressed well and by early February, two further depots with reserve rations and water storage tanks were being established at Lower Dikgatlhong (earlier Lower Dekatalong) and Boesmansput (earlier Bushman’s Pit).
By providing water storage tanks at the water points and running the pumps continuously, it was anticipated that there was just enough water to get from Kuruman to Boesmansput. As soon as each depot along the way was established, convoys of transport wagons started to push supplies and equipment forward.
West of Boesmansput, the water boring teams ran out of luck. The next advance depot was planned at Matlapaning (see Figure 13) but adequate water could not be found. Then their work was cut short due to enemy activity which forced them to drop back to Boesmansput. This left a “Thirst Belt” of 150km between Boesmansput and Witdraai, impossible to cross by transport wagons without water. This left no other option than placing storage tanks at Newton (42km away from Boesmansput) and Eersterust (26km away from Witdraai). This left a considerable distance of 83km between Newton and Eersterust, on the limit for oxen- drawn convoys. The sedan motors were organised to bring water from Boesmansput to Newton; ox transport had to carry water from Witdraai to Eersterust.
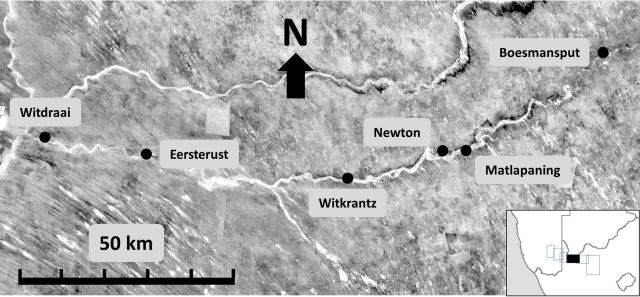
Figure 12. Route map from Boesmansput to Witdraai.
Communication
The Thirst Belt forced Berrangé to despatch his troops in squadron-sized groups, turning the Eastern Force into a convoy of small units, at times strung out over hundreds of kilometres. For proper coordination, he employed all the means of communication available at the time – heliograph signalling, telegraphs and telephones, Marconi radios, despatch riders on horseback and with sedan cars, and pigeons. A telegraph and telephone section under Captain Watson started by mid January to establish telephone communication between most of the units camped at Kuruman and then laid a line from Kuruman onwards. By the time they reached Boesmansput on 6 March, they had run out of poles and had to improvise by hanging wires from trees.
Thereafter, their work was confined to keeping the telephone line between Kuruman and Boesmansputs in order. The Marconi radios were used at the Thirst Belt, and the other means once the Eastern Force entered enemy territory.
Ready to Advance
By the end of February 1915, preparations for the crossing of the Thirst Belt had advanced to the point where Colonel Berrangé was ready to despatch the troops of the Eastern Force towards the border. This turned out to be more difficult than anticipated due to the presence of the enemy who had to be cleared first – to be told in companion papers in the following two Journals.
Return to Journal Index OR Society's Home page
South African Military History Society / scribe@samilitaryhistory.org