
 The South African
By Graham R. Winton, Cambridge
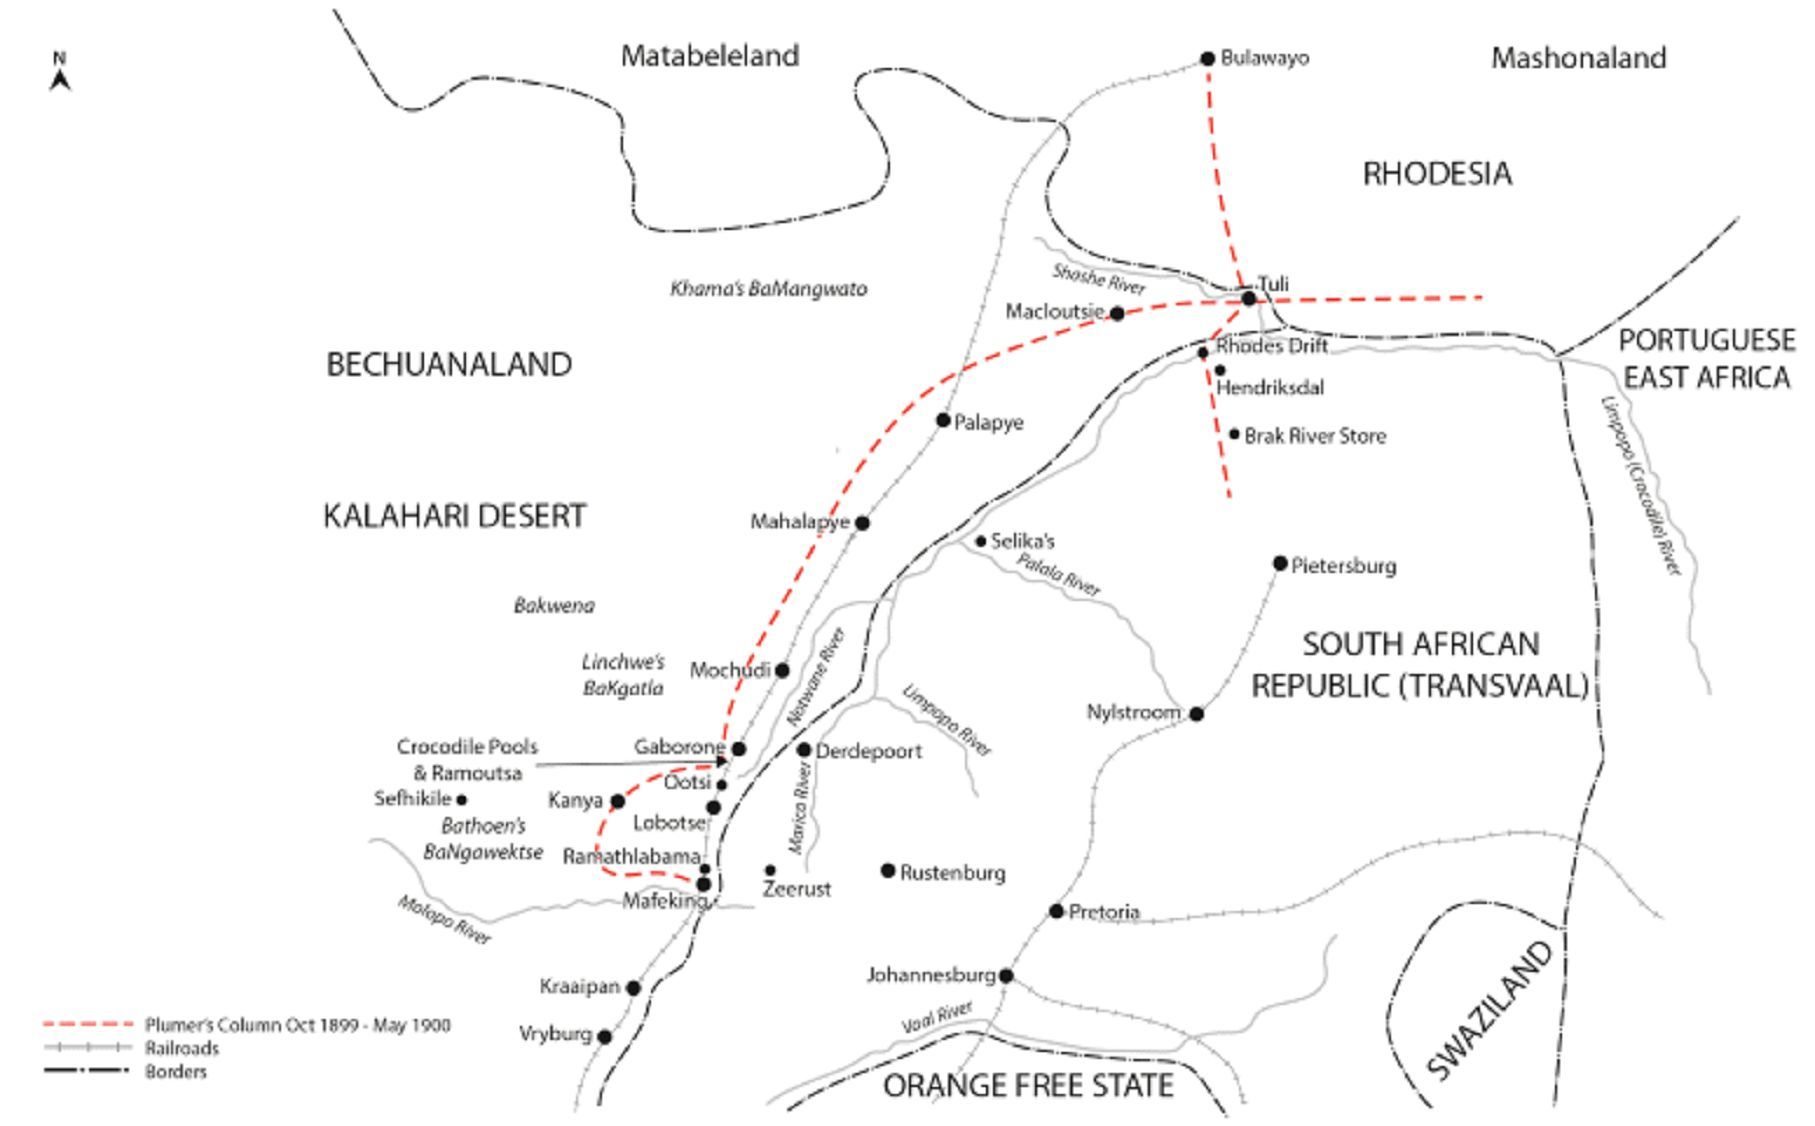
Plumer's Campaign 1899-1900 (Courtesy Helion Co Ltd)
From 18 October to 25 November, Plumer's column at Fort Tuli was frequently engaged in skirmishes with Boer patrols and watering parties mainly at the Pont and Rhodes' drifts and a Boer stronghold on the Rhodesian side of the Limpopo between the drifts. Initially, with aggressive patrolling Plumer was able to disguise the weakness of his Column, discouraging the Boers from crossing the Limpopo in strength (Plumer Evidence RCWSA, Q17950, p. 335). A serious encounter took place on 21 October when one of Plumerĺs patrols, between the Rhodesĺ and Pont drifts, was ambushed, in a determined Boer attempt to push back Plumer's forces.
Amidst rumours of a Boer thrust into Rhodesia from drifts along the Limpopo, 22-23 October, Plumer recalled his troops to Tuli and Macloutsie. Fearing a trap, the Boers failed to push their advantage and abandoned the Limpopo Drifts, retiring towards the Brak River Store; others went south to Mafeking leaving only some small, manned outposts. [The town name is spelled Mahikeng in 2021 but left as the contemporary name in this article]
Plumer misread this situation believing the Boers would not advance in mass across the Limpopo. He therefore sent men back to the drifts where his patrols encountered significant numbers of Boers. However, Plumer still believed most of the Boers had retreated. He was proved very wrong when the two major actions of the Tuli campaign took place on 2 November (Powell, Plumer: The Soldier's General, p. 61; Moore, 2 November 1899).
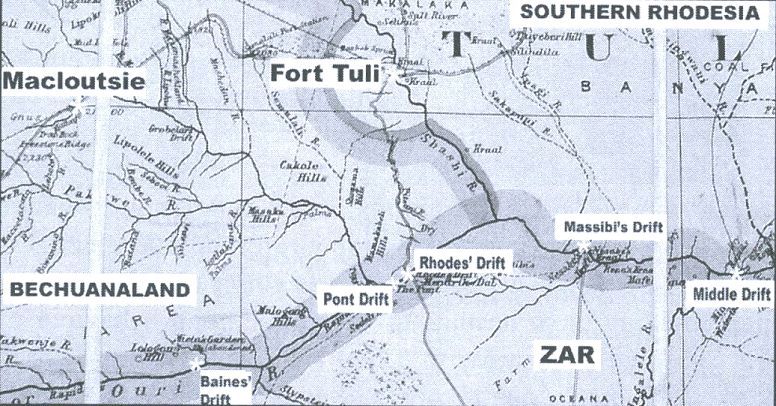
Fort Tuli, Shashi River and Limpopo Drifts.
Modified section of Stanford 1899, courtesy of Robert Burrett.
The Boers launched a concerted attack with some 300-400 burghers, in two columns, across the Limpopo, to destroy the Rhodes' Drift camp and take Fort Tuli. One column surprised the Rhodesians at Bryce's Store (Plumer's advanced supply depot) who fled into the bush or surrendered. Those at Rhodes Drift were surrounded and, after heavy firing and shelling for much of the day, withdrew during the evening to Fort Tuli. Most of the Boer column under van Rensburg retired for the night to Hendriksdal, failing to push home their advantage, though capturing much needed stores and animals. Failing to move on Fort Tuli was another serious tactical error by the Boers, one that probably cost them the war on this front (Burrett, June 2003, pp. 166-169). Grobler felt he could take Tuli with just 400 men, probably an impractical option with the coming of the rains and rising levels of the Limpopo River. However, a divided council held back this initiative for an assault on Rhodesia and was finally turned down by Pretoria, on the basis that Groblerĺs force was better used elsewhere, as Plumer's small Rhodesian force was not seen as a threat to the security of the ZAR. The North-West Commando was reorganised and recalled to Pretoria, effectively abandoning the Northern Transvaal, except for a small force left to guard the entire length of the Limpopo.
Owing to the small number of men available to Plumer, the difficult nature of the country and the Limpopo River in flood, the Boer retirement was not followed up. However, concentrating his forces at Fort Tuli, Plumer launched a series of patrols along the flooded Limpopo especially in the direction of Bryce's Store, resulting in occasional skirmishing. The last substantive action took place on 18 November when a Rhodesian patrol was ambushed on the Rhodes' Drift road. By late November Plumerĺs patrols found Boer camps and fortifications deserted, including Hendriksdal in the Transvaal. On 1 December, a strong Rhodesian patrol moved deep into the ZAR, some 80km north of Pietersburg but found virtually no Boers. Further patrols, again deep into the northern Transvaal, found complete abandonment of the area. Initially, Plumer remained fearful of Boer attacks, until ascertaining that they had pulled back to Pietersburg and Pretoria, and that any invasion threat was minimal. Plumer's forces began departing Fort Tuli on 11 December, leaving only a small force, about 100-130 men, to guard the border against any future Boer offensive into Rhodesia. He marched his main force over 282km, via Macloutsie to Palapye, then by rail to Mochudi, to support operations in southern Bechuanaland (Burrett, December 2004; Moore, 14 December 1899; Parsons, N, p. 51).

Gaborone-Crocodile Pools Area. Courtesy of Michael Brook
Operations in Bechuanaland
By 11 January 1900, Plumer's Column was just north of Mochudi. Taking direct command of all troops in the field, he reached Gaborone, about 161km from Mafeking, on the 14th. On 17 February Plumer reported having a total 988 officers and men with 502 horses (Rhodesian Regiment, BSAP and Volunteers) including the sick, the lines of communication troops and men with the armoured trains. Crucially he remained short of artillery. He planned to take the offensive, drawing Boer forces away from Rhodesia and Mafeking, creating a nuisance value and probing towards Mafeking and its possible relief (Plumer Evidence RCWSA, p.335). There was a clash with Boer forces trying to destroy the railway bridge over the Segoditshane River, 1.6km north of Gaborone, which Plumer's forces, supported by armoured trains, finally reached on 14 February; the Boers retired the same day. On 15 February, an advance towards Boer positions was halted by the flooded Metsemaswaane River, over which the bridge had been destroyed. The junction of the Metsemaswaane and Ngotwane rivers at this point forms the border between Botswana and South Africa. On 7 February, Plumer moved his men south of Gaborone, establishing a base camp (Bird's) on the banks of the Tlwane River, closer to Boer positions, occupied Fortress Kop and fortified Basuto Kop (Fort Butters), (Moore, 18 January 1900). The Rhodesians worked at repairing the Metsemaswaane River bridge only to have their efforts destroyed repeatedly by Boer shelling. Between 16 January and 26 February, Plumer's force was engaged in skirmishes with Boer patrols and in artillery duels near the strategically vulnerable Crocodile Pools area of the railway line, about 16km south of Gaborone (Parsons, N, p. 51).
On 23 January, a large Rhodesian patrol successfully attacked Boer positions on Mogagabe Hill but were forced to retreat with the arrival of Boer reinforcements and heavy shelling. An unsuccessful attack was launched on Boer positions on 2 February. Further attacks were planned but cancelled due to torrential rain and flooding. Fierce fighting took place with an unsuccessful Rhodesian night attack, 11-12 February, against Fort Eloff on Sepitsi Hill. Plumer sustained his most serious losses so far in the campaign, five killed, 21 wounded and five taken prisoner. The Boers strengthened their defences on Mogagabe Hill and began a concerted shelling of Rhodesian positions. With some 200 reinforcements from Mafeking a planned surprise Boer attack was aborted when discovered by a Rhodesian patrol. The Boers then evacuated their position on 25 February, retiring southward some 72km to Lobatse -another miscalculation, abandoning the most serious barrier to Plumer's advance. The Rhodesians occupied Sepitse Hill, completing repairs to the Metsemaswaane River bridge and railway line, allowing the armoured trains to proceed to Ramoutsa (Ramotswa, 132km from Mafeking), taking Lobatse on 6 March, where Plumer received reinforcements from Bulawayo including an armoured train. Plumerĺs advance was aided by a reduction in Boer forces opposing him which were required as reinforcements at Mafeking and Derdepoort. However, poor intelligence work suggested that the way to Mafeking was open. A two-day patrol south along the railway on 9 and 10 March to Pitsani- Pothlugo (Pitsane-Poltoko), 45.7km from Mafeking, found the Boer lager deserted. A patrol on the 12 March reached close to Ramathlabama, 21km from Mafeking, where a large Boer force, reinforced from Mafeking and later Derdepoort, was concentrating. Plumer divided his forces into three columns, to confuse the Boers about his intentions, and advanced on 13 March towards Pitsani-Pothlugo, the same day as it was re-occupied by the Boers. In a fighting retreat the Rhodesians were pushed back to Lobatsi.
Plumer now decided to withdraw from Lobatse. Leaving about 350 dismounted men to hold the railhead at Crocodile Pools, he moved his mounted troops westwards about 48km, away from the railway line and Lobatse to Kanye, capital of the BaNgwaketse people. Here, he had prepared a well-supplied depot with a 1,770km supply line back to the port of Beira. The Boers retook Lobatse but had evacuated it by the 28 March. On 21 March Plumer moved to Sefhikile, about 48km west of Mafeking with supplies being transported 96km by wagons from Gaborone station (Plumer Evidence RCWSA, Q17950, p. 335; Moore, 18 March 1900).
Using the armoured train, the Rhodesians moved south from Ootsi, reoccupied Lobatse and patrolled south close to Mafeking. Brevet Colonel R.S.S. Baden-Powell (B-P) had hoped Ĺto join handsĺ with Plumer at the end of March. Plumer reported, 23 March, that his scouts had found no Boers at either Ramathlabama or Jan Massibi's, both less than 16km from Mafeking. However, the Boers were concentrating around Mafeking with their numbers increasing from about 800 to at least 2,000. By the end of March, the joint forces of B-P and Plumer, probably, for the first time outnumbered Boer forces around Mafeking (Hanbury-Tracy, (1378/ 1379) 12 May 1900; Gardner, 1968, pp.146-147).
On the 26 March, in the hope of drawing Boer forces away from Mafeking, Plumer took a patrol into the Transvaal to within 19km of Zeerust but, having covered 180km in just over two days, was forced to retire due to a shortage of food and fodder. On 31 March, with a stronger force of about 300 men, Plumer reconnoitred the open country towards Mafeking with the purpose of testing Boer strength to determine whether an attempt to relieve Mafeking was possible. Leaving 30 dismounted men at Ramathlabama, Plumer moved south to within about 6km of Mafeking. During the afternoon, at Oakland's Farm, contact was made with strong Boer forces from the Marico and Rustenburg Commandos. The engagement that followed was the first time Plumer fought the Boers in open country. Fighting over probably a two-mile front the small Rhodesian force gained some initial success but were forced into fighting a rear-guard action back to Ramathlabama as the Boers tried to envelop their flanks. Plumer then retired to Sefhikile. His casualties were heavy with eight killed/died of wounds, 32 injured, and 11 missing. Plumer was informed by B-P and Lord Roberts (Field- Marshall Lord Roberts, Commander-in- Chief South Africa) that he was not to risk any further moves to relieve Mafeking with such a small force (BLM Weil Papers, 31 March 1900; Will & Dent, p.209; Jeal, p.289; Creswicke, pp.210213; Spiers, pp.142-143).
During April, the Boer forces around Mafeking probably numbered some 3,000 burghers. Plumer's force, weakened from the action at Ramathlabama, from malaria and horse fever, played a static role during April, building supplies at Kanye to support an exodus of some 1,200 natives from Mafeking and attempting to get cattle into Mafeking. On 9 May, a Boer force detrained at Pietersburg with the object of proceeding to Seleka's to cut the north-south line of Plumer's communications and his means of reinforcement. However, these orders were countermanded, and the force turned back (Parsons, Q.N, p.190; Parsons, N, p. 52).
Plumer was only able to muster about 500 healthy men until receiving some 150 reinforcements from the BSAP and from Carringtonĺs Rhodesian Field Force, 100 dismounted men of the 3rd Queensland Bushmen Mounted Infantry, and ôCö Battery (with only four of its guns) Royal Canadian Artillery. On 12 May Plumer was informed the Mafeking Southern Relief Column under Colonel Mahon, about 1,150 strong, was expected on the Molopo River (Molepolole Valley west of Mafeking) by 15 May.
Relief of Mafeking
On 14 May Plumer departed Sefhikile with about 800 men (450 mounted) and eight guns, marching some 45km and making contact with Mahon early on 15 May, about 32km west of Mafeking at Jan Massibi's farm (Hanbury-Tracy, Mafeking Day Book 1384/1385, 12 May 1900; Powell, p.68; Burrett, 2009, pp.208-218).
As the senior officer Mahon took command of the combined force, which he split into two columns either side of the road alongside the north bank of the Molopo River. Plumerĺs column took the right flank along the river side. On 16 May the columns moved off towards Mafeking. At the same time, a 2,000 strong Commando, under Commandant Koos de la Rey, advanced to intercept them, taking up positions on the high ground to left, right and front of the Relief Columnĺs advance. Except for a slight British superiority in artillery the two forces were evenly matched. On Plumerĺs right the Boers were positioned along the higher ground along the Molopo River above his line of advance. Mahon, having anticipated Boer tactics, kept a strong reserve in hand thus thwarting de la Rey's attempt to envelop his flanks. The action on Plumerĺs front was hard fought until eventually, with reinforcement from Mahonĺs Column, the Boer line was broken and fell back, redeploying north of Mafeking; retiring completely on 17 May. The relief force formally entered Mafeking on 17 May 1900 (Young, pp.210-214; Will & Dent, p. 209; Amery, pp. 183-4).
Following the Relief of Mafeking
Plumer and the Rhodesian Regiment got little rest and were resentful of being sent so quickly back into the field. De Montmorency, serving with Plumerĺs artillery, wrote, 'they were in bitter mood. I have never known men so sulky or march with such bad graceĺ (TNA (UK), WO 108/185, pp.47-48). Departing Mafeking on 19 May via Ramathlabama and Lobatsi, they supported gangs repairing the railway as they moved northwards, occupying Zeerust in the Transvaal on 28 May and Rustenburg on 14 June. The greater portion of the Regiment accompanied Plumer during July, August and September (when it was disbanded), operating to the east of Rustenburg and to the north of Pretoria in the guerrilla campaign against de la Rey and Grobler.
Conclusion
The campaign on the North West Frontier was small in the overall scheme of the Second Anglo-Boer War, but one could argue, one of the most interesting of the minor operations during 1899 and 1900. This is certainly the case with regard to the maintenance of Rhodesian supply lines and communications. Plumer kept his force mobile and active, living rough in the field, men and animals fighting against appalling natural conditions: thick scrub, flooding, humid and malarial areas such as around the Limpopo and Crocodile Pools, enteric fever and horse sickness. Plumer's Veterinary Officer, Captain John Moore wrote that, Ĺthe bush in the vicinity of the River Crocodile was very thick, high camel thorn and difficult to operate inĺ (Moore, 23 October 1899). Numerically inferior and woefully short of artillery, Plumer's Column managed to hold a considerable number of Boers in the north and north-west, dissipating the energies of the force besieging Mafeking. Commandant-General Grobler failed to mount any serious attempt to dislodge Plumer from Fort Tuli which should have been his main objective. Though Plumer was not successful in his principal engagements with the Boers, there was no invasion of Rhodesia, Mafeking did not fall and other than briefly in the contested area between Mafeking and Gaborone the railway line to Bulawayo did not fall to the Boers. B-P wrote that, 'For months past the Rhodesian Column has been carefully and patiently preparing the way for our ultimate relief through a difficult country, in a bad climate and in the face of a numerous and watchful enemy. It was only the want of numbers that prevented them from completing the job at the end' (BLM, Weil Papers, 23 May 1900; Will & Dent, p. 201). Making all due allowances for some ineffectual Boer leadership and the difficulties that confronted them, it is perhaps surprising how little the Boers achieved along the Rhodesia and Bechuanaland borders. Plumer's forces successfully performed the mobile role delegated to them by Colonel Baden-Powell, Commander in Chief North West Frontier Force.
Acknowledgements
This article is based on a paper given at the 120-Year Commemoration of the Anglo-Boer (South African) War Conference held at the War Museum in Bloemfontein, South Africa, 9-11 October 2019. I am indebted to Robert Burrett for sharing his extensive knowledge and research on the North West Frontier Campaign; to Tim Jeal and Michael Brook; to the Moore Family for access to John Mooreĺs Diary and James Nicholson for allowing access to the private papers of Major the Hon. A Hanbury-Tracy.
Bibliography
Amery, L.S, (ed), Times History of the War in South Africa 1899-1902, 7 Volumes (London: Sampson, Low and Marston, 1907), Vol. IV.
BLM: British Library (Manuscripts):
Weil Papers:
Vol. IV 46851, Folio 270-541, Document 310, 31 March 1900.
Vol. 2, 46849, Document 302, 23 May 1900.
Brook, M.C., Crocodile Pools Botswana-History and Biodiversity (Botswana 2011).
Burrett, R, ĹEvents in the Tuli Area, Part 3, 'The Attacks on Bryce's Store and Rhodes Drift', South African Military History Society Journal, Vol.12, No.5, June 2003, pp. 166-169.
Burrett, R, ĹGaborone and the Anglo-Boer War, 1899-1902', South African Military History Society Journal, Vol.13, No.2, December 2004.
Burrett, R, Plumerĺs Men (Just Done Productions, Durban, 2009).
Creswicke, L, South Africa and the Transvaal War, Vol. IV (Edinburgh: Jack, 1900).
Gardner, B, Mafeking A Victorian Legend (London Spere Books, 1968).
Hanbury-Tracy Papers:
Jeal, T, Baden-Powell (London: Pimlico, 1991).
Moore, J, Diary of Veterinary Captain John Moore.
Parsons, N, ĹNot Quite All Quiet on the North West Frontier: Khama's Bangwato and the Waterberg Commando', South African Military History Society Journal, 41, November 1999.
Parsons, Q.N, ĹKhama III, the Bamangwato and the British: with special reference to 1895-1928'. (Unpublished PhD Thesis University of Edinburgh, 1973).
Plumerĺs Evidence, before the Royal Commission on the War in South Africa, Cd. 1791, Vol. II, 12 March 1903,
Powell, G, Plumer: The Soldier's General (Pen & Sword Military, 2004).
Spiers, E, Letters from Mafeking (Pen and Sword, 2018).
TNA (UK). The National Archives (United Kingdom), WO 108/185, The Boer War Diary of Major H de Montmorency, RFA.
Will, D & Dent, T, ĹThe Boer War as Seen from Gaborone', in Botswana Notes and Records, Vol.4, 1972.
Young, F, The Relief of Mafeking (London: Methuen & Co., 1900).
Return to Journal Index OR Society's Home page
South African Military History Society / scribe@samilitaryhistory.org