
 The South African
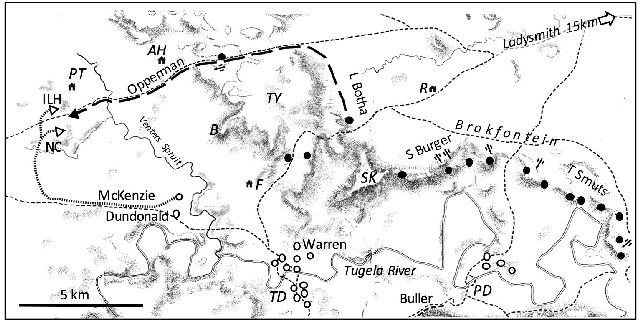
Fig 1. The upper Tugela, 3pm, 18th January 1900 (adapted from maps in Barnard and Maurice).
Farms: AH = Acton Homes; F = Fairview; R = Rosalie PT = Peach Tree;
Drifts: TD = Trichardt’s Drift; PD = Potgieter’s Drift
High ground: B = Bastion Hill; TY = Tabanyama; SK = Spion Kop
ILH = Imperial Light Horse; NC = Natal Carbineers
Boer positions are shown as black circles, British positions as white circles.
Wagon roads are shown as dashed lines. Boer artillery positions are approximate.
Background
Ladysmith had been besieged since 2 November 1899. Sir Redvers Buller’s Natal Field Force had failed to break through the Boer lines at Colenso on 15 December 1899. Next, the British army of 24 000 men marched 26 km west, to Springfield (near Winterton). Buller divided his force, retaining 9 000 men under his command and, on 16 January, crossed the Tugela River at Potgieter’s Drift (GPS: -28.68643, 29.56586). However, Buller faced entrenched Boers on the Brakfontein heights, plus three well-concealed 75mm field guns and two Maxim-Nordenfeldt ‘pompoms’ (Barnard 1970, p83). Unwilling to risk heavy casualties, Buller instructed Sir Charles Warren, his second-in-command, to cross 8 km upstream at Trichardt’s Drift.
Crossing Trichardt’s Drift, 17th January 1900
At noon on 17th January 1900, the Natal Carbineers waded on horseback across Trichardt’s Drift, led by Maj. Duncan Mackenzie, a farmer from Nottingham Road (McKenzie, 1963, p.167). The remainder of the 1,642-strong Mounted Brigade followed, under command of Col. Douglas Cochrane, 12th Earl of Dundonald. Dundonald was a “much publicised and overpraised officer”, known to his men as “Dundoodle” (Stevenson, 1971). That afternoon, the Royal Engineers assembled two pontoon bridges to allow Warren’s main force to cross. Warren’s orders were ambitious. He was to break through the Boer lines, march until arriving behind the Brakfontein heights, and attack the enemy in the rear. Buller would simultaneously mount a frontal assault on Brakfontein. This plan required wagons and artillery, so it was essential for Warren to capture one of two roads. The direct road went from Trichardt’s Drift, near Fairview Farm (today Rangeworthy Farm), past Rosalie Farm (today Roseleigh Farm). This road gently climbs the slopes of Tabanyama, passing slightly west of Spion Kop. This route was 17 km to the rendezvous with Buller. The alternative road ran due west from Trichardt’s Drift, across Venter’s Spruit, joining the road from the Orange Free State, then turning towards Ladysmith. This would entail a march of 35 km, overlooked throughout by high ground which was already in Boer hands, with a much larger force.
The action begins
On 16th January, the newly-promoted General Louis Botha left Colenso to command the upper Tugela. Botha summoned men from Colenso and Ladysmith to reinforce the heights overlooking both drifts. Soon 4,000 burgers were in the sector, of whom 1,800 were facing Warren. (Barnard, 1970, pp. 84 -90). Despite being scattered over a wide front, the Boers could quickly move behind the hills to reinforce and entrench wherever threatened.
Throughout the night of 17th and all of 18th
January, Warren’s force crossed the Tugela:
15,000 infantry, 36 field guns, 4 howitzers, 650
wagons and 15,000 oxen. On reaching the north
bank unopposed, the infantry established
positions on the low hills. The Mounted Brigade,
having crossed earlier, had immediately moved
west and encamped on the night of 17th across
Venters Spruit (their camp GPS approx. 28.65837,
29.43782). Dundonald’s orders were:
'The mounted brigade will guard the left flank of
the infantry' (Churchill, 1900, p. 131); but
Dundonald was inclined to more independent
action. On the 18th, the Mounted Brigade probed
westward, stretching the British line. Leading was
the Composite Regiment, comprising “A”
squadron Imperial Light Horse and No. 5
Squadron, Natal Carbineers (these were the only
ILH and Carbineer squadrons not besieged in
Ladysmith). With them were a Mounted Infantry
company of the 2nd Kings Royal Rifles, a section
of mounted Dublin Fusiliers, a squadron of Natal
Police, 4 squadrons of the South African Light
Horse, Thorneycroft's Mounted Infantry, 2
squadrons of the 13th Hussars and the Royal
Dragoons. By 2pm, the extended Mounted
Brigade “formed a line of observation along the
lower kopjes by the river” about 8 km long
(Churchill, 1900, p. 132), and they were now out
of sight of Warren’s force.
In response to this westward movement, Botha despatched a large commando along the strategically vital Oliviershoek-Ladysmith Road. The commando set off from behind Tabanyama. Rev Kestell wrote: “A number of (British) mounted men detached themselves from their left wing and hurried on in the direction of Acton Homes. It was clear that they must be stopped, and some of our men were immediately sent to oppose them.” (Kestell, 1903, p.57). These Boers first became visible to the British when they emerged through a narrow nek and turned south-west (GPS approx. -28.60630, 29.45417). This nek, and the plain south of it, was defended by a Transvaal Artillery 75mm Creusot gun under Lt. Friedrich von Wichmann.
The countryside was largely deserted. Loyal farmers, like John Coventry of Fairview Farm, had gone into Ladysmith for safety, with their cattle, and those with Republican sympathies, like the farmer at Trichardt’s Drift, had joined the Boers. The Africans had beenconfined to their kraals. There was only one feeble map, which showed farm boundaries rather than hill features (Maurice, 1906, vol 2 p. 339).
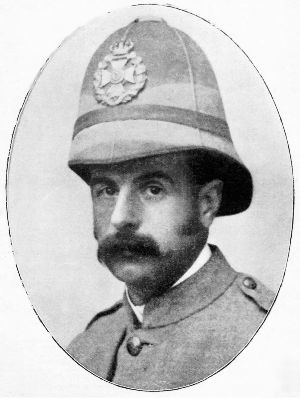
Fig 2. Col. Douglas Cochrane, 12th Earl of Dundonald 1852-1935.
He commanded the Mounted Brigade. Nicknamed “Dundoodle”,
some considered him “much publicised and overpraised”.
In 1901 he patented a new design of tea-pot.
(Image: Black & White Budget, Fleet St., London page 1, 10 Feb 1900)
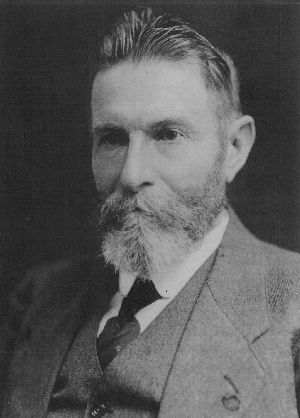
Fig 3. Daniel Jacobus Elardus (“RooiDanie ”) Opperman, 1861-1928.
Veldkornet of the Pretoria Commando, he led his men carelessly at
Acton Homes but regained his reputation at Spion Kop.
(Image: Transvaal Archives TAB 31277)
The Natal Carbineers, being familiar with the area, scouted ahead for the Mounted Brigade. Around 3pm Maj. McKenzie was observing from a low hill when the Boers rounded the shoulder of Tabanyama and came into view. He immediately saw an opportunity, and said to his British counterpart, Maj. H. W. G. Graham of the 5th Lancers: “I can trap these men if you will let me” and Graham replied “do what you like, McKenzie”. McKenzie: “I gave the order to mount, and my men were in the saddle in a moment. We set off at full gallop”. He had with him 40 Natal Carbineers, and soon 40 men of the Imperial Light Horse joined him, under Lt. Barnes. McKenzie: “I do not know who ordered the ILH to follow me, but they did so” (McKenzie, 1963, p.167).
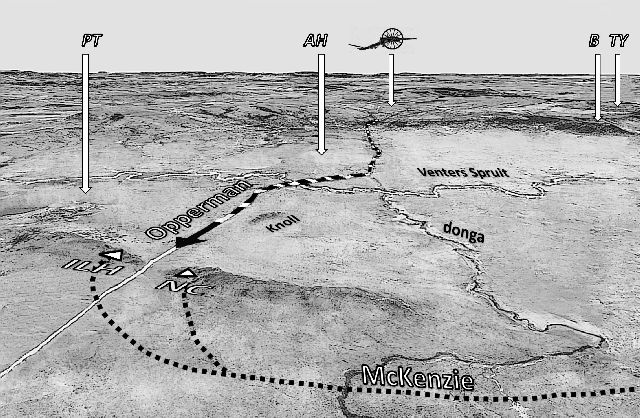
Fig 4. The battlefield at Acton Homes (adapted from Google Earth).
Farms: PT = Peach Tree; AH = Acton Homes High ground: B = Bastion Hill;
TY = Tabanyama ILH = Imperial Light Horse; NC = Natal Carbineers
McKenzie galloped along the low-lying wagon road heading westwards near the north bank of the Tugela. His objectives were two koppies on Peach Tree farm (not labelled on British maps, but near Acton Homes - after which this action has since been named). These koppies make up a prominent grassy ridge which straddles the road to Oliviershoek. Between them is a shallow saddle through which the road passes. To the north, they overlook a gently rising slope, devoid of cover except for a small knoll just east of the road, and 800m north of the koppies. Although the koppies are of no great height, if McKenzie were able to occupy them unseen, he would be able to dominate the road for about 2km. About 1km east of the road, a deep donga runs parallel to the road. Because Mckenzie kept out of sight of the Boers, he was unable to observe their movements, and he “hoped we had galloped fast enough to reach the koppies before the Boers”. Among his Carbineers was Trooper Park Gray, a farmer from Cathkin who knew this area intimately(Stevenson, 1971). McKenzie galloped along the low-lying wagon road heading westwards near the north bank of the Tugela. His objectives were two koppies on Peach Tree farm (not labelled on British maps, but near Acton Homes - after which this action has since been named). These koppies make up a prominent grassy ridge which straddles the road to Oliviershoek. Between them is a shallow saddle through which the road passes. To the north, they overlook a gently rising slope, devoid of cover except for a small knoll just east of the road, and 800m north of the koppies. Although the koppies are of no great height, if McKenzie were able to occupy them unseen, he would be able to dominate the road for about 2km. About 1km east of the road, a deep donga runs parallel to the road. Because Mckenzie kept out of sight of the Boers, he was unable to observe their movements, and he “hoped we had galloped fast enough to reach the koppies before the Boers”. Among his Carbineers was Trooper Park Gray, a farmer from Cathkin who knew this area intimately(Stevenson, 1971).
McKenzie ordered Gray to “gallop on as fast as he possibly could to the nek between the two koppiesW dismount and peep over and see where the enemy were; and if you found they were close and would get to the position first he was to get back and save himself and I would retire. Otherwise he was to remain there and wave me on. In the meantime, I pulled up and hurriedly told the ILH they would occupy the ground on the left koppie, and not to fire a shot until I gave the order. Trooper Gray did his part splendidly, and I was delighted to see him creep back and remain there waving. We galloped up to him, dismounted, to occupy the position” (McKenzie, 1963, p.168). The rest of the troops were then signaled to come up. “This they did at the gallop and, making skillful use of cover, they reached the ridge unobserved” (Stevenson, 1971).
As the men took up positions among the rocks, McKenzie sent Lt Barnes back to ask Lord Dundonald for support (Churchill, 1900, p.133).
About 3:30pm, two South African forces were about to clash. Concealed on the crest of the koppie just west of the road were 40 men - mainly Johannesburgers - of the Imperial Light Horse. Lying in a similar position just east of the road were 40 Carbineers from Estcourt and Weenen. Trotting towards them, unaware of the danger, was a large group of Boers comprising Pretoria men (Witwatersrand and Elands River wards) under Veldkornet “Rooi Danie” Opperman, and Free Staters under Veldkornet Nicolaas “Mordechai” Mentz (Heilbron Commando). Estimates of Boer numbers vary: Barnard (1970, p. 87) writes there were 160, and Churchill (who arrived very late in the action) estimated 200 (Churchill, 1900, p.132) and Blake Knox (1902, p. 22) reports 300. Mackenzie’s eyewitness estimate of 320 is probably the most accurate (McKenzie, 1963, p.168). McKenzie (1963) described the scene: “I only saw one scout a short way in front of them and towards their left flank... They were riding Boer fashion in a very irregular way. About 40 or 50 men were clumped together in front and they came in fours and fives, and then another big batch apparently talking and riding in a way as best suited themselves.” “Seeing this, I made up my mind to let them ride practically onto me.” “There was a bank which they had to go up, and so they were very close. I did not want to fire until a large number of them were on top of it. I was almost ready to blow my whistle, when one of the ILH could evidently stand it no longer, and fired, and so gave the show away, so I had no alternative but to blow my whistle and everybody fired and continued to do so as quickly as they could.”
The leading Boer scout was about 70m away when the ILH opened fire. The ILH and Carbineers were armed with .303 Martini- Enfields, whose smokeless cordite ammunition, sights, and accuracy is identical to the magazine Lee Enfield. The Martini-Enfield has a slightly slower rate of reloading (approx. 12 rounds a minute) but this is no disadvantage for deliberate shooting. “The enemy was taken completely by surprise and altogether it was a horrible affair. We emptied many saddles, and many of them jumped off while others galloped away” (Mackenzie, 1963, p. 169).
Most of the Boers managed to gallop away out of rifle range, down the road they had just come along. Two members of Edwards Reconnaissance Corps, Slegtkamp and De Roos, galloped to Peach Tree farm, about 900m away, and provided covering fire for their comrades (Mostert, 1935, p.33).
A group of 35 Boers dashed for cover among the boulders of the knoll alongside the road, 800m away. Some were wounded and some had lost their horses, but all were determined to make a stand - among them, Veldkornet Mentz. Strangely, many of the riderless Boer horses galloped between the koppies and stood among the British horses behind the ridge (McKenzie, 1963, p.169). Once concealed behind the rocks it became difficult to identify an individual target at 800m. The Boers were good marksmen, and their Mausers very accurate, but “at two hundred yards a man in khaki is indistinguishable from the rocks around him. Indeed, the khaki is the English soldier’s sole protection” (Davis, 1911, p. 104). During the prolonged exchange of rifle fire, the unlucky Captain Arthur Shore of the ILH was severely wounded - he’d only just recovered from being shot through the chest at Elandslaagte. Another ILH trooper was lightly wounded. All the men found themselves pinned down. At one point, someone in the Boer ranks raised a white flag for a moment but it was immediately taken down by order of Veldkornet Mentz, and the fight continued with even greater fierceness (Churchill, 1900, p. 135).
Reinforcements
Around 4pm, Lt. Barnes arrived at the Mounted Brigade HQ requesting reinforcements. Dundonald replied: “Certainly, every man we can spare” (Churchill, 1900, p. 133). Off galloped the Mounted Infantry Company of the Kings Royal Rifles, a squadron of the South African Light Horse (including Lt. Winston Churchill), followed later by some of Thorneycroft's MI, and later still by Dundonald himself. By now the Boers were tenaciously holding the rocks of the knoll and were quite invisible. The British riflemen curved round them in a half-moon, firing continually at the rocks. A squadron of SALH worked along the large donga, parallel to the road, east of the knoll. This put them almost behind the enemy, and every Boer “who dared make a dash for liberty ran a terrible gauntlet. Still the surrender did not come. The white flag flickered for a moment above the rocks, but neither side stopped firing. Evidently a difference of opinion among the enemy” (Churchill, 1900, p. 133).
The shadows were lengthening, and the Mounted Infantry Company of the 2 King's Royal Rifle Corps in the donga decided to try a bayonet charge. They made the suggestion because they were the only men with bayonets. A section of the Rifles then crawled forward towards the knoll, watched by Churchill and others sheltering in the donga. Then “there broke out a savage fire from the kopje”, and the line of riflemen retreated, wriggling backwards slowly on their bellies, “but leaving two brown forms who lay still and hunched in the abandoned position. Then suddenly the retiring Riflemen sprang up and ran for shelter in our donga”. 'We got to within fifty yards of the Dutchmen,' they said; 'but it was too hot to go further. They've shot two fellows through the head.' The dead men were Private S Hampshire and Private WFC Long. The Boers were firing at the donga so determinedly that when a Carbineer in the donga put his helmet over the crest on the end of his rifle, “the bullets whistled round it” (Churchill, 1900, pp. 133-134).
Around 5pm, Lord Dundonald and his staff arrived. The intensity of the fire increased, with the British firing from the koppies and the donga. The Boers were under fire from several directions, and again the white flag was raised. A British officer complained to Dundonald “the white flag has been up off and on for the last half-hour, but they don't stop firing, and they've just killed two of my men” (Churchill, 1900, p. 134). Trooper Gray considered that abuse of the white flag was due to genuine misunderstanding and not to treachery (Stevenson, 1971).
Dundonald ordered the British to cease fire, and “from among the rocks (on the knoll) three dark figures stood up holding up their hands, and at this tangible evidence of surrender (the Mounted Infantry) got on (their) horses and galloped towards them waving pocket handkerchiefs and signaling flags to show them that their surrender was accepted” (Churchill, 1900, p 134). As they moved forward, they saw the bodies of 10 killed and 8 wounded burgers on the battlefield. Twenty-four burgers surrendered, including the wounded Jopie Fourie. They had run out of ammunition ( [Kemp, 1941, p. 274). Among the dead was Veldkornet Mentz, aged 53 “with firm aquiline features and a short beard. The stony face was grimly calm, but it bore the stamp of unalterable resolveK Mentz had refused all suggestions of surrender, and when his left leg was smashed by a bullet he had continued to load and fire until he bled to death; and they found him, pale and bloodless, holding his wife's letter in his hand”. Next to him was a boy of about 17 years who was shot through the heart (Churchill, 1900, p.134).
For the British, this was their first opportunity to see their enemy up close. “It was curious to notice how the knees and elbows of their clothes showed signs of wear from their favourite shooting attitude, and there were many with 12 missing from their waistcoats that had been scraped off by the stones on the kopjes, or with buttons of different patterns that had evidently been sewn on by the wearers in place of those worn offK all the Boers appear to give up shaving when on the warpath, which adds to the wild picturesqueness of their appearance” (Lynch, 1903, p. 64). The British treated the wounded compassionately: “The soldiers crowded round (the wounded Boers), covering them up with blankets or mackintoshes, propping their heads with saddles for pillows, and giving them water and biscuits from their bottles and haversacks. Anger had turned to pity in an instant. The desire to kill was gone. The desire to comfort replaced it” (Churchill, 1900, p. 135). Trooper Gray hated the whole experience; he’d found it hard to shoot to kill (Stevenson, 1971). Gray and McKenzie both recognised a wounded man named Moodie. Moodie was an English-speaking Transvaaler, and had married a Boer girl; he explained “you can’t blame me for fighting for my country” (McKenzie, 1963, p. 169). His thigh had been shattered and he was in great pain, and it was he who had waved one of the white flags. Eventually he made a good recovery.
Dundonald sent Lt. Silburn with a white flag to the Boer lines, informing them that they might come in and take their dead. The Boers tied their dead across horses and carried them away for burial (McKenzie, 1963, p. 169). Veldkornet Mentz was buried nearby, and reinterred at Platrand, where his tombstone can be seen today. The Boer prisoners and wounded reached General Warren's camp about 2am on 19th January, where British surgeons attended to them and made them as comfortable as possible (Blake Knox, 1902, p. 24).
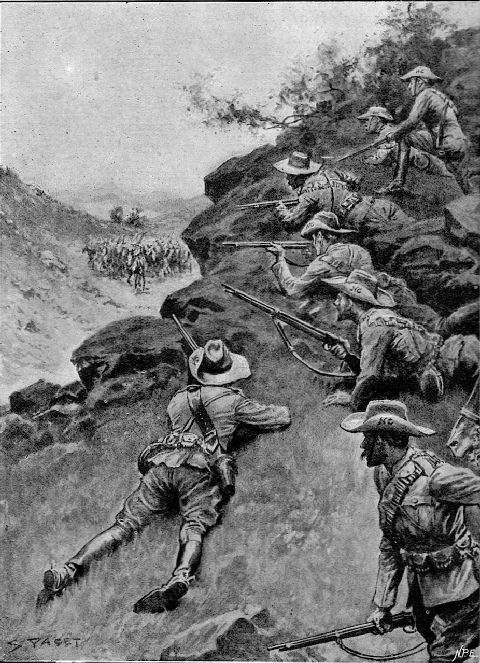
Fig 5. The ambush at Acton Homes as depicted in
With the Flag to Pretoria 1900, Harmsworth Bros, London. Vol 1, p 268.
The scene shows the moment before the ILH opened fire.
The Natal Carbineers are accurately depicted, wearing Royston webbing
and carrying Martini-Enfield Mk I rifles. The steep terrain is misleading.
Night of 18th January
Nightfall came at 7pm; a waning moon rose an hour later. Dundonald remained on the koppies; he exaggerated to Warren the safety of his position and the significance of his success. He asked for reinforcements and artillery. Dundonald could not advance across the plain without artillery, facing by now two long-range Boer Creusot guns 6.5km away (Blake Knox, 1902, p 28). Warren remained at Trichardt’s Drift, supervising the crossing of his force which was completed at 10pm. The disappearance of the Mounted Brigade to the west and the stretching of the British line caused him great concern. Warren began recalling Dundonald’s men, starting with the Thorneycroft’s MI. Warren needed the mounted men to protect the left flank of his infantry, exactly as he had ordered. Moreover, a heliograph message reached Warren from Sir George White in Ladysmith: “a commando of at least 2 000 Boers, with artillery, were advancing from Ladysmith to surround Dundonald's small force” (Burleigh, 1900, p. 305). As the Boer reinforcements arrived they could be clearly observed on the high ground. Botha strengthened the positions overlooking Dundonald, but also those overlooking Warren. Parts of the Pretoria, Boksburg, and Heidelberg Commandos took position on Tabanyama, while the Germans and the Heilbron, Krugersdorp, Winburg, and Senekal burgers occupied Green Hill. On Spion Kop were scouts of the Vryheid and Carolina Commandos. Boer guns were brought up on to the reverse slopes of Tabanyama. The British occupied inferior positions and the Mounted Brigade might easily be cut off. Revd Danie Kestell wrote: “The English did not advance any farther (than Acton Homes). They were prevented from doing so by the presence of numbers of Free Staters and Transvaalers in the road from Acton Homes to Ladysmith, (so) no (more) fighting occurred there” (Kestell, 1903, p.58).
Morning of 19 January
At 4.30 am on the 19th, even whilst recalling the extended Mounted Brigade, Warren ordered two brigades of infantry (Hildyard's Brigade, with Hart's following in reserve), to march westwards to join hands with Dundonald’s Mounted Brigade. About 8,000 infantry advanced slowly, in 6 parallel columns, with five days’ food intending to fight and march around to Buller at Brakfontein (Atkins, 1900, p.222). They kept to low ground to avoid Boer fire, but the waterlogged road soon bogged down progress. The road had to be improved by working parties. Fences and ditches were levelled in many places to allow the advance of the field-guns and transport, which were in the centre of the broad line formed by the British force as it moved west. Venter's Spruit proved almost impassable. Progress was intermittent -the troops halted while the 17th Royal Engineers tried to improve the drift across the Spruit (Blake Knox, 1902, p.28). Some units got lost and thought they were cut off by the enemy (Atkins, 1900, p. 221). Reaching some higher ground, the Dublin Fusliers halted about 2pm to dry their boots and puttees, but they immediately came under Boer artillery fire.
By late afternoon of the 19th, the futility of the westward movement was obvious. General Warren after inspecting the road, recalled the troops, the furthest of whom had only progressed 3.5km towards Acton Homes. They “received an order to re-cross Venter’s Spruit and bivouac. The movement by Acton Holmes had been given up ... it was not difficult to see that the alternative was a frontal attack.” Two brigades of infantry were immediately sent forward, “and soon long-range rifle-fire was drawn from the enemy, who were posted on Three Tree Hill and Tabanyama; through our glasses we could see a good number of their men on Bastion Hill, some of whom were riding leisurely about, and others industriously digging trenches” (Blake Knox, 1902, p. 28). The men who had tried to march westwards halted close to Venter’s Spruit. During the night of 19th, their wagons eventually caught up with them and “the men were thus able to have their great-coats. Not much sleep was, however, allowed” (Romer and Mainwaring, 1908, p.47).
Significance of the Acton Homes ambush
The Boers fell into the ambush because they assumed the British were several km east of the road. Some blamed one of their scouts, an Austrian. “It all comes of trusting these cursed foreigners! If we had only had a veldt Boer out we should never have been caught” (Churchill, 1900, p. 133). The Boers had been carelessly led, but “Rooi” Daniel Opperman completely rehabilitated his reputation at Spion Kop a few days later. The ambush was relatively insignificant: yet, starting immediately and continuing ever since, multiple commentators have viewed the ambush as a lost opportunity. Their notion is that the failure of Warren to follow up on Dundonald’s success and use the Acton Homes road led inevitably to two disastrous frontal assaults: first, on Tabanyama (20-23 January) and next, on Spion Kop (24 January). However, it is important to correct some misconceptions. It is often erroneously thought that the ambush took place at the narrow nek on the Ladysmith-OVS road (GPS -28.605749, 29.453958). Some maps make this error, and some illustrations depict the engagement in steep terrain (Fig 5). Most histories also overlook the failed large-scale attempt of the infantry to move westwards to Acton Homes.
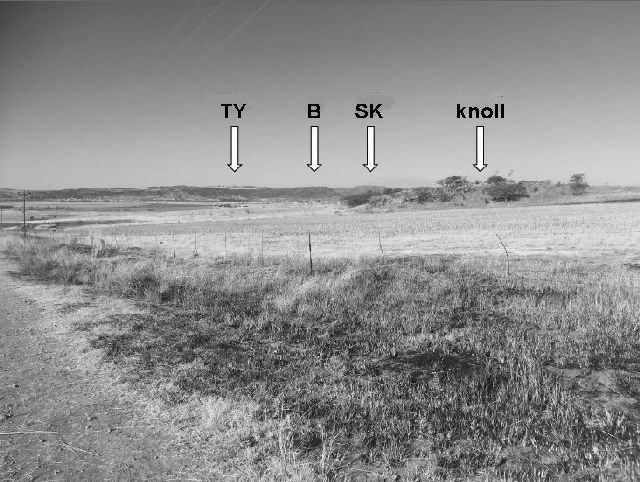
Fig 6. The knoll where the Boers held out, and where
Veldkornet Nicolaas “Mordechai” Mentz of Heilbron succumbed.
Photograph taken from the old Ladysmith-OVS road, facing east.
The author was led to the site of the ambush by Barry Coventry of Rangeworthy (Fairview) Farm. Mr Coventry has known these places, and their story, for 70 years. “Peach Tree Farm” is the place of death in the War Museum of the Boer Republics database for burgers Arno Senf and D J Hebst. The old road, the koppies and the knoll are all on Peach Tree Farm (also known as “Peaches”). The exact locations of the Boer and British positions were confirmed by battlefield archeology, undertaken by the author with permission of the landowner.
The Battlefield today
“These are among the waste places of the earth - barren, deserted, fit meeting grounds only for men whose object in life for the moment is to kill men. Were you shown over one of these places, and told, 'A battle was fought here', you would answer, “Why, of course!” (Davis, 1911, p.64).
To visit the site, drive along the R616 from the N3 towards Bergville. At 16km you’ll pass the narrow nek where the ambush is erroneously considered to have occurred. This is von Wichmann’s field gun position. At 17.5km you’ll pass the turning on your left towards Three Trees lodge and Rangeworthy Military Cemetery. At 18.8 km, turn right onto an unmarked road; keep left, and after 1 km cross Venters Spruit over an iron bridge. 250 m after the bridge, turn sharp left up a track. This is all that remains of the old Ladysmith - Oliviershoek road. After 650 m, you’ll see Mentz’s knoll to your left (GPS -28.627034, 29.400786). Looking up the road you will see two low koppies, straddling the road: the eastern one held by the Carbineers (GPS: 28.63118, 29.39087) and the western one by the ILH (GPS: GPS: -28.62688, 29.39074). Between the koppies, the road peters out at a farm gate; the telegraph poles beyond indicate the direction it once followed. The donga is still there. (GPS -28.63248, 29.40731)
References
Atkins, J.B. (1900) Relief of Ladysmith.
London, Methuen.
Barnard, C.J. (1970). Generaal Louis Botha
op die Natalse Front 1899-1900. Kaapstad, Balkema.
Blake Knox, E. (1902). Buller’s Campaign with
the Natal Field Force, 1900. London, Johnson.
Burleigh, B. (1900). The Natal Campaign.
London, Chapman and Hall.
Churchill, W.S. 1900. London To Ladysmith
Via Pretoria. London, Longmans.
Davis, R.H. (1911). Notes of A War
Correspondent. New York, Scribners.
Kestell, J.D. (1903). Through Shot and Flame.
London, Methuen.
Lynch, G. (1903). Impressions of a War
Correspondent. London, Newnes.
Maurice, F. (1906) History of the War In South
Africa 1899-1902. London, Hurst and Blackett.
McKenzie, A.G. (1963). Delayed Action.
Pietermaritzburg, Privately published.
Romer C.F. and Mainwaring A.E. (1908). The
Second Battalion Royal Dublin Fusiliers In the South African War.
London, Humphreys.
Return to Journal Index OR Society's Home page
South African Military History Society / scribe@samilitaryhistory.org