

Newsletter No. 498
August 2017
The Chairman welcomed all present including our guests and proceeded with the announcements emphasising the upcoming "Ken Gilling's Memorial Tour" which takes place over the week-end of 19th/ 20th August 2017 and takes in the siege of Eshowe and the Battles of Gingindlovu and Nyezane.
The first talk for the evening, the DDH, was announced by the Chairman and he introduced the speaker, fellow member, Dr. Duncan Drew and his presentation of "The Battle of Kohima".
My grandfather fought in this battle, but who amongst us had actually ever heard of the battle of Kohima or even knew where it was. I certainly didn't. So then I starting digging and I came across an article where it was voted as Britain's greatest battle. This competes with many other great British battles, so surely there must be something about this battle that makes it epic. So tonight I am going to tell you about what I found.
So in 2003 the British National Army Museum voted on which was Britain's greatest modern day battle. The contest's criteria included a battle's political and historical impact, the challenges the troops faced, and the strategy and tactics employed.
Some of the other contenders were D-Day and Normandy with 25 per cent, Waterloo with 22 per cent and Rorke's Drift with three per cent. Imphal - Kohima came in with over 50% of the votes. It is also often referred to as the "Battle of the Tennis Court" or more realistically the Stalingrad of the East.
I will use the term British troop's, however this is actually a misnomer as there were actually very few pale faces there. The 14th Army was principally an Indian army but did also contain men from the Commonwealth countries, Black Africans from the African west coast and of course the Gurkhas from Nepal. One officer described this conglomeration as averaging in height from 5 foot one to 6 foot three. Some were purple black, and others as lightly skinned as a fair haired blonde. It really was as mixed a bag of soldiers as one could ever see.
In December of 1941 the Japanese invaded British Malaya at Khota Bharu and within 3 months they had pushed the British back to Singapore, which fell in February 1942. The Japanese then invaded southern Burma at Victoria point, and moved up the coast and took Rangoon in March 1942. The British forces had to fight a 3 month fighting retreat back to the Indian border, and the Chinese troops in Burma were pushed all the way north back to the Chinese border. They made it just before the monsoon broke which prevented any further push by the Japanese. This left all of Burma in Japanese control.
So why had the Japanese invaded Burma?
Firstly it severed the rail and road link from Burma/Rangoon through to the Chinese border commonly known as the Burma Road. This drastically weakened the Chinese fighting ability by denying them the supplies they so desperately needed from the Allies.
Secondly, the Japanese hoped to inspire Indian Nationalism and have the Indian people rise up and boot the British out of India.
Thirdly they wanted to create a jungle buffer zone between British India and their more important conquests in South East Asia. The rivers, mountains and jungles would provide a suitable obstacle which would secure the raw materials in the previously occupied British and Dutch colonies.
Leading the British 14th Army was General William Slim. The 14th Army composed of 8 Indian Divisions, 3 African Divisions and 2 British Divisions. From humble beginnings, he started as a private in WWI where he saw action at Gallipoli. From there he worked his way up the ranks in the Indian Army (not the British Army), (the poor man's Army ) where the lack of an Eton or Harrow school record was the required norm. He remained in India from the end of WWI where he initially was attached to the 6th Gurkha Rifles and later the 7th Gurkha Rifles. It can thus be seen that he rose through the ranks the hard way, based on merit, not family connections. He was a brilliant tactician with a great deal of common sense, but he also had a real care for the men under his control. He spoke the native languages of his troops and this is why he was affectionately known by his men as "Uncle Bill".
Lieutenant Renya Mutaguchi
As opposed to Slim, it appears that Mutaguchi had risen through the ranks based on his background and not his leadership abilities. His positions included Military attach�, Army General Staff in Tokyo, Beijing Garrison commander and Commandant of the Military Preparatory School. These were all "desk jobs" which clearly show his lack of combat leadership abilities and his lack of knowledge of how things actually happened on the ground. In March 1943 he was made commander of Japanese 15th Army.
Lieutenant General Kotoku Sato
Commander of 31 Division tasked with taking Kohima. Sato was an experienced infantryman, with active knowledge of how things worked on the ground He and Mutaguchi didn't see eye to eye and Sato thought his superior( even though they both held the same rank) to be a real Blockhead.
Battle plan of Japanese: U-Go
After the British were pushed out of Burma in mid - 1942, they had been re building and retraining the 14th Army with the aim of launching an attack into Burma in mid - 1944. The Japanese has also been planning further incursions into India and put together Operation U-GO which would be an attack on the British build up area and supply depots. The plan was extremely unpopular with the Japanese commanders on the ground, namely Sato, however with Mutaguchi's persistence, the Japanese high command eventually gave the go ahead. The reason the Japanese commanders where against such an attack was primarily due to the lack of adequate supply lines for the attacking troops. It was extremely difficult to supply troops through the jungle and the Royal Air Force controlled the skies so air supply was out of the question. Too much reliance had been placed on capturing British supplies and arms, and they knew that if this did not happen then the troops would starve.
Operation U-GO was an attack on 3 fronts: The 33rd Division would attack Imphal from the south, the 15th Division would attack Imphal from the north, and the 31st Division under Sato would take Kohima and push on to the more important supply depot at Dinapur. This is where we will focus today.
Kohima was a small supply depot and rest camp. It was the administrative centre for Nagaland Province and the District Commissioner was Charles Pewsey. (You will hear the reference to the DC's bungalow) hence most of the troops here were non combative as they performed administrative and supply duties, or as I have called them, The Odds and Sods!
Kohima wasn't an important target, but in order to secure the road to Dinapor it had to be taken. Dinapor was the major prize that the Japanese were after as it had extensive supplies and it had a railroad junction. Taking Dinapor would have meant that the Japanese would have been resupplied and allow them to move further into India.
In early March 1944 the Japanese crossed the Chindwin River and made approaches towards Kohima. Mutaguchi believed that this would be a short campaign thus the Japanese troops only had 3 weeks supply of food. Mutaguchi also believed that the dense jungle would not allow the British to utilise their Tank regiments, hence he only took a quarter strength of field artillery, which was the main weapon against tanks. He also did not take any anti -aircraft artillery, which would allow the British to rule the skies and constantly disrupt the Japanese supply lines.
On March 20th Sato's 31st Division clashed with the outlying troops of the 50th Indian Parachute brigade at Sangshak. Heavy fighting lasted for 6 days and thus delayed the advance on to Kohima. It was here that vital documents were taken from a Japanese officer, which showed the aim of attacking Kohoma and Dimapur, and most importantly the size of the attacking force. Roughly 15 000 men, Divisional strength! This gave Slim a huge wake -up call as he had presumed that only 1000 - 2000 of regimental strength could penetrate through the thick terrain. At that point in time Kohima had few fighting troops, as opposed to administrative units and supporting services ( the odds and sods ) .The reason for his shock was that Dimapur contained an area of supply dumps 11 miles (18 km) miles long and 1 mile (1.6 km) wide, therefore the fall of Dimapur would have been disastrous for the Allies.
This gave Slim just over a week to get further fighting troops to Kohima. He knew that the Japanese were advancing with 15 000 men and he had to get fighting men to Kohima in a hurry. However the logistics of such a transfer of men would take time....something Slim didn't have. Fortunately there were troops in the Arakan area, namely the 4th Battalion Royal West Kent's and the 7th Rajput Regiment. These troops were quickly flown from the Arakan Front to Dimapur and on to Kohima. Thus the only combat troops in Kohima were the West Kent's, the Rajputs and the newly formed Assam Rifles. There were also a small number of Gurka and Burmese troops. This brought the garrison up to 2500, however only 1000 of these were actually combat troops. The rest were "admin" troops, namely, the odds and sods. The garrison was commanded by Colonel Hugh Richards who had previously served with the Chindits.
One can view this scenario and almost look at these men as sacrificial lambs. It would be hard to believe that, against 10:1 odds, Slim actually believed that Kohima could be held. However, what it would do was buy time. It would give Slim the week he needed to transfer men to Dimapur. And remember that Kohima had no real significance however Dimapur had enough supplies to last the Japanese another 6 months...the true prize. This is why this battle is also referred to as the Stalingrad of the East....another meat grinder.
On the 6th April the British and Indian troops arriving from Dimapur by road, had only just arrived in Kohima when shells started exploding and the road they had just come on was cut. The siege had begun.
Very little has been said of the commander, Colonel Hugh Richards, and the reason being that this was a soldiers battle: there were no brilliant tactical movements made, there was no passing of orders down the line from a lofty HQ. Decisions had to be made at platoon level with small groups of men acting without guidance from higher ups. Men would have no clear idea of how the battle as a whole was going and had to make their own tactical assumptions based on what they saw in front of them.
Norman Charles Drew
Departed England 15/2/1942 for "Overseas "...believed to be Singapore, and disembarked India 13/4/1942.
12/4/1944 attached to Royal Norfolk Regiment
24/4/1944 attached to 4 Royal West Kents.
Originally with the 187 Light Anti - Aircraft Regiment, LAA, RA, one can assume that this unit was cannibalised and re distributed as infantry. This would be due to the fact that the Japanese had virtually no aircraft in the area therefore, there was no need for an anti- aircraft unit.
His records indicate that he was attached to the 2nd battalion, Royal Norfolk Regiment around the beginning of April 1944. The Royal Norfolks were part of the 2nd Division relieving force that was flown and railed from Calcutta, over a thousand Kms away to Dimapur. They landed there on 10th/11th April, roughly 5 days after the siege had begun and began fighting their way towards Kohima where they eventually broke the siege on 19th/20th April. His report also shows that he was again transferred to the 4 Royal West Kents in late April. One can assume that this was to replace dead and wounded soldiers from the siege. He would have been involved in heavy, close quarter fighting as the Japanese were slowly pushed back from the surrounds of Kohima. It must be remembered that the Japanese had dug themselves in deep around the perimeter of Kohima and with their no surrender, no retreat policy, this would have been gruesome work. Following Kohima he would have been involved for another 2 months as the Japanese were pushed back to the Chindwin River.
The 2nd Royal Norfolks flew from Calcutta to Dimapur, via Belgaum and Bangalore a distance of 600 miles. On the flight, someone said to dad are there any parachutes? Dad said, "If there is, and while I have this weapon, we'll see who gets one". On April 10th, 1944 they arrived at Damapur.
Out of the 500 who went into battle, the 4th Battalion lost 61 killed, 13 missing, and 125 wounded, a casualty rate of 40%; but including those who were slightly wounded and continued fighting without being taken to the Aid Post, the rate was probably above 50%.
By denying the road to Dimapur to a whole Japanese division for 15 days the Battalion and its attached troops gained time to get enough troops into position to prevent the invasion of India. While limitations of space prevented the enemy from putting the whole division into battle at the same time, his vast superiority in numbers enabled a rotation of units, whereas the Kohima garrison had to fight - in modern parlance - 24/7. Decisions had to be made at platoon level and very often it was the Corporal i/c a Section of 8 men in a slit-trench who had to act without guidance from above. Men had little or no indication of how the battle as a whole was going; perhaps they might have known what was happening in the next trench, otherwise all they knew was that they were fighting a merciless enemy.
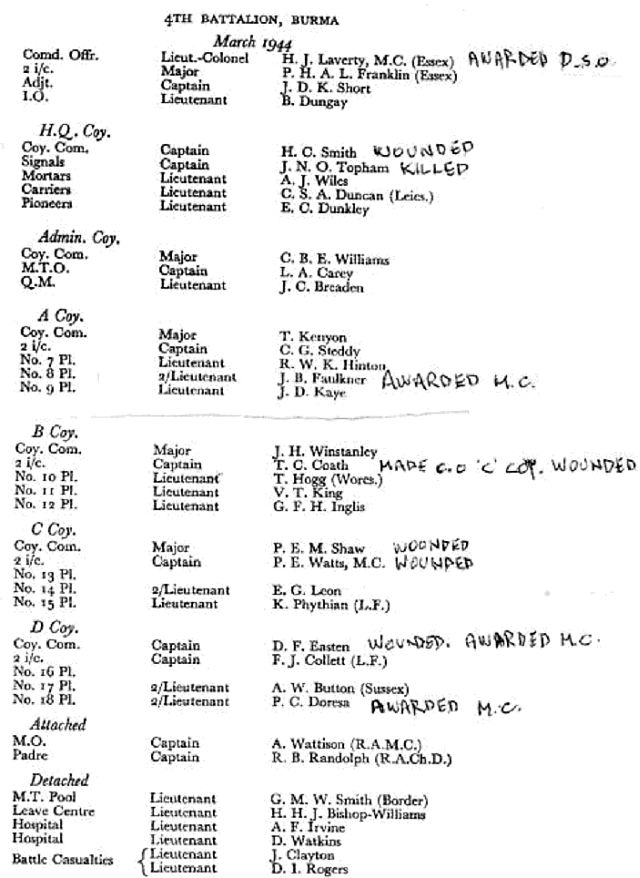
As well as the decorations to officers shown above, and L/Cpl Harman's VC, the DCM was awarded to Sgt's King and Tacon, and the Military Medal to Pte Archer and Sgt's Eves, Stammers, and Williams. The relief of the RWK's was not the end of the battle of Kohima. It was not until 11th May that our troops were in sufficient strength - 2 Brigades (6 Battalions) of 2nd Division - to begin an attack on the Japanese positions, but by evening of 13th May the whole of Kohima was in our hands. It was a remarkable achievement against an enemy who had no notion of retreating to fight another day - Gen Slim, C-in-C of 14th Army, stated "There is much talk of armies fighting to the last man, but the Japanese soldier was the only one to do so as a matter of routine".
Source: 'Queen's Own Royal West Kent Regiment, 1929-1950',
by Lt.Col. H.D. Chapman
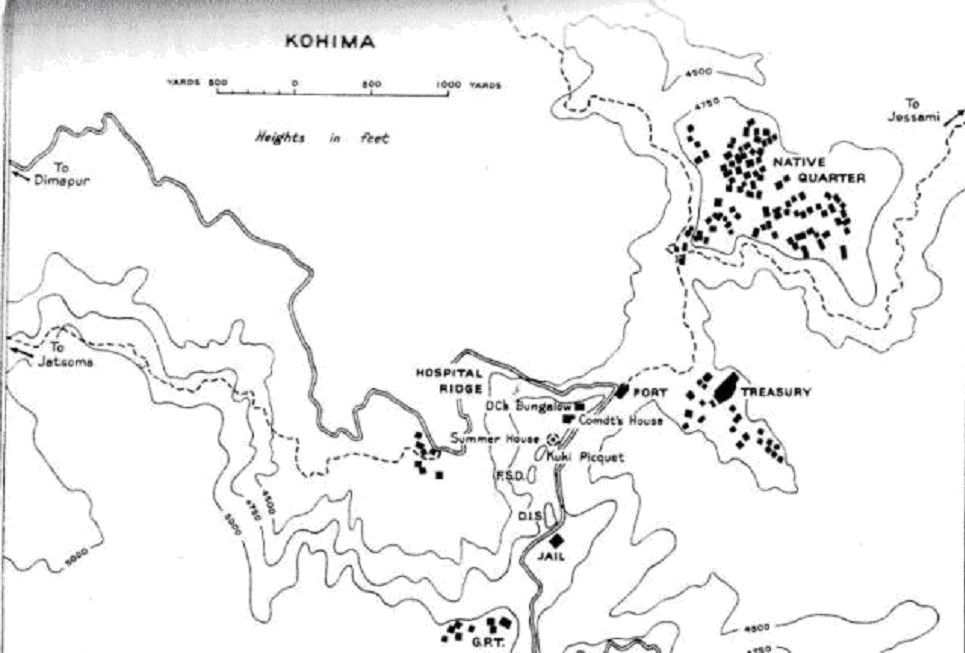
Key: DC Bungalow = District Commissioner's Bungalow; FSD = Field Supply Depot;
DIS = Daily Issue Store; GPT = General Purpose Transport Company.
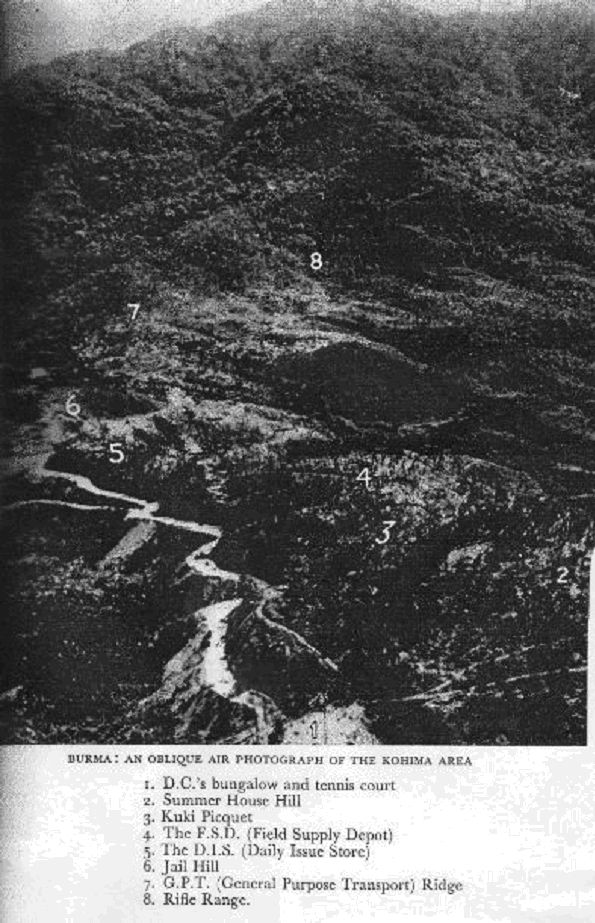
The photo gives a better idea of the terrain and steepness of the slopes
On arrival on the evening of 5th April 1944, 4th RWK was only 500 strong, its Admin Company having been left behind, as had its Bren Carriers and Motor Transport. Debussing under sporadic machine-gun fire from the Native Quarter, much of their kit and stores had to be left on the lorries. Defensive positions were taken up as follows: Battalion HQ & A Company at Summer House Hill; B Company at Kuki Piquet; C Company at the DIS; D Company between Kuki Piquet and Hospital Ridge; Carrier Platoon personnel + miscellaneous troops around the DC's Bungalow; the Indian field artillery battery was near the DC's Bungalow, but their guns were in full view of the enemy and couldn't be operated, so they fought as infantry; Assam Rifles on Hospital Ridge; Assam Regiment at the GPT. Artillery support was provided from the other side of the Japanese block on the Dimapur road, but it was at extreme range and fire control was difficult.
Administratively the position was dire: The water reservoir was near the Rifle Range (8 in the photo) and in enemy hands, and apart from some unreplenishable and already partly empty canvass tanks, the only water supply was a stream near the road which could only be approached at night to fill containers; the water ration was eventually cut to a half-mug/day/man for all purposes. While troops managed to dig-in to fighting positions, there were no communication trenches between them. Treatment for the wounded, and accommodation for the most serious cases, was in uncovered trenches; less serious cases had to stay on the surface and were better off returning to their positions if they could, to carry on fighting.
As well as their main body coming up from Imphal to the south, Japanese advance troops were in the Native Quarter, the Fort & Treasury area, Jail Hill, and the road block about 2 miles along the Dimapur road.
On 6th April the enemy attacked from the south and captured the GPT. D Company moved to the FSD. A company of Rajputs got through the block on the Dimapur road and took over D Company's former position, after which the Japanese strengthened the block. In the night the enemy attacked from Jail Hill and got between the DIS and the FSD.
On 7th April D Company cleared the intruders then joined C Company, which had suffered heavy casualties, at the DIS. During this operation 2 Japanese - 1 an officer - were taken prisoner, a very rare event in the Far East war. The Rajput Company moved to the FSD. That night 80 walking-wounded and 100 non-combatants, escorted by a Rajput platoon, escaped along the jungle path to Jatsoma.
At dawn on the 8th it was discovered that the enemy had placed a machine-gun post overlooking the entire DIS. L/Cpl Harman went out alone, killed the crew with a grenade and returned with the gun. An enemy attack on the DIS was broken up by artillery fire from beyond the Dimapur road block, and at dusk another attack was repulsed by the men in the trenches. At dawn on the 9th L/Cpl Harman discovered a party of Japanese digging a machine-gun pit near his post. With his Bren Gunner giving covering fire he charged the post and killed 5 of the enemy, but was killed by a burst of machine-gun fire as he returned. For his actions on 8th and 9th April Lance Corporal J.P. Harman was posthumously awarded the Victoria Cross.
On the night of 9th/10th the enemy gained a hold on the DIS by occupying some trenches that were empty due to lack of manpower, and overnight on 10th/11th the remnants of the combined C/D Company was withdrawn to the FSD.
By now the enemy had established artillery to the north of Kohima, and at the GPT firing over open sights. Point-blank fire had destroyed the trenches round the DC's Bungalow and enemy troops had occupied the area. A counter-attack by the Assam Rifles failed, so A Company was moved to Summer House Hill to hold the enemy from further advance.
From the morning of 10th April battle raged around the Bungalow and across the width of the tennis court. Ammunition and food was got to the forward positions by crawling across open ground under cover of darkness. Constant mortaring and sniping interspersed with vicious little close quarter fights took a steady toll on both sides, and A Company was relieved by B Company from Kuku Piquet on 11th. And so it went on until B Company was relieved by the Assam Rifles on 14th April.
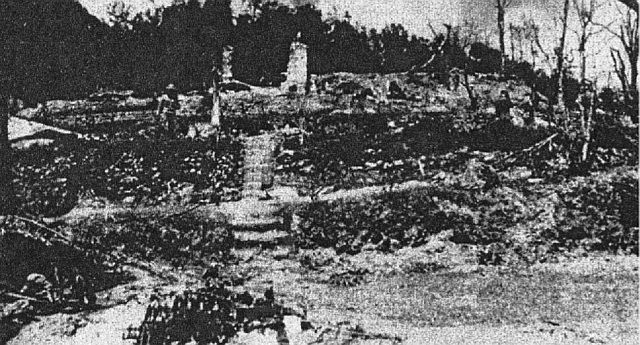
The Ruins of the DC's Bungalow and Tennis Court
On 13th the Japanese resumed attacks on the FSD, held by C/D Company, and were only repulsed with the help of A Company, supposedly resting at Summer House Hill.
Medical supplies were air-dropped within the perimeter, but it was risky for troops to leave their trenches to retrieve them, and a drop of ammunition was delivered to the enemy in the Treasury area! But another drop on 16th of ammunition, water, medical supplies and rum was more successful.
On 16th artillery fire on the FSD caused heavy casualties and during the night the enemy gained a footing on the hill. C/D Company withdrew to Kuki Piquet, to be replaced by Assam Rifles.
Then on the night of 17th/18th the Assam Rifles abandoned the FSD and C/D Company was forced to retreat to Summer House Hill, so that only that location and part of the area round the DC's Bungalow was still occupied by 4th RWK, and the enemy was within 100yd of Battalion HQ. On 18th two companies of Punjabis got through the Dimapur road block and cleared the road as far as Hospital Ridge; one of them took over the DC Bungalow area and the other reinforced Summer House Hill. 300 wounded were safely evacuated.
During the night of 18th/19th, and through the next day and night, the Japanese kept up attacks on the perimeter, resulting in some of the hardest fighting of the battle. Despite the reinforcements they were only just beaten off, and at one stage got to within 40yd of Battalion HQ.
Then on 20th April it was over at last. The enemy block on the Dimapur road was cleared and 4th RWK were relieved by 1st Royal Berkshires. The companies and attached troops filed down past the wrecked hospital - but even then taking some casualties from artillery and sniper fire - to the main road, where they boarded lorries to take them to Dimapur.
Remarkably, unlike Stalingrad and Alamein, it was fought by no more than a few thousand men over an area no more than 2 miles square.
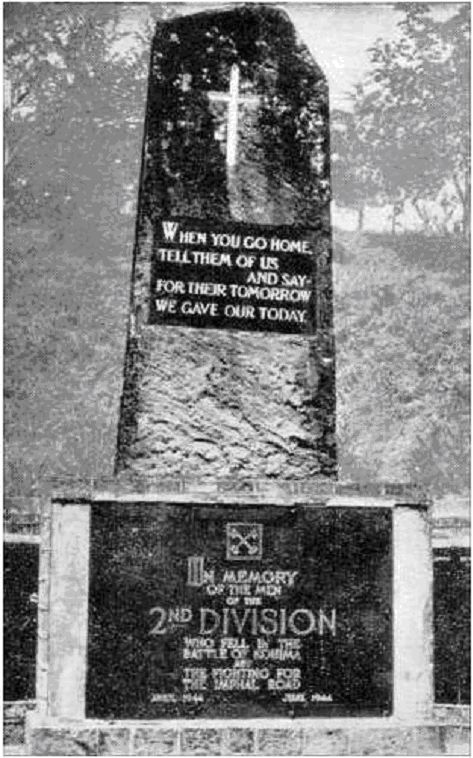
The words spoken at the annual Festival of Remembrance:
Impact
The defeat at Kohima and Imphal was the largest defeat to that date in Japanese history. The British and Indian forces had lost around 16,987 men, dead, missing and wounded.[2] The Japanese suffered 60,643 casualties, including 13,376 dead.[2] Most of these losses were the result of starvation, disease and exhaustion.
The defeat resulted in sweeping changes in command within the Japanese Army in Burma. Mutaguchi sacked all his division commanders during the operation, before being sacked himself on 30 August. Kawabe, whose health was broken, was also dismissed. Many of the senior staff officers at the headquarters of Fifteenth Army and Burma Area Army were also transferred to divisional or regimental commands.[18]
A lively question and answer session followed during which many aspects of this little known battle in the Far East Theatre were made clearer.
A 15 minute recess was called while the projection equipment was readied for the Main Talk Speaker.
When all was ready, the Chairman introduced the speaker for our Main Talk, Robin Tarr.
Robin's subject was "D.Day - Normandy Revisited" and related, on video and maps, his recent visit to the Normandy D. Day Battlefields of 1944.
We started off with the glider operation to capture and hold the bridge over the Caen Canal. The bridge was subsequently named Pegasus Bridge after the emblem of the glider force that captured it. The tiny force of airborne troops, under Major John Howard, were the first troops to land in Normandy at 16 minutes after midnight on 6th June 1944. The number two glider landed on the edge of a large pond and as the troops exited from the broken glider, one of their number fell into the pond and drowned, so becoming the first casualty of the D. Day Landings. Lt. Brotheridge, of the invading force, was wounded whilst attacking a German bunker defending the Bridge but failed to recover from his wounds so becoming the first casualty to die due to enemy action.
From the Pegasus Bridge action we were taken through the Bocage country to the actual landing beaches of the British and Canadian Forces, Gold, Sword and Juno. The positions of the German defences and examples, which are very well restored and preserved together with the Higgins Boat landing craft, were shown, as well as many of the buildings dating back to the invasion day which are still standing.
From the British beaches we moved to the town of Sainte- Mere-Eglise, where a memorial has been made to the hapless American paratrooper, John Steele, who was left hanging on the bell tower of the town church throughout the battle for the town and eventually captured by the Germans, later to escape and rejoin his Division.
We viewed a C47 Skytrain which has been restored and made into an exhibit of the equipment used by the invading forces.
From Sainte-Mere-Eglise it was down to Pointe du Hoc to view the precipitous cliffs that the US Rangers had to climb, under heavy fire from the defenders, only to find their objective, the guns, had been moved some six kms back from the cliffs. The Ranger force regrouped and found the guns, subsequently destroying them. The bomb craters from the unsuccessful attempt by the heavy bombers to destroy the concrete gun emplacements is still visible and it is with wonder that one sees the emplacements still standing, despite the bombing
On to Utah and Omaha Beaches and it can be easily seen why the American forces took such high casualties as there was very little cover other than a low sea-wall. At Omaha Beach parts of the Mulberry Harbour are still visible as well as a few of the beach obstacles
A trip to Normandy would not be complete without a visit to the cemeteries for Allied troops at Colleville-sur-Mer and cemetery for the German troops nearby, who died on the peninsula during the D. Day landings.
A question and answer session brought lots of facts to life as many of the audience have, over the years visited the area.
It remained for the Vote of Thanks from the meeting to the two speakers and this was given by the Chairman, Roy Bowman, who presented Robin Tarr with a memento of his evening with The South African Military History Society.
The meeting closed with the Chairman reminding those present of the next meeting on 10th August 2017 .
The DDH will be presented by Professor Philip Everitt and is entitled "Experiences in the Frontier War 1877-78", based on the unpublished notes of Harry Burgess FAMP, by his great grandson Phil Everitt.
The Main Talk will be - "The Rescue of Mussolini" by fellow memberCharles Whiteing.
Roy Bowman
CHAIRMAN
SOUTH AFRICAN MILITARY HISTORY SOCIETY
KZN BRANCH
South African Military History Society / scribe@samilitaryhistory.org